

tsongololo
-
Posts
78 -
Joined
-
Last visited
Content Type
Profiles
Forums
Gallery
Articles
Everything posted by tsongololo
-
Hey, silly me. I forgot about this thread. Can it be merged with my newer thread? (Jen’s R1TK Build - 850 AW?)
-
Here are a few pics of the butt return edge. Sorry about the quality, I am *not* a photographer! I attached it with straps last night. The gap is small enough you can’t see the rough edges - it’s good enough for film, at any rate. Hopefully I can have enough completed tonight to make another update.
-
Since the vocoder was the most perplexing for me, I’ll start with that. The stock vocoder is rubberized, but lacks the 3D gap on screen. Recreating that pretty much requires annihilation and rebuilding. First task: Remove the rubber coating. Turns out you don’t have to perfectly preserve the white plastic underneath. Then I cut away the outer ribs. I’m not sure if I could’ve left the rubber coating on the inner three ribs. I made replacement ribs out of windshield wiper fluid hose from the auto parts store. For the inner ribs I cut the hose in half and glued it on. The rubber neck seal is integral to the helmet so I left it on the front. I left part that connects to the three center ribs and did my best to line up the hose halves with it. I just threaded the remaining tubes and glued them in place, working from the center outward. I only used CA (superglue). Since I was mounting the speaker behind the vocoder, I didn’t want to fill the gaps with ABS. I improvised and used the outer layer of a dust mask. It’s rather like Tyvex, but obviously breathable. It was a pain to glue it in there and make it flat. I’m sure there’s a clever way to do this but it escaped me.
-
Here is the kidney after being trimmed: And here is the butt taped on to make the proper length - almost 3/4” overlap. Yes I did trim that much off! My hips aren’t too even because of scoliosis, so I hung the butt so it looked straight. I did the same return edge trick with the butt. I haven’t pulled the tape off yet to fill in what’s under it and smooth the rest. I trimmed the buttons waaaay too close! This is my salvage result.
-
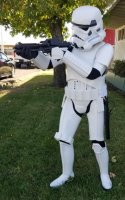
My TK adventure started out with with an RS kit on Craigslist (build thread Here) last fall, but it had no helmet. I was totally enamored with the Black Series’ clean lines, and let’s face it - the price. The helmet arrived before the armor, and I got started right away. Many thanks to Parquett and his thread. I have an armor kit on order (pre-order?) from 850 Armorworks. The helmet is more or less finished (is any project ever really finished?). I have wanted to build a *fully* functional bucket for *years*, maybe decades. So I decided to go all out, and arguably ended up with more of a piece of art (albeit functional) than something troopable. I’m not prone to claustrophobia, so who knows, maybe it’ll be just fine. Some things I learned and would do differently next time (why not a next time?): 1. Trim ALL the plastic from the inside. I tried to preserve much of perimeter where the snap connectors attach, but once assembled, the helmet didn’t really fit *perfectly*, and to get perfect results it would have been better to just glue it. Starting with an empty shell would have given quite a bit more room (but my head is small so didn’t matter much). 2. As this was my very beginning, I didn’t have a reserve of scraps to make ABS paste. So I hoarded every little bit, and my batch got contaminated by a tiny speck of black rubber from the vocoder. It turned a lovely shade of primer grey, and then made a lot more work for me filling in the rear speaker hole. (Insert something something power of the Dark Side...) 3. Do the speaker hole first, when everything is disassembled, especially the face. If you need to paint it, you can paint the whole bucket if your paint doesn’t match. I ended up mixing my own acrylic to match the shade, then coating the rear piece with Krylon clear-coat gloss. That added just a *touch* of yellow to the result, but it still matches more or less. I was too stubborn to take the face apart and paint the whole thing. 4. If you want to keep the hideous lenses, remove them while working on your bucket. They scratch super easily. And no, they cannot be heat polished. Or polished at all, as far as I can tell. A headlight restoration kit had no effect. Plexus had no effect. Filling in with wax had no effect. Swearing at it didn’t even make me feel better. And Hasbro, for some reason, does not have replacement lenses. And if you’re going to replace them with different material (recommend), it’s easier to make a template before the last-ditch attempt and heat polishing. 5. I wanted to give the tears/traps a more 3D look by running a groove around the perimeter and filling in with black paint. I think it might be best to leave them as is. I abandoned the attempt on the traps. Here are some pics of the end result (build to follow): Tube stripe and tear detail (and couldn’t find much visual reference for the snout/faceplate gap, so I winged it). Trap detail. Be careful with your Dremel! I also left one vent hole because the back side was a boss for a screw. If you follow advice #1, you should be able to trim all of them: Eye detail, with replacement lens I made. *I have 3 available to anyone BTW!* The first one I cut out was the worst, but looks fine from the outside. I used a bandsaw at work to cut them out on a 12x12” piece of standard TAP Plastics transparent green. After the disaster with the original lens, I wanted to hedge my bets. Turns out the new acrylic is made of normal matter that plays nice. It requires a higher temp to bend, though, and I used two radii to bend - one large (like cookie jar) and one smaller (a jar of jam or something) for the center piece. Vocoder / Hovi tips: Wut: The specs are - Two 12V fans on the rear traps, two 5v fans on the tears and two buried as a sealed outlet to the exhaust stripes (blue tubes) from the respirator. Respirator? Yeah, I kinda geeked out there. But hey, in theory it will protect from a lot of environmental hasards! The filters are easily removable and the default setting will probably be no filters. It should avoid fogging up the lenses too. Mic installed in the respirator, connected to an aviation style portable intercom, which is then connected to the original speaker. The speaker was relocated behind the vocoder (and the rear was filled in with a Tyvek-type material). My roommate says it’s “not unloud”. No special effects at this point. The speaker is only 1/4 watt near as I can tell, and I don’t know if a more powerful speaker would help. The intercom is only supposed to drive headset speakers (though aviation specs are a bit different, at 300/600ohm). Hearing augmentation - two mics installed in each ear bar (if you look closely, the black is drilled out and covered in cloth), going to a mixer, which goes to a cheap pair of noise reduction headphones (with phone mic). If you unplug them from the mixer and plug into your phone (Android anyway), you can have a nice conversation while being acoustically isolated from the outside world. My roommate said he could understand me just fine with the dangling headphone mic. The next thing I want to try, but am limited by funds, would be a visual augmentation system. The Vufine display is the only one I could find that acts as a straight display, is small and affordable. AR would be nice, but I think a workable system would start at $2k. Hook that up to a Raspberry Pi, with a camera designed for the Pi. They make IR passive cameras too. I figure since you can’t really see out of the bucket anyway, covering up one eye wouldn’t matter *too* much, especially if it has a much better wide-field view of the world.
-
I like it! The plague doctor was my first “real” costume. Most, but not quite all was scratch built....thrift store leather pants, boots and some weird shirt with ruffled sleeves. Not the visible parts. Your steam punk dude is a bit classier. So... I removed and cut the kidney. I won’t know how I feel about that until tomorrow, when the glue is dry. Hmmm...maybe I can use the piece I cut off as a form to make a new return edge... Note to self: NOPE DO NOT PROCEED ABORT ABORT No damage done! *NOT* a good idea, though I know! I’ll just use the piece I cut off as a new return edge. Filled in the holes - ABS/fiberglass backing, ABS goo pressed into the front. Will definitely need to sand and polish. And this is how it matches up with the ab.
-
PM sent. Thank you!! I can’t really pay you back, but I can pay it forward. I have 3 green acrylic lenses that fits a Black Series TK, free to anyone that needs one. I can’t believe I don’t have any pictures of my completed helmet, but I’ll get some up soon. I don’t know if they’ll work in other helmets. It’s the standard translucent green from TAP Plastics, much darker than the original lens. It will need to be shaped, and the softening temp seems to be a bit higher than ABS. I shaped it around a large glass container (think cookie jar). When you drill the holes, drill at an angle, matching the original. I was pleased with the way it fit.
-
I just taped my butt on, and...wow. I see what must be done. Everything Christine said makes sense now. I have my work cut out for me, it should’t be too bad other than lost time. I’m going to have to redo the rivets on the kidney once I trim it. So, I’m guessing the kidney/ab rivets don’t take too kindly to being reused. And the Han snap - I have a package from Michael’s with no identifying brand other than “Loops & Threads”. It’s close, but not quite the same visually. Are they an acceptable Han snap replacement? Are the Tandy line 24 rivets the same thing? Where is your favorite place to buy hardware? I see Trooperbay has kits, though at this point I only need to replace 3 of the kidney rivets and the Han snap. Obviously RS will have them, but I suspect shipping will take a wee bit longer. Good info! Thank you!
-
Here are a few more pics. Potato worthy. It’s really hard to take selfies!! That look on my face is mostly frustration.
-

Shoulder strap length question
tsongololo replied to tsongololo's topic in Assembly, Mods, and Painting
I actually forgot to include my build thread! Something about best intentions..... -
Oh, where to start! First, thank you Christoph, for moving the thread. I’ve looked at Cricket’s thread, but I don’t think I’ve seen fragarock’s yet. Thanks Matthew! ....now you tell me! I didn’t really do it that way, and I think I now have some regrets. I was counting on notifications and I must not have them set up correctly. I only just now realized I had replies. I did solve the mystery of why the kidney was crooked - it just wasn’t shaped enough. This is is the repository for all my pictures. Captioning them is on my to-do list, but there aren’t any as of yet. It has my ROTK helmet as well. http://imgur.com/a/a5TD8u3 So, let me start from the beginning. The highlights of this project are basically - 1. Cut cod from abdomen, trimmed about 1.25” from the top of the cod, then secured it with elastic. Shaped the abdomen to my form a little bit with a heat gun (sorry Matthew! But it has a digital temperature control so I haven’t screwed it up. Yet). Trimmed return edges. 2. Trimmed return edges on the kidney, and found my first mistake - I didn’t contour the cod, and now the kidney is much larger. The horror! If the belt doesn’t hide it, my plan is to shim it. Hopefully I’ll have enough new material left over after I make my cover strips. Yeah, the material I removed...isn’t going to make a comeback. RIP. The blue tape isn’t hiding it either. 3. The ab/kidney seam wasn’t flush. See the pic above. That was just a matter of not having shaped the kidney enough. It’s much better now, but don’t have a picture yet. Looks like I may need to trim the edges so they meet up more flush per Cricket’s advice. After shaping, I got those dimples on the return edges, so I cut them out, and built them up with fiberglass and ABS paste. I really just wanted to see how that would work. It actually works quite well, and is slightly easier to work with than resin. I also made a nifty tab to help secure the lower section of the ab/kidney (elastic with shaped ABS hook): 4. Attaching the chest plate. I don’t seem to have any pictures of this. I did trim maybe 5/8” from the neck, and 1/4” from each arm hole. It was almost impossible to reach in front of me. Now it’s merely a challenge. I took two cuts, the pic is of the second pass. More pics later... 5. Attaching the back I should’ve trimmed the bottom of the back piece. But I didn’t. I shaped the shoulders a bit, thinking that would be all I needed for my frame. It’s close, and I think workable, but the shoulder straps hit the square “O ll” section. Is it ok to trim the rear, slightly larger tab off? Will that affect EIB/Centurion eligibility? That’s where I’m at right now. I wanted to get the shoulders sorted out before attaching the butt. Started trimming the biceps. Noticed that the shoulder bells look like they’ll need a fair amount trimmed. The aspect ratio is nearly square, and they should be more rectangular, correct? I have not been able to find a post detailing trimming them yet.
-
Shoulder strap length question
tsongololo replied to tsongololo's topic in Assembly, Mods, and Painting
I have all my pics in this album: http://imgur.com/a/a5TD8u3 It’s just an album with no commentary, sorry! I have been meaning to start a detailed build thread but just haven’t had the time. Updating now. -
I’m excited that I’m starting to make visible progress on my ANH armor! I went with the torso first, and now I’m wondering if I should trim the shoulder straps in the rear. Due to my small frame, there isn’t really any gap between the back and chest armor at the shoulders. The CRL says the rear tab is optional for basic, and silent for EIB and Centurion. I assume it’s talking about the last slightly larger bump at the rear of the plastic straps? They hit the O ll box: There are a few things I’d do a little differently, and trimming the bottom of the back armor is probably one of them. The only thing I’ve trimmed so far is the cod plate. I didn’t pay attention to the contours where it lines up with the kidney armor, and I hope the belt hides it.
-
Hello everyone, I finally am getting started on my armor build. I don’t have a matching helmet (yet) but have reached the “close enough to call it done” stage on my R1 helmet (Black Series). Seeing as I’ve had this post in the works for 3 days, it may take a while before I update that project. So now it’s time to get started on my RS armor kit - I decided to fit the abdomen / kidney first. As I’m on the small side (5”3” and 135#), I did trim the cod. I also used a heat gun (Wagner set at 300F works fairly well) to shape the sides. One thing I’m not too sure about is the fact that the seam on the right side between the kidney and an just doesn’t want to sit square. Is this normal, and will the belt will take care of it? The left side is held together with tape, in the locations where the elastic will go. More to come, hopefully soon! ETA: Also missed putting this in the build subfourum. Sorry! Can/should it be moved or reposted?
-
I have a few questions about the gaskets/undersuit for the TK. Per Chris’s reference album... back up about 20 photos for the ROTK. Zoom in on the right side of the butt...that almost looks like denim. Sweatpants? What is that material? You can see very fine ribbing. ----------- And if you look at this photo - it looks like the right arm gasket at the shoulder has much larger ribs than the left side. Is that correct or am I seeing things? Even if it is different, it’s not in the CRL, so it shouldn’t matter, correct? ----------- I haven’t found RO harness detail yet, is there a post for that? Thanks everyone!
-
Building a Black Series TK helmet, have a few questions
tsongololo replied to tsongololo's topic in Rogue One Build Threads
I figured out the brow. I ended up “repurposing” and trimming off the upper part of the rear neck trim, and glued it to the bottom of the brow, and covered with electrical tape. Now that leaves me with replacing the bottom trim. I haven’t been able to really find anything detailed on what others have done with the neck hole trim, though regular weatherstripping seems to be an option... Remove/leave the front? Match what’s already there, or put a new trim right over the old? S shaped or not? So many options! Ack! -
Helmet to armor wiring connectors?
tsongololo replied to tsongololo's topic in Electronics for Helmets / Blasters
Hmmmm.... I was going to go with 3.5mm jacks/plugs since I happen to have a lot, but here’s a brief description. I can probably put at least one power supply in the helmet: Mic/Speaker system I mounted the original speaker (Black Series) under the vocoder, and a mic in the helmet. Having an aviation background, I repurposed a portable intercom system and the mic from a broken headset. The intercom is a little bulky (<2x2x4”) so not going in the helmet. It could accept more channels for various “chatter”. Total wires: 4 pins Hearing aid: This works in theory and on the bench...fingers crossed it will apply to real life! Two mics in each ear, and their power supply fits easily in the helmet. I have left/right/ground going to a mixer (Maker Heart’s Just Mixer) and it could possibly fit in the helmet. I bought a cheap noise-canceling headset with mic, and it would be a simple matter to unplug from the mixer into my phone should I wish to make calls. I could also add another channel for...radio communications? Would only be able to receive though, unless I wanted to route audio out to the intercom with a push-to-talk...(getting ahead of myself here!) Total wires: 3 that need a connector, and one 3.5mm headset plug Fan system: I have 4 really teeny 5v fans (wired together ) and 2 larger 12v fans (probably CPU fans) also wired together. This requires two different power supplies. I kind of wanted to power the small fans, the mixer, and the headset off a USB battery pack. The armor seems like the best place for that, for accessibility’s sake. ukswrath - do you have a 12v power supply that would fit in the helmet, and last a reasonable amount of time? Total wires: 4 (but hopefully can eliminate 2) I’d like to minimise the connections going to the helmet, so I’m looking at something that has at least 9 pins. DB9 seems clunky to work with and prone to failure if you don’t screw it together...bayonet connectors might work. This is the part i’m having trouble deciding on. Jennifer -
I was wondering how many of you have wires running from the helmet to somewhere on the body, and what kind of connectors you use, and where they are mounted? Do you prefer the front, like in the vicinity of the Hovi tip, or the nape of the neck?I can’t imagine a straight connection would be very user friendly, especially if you need to take the helmet off! Thanks Jennifer
-
ETA is it preferred to have links automatically load, and if so, how do you do that without actually embedding the photos in the post? Does the “insert media” button force the data onto the Whitearmor server? Jennifer
-
Greetings everyone- I wanted to share the mods I’ve done to my Black Series helmet. I’ve discovered two more ROTK kits in the works, from 850 Armor Works and Head Shot Props. The prices are reasonable too, but if the lead time is too far away I always have my ANH armor kit. 1. So the first thing I did was disassemble it, trimmed the rear plastic cover, removed the black teeth filler/backing, cut out the battery compartment. In hindsight I would have left the lenses out until final assembly (not there yet but getting close). I ultimately ended up trimming the rear plastic cover leaving just the vertical part that holds the front piece to the ears. I filled in the battery compartment with plastic trimming goo made by mixing acetone. Turns out it’s not a very good filler but adequate if you have a lot of patience. However, I made the mistake of getting a little bit of black rubber in it (from the vocoder) and it turned it a lovely shade of primer grey. I was hoping to avoid painting the entire helmet but I’ve tried Rustoleum 2x Ultra Cover gloss white, Testors classic white, and a can of Quick Cover gloss white (something I found at work and was terrible on all counts). I liked the Testors the best but still didn’t match enough to my liking. My last ditch effort before painting the entire thing will be to mix acrylics and airbrush to hopefully get a good match, then spray with gloss clear coat. 2. Time to trim all the vents, traps, tears, vocoder, etc. I had to leave one slot on the rear traps because there’s structural material there and didn’t feel like getting that involved. Vocoder removal Misc 3. Vocoder detail I decided to keep the front rubber trim on the bottom and connect the vocoder to that. I used hose for windshield wiper pumps. I thought I had a picture of the product but can’t find it. I bought it at O’reilly’s. I cut the hose in half to cover the ribs I left in place. Routing the outer ones was a bit of a challenge. I used superglue to secure everything. I covered the hole with the outer layer of a dust mask. That was a pain. I didn’t want to use ABS because I wanted to put the speaker there. 4. Covering vents I used blue fabric for the exhaust vents, black fabric for everything else. I also cut out the black ear bars so I could mount microphones there. This is unfortunately the only photo I have of this process. You can kind of see it here, where I added mesh for the frown, and mounted the speaker. I secured the fabric with superglue. Next post will be “functionality “ mods. Jennifer
-
Hello! I’m thoroughly enjoying my helmet build, and also trying to make it “functional “. I have a few questions regarding the neck trim, and the mouthpiece where it joins the cheeks. I did gut a lot of the plastic in the rear of the helmet, but left the entire edge, including the bottom edge. Should that be removed to make the seal look more appropriate? I would love a link to some reference photos. I’d also like to see the the seams on the mouthpiece. I’m not sure what I’m supposed to be going for, it seems to me the helmet already has a representation of seams. And the the brow trim seems to be the proper distance from the eyes, just not painted on the bottom. Is that all there is to that? Mods so far include a hearing system, I moved the speaker to the front under the vocoder (and filled in with material from a dust mask), and retrofitted a respirator so my breath is routed *away* from the eyes. Everything works on the bench but putting theory into practice is always has bugs to iron out..l Sorry there are no captions, feel free to ask wtf the pictures are. Or add your own captions... https://imgur.com/a/a5TD8u3 My biggest dilemma is to start over with a ANH helmet, hopefully improved, that matches the RS armor kit I have, or somehow obtain a RO armor kit...either by trade or mods. Jennifer
