tsongololo
-
Posts
78 -
Joined
-
Last visited
Content Type
Profiles
Forums
Gallery
Articles
Everything posted by tsongololo
-
No worries, in fact I like a challenge so I'm not frustrated (yet), though like most mechanics I don't like to do work twice. I'm all for trying new techniques and being creative with supplies on hand. R&D is fun! Some of these techniques could potentially transfer to actual work. What I've learned so far: Micro Mask says right on it to not use with water based paints. I think I let the paint dry a wee bit too long too, and it was much too thick. I haven't decided if I want to try again by airbrushing white, then blue with the same masking technique. If I had oil based paints I definitely would. Denatured alcohol and a microfiber cloth works GREAT to remove day old Testor's acrylic French Blue (and is safe for plastic). It does take a bit of elbow grease but it had both sides paint free in about 5 minutes. It did, however, stain the plastic underneath with a very faint ghostly blue image of the stripes, including the runs. 5000 grit sandpaper polished both sides out in less than 2 minutes. Now to change the subject: Does that ear bar stripe look too fat? I put my screwed up ear to good use as a test bed. Electronics showed up today, and I positioned a microphone in the rear stripe. The thin one was drilled off center so I abandoned it, and it's roughly the same width as the finished ears. I wanted to duplicate the installation of my R1 helmet, but it had a nice slot to cut out and cover with fabric. That won't work on this style. The other alternative is mounting behind a smaller hole.
-
Helmet update - I'm now in the last 10% of the project, which could take as long as everything else if I let it. I'm totally feeling the frustration (and excitement) of being SOOOO CLOSE but still a lot of work to do. Anyway, I found a template for the tube stripes with a Google image search. It helps a lot to get the right keywords. Hint: search "tube stripes", NOT "stormtrooper helmet" template. I sized it in Word, printed it, and cut it out. I had to trim off a few stripes to make it fit. Without the luxury of vinyl, I came up with a creative solution that sorta worked. I applied Micro Mask to the paper, which is water soluble. It softened the paper up nicely, which made it flex and adhere to the tube without buckling. I let it dry, but perhaps not long enough (10 minutes max). I had water based Testor's French blue, which went on really thick. I think this combo wasn't ideal - there was some running underneath, but better than just paper taped on for sure. And when I peeled it off, it took some of the paint with it. I forgot to get a picture of the immediate results. It was disheartening but I was able to make it acceptable with about 30-40 minutes of effort. Still not awesome, but good enough.
-
Thank you! I’ll gladly take you up on that suggestion, especially if it will only enhance mobility. Better to err on the side of caution. Easy fixes are the best fixes. I just ordered electronics for my helmet. <sigh> There goes another $75. The plan is to make this self-contained to the helmet and more professional looking. Hopefully I can get tutorial quality documentation this time. My beta helmet is interesting for sure, and a proof of concept, but not what I’d consider something that should be replicated. One more question: The Tube Stripe Masking Templates files are missing from that thread. Are they located somewhere else on the forum? Were they intentionally removed, or would it be ok to PM Panda Trooper?
-
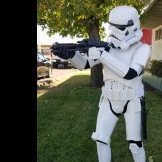
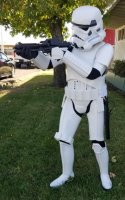
WOW!!! I just tried everything on, and I wasn’t really expecting to be as stoked as I am. It looked awesome! But I don’t think I can see the flaws through my excitement. Maybe once I get some pics that weren’t taken with a potato, I can get some feedback. But if anything sticks out with today’s post, please critique! Once I got the helmet and gloves on, I swear I totally felt incomplete with no blaster! Odd, since that wasn’t on my radar - I wanted to get basic approval before starting that project. So so far so good....got the boots on! Got the belt on and the TD is on. I can’t even tell if it’s centered, but close enough for today. Arms are next... One down... Full suit of armor! Using the R1 helmet for now...found the gloves, got them on...looks cool!
-
Thank you Daniel for clarifying that. I thought maybe I read that sandtroopers were different somewhere, but I’ll go with information overload instead. Cableguy Dan - the replacement calf has been done correctly (insofar that it actually is split), with magnets to help the bra hooks. I gotta say, the ATA parts have been really easy to work with. Though maybe experience helps too. Maybe I can get away with one calf fused - if not, I can always split it. And then maybe replace it. Here is the RS right calf: And the ATA left (with....unconventional closures): The helmet is going together without too much fuss. It’s got more charm than the R1 bucket, AND I have binocular vision!!! It fits my face way better. Here’s a comparison with the Hasbro R1:
-
Time for an update! I haven’t had a lot of time to work on my armor this month, but have been going fairly good for the last week. Got my new shin from ATA completed, bells have been trimmed, and I reworked how the ab closes. I’m ready to test fit the armor, but with the wrong boots for now. Still need to dye boots, make a holster and neck seal. In theory, I’m ready for...HALLOWEEN! I have a completed R1 bucket. I’m making good progress on the ATA helmet, got the left ear trimmed and fitting nicely. Then it looks like the right ear...just won’t fit the way I rough trimmed it. I *thought* I was following the transition lines. I’m unclear if the kit comes with two sets of ears, or one of each for regular TK and sandtrooper. But at least I have another! Pics to follow soon, as long as I can get into the armor by myself.
-
I got a free sample of this - looks different in person. The stitching isn’t really stitching, just a stripe the width of a thread between the ribs. What do you all think? Should I post this in another sub forum?
-
Here’s a few pictures of what the kit entails. I’m stilling finishing up my RS armor & the helmet arrived a few days ago, so I likely won’t get started on the R1 for a few weeks. 3D printed parts: Some parts are familiar, others not so much. The squares aren’t obvious to me. The arms and legs for the most part look like mirror images and are symmetrical. Thickness difference in the shin halves. Biceps in the foreground, shins and one set of thighs in the back, some hand guards, and 1 of 2 I don’t knows. And some boots I got from Groupon for $15. Obviously they need to be dyed, and a zipper added for Centurion, but for the price failure is an option.
-
It’s here...
-
Good news they will be shipping at the end of the week!! BBB day is coming soon.
-
I bit the bullet and got a new shin on order. The original just wouldn’t line up on both sides and the front. If I lined up the edges, then the kneeplate was angled in at the top, with only a small contact patch. If the kneeplate lined up, then the edges would meet at the bottom, but resulted in the off angle, as seen in the photos. I went with lining up the kneeplate, but maybe it’s not that important? Is it supposed to work out with the best of both worlds, and if so, what went wrong? Also have the ANH bucket arriving soon! I use predominantly ABS paste because of the low(ish) toxicity of acetone...I’m exposed to a lot of fun chemicals at work and getting sensitized to a few, so my preference is to avoid exposure while doing fun hobbies. Has anyone discovered a non-volatile alternative?
-
Well, I’m making progress. I was able to salvage the kneeplate, but it required a lot of sanding, filling, sand some more....and fill. Again. I’m happy with the contours and hopefully can start the final sanding/polishing. There’s enough parts put together to try on. The thighs attached to the belt turned out ok, and with everything on it looked like a stormtrooper! Those shoulder bells though.... and my left bell is attached too far back. The elastic is glued on with ABS paste. Is there a preferred method of getting it off? I was going to try a cotton swab soaked with acetone and gently peel it off. I have my work cut out for me. The boots came from Groupon and were $35. That will be another post.
-
Brow Trim: The brow trim looked a little high. Here is a pic taken about two minutes after opening the box, so original configuration. This was further along, still original: I ended up replacing the rear neck trim with square U-channel. Not wanting to waste it, I cut it in half, leaving a lip to go on the bottom, and covered it extra wide vinyl tape. Finished result:
-
Filling in the battery compartment: This was my first ever attempt to do anything, including making ABS paste. It’s been a while, but I’m not sure the Hasbro bucket is ABS. A tiny speck of rubber got into the paste and I didn’t have a lot of material to start over, so I went with it. This necessitated painting it.
-
Of course the last piece to assemble is the one I screwed up bad enough that I might need to bite the bullet and replace - left shin and kneeplate. I got carried away with the ABS paste. I don’t know if it’s salvageable, but putting on a filler layer of paste made it look better, so maybe I can fix it. I have hope, but no confidence... So that being said, is it ok to mix armor? ATA is having a 10th anniversary sale, so might as well buy from them along with the helmet. One more thing, do the shins *have* to open in the back? I have been able to get the thighs on, and slip my foot through the shin, and put the boot on (with a hook), but not both at the same time yet.
-
Hi Jeff - I have been following them on Facebook and it’s definitely down to the wire. I did message Kevin a few weeks ago. I forgot if I paid in full or not, but I did tell him how much I paid. He didn’t say I owe more so I’m hoping it’s good! I have a warm and fuzzy feeling BBB day is two weeks or less! I’m almost done with my ANH assembly, but screwed up the shin/kneeplate, and might need to reorder. Bummer because I don’t like to have multiple projects going at once.
-
Looks like I should send them an email. Thanks for the info!
-
Oh. My. Those colors are a bit different, aren’t they? I’ll have to think about that, if I would paint it, live with it, or just get one that matches. Is the ATA the same scale as the RS? It looks smaller in the pic, but maybe it’s just the photo. Full scale doesn’t look odd either. I might end up painting at least a few things, anyway. I got the shin repaired, and it turned out OK, but the butt joint gap shows, and at the bottom there’s a little pencil showing through too. It polished up acceptably well, this was just 5000 grit paper. Some wax or Novus should help. Hopefully the cover strip will cover some of it, and I can touch up the rest. I looked in the BBB, and there’s just a kneeplate, some gloves and extra hand guards, and cover strip material. The other shin is taped together and needs trimming to match the first. Then I can move on to the last 10%, which is the other half of the job - it still needs strapping, boots, holster and neck seal. And a helmet, unless a R1 can somehow be made to pass basic...
-
Update! I had surgery a little over two weeks ago, and while I’ve had plenty of free time, surprisingly I did not feel like doing all the things my brain was envisioning. But I have made progress on my armor, even counting for my oops... I think I can salvage it, but this poor trooper is definitely going to be a battle damaged unit. I’ll just blame it on the meds. I cut a super wonky line on the rear calf halves. The fix is to glue it together with ABS paste, sand, fill, and repeat as necessary. Then cut a straight line if needed. I have discovered that I can get my foot through it. So... the CRLs do not mention anything about closure method in the back. Can I get away with none, put a cover strip on and call it good? That cover strip isn’t held straight either. I was having a day. Second coat of ABS. Taking it down with 150 grit sandpaper was a little heartbreaking. Looks like I get to find out what 5000 grit can do! (Thanks, Amazon for your all-inclusive multi pack) I still need to get my hands on a helmet, and follow up with WTF. Would anyone here know if their child’s helmet will fit a small adult? I hesitate to call myself a pinhead, but I once got a $180 motorcycle helmet for $39 because apparently nobody actually can fit into an XS.
-
This is the link I tried to access: I don’t know if you can see it from your end, but even the hotlink shows a frowney face on my display - Indeed, the CRL link you just posted has a date of May 5 2019. I’m assuming that’s not the updated version. I was building towards Centurion, but I have made enough mistakes that it’s likely going to need a few fixes at least. I’ll be eagerly waiting for the update to post. Thanks for your response.
-
Hello, I would like to access the new CRL but I can’t. Not sure if it’s because I’m not a 501st member yet - I’m still working on my first build, but making good progress. The link in the May newsletter informs me I don’t have permission to view that link. And a site search of “CRL” doesn’t return any results. Is this a tech support question? I’m not sure what access level I should request, since I’m still a month or two away from applying for official membership...is there a different link? Thanks!
-
They have been posting a lot of pictures to Facebook the last few weeks, at any rate. As close as they appear to be, I’d say expect delivery in the cliché 4-6 weeks. My ANH armor is my practice build. The plan is to make the R1 the “best” one, and if I succeed then I’ll just have to get *another* R1 helmet, because what I have now is the “beta” version. It’s kind of a mess inside, which I’d like to make more professional looking.
-
I’m trying to source boots on a shoestring (ha!) budget. I found out that the original boots in the films were dyed white. I’m not afraid to try that, so have now opened my search to other colors. I came across this Groupon link: ------ I have love-hate sentiments with Groupon, more towards the hate side of the spectrum. If it’s an item sold by a small business, it never hurts to call and ask if they will honor the price directly. Unless something has changed since I last dealt with them as a vendor (2014), there is absolutely nothing requiring you to sell your product through their website. Bypass them and you’re not shelling out upwards of 50% of the already discounted price to them. But I wanted to share: Discounted boots in the wrong color! Other than all the cons associated with dying, are these boots okayish?
-
Let’s see... I have the torso assembled!! First big milestone. I decided to hang it so I can fit the bells. I cleaned up the butt joint on the left forearm, then got to trimming. I traced the edge and moved it down...three times. Here’s a picture of how much I took off the upper half. I repeated tracing the edge and trimmed the length match the upper.
-
No pics yet of the torso, but the kidney / ab has been re-secured with the split rivets. Installed the new Han snap, and filled the hole from the original. Butt is attached and formed. Biceps are pretty much finished, need to fine-tune them. Here are some pics of one trimmed to fit and the other rough trimmed: Help needed! I can’t seem to find any threads discussing which end of the forearms to trim, though I know I’ve read a few. I’m going to guess it would be the elbow end, but as you can see, I definitely need to trim the length. The blue tape marks where my wrist is.