FN1313
-
Posts
823 -
Joined
-
Last visited
-
Days Won
6
Content Type
Profiles
Forums
Gallery
Articles
Everything posted by FN1313
-
In terms of decal sheets. I have a Jimmi kit and didn’t use the decals. I just painted. But I’d recommend if you want to not paint the black vinyl wrap would be good.
-
Following
-

FN1313's Jimmiroqaui FOTK Armor Build
FN1313 replied to FN1313's topic in Build Threads Requireing Maintenance
Thanks all! Been a dream for many years! -
FN1313's Jimmiroqaui FOTK Armor Build
FN1313 replied to FN1313's topic in Build Threads Requireing Maintenance
Been a while, but just figured I’d share a quick update. I’ve been approved and now have my TKID! Glad to be trooping! -
I’m just going to slide in and join this conversation here.
-
FN1313's Jimmiroqaui FOTK Armor Build
FN1313 replied to FN1313's topic in Build Threads Requireing Maintenance
Got temp approval for a troop, so heres the first picture. the harness holding the thighs up tends to sag after time, so im going to adjust that a bit. -
FN1313's Jimmiroqaui FOTK Armor Build
FN1313 replied to FN1313's topic in Build Threads Requireing Maintenance
Yeah I’ve fixed it up for now with the advice given as well. It’s going to need a little more touch up, but for now I’ve got it to a point that it’s protected and painted. I will later need to sand some more and fill with spot putty, but at least for now it’s not noticeable unless up close. -
FN1313's Jimmiroqaui FOTK Armor Build
FN1313 replied to FN1313's topic in Build Threads Requireing Maintenance
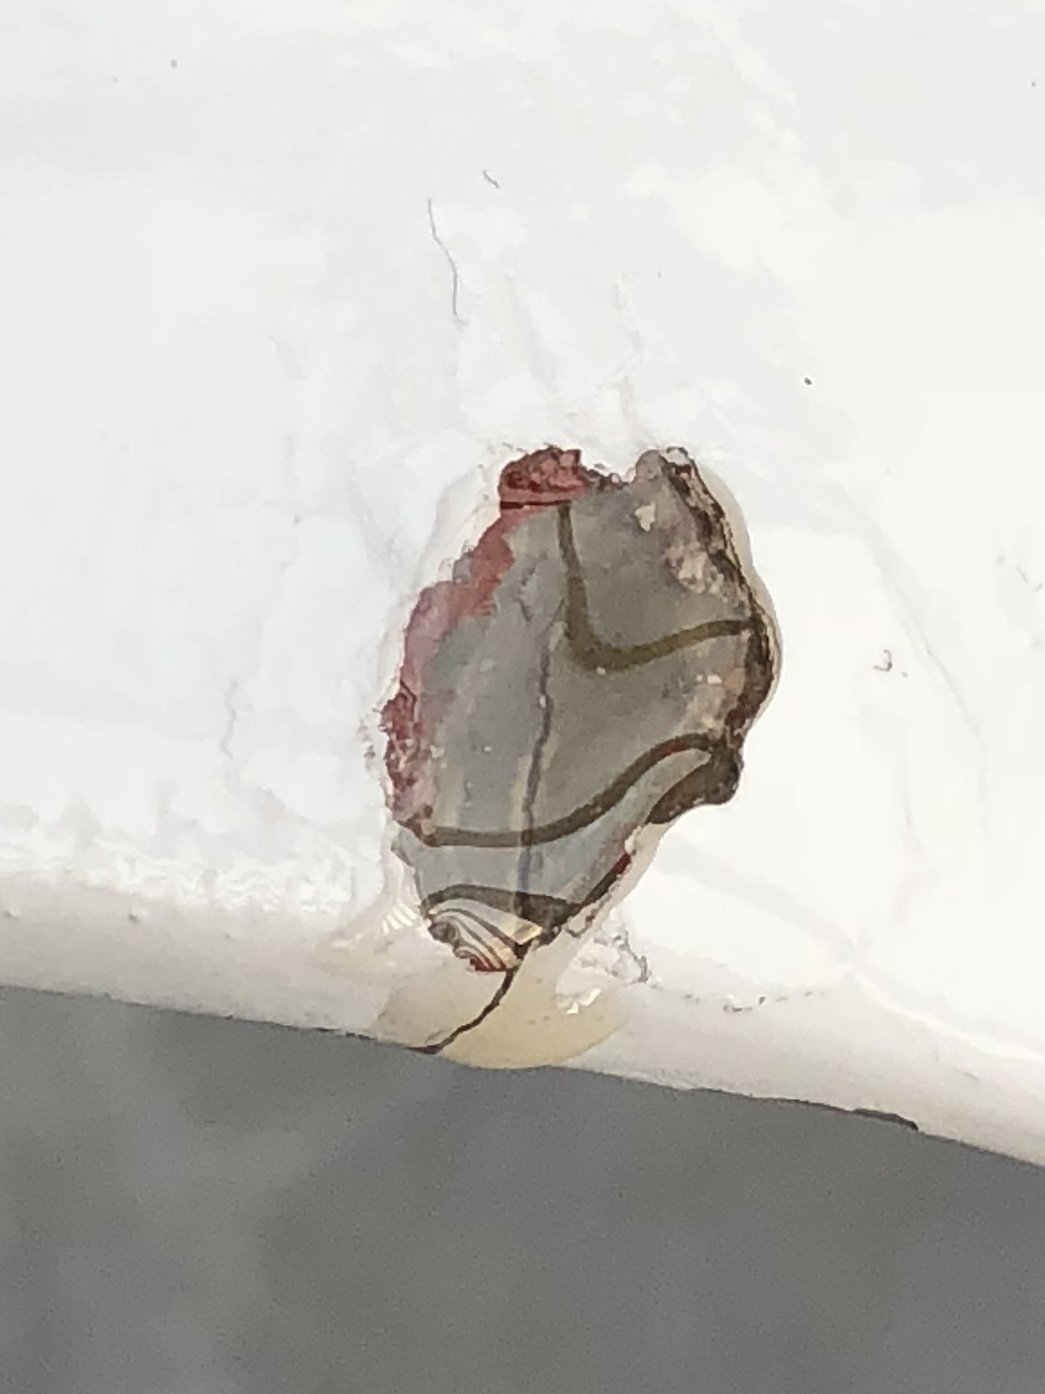
Read in many fiberglass repair sites recommendations to use fiberglass resin to fill and repair cracks in fiberglass. Since the CA glue hasn’t been working, I did this method this time. Having some on hand I’ve filled the crack thus. Luckily this happened after sending approval pics in. So from here, just some light sanding over the spot and then touch up paint.
-
FN1313's Jimmiroqaui FOTK Armor Build
FN1313 replied to FN1313's topic in Build Threads Requireing Maintenance
Ugh... slight crack in the yoke led to some paint mess. Need to work on that. Probably have it fixed and repainted in a couple of days.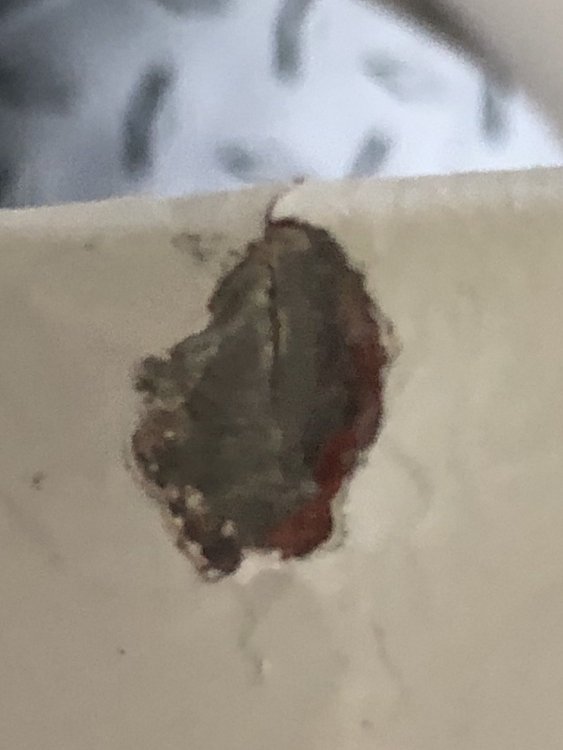
-
FN1313's Jimmiroqaui FOTK Armor Build
FN1313 replied to FN1313's topic in Build Threads Requireing Maintenance
I’m out of town but here’s a teaser.
-
FN1313's Jimmiroqaui FOTK Armor Build
FN1313 replied to FN1313's topic in Build Threads Requireing Maintenance
@gmrhodes13 definitely adding the foam. My first pre approval fit scratched paint so I painted those spots again and now will add some foam. The Velcro didn’t quite pad enough. Im doing that and then getting my approval pics tonight. Hoping to get at least some temp approval for a troop next week. So get ready for some pretty pictures. -
FN1313's Jimmiroqaui FOTK Armor Build
FN1313 replied to FN1313's topic in Build Threads Requireing Maintenance
Yeah I’ve seen that from a few builds myself. I threw in some of the soft side of Velcro where it would run to help. Might need foam though. I will check. -
FN1313's Jimmiroqaui FOTK Armor Build
FN1313 replied to FN1313's topic in Build Threads Requireing Maintenance
Ab and TD today. then the black Getting there. -
FN1313's Jimmiroqaui FOTK Armor Build
FN1313 replied to FN1313's topic in Build Threads Requireing Maintenance
well since its mostly just paint now...just more complete build pics -
FN1313's Jimmiroqaui FOTK Armor Build
FN1313 replied to FN1313's topic in Build Threads Requireing Maintenance
Alright. Somewhat nice update here. So I worked on painting the calves and the Yoke this week. Paint went well overall. I was then able to attach velcro to the calves inner seam now too. My compression shirt and pants came in too. So I figured it was time for a quick few pictures. Here's the closer look a the back of the yoke. -
FN1313's Jimmiroqaui FOTK Armor Build
FN1313 replied to FN1313's topic in Build Threads Requireing Maintenance
No, it was definitely a little more width between the pieces. I actually last night went and re-positioned the right box a little closer in. Thanks for the response though. Rather catch it now than later. -
FN1313's Jimmiroqaui FOTK Armor Build
FN1313 replied to FN1313's topic in Build Threads Requireing Maintenance
Actually I think the right front box is slightly too far to the right which is where that space is. That's not too difficult to fix though. -
FN1313's Jimmiroqaui FOTK Armor Build
FN1313 replied to FN1313's topic in Build Threads Requireing Maintenance
I can probably bring them in just a smidge -
FN1313's Jimmiroqaui FOTK Armor Build
FN1313 replied to FN1313's topic in Build Threads Requireing Maintenance
Finished building my Belts of the First Order belt today. Just needed some more CA glue to help. I forgot to take better documentation pictures as I was so excited to get another thing done, but what I did was I used some strips of industrial strength velcro, punched a 5mm hole in the center of them. I then pushed the female end of the Chicago screws through these holes. I had removed the plastic adhesive cover and then put some CA glue on the adhesive as well. After that I attached those to the two front boxes and let sit to cure. For the side boxes though I did take some pictures. So I punched two 5mm holes in the nylon strips provided and pulled the elastic string through. (As indicated in the instructions) I then used CA glue to attach these to the the back of the boxes as well. As you can see in the first picture I attached the side boxes lower than the front boxes (the picture doesn't show it as nicely, but they are supposed to be a little lower on the belt) And I tested the fit and look with the cod and butt plate alone: Above: you can see the side ammo packs sit lower. -
FN1313's Jimmiroqaui FOTK Armor Build
FN1313 replied to FN1313's topic in Build Threads Requireing Maintenance
I also forgot to post pictures of this finished beauty. Only thing this bucket is missing (but soon won't be) is a nice audio system. -
FN1313's Jimmiroqaui FOTK Armor Build
FN1313 replied to FN1313's topic in Build Threads Requireing Maintenance
More updates. Had a good time this weekend doing some more work. Got the belt boxes ready to go for attaching to the belt. Just need to go get some more CA glue to finish getting them added to the belt. Painted the chest piece And used spot filler putty on the ab plate and yoke. Holy crap that's a lot of spot filler. I noticed I was having issues with the extended front piece on the yoke in putting it on and taking it off with risk of too much stretch and cracking around the shoulders. Because of this I opted to do some trimming of the front piece so I can get it on and off easier while still having enough to use the magnet method I had setup. So much better now. So from here I'm going to finish the belt, and then I will clear coat/wax the chest piece in a day or so after it's cured. The remaining bits to do are just sanding down the spot filler putty with 600 grit, then painting the rest of the components. Attaching the velcro to the spots I need to and the gaffer's tape on the insides. Here's to hoping I've got it ready for approval process to start some time next week give or take. Hope to be approved before my garrison's next troop in a few weeks. -
ANOVOS (DENUO NOVO) FOTK Armor Delivery Possibility
FN1313 replied to JonnieBear's topic in TFA Stormtrooper
Considering nothing has shipped and it’s already almost August I’m sure things will be on track for another delay. The helmets were already delayed to fall and Anovos always seems to be faster with helmets then armor kits. I think its quite apparent aren’t that we can’t rely on anything they say at this point. I still will keep my helmet on order though. I like my Jim bucket, but think the Anovos one will just be a bit more accurate. -
FN1313's Jimmiroqaui FOTK Armor Build
FN1313 replied to FN1313's topic in Build Threads Requireing Maintenance
More pictures = more progress. So here we go. I took the lid of a Plastidip can and cut it down in size to match TLJ TD end cap. I used some CA glue to glue it into place on the end of the TD before I sand down and prime again. Not shown in this picture. I also used some spot putty to close the seams from the cap and the TD so it's a continuous piece. Then it was on to more paint: The wind did actually lift the box and throw a lot of the armor while wet, so I had to wet sand down to smooth again and then do it over again. These pictures are after that happened. Finally I applied the jim kit decals I got from trooperbay onto the hand plates now that they are fully cured with the enamel. Get some time off tomorrow so I will do some more work. Can't wait to enamel what I have done next Monday. -
FN1313's Jimmiroqaui FOTK Armor Build
FN1313 replied to FN1313's topic in Build Threads Requireing Maintenance
Thanks! It took a lot of work to get things to this point, but the payoff is oh so sweet. -
FN1313's Jimmiroqaui FOTK Armor Build
FN1313 replied to FN1313's topic in Build Threads Requireing Maintenance
Alright. Now that I'm more secure on knowing how to use this paint and clear coat here's my most recent update: Finished up the Helmet. Letting it dry/cure and next Monday will enamel it (I'm giving it more than 3 days just because it's a real pain so I'm being more cautious with it.) I will also work on painting a few other parts so I can enamel them all next Monday. Oh so pretty. Can't wait to clear coat and get it smoother and prettier.