


ocmano
-
Posts
127 -
Joined
-
Last visited
Content Type
Profiles
Forums
Gallery
Articles
Media Demo
Posts posted by ocmano
-
-
I'll do a retroactive build thread. Finished most of my build in 12 days, and took a few pictures, but didn't take the time to do a build thread. Had to get it done fast before my wife gets back from her trip since I was using the kitchen as a shop since I live in a townhouse. Only had 19 days to get this all done really.

Got a stop strap with snap plates installed already and it stops the chest from pulling up too high. So that's 'fixed' for now.
What I think is the real issue is the top brackets that go onto the chest plate ridge might be too short. If they were a centimeter or two longer it'd keep the chest down over the abs much better. Might eventually try and make my own longer brackets, but the stop strap seems to work really well for now.
I'll get build thread started and post anything more over there.
-
 1
1
-
-
So got it all on, and the Bracket and Loops between the Chest and Abs seem to be 'pushing' the chest plate up above the top of the Ab plate when I raise my arms at all.
Thinking of doing bigger elastic loops so the chest plate csn sit further down over the Abs.
Think it'll help, or should I not worry about it? With my arms down the gap is gone.
Would a 'stop strap' that's the length to stop the ABs and Chest from separating far enough, to make a gap, be permissible? Was thinking of putting in a couple snap plates on the Abs and Chest, right by the gap, then adding a short snap ended piece of black strapping to halt the two pieces from separating too far. Still could flex down, but the strap would stop it from flexing apart.
Thoughts?


Sent from my SM-G955U1 using Tapatalk
-
Alright, just saw the other thread right after this one with the reference pics. Looked around and found a 2nd set of decals in the kit. Here's new pics with them moved up.
Better?


Sent from my SM-G955U1 using Tapatalk-
1
-
-
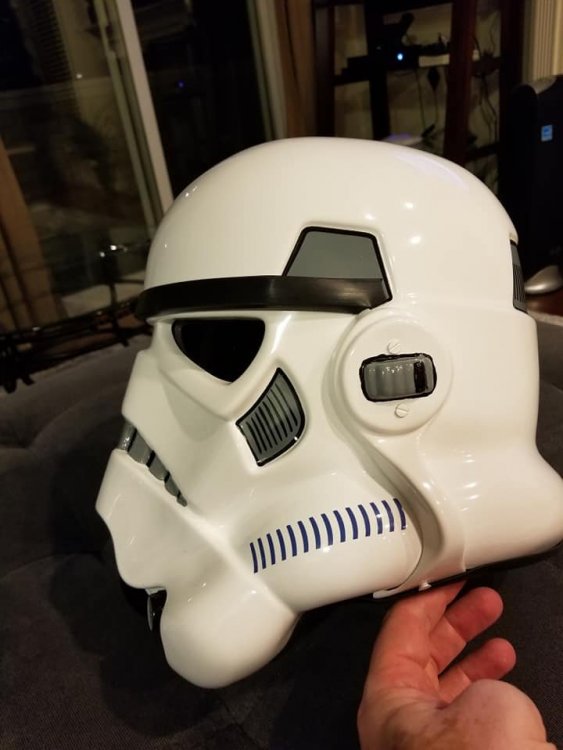
Left side bulges out a bit more than right, not sure if I can move them without getting another decal set from Trooperbay. Tried setting the start and end at the same location based on the jowl and ears.They shouldn’t wear off, it’s not a high wear area.
However, are they high enough up the tubes? They look rather low to me but it may well be the angle of the photo.
Could try masking off the tubes and paint them. Have the right color for it, just don't know if its needed for approval or not.
Sent from my SM-G955U1 using Tapatalk
-
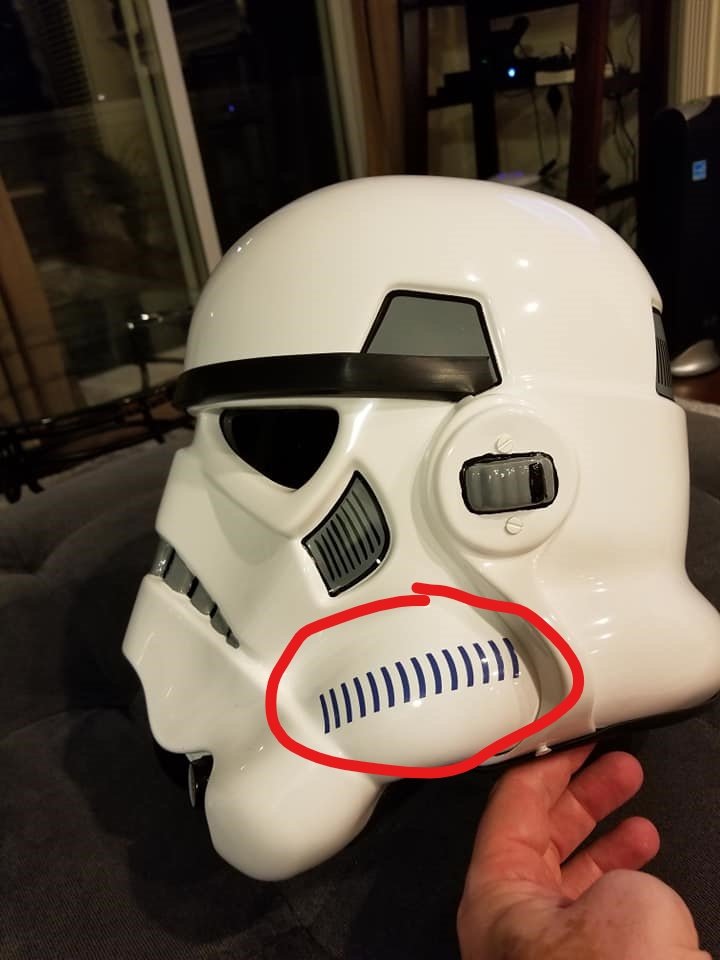
So about wrapped up, but a little concerned about the tube gills that are decals on my helmet rubbing off by people grabbing the helmet there. Now I know there's clear coat sprays out there that I could put over the decals to cover them and make it more resistant to rubbing off. Anyone use a clear coat, or have an idea how to protect the tube decals? Recommendations on what to use?

-
9 hours ago, justjoseph63 said:
I would steer clear of using the Zap a Gap for a few reasons,, Aaron. I used it in a few areas on my first build, and found that it can get brittle over time and things can pop apart (like my calves). If it drips on your armor, it is danged near impossible to get off without sanding, buffing and then polishing. Also, once you glue something together, it's a done deal... (You really lucked out in this case with the ab plates).
Yes, it takes more time to use E-6000 and there is clamping involved, but there is a good reason we use it. It has some flexibility and can actually be removed in many cases if you make a mistake.
Yeah have both. Thought I'd try using Zap-a-Gap on this part since it seemed pretty straight forward. Used E6000 on about everything else.
Considering I hadn't trimmed the part correctly, kinda glad that Zap-a-Gap was so brittle. It popped right off.
Using E6000 to put it on, correctly now.
-
1
-
-
Actually, orginally used Zap a Gap, so was really worried about popping them off. Went ahead and did it anyways, and it wasn't bad! *Whew*
Trimmed the plates and have them on now drying with E6000.
Feeling very lucky. Minor 'weathering' but the belt will cover most of it.
Sent from my SM-G955U1 using Tapatalk -
Oh yeah. Masking and the layering looks a lot better. Thanks guys!

Sent from my SM-G955U1 using Tapatalk -
So, painted and added my AB plate buttons from the parts. Noticed they looked a little different than some other people's submissio ns in that the one's I'd installed had a bit of a rise on them.
Now was I supposed to trim these flat? I already glued these on like this.
Am I screwed or are they fine as is now?


Sent from my SM-G955U1 using Tapatalk
-
Thanks! Masking off the edge seems like a great idea. I'll Mineral Spirits the edges and try repainting using the masking.Fantastic to hear that you are aiming for EI (and then hopefully Centurion) Aaron! Would they pass? Yes. There is not a specific rule in the CRL stating that they have to be perfect, as long as you have the one ear bump painted. Would it be suggested that you make it look a bit better? Definitely. The higher levels are all about getting as close to screen accuracy as possible, and if you take a look at the reference pics below they show that the lines are a lot tighter.
My advice at this point would be as follows:
1. Remove all the black from the edges and paint over the black ear bump(s) with gray.
2. Using blue painters tape, (not regular masking tape) mask off the edges as seen in photo 1, and make sure the edges are firmly pressed down. You may have to remove the ear screws for this.
3. Paint the edges black, and if the paint covers well wait 5 minutes (no more) and remove the tape.
4. Wait an hour or two for the paint to set.
5.. Using a high quality brush, carefully paint in the gray as needed. (It's easier to get a straight line on the gray than paint a thin black line).
6. Repaint the ear bump black.
Hope this helps! Reference images


Sent from my SM-G955U1 using Tapatalk
-
Just wrapped up most of my build and did the helmet last. As far as painting the ear bumps, would this be acceptable for EIB?
Could redo the edges with some Mineral Spirits and redraw the black if needed. Had a pretty hard time with the brushes I have.
-
Heard back finally. Guess he's just way behind. Hopefully be shipped in September.
Sent from my SM-G955U1 using Tapatalk -
Ordered up a E11 from them a month ago and was in contact with someone over there supposedly who was pretty responsive. However, once I did the paypal transaction to paypal@sci-fire.com got like one more response, then silence.
Are these guys legit or did I just get scammed?
Thanks.
-
Heard back from RS Props and sounds like I'm too tall and large for their kits.
Reaching out to Armor Master (troopersupplies@hotmail.com) now. Guess I'll be building one after all.
Hope I'm better at it than I was when I made models as a kid. Used to get glue and paint everywhere.

-
Yeah going TK since its less gear to hump around. Sent measurements off to RS Props. Fingers crossed.Lol. You're singing my song, brother. Welcome to the FISD. And as mentioned above, I would go TK first as well (and I did).
Sent from my SM-G955U1 using Tapatalk
-
Thanks all. Yeah mailed RS and sending over measurements. Will be nice to be able to go TK on occasions.
Yeah Titan Garrisons got a lot of Vaders. LoL. Want to be able to back the other guys up when needed. Can never have too many TKs.
Now have to decide normal TK or SandTrooper. . .
Sent from my SM-G955U1 using Tapatalk -
Already a Titan Garrison member as a ESB Vader, but looking to get a TK ANH for those troops where there's already a Vader.
Been doing some research and I really like RS Propmasters so far. However, I'm 6'2" and 240lb (46" Chest / 42" Waist) and am a little worried if they do work on people this big.
Anyone around my size have a RS Propmasters TK or should I go with a RT or AM kit?
Kind of like the RS Propmasters as they have a 'complete' kit. I don't have a lot of workspace in my townhouse so doing a full assembly would be kind of rough (plus my wife would kill me taking up even more space).
Suggestions?
Thanks!
oCMANo's ANH TK build [AM 2.0]
in ANH Build Threads
Posted
This is a bit of a retroactive build thread. Only had 19 days to get the TK built while my wife was out of the country. Live in a townhouse that doesn't have a shop space, so took over the kitchen and used the balcony for cutting and sanding.

Day 1 - August 30 - BBB day. Had used the list in the thread to make sure I had all tools, snaps, rivets, strapping, and glue ahead of time.
AM pre-trimmed so that saved a lot of time. Started Arms first, legs next, body, then did helmet last.
Sent from my SM-G955U1 using Tapatalk