
imperialbrewer
-
Posts
92 -
Joined
-
Last visited
Content Type
Profiles
Forums
Gallery
Articles
Media Demo
Posts posted by imperialbrewer
-
-
Thank you Draco for the reference photo — will tackle that soon.
I have moved onto the scope, have successfully hollowed it out, and also spliced off the end pieces. But I have a question about the lenses. I know they are purely for cosmetic purposes, but which way does the lens curvature face? Does the concave face toward or away from the person looking into the scope?


Sent from my iPhone using Tapatalk-
 1
1
-
-
OK, photo links have been fixed — I had to drop them into a shared directory. Hopefully they're working for you guys now.
-
I’ll fix the image references later — was having problems with Tap a Talk’s interface getting in the way and unable to see my message after uploading a photo.
Sent from my iPhone using Tapatalk-
2
-
-
So I recently started on my Doopydoos E11 kit with Tino's completion kit and am mildly terrified about this — not that there's any shortage of reference material, but without any authoritative process to follow. So I'm just shadowing some of the other builds here, hoping to get it right. Order of operations is pretty important from what I gather — getting some of these things done in the right order is high on my priority list.
Anyway, here's the progress i've made so far.
Main Sterling Body and Forward Understock Section — I hollowed out the underside and drilled out the holes on top (note the photo isn't the final photo — just in progress of clearing out the cavity underneath).
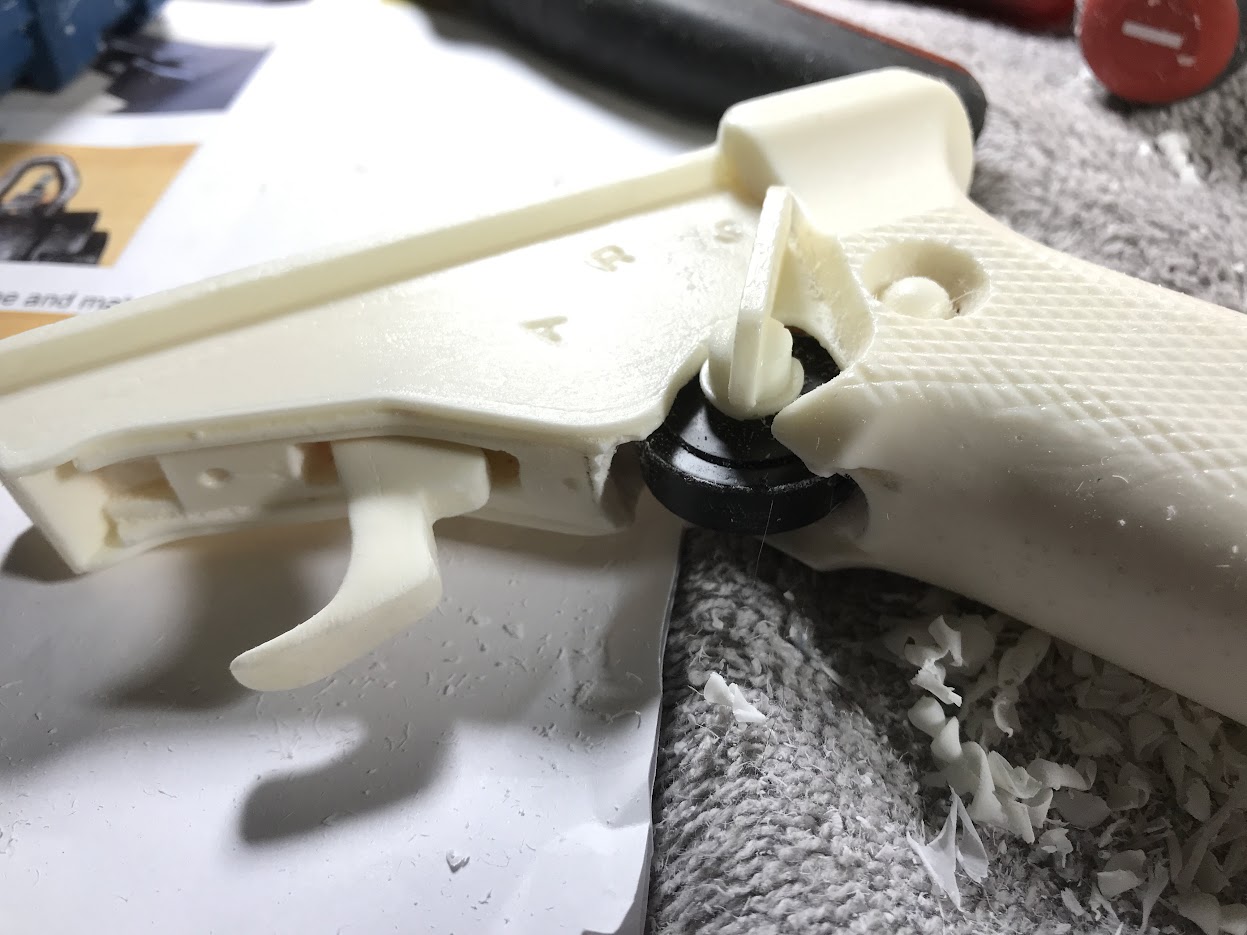
Main Grip — trigger installed with pen spring and nail holding it in place. I may also go back and put in small metal washers on either side of the trigger for a more smooth action and to give it a little more stability to prevent it from wobbling. I also hollowed out enough of the grip to fit the three-way switch. I'm not putting in electronics in my gun but did like the idea of a physical response from the switch. THIS WAS TERRIFYING hollowing out the grip like this.
Main Grip — filled in with Green Stuff and the installation of the stabilization screw:
Interior spring coil:
Front of body:
Magazine screw thingy attached. Had to do a slight repair on the surrounding resin:
I hope to make more progress this weekend. It may be slightly unrealistic, but I want to try and get this ready for my first troop in two weeks. Time to buckle down and get things done.
-
1
-
-
I use a belt and suspenders and they work great. The suspenders are clipped to both the belt and the thigh elastic straps to keep them in position — works awesome. I also glued black elastic over the metal parts so they wouldn’t be seen as easily and blend in with my under armor.
Sent from my iPhone using Tapatalk-
2
-
-
TK-27072 reporting for duty. Please enable me in the forums. Thank you!
http://501st.com/members/displaymemberdetails.php?userID=27150
-
Thanks!! I couldn't find information on my next steps and no one in my chain of command sent that link along to me. Thanks!
-
1
-
-
31 minutes ago, FISD E-11 Reference Team said:
Found and fixed that broken link
You 'da man.
 Thank you!
-
I was recently approved and designated TK-27072 and I need permission adjustments at whitearmor. I'm not sure which forums are locked down, but I do know that I'm unable to post in the forum "Newly Approved Members - Sound Off!". Please adjust my permissions accordingly. Thank you!
-
On 7/6/2015 at 2:09 PM, FISD E-11 Reference Team said:
Sterling parts in downloadable PDF document Photo Compendium (15,4 MB and 62 pages)
Could we get an updated link to the PDF document Photo Compendium? That Google Drive link is no longer working. Thank you!!
-
I’d say err on the side of consistency — all or none.
Sent from my iPhone using Tapatalk-
1
-
-
I made the mistake of buying those boots (the ones in the Amazon link), they are sufficient for basic clearance but not for expert or centurion builder.If anything, they might make good back up boots or good for the more rough troops.
Sent from my iPhone using Tapatalk
-
One other thing comes to mind that I thought I’d share — don’t be too paranoid about screwing something up, because in the end it’s just plastic. It’s not that hard to make up a solution of ABS paste, fill in your blunder, and sand/polish it back down to a level surface. ABS paste is just a mixture of PURE acetone and ABS scraps mixed together in an air-tight jar (I use small canning jars). It takes a few hours for the acetone to melt the ABS into a paste — you want it about the consistency of white school glue, maybe even slightly more liquidy because it dries/cures so rapidly. I had to do a HUGE shimming job on the backs of my thighs (filling a 40mm gap) — and though it took around 60-80 hours of filling/sanding/buffing, it looks pretty damn good for an amateur.
You can do it! Just take your time, measure three or four times first, make your cuts slow and deliberate, and enjoy the process. Stressing out about it makes it a chore. Instead keep your eyes on the “prize” and persevere.
You’ve got this, trooper!
Sent from my iPhone using Tapatalk-
2
-
-
@ukswrath — I totally understand your paranoia and fear of not being able to cut the straight lines. I’ve got a bit of a tremor condition, so that poses a challenge. A few things that have helped me out:
• Don’t stress out about being perfectly straight if it’s going to be hidden by a coverstrip. Just get them reasonably straight so there’s not sweeping gaps between the two halves of armor.
• If you don’t own one, get one of those flexible, transparent plastic rulers/straightedge — preferably something that is about a half meter or thereabouts (in America, I have one that’s a “two foot” ruler, which is roughly a half meter). Use that flexible ruler/straightedge — held in place with clamps — to mark your lines.
• When it comes to trimming armor, I prefer using lexan style scissors — I use both a curved and straight scissors. To me they’re much easier to manage than using a shop knife. You can make your trims slow and deliberate and still get a pretty clean edge that doesn’t take long to sand down to a smooth edge. I just use a flexible bit of 220 grit sandpaper to go back over my trimmed edges to make them smooth and clean.
• On some pieces — particularly those that have level surfaces and require an even trim/cut (like the ends of the thermal detonators) — you can just prop up your pencil in place up at the appropriate height, and just turn whatever it is you’re marking without moving the pencil. I did this for the thermal detonator and some of the other armor pieces, making it really easy to ensure a level surface or straight line.
• I have used shop knives and exacto knives on my trimming, too, but generally just for taking off really small snippets. I don’t trust myself with making longer cuts.
• If you’re trimming your cover strips make sure you clamp down the ABS plastic and your metal straight edge on top of it securely to your work surface. You don’t want the ABS or your straight edge moving at all when you’re marking, scoring, and cutting your coverstrips. And as others may have mentioned or you’ve probably seen in videos, the first two or three passes with your shop knife should be pretty light, and SLOWLY increases in pressure/depth with each pass of the blade. You really only need to get down to about half the depth of the ABS before you can bend and snap your coverstrips off.
Hope this helps a little! If you have any questions, I’d love to help as well. I just finished my first build about a week ago and learned a LOT from the process.
Sent from my iPhone using Tapatalk-
2
-
-
I’m sure it was 11 hours of hell though
Sent from my iPhone using Tapatalk
*days LOL
Course not 11 full days, but probably a good 40-60 hours.
Sent from my iPhone using Tapatalk -
Gotta day though came out nice.
Thank you Frank! Very kind of you!
Sent from my iPhone using Tapatalk -
9 hours ago, Zugor said:
This may sound like crazy talk but you may need to add a fill strip and fill the gaps with ABS slurry. Then sand smooth and put the proper size cover strip over the top for aesthetics. Potentially a lot of sanding. It sounds like you have one of the smaller kits.
Yeah, I ended up doing that. There were a couple of guys at RWA Creations' Facebook page that were quite helpful in steering me towards this direction. It was a major pain in the butt — it took about 11 days out of my build to get it from huge gap to relatively clean surface — but in the end it was a pretty good learning experience. Were it not for the saving grace of putting a cover strip on the back, I think it would have taken a lot longer to hide my crimes (so-to-speak). It seemed no matter how much I filled-sanded-buffed, there was always this discoloration that I just couldn't get rid of.
Here's a photo from relative start-to-finish:
-
I want to thank everyone in this thread who helped me out in one way or another. I finally got approval today and given my TK designation — TK-27072. Thank you so much for your advice, feedback, and encouragement!!
Now onto small refinements and making things more comfortable on troops!
Sent from my iPhone using Tapatalk-
1
-
-
Ok, Tnx.
I followed my plan with the forearm - removed the return edge at the wrist and took away about half at the elbow. I sanded them and they are perfect. Next move will be adjusting for size by cutting the butt connection I guess.
I’m am quite scared about this. It has to be enough room to get your hand through it, but cut away enough to make it look good and not to big.
The movies I see on YouTube only show how to cut and how to assemble, but nothing shows how to find the right measurements. I feel it’s very hard using tape and “testing”, coz the tape doesn’t really hold and give me confidence in the result. I’m afraid to cut to much and have a hard time squeezing through, and I am afraid to have a piece that looks way to big.
Sent from my iPhone using Tapatalk
I totally feel your anxiety, and I have been there too. Just take your time, take cuts off in small increments, and cut with intention and slowly. I relied heavily on this forum and RWA creation’ Facebook group for guidance and feedback. And now just about a month later, I finally have my TK designation!
Remarkably, most of the fitting is just intuition. Make sure you have a bout a finger’s gap between your body and your armor — loose enough to be somewhat comfortable. The old adage “measure twice, cut once” applies here — take your time measuring and remeasuring as well as “dry-fitting” with tape to get an idea for how much you’ll have to trim off. And ALWAYS measure with your under armor on.
If I can ever be of assistance, just ask!
Sent from my iPhone using Tapatalk-
1
-
-
I made it! Thanks everyone for your guidance, feedback, and encouragement!
With unwavering service,
TK-27072
Sent from my iPhone using Tapatalk-
2
-
-
Information
Name: Michael Tangen
Garrison: Central Garrison - Minnesota Wolf Pack
Armor maker: Ross Walmsley of RWA Creations
Helmet maker: RWA
Cloth belt maker: RWA
Neck seal maker: RWA
Boot maker: N/A - just some crappy boots I bought on Amazon that ended up having a seam on the front, the photos on Amazon didn't show the seam. These boots are also just temporary until I finish painting/dying my centurion-compliant boots.
Height: 5' 10"
Weight: 213 lbs
TK type: ANH stunt
Assistance: Ross Walmsley and the others at his Facebook page were immensely helpful in terms of providing advice, guidance, and feedback. Also, a huge shout-out to Ross who sent a free replacement helmet (already assembled) when I had messed up my first attempt at assembling it. Other than that, the entire build was done on my own, relying heavily on guidance through videos and Facebook.
Photos
(Full gallery can be seen here)
Front view:
Back view:
Left side:
Right side:
Ab plate close-up:
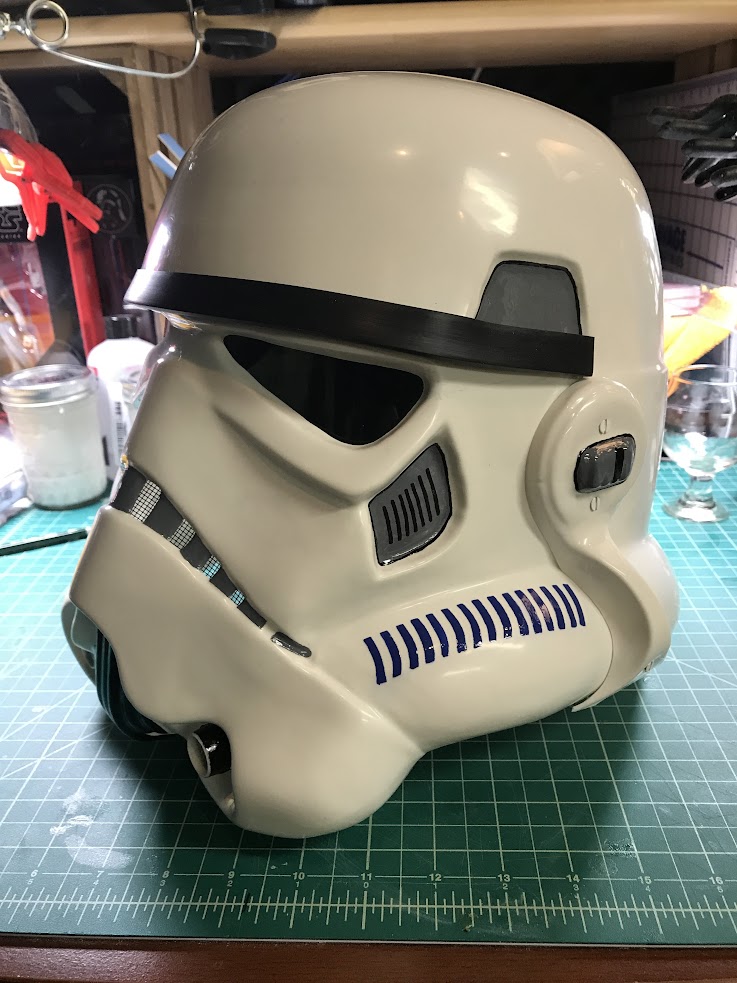
Helmet (front):
Helmet (left):
Helmet (right):
Helmet (back):
Interior strapping:
Belt/detonator question: Where exactly is the belt supposed to rest when it wraps towards the back? Also, how is the detonator typically secured to the belt so that it doesn't slide around?
Question on the back: is that too much of a gap in the back knees or is this acceptable?
-
1
-
-
Just a few strapping issues to resolve and I think I’ll be ready for Pre-Approval! The chest and ab seems to come apart too easily and the thighs need a better belt solution — they tend to slide inward and throw off the vertical alignment. Bugger.

Sent from my iPhone using Tapatalk-
1
-
-
So I've made a ton of progress and haven't really been posting many updates here — however I have kept a complete log of all my work over at my TK Facebook page with links to all the galleries of photos and summaries of the build days. Some of the more notable updates and things completed as of late:
The helmet build-out is "complete" (save for non-required internal components that I plan on installing, including fans, switches, and a few other items). The paint job was extremely difficult because of my tremor condition, but I persevered through it and am pretty happy with the results.
I've also completed the belt assembly with FUNCTIONAL DROP BOXES. WHAT THE WHAT?
The drop boxes are secured together using white industrial strength velcro — the soft half on the outside of the interior boxes and the coarse half on the inside of the exterior boxes. Just that little bit of velcro (probably 3mm wide?) is enough to securely hold the two ends together yet still make it easy enough to pull apart with TK gloves on. The added bonus is that it's the perfect size for my driver's license, a few credit cards, and some folded up cash.
And the last bit that I thought I'd share is the extensive shimming that I had to do to the thighs to get them to fit right. It look a VERY long time to go through the filling -> sanding -> buffing process — essentially repeating that process for several days until I got it to a point that I was content with. Towards the end I had a number of issues with discoloration of the ABS paste and some small bubble pockets as well. But with enough time and patience managed to see it through.
The photo doesn't really do it justice — sooooo much sanding. But in the end I've got a result I'm pretty proud of. A few things I might have done differently and learned along the way:
• I read somewhere to make the ABS paste a mayonnaise consistency, hind sight I'd go even a lot thinner. Not so much that it's a runny mess, but enough so that it's super easy to spread. My experience with ABS paste has taught me that it starts to dry VERY QUICKLY, and that doesn't give you much time to go back over it with a popsicle stick or scrap ABS to smooth things out.
• Straight up acetone painted on with a brush works great for blending minor ABS issues. I found it effective in blending edges.
• My shimming job was kinda half-assed. I wish I would have just put in a rectangular piece in back instead of trying to be clever and making a triangular shaped one. Oh well. It all worked out in the end.
Going through this whole shimming process with the thighs will make it much easier to shim the kidney armor now that I've got this knowledge and experience in the bag.
If you're curious here's all the recent photo/timelapse galleries:
Day 14 (helmet trimming and fitting):
https://photos.app.goo.gl/5G9phGDh4osam83a2Day 15 (helmet and ear cover fitting):
https://photos.app.goo.gl/Yiax6QbC3gQKKSoo1Day 16 (screwing up my helmet - trimming):
https://photos.app.goo.gl/6Mt2Nm8NVuqSQPzI3Day 17 (ABS pasting and sanding the thighs):
https://photos.app.goo.gl/OSsa3DztKnaeUcTt2Day 18 (more pasting/sanding the thighs, thermal detonator fitting/fixing):
https://photos.app.goo.gl/FxQqzHSVC6txuLK12Day 19 (finishing the thermal detonator, more pasting/sanding the thighs):
https://photos.app.goo.gl/qiMSsTNGWOnTXNcu1Day 20 (shin strapping/clips):
https://photos.app.goo.gl/fPW41kfEw6Z7sFbP2Day 21 (checking torso/arm fitting, more filling/sanding the torsos):
https://photos.app.goo.gl/xA3FvwqtMVbsFe693Day 22 (more filling/sanding the torsos, dry-fitting the sniper knee):
https://photos.app.goo.gl/zny66lelmOLV9mM73Day 23 (torso sanding, sniper knee, helmet painting):
https://photos.app.goo.gl/cXfoz5A38MT7Khyi2Day 24 (more helmet painting - trapezoids and blue striping):
https://photos.app.goo.gl/sdvhgcwS8fXKixts2Day 25 (cleaning up helmet line painting, prepping thighs for cover strips):
https://photos.app.goo.gl/0katM4aWw1g9BASA2Day 26 (cleaning up strapping issues, belt assembly, painting exposed rivets):
https://photos.app.goo.gl/AemkgfZS5zmm7CRx2
-
So I have been absolutely TERRIFIED about painting anything on my kit — I have mild to moderate essential tremors (my hands shake when engaged in action). But I conquered my fears and tackled the torso blue and gray “buttons” ...and I have to say, they came out pretty good for shaky hands.
I used blue painters tape, made 1mm sized circles with a circle template on the tape, and carefully cut the circle out leaving me a template to paint with.
I’m pretty proud of the job despite my condition.
I also finished shimming the thighs and am just waiting on the acetone to arrive so I can make ABS paste and fill in all the gaps. I think this is going to work!
I am a little concerned about the fitting, but that’ll come with time. I also am waiting on more 15mm poppers to arrive — held up on strapping until I can get those delivered. I may start working on the helmet soon.
Progress galleries:
Day 12:
https://photos.app.goo.gl/15w5p5IcY4CESm573
Day 13:
https://photos.app.goo.gl/T7nlIfourchBP76W2
Sent from my iPhone using Tapatalk


WIP: ImperialBrewer's Doopydoo Blaster Build with Tino's completion kit
in ANH BlasTech E11
Posted
Yeah, these are from Tino’s completion set and I took them out of the housing that they came in. I am assuming that the lenses can be just mounted inside the scope and I was not planning on using the prisms. But maybe they are essential? I don’t know. I always thought and assumed that the lenses inside a scope were purely cosmetic and not functional. Frankly, I wasn’t aiming for a fully functioning scope either. I’m just happy enough to try and shoot for a movie accurate prop that does not have to fulfill hero prop levels of accuracy.
Sent from my iPhone using Tapatalk