

Eric Ostendorf
-
Posts
63 -
Joined
-
Last visited
Content Type
Profiles
Forums
Gallery
Articles
Everything posted by Eric Ostendorf
-

Eric's mostly 3d Printed HWT Pack Build
Eric Ostendorf replied to Eric Ostendorf's topic in HWT Build Threads
Thanks for the compliments! This has been rolling around in head for a while and its really nice to see it getting a lot of hits on Thingiverse already. I'm going to drop a quick edit with the link on my first post of this thread and I'm going to drop it onto the 3d printed parts board too. As for approval, I think the only part that might cause issues would be the flap vent box. I think its the most different looking component of the batch but even then with a screenshot of the game pack and some conversation with your GML I would imagine it would be fine. Also, I think it would be neat to see the parts mixed and matched or have some scratch built parts mixed in too. When I was doing research, I saw lots of variations in the scratch built parts so there's certainly some leeway on these packs anyway in terms to uniformity. -
Eric's mostly 3d Printed HWT Pack Build
Eric Ostendorf replied to Eric Ostendorf's topic in HWT Build Threads
Annnnnnd its live on Thingiverse! If you see any changes I need to make or suggestions for new parts I'm open to ideas. https://www.thingiverse.com/thing:4462006 -
Eric's mostly 3d Printed HWT Pack Build
Eric Ostendorf replied to Eric Ostendorf's topic in HWT Build Threads
Second pack is assembled! I'm *almost* ready to release the files. I need to tweak a couple parts and that's it! Assembly of my second pack went pretty much the same as the first. Cut out the back of the oil can (an oscillating saw worked wonders for this), plug the top hole with my 3d printed plate, attach the side PVC tube with my clamps and 1/4"-20 screws, lay out parts on the can, use doubled sided tape to hold the parts in place while I screwed them in from the back (use a hole saw and/or step bit to cut some access holes for your drill), then attach the straps. And the finished product side-by-side! I'm super stoked with BOTH packs!!! Here are pictures of the new Game Accurate Pack. Almost everything is 3d printed, including the wipe tube. The Memories box was left uncut, the base is still an oil can, and the side tube is still PVC. And this is the first CRL Accurate-ish Pack. It very closely matches the Ukswrath builds and pictures in the CRL with the exception of the tombstone vent box being slanted. (a note about the straps - the CRL pack straps dig into my ribs so the Game pack straps were cut to 46" long total, the longer top straps were cut to 26" to put the buckles further away from my armpits) -
Eric's mostly 3d Printed HWT Pack Build
Eric Ostendorf replied to Eric Ostendorf's topic in HWT Build Threads
Everything is printed so its paint day! The PVC tube was painted and assembled a couple years ago when I did the first one so one less part to paint this time around. I have found a couple parts that need a little tweaking of the files but otherwise everything else is working out nicely. Parts laid out. Don't mind the VW vents or the Mando Gaunts. While this batch of parts were drying I assembled my radio. For the CRL pack, I cut the memories box down to 2.5" tall and glued it together with hot glue. For this more game accurate pack, I left the height of the memories box alone. Per the screen grabs, the radio sits pretty proud of the other components so I think its better this way. We'll see for sure once its all assembled but cutting it down some will be an easy thing to fix if I don't like it. The faceplates are also spaced closer to the bottom of the box per the game and I have an empty strip at the top where I put two screws. I could tweak it a little more to get it closer to the game but I think the way I have it now is simple and still matches the CRL in spirit so I'm happy with it as-is. -
Eric's mostly 3d Printed HWT Pack Build
Eric Ostendorf replied to Eric Ostendorf's topic in HWT Build Threads
I hadn't planned on it since its such a large part to try to 3d print. It would have to be sliced into several small sections, glued together, the seams hidden, and painted. I think it may end up being too fragile and/or too heavy, which is the beauty of building on the pre existing oil can. But if none are easily available then you may have to just make do with whats available or use a different container? The CRL is just a guide, the base doesn't have to match perfectly and maybe Australia just needs a different "standard base" due to availability. Here is this oil can: https://www.ebay.com.au/itm/Black-Oil-Drain-Pan-15Ltr-Large-Capacity-Perfect-for-Multiple-Oil-Changes/302944282702?hash=item4688e2e84e:g:9B8AAOSwUalb3UAi You could flip it upside down to get the handle on top and then just cut off the U-shaped handle and spout on the bottom and fill in the holes with sheet plastic. It would probably be close enough. Barring that, how about another long flat rectangular container like an under-the-bed storage tub?: https://www.ebay.com.au/itm/5-x-12L-Under-Bed-Storage-Container-Plastic-AU-Shoe-Toy-Organiser-Lid-Box-Holder/184287657434?hash=item2ae8667dda:g:0XYAAOSwCMxeuNIG I'm sure they come in enough sizes to find something that would be close enough and if the lid were glued to the body it would probably be strong enough. -
Eric's mostly 3d Printed HWT Pack Build
Eric Ostendorf replied to Eric Ostendorf's topic in HWT Build Threads
I actually hadn't seen that thread, or at least not recently enough to remember it! He is seeing a lot of the same things that I am. I'm trying to match the game parts but still be sympathetic to the CRL in the hopes that I can still get it approved. If not, I still have the files from most of my gen 1 parts that are very close to the CRL parts so I shoudln't have any trouble. When I release the files I'm going to release it with both variations of CRL and Game versions. -
Eric's mostly 3d Printed HWT Pack Build
Eric Ostendorf replied to Eric Ostendorf's topic in HWT Build Threads
The round back on the wipes container is a little tricky. The best way is to pre drill holes and put just the very pointy tips of screws through to jab into the wipes container, and then screw it all the way down. Only after the wipes container is on the oil can, then is the time to put on the face plate. Its hard to get the wipe bottle on the can straight after the cover plate is screwed on... whoops. The button plate is actually a separate part. I made it that way so that it would be easy to paint because I hate masking parts when I can just let the printer spend an extra couple hours to churn out individual parts. The buttons sit in little square cutouts in the plate. My buttons were modeled after the size and shape of the adhesive buttons so they will still be compatible. -
Eric's mostly 3d Printed HWT Pack Build
Eric Ostendorf replied to Eric Ostendorf's topic in HWT Build Threads
And one more part - the full wipe tube as a 3d printed part. It is 200mm tall to match the height of the button box and modeled to match the game with the full height faceplate but also has four holes for screws/rivets like on the CRL. I know finding cleaning wipes can be very difficult with the coronavirus going around so I went ahead and made a file for anyone that can't find an off-the-shelf tube to use. Or if people just want to print one for style points or because they don't want to buy one or whatever. It is in three parts for ease of painting: body, lid, and faceplate. The back of the tube has a flat section to make screwing it onto the pack straight much, much easier (similar to what I did on the upper section of the drop siphon). -
Eric's mostly 3d Printed HWT Pack Build
Eric Ostendorf replied to Eric Ostendorf's topic in HWT Build Threads
Thanks for the feedback! I've been busy with other things the last few days but I'm almost ready to start printing my second batch of parts. I figure a week or two of printing, tweaking my files if they need it, and then they'll be released. I have slightly changed the lower radio box panel to match the game a little closer. The square on the lower left corner is now raised with holes in it for rivets or screws. I'm saving the original files that more closely match the CRL images for anyone that may have issues getting it past their GMLs or for personal preference. The radio is the least game accurate part I have so I may come back and revisit it later but I'm really not that worried about the discrepancies thus far. -
Eric's mostly 3d Printed HWT Pack Build
Eric Ostendorf replied to Eric Ostendorf's topic in HWT Build Threads
Thank you everyone for the compliments so far! Drawing this in CAD with the aid of build threads and specs from here on FISD and 3D printing most of the parts has really helped me make this a sharp looking pack! I couldn't do it without all the resources available! My local garrison did a social distancing outdoor drive through con a few days ago so I got to try out my pack! Overall everyone liked it and it mostly worked well. I need to move the straps in and up just a hair and tighten them some so the pack rides higher on my back. The buckles are placed too high and they rubbed my rib cage/armpits so hopefully just moving them and tightening them will do, if not I'll make new straps with the buckles moved further down. I think all the pack needs otherwise is the addition of the third MP40 ammo pack and weathering. I'm super happy with it and will start printing parts for Pack #2. Once I'm happy with all the parts and its assembled, I'll release all the files -
Eric's mostly 3d Printed HWT Pack Build
Eric Ostendorf replied to Eric Ostendorf's topic in HWT Build Threads
I have the pack pretty much assembled! I have a troop here in a few hours so I'm going to wear it to try it out. If the pack isn't comfy due to strap placement or whatever, I'll be able to ditch it nearby without any issues. First I bought some nylon straps: https://www.amazon.com/gp/product/B07H1D15LZ/ref=ppx_yo_dt_b_asin_title_o01_s00?ie=UTF8&psc=1 I then used a regular backpack strap to get a rough idea of how long I needed it and where to put the buckle. After cutting and melting/sealing the ends, I put super glue on about 1" of the strap and folded it over and clamped it. I then used an old soldering iron to burn a hole in the strap for a 1/4"-20 bolt. The straps were then attached to the tank with washers and nylock nuts. I used the mounting position of the straps from a couple other builds but I think the top strap needs to go up and inwards a hair but we will see after I do some trooping. Easy enough to change in any case. I then tried it on. Granted its without armor so I'm not sure how its going to actually sit. After deeming it "good enough" I took a black paint pen and covered up some of the exposed unpainted screws. It needs more touchup and weathering, but for the purpose of having a complete pack to take on a test troop I'm super happy with how its looking. ...keep in mind that this is my "rough draft" pack that I'm planning on giving to a friend. My revised parts, strap locations, improved assembly methods, etc. will all go into a second, more refined pack that I plan on keeping. I'll do a build on it as well and use those photos on my Thingiverse after I release the files. I have other projects and work and real life to take care of, but I suspect files will be available very soon for anyone else wanting to use my parts! -
Eric's mostly 3d Printed HWT Pack Build
Eric Ostendorf replied to Eric Ostendorf's topic in HWT Build Threads
I got my nylon straps in the mail to make the shoulder straps. I also noticed I forgot to cover the hole on the top of the oil can from where I cut the drain spout off of. I just whipped up a simple plate that will just screw or rivet over the hole. Should look spacey enough. Looks pretty good IMO. I did a sloppy job hacking the oil spout off so this covers it nicely. The shine and screw heads will get painted/weathered when I get to that phase, of course. -
Eric's mostly 3d Printed HWT Pack Build
Eric Ostendorf replied to Eric Ostendorf's topic in HWT Build Threads
Tube Stripe - 5 Bumps Edition: -
Eric's mostly 3d Printed HWT Pack Build
Eric Ostendorf replied to Eric Ostendorf's topic in HWT Build Threads
Dang, how did I miss that? Easy enough to fix at least. Thanks! EDIT: You're right that the game model shows 5 but the CRL pack shows 7. Weird! I'm going to go ahead and change it to 5 in the name of accuracy. The tube stripe on my existing pack is 7... but its superglued on so I think I'm just going to live with it on that pack unless its an approval issue. Also, I will indeed be painting all the exposed screw heads black during the weathering phase before submitting. The shiny bits would definitely stick out too much otherwise! -
Eric's mostly 3d Printed HWT Pack Build
Eric Ostendorf replied to Eric Ostendorf's topic in HWT Build Threads
I made a few revisions per these screen grabs: 1. Flap filter box. Per the game, the box is shorter and the base has an upside-down U-shape where the vents fit into. I have made a new file to reflect this. It is not what is shown in the current CRL (its closer to the ukswrath construction of the flaps in the center of the box) but the CRL also says to make it as close to screen captures as possible... so thats what I'm going with unless its going to cause problems with approval. 2. Tombstone FIlter Box. I have revised the angle to be a little sharper and I have moved the faceplate down further per the game. Again, I'm basing my parts on the screen captures more than the CRL, but per the CRL itself making it as close to the game is the goal. 3. Button box. The screen grabs show the button box to be about the same length of the wipe tube. The thread with the specs show that this part can be up to 200mm so I maxed it out at that dimension, which is about the same height as the wipe tubes that I'm using. The button plate isn't exactly centered in the middle either so I have made mine the same. One other concern I have is the screw/rivet holes in the corner of each part. I can't really see these on the screen grabs. I think most of the pack builds I see use screws to attach a face plate to the plastic bins used for each component and are therefore necessary for construction. As an added bonus I think they add a little more depth and detail to the pack. In the spirit of matching other HWT I'm leaving my pre-cut holes in my files for screws/rivets to be added unless this should be omitted for accuracy? -
Eric's mostly 3d Printed HWT Pack Build
Eric Ostendorf replied to Eric Ostendorf's topic in HWT Build Threads
Scaling may affect how tightly the parts fit together but just reprinting the parts that get inserted into the pockets a percent smaller would probably work fine. Otherwise, belt sander to the rescue! -
[EDIT 6-17-20: Please do read this entire thread but the packs are done and the files are HERE: https://www.thingiverse.com/thing:4462006 ] Hey all! I'm an approved ANH Stunt TK with aspirations to become a HWT. I started my pack project about two years ago but got derailed by life. I'm building two packs, one for me and one for a friend currently building a TK. The first pack is almost done and has used my initial 3d printed parts to test it, and after building that I have gone back and modified my files. I'm going to post screen captures first to see if there are any issues or CRL conflicts before I start printing them to make the second pack. After everything is approved and assembled, I will be releasing the files to my Thingiverse for any future HWT that want to use my parts to build their pack vs. scratch building everything. I used ukswrath's build, the published approximate dimensions needed for each component, and screen grabs from the game to base my parts on. The base of the pack is still an oil can, the radio base is still a "memories" box, the upper center tube is a wipes container, and the side tube is PVC. CRL: https://databank.501st.com/databank/Costuming:TK_hwt UK's Build: Game Screen Grabs: Pack Specs: First, here is my "rough draft" pack. It is currently only lacking 1" webbing straps, weathering, and the chest MP40 pack before I consider it complete. Bear in mind the rendered parts are the current revision, mostly just added some radii and screw holes for the corner screws. Upper Left Button Box. I've made each sub component that is painted a different color a separate part for ease of assembly. The frame the buttons fit into actually sits in a pocket in the button base so that everything will easily line up straight. The parts will just be glued together unless there is any reason to add holes for screws? The buttons are based on the same dimensions as the rubber bumpers used in UKWrath's build as they seem popular. The bumpers could be used in lieu of the printed buttons, but its way cheaper to just print them IMO. Top Middle Wipe Tube cover. I'm still using the standard plastic dollar store wipe tube. I could just print a tube with a flat back but honestly for $1 its not worth it, although with the covid pandemic wipes have all but vanished. I may go ahead and make a file just to have it available though. I've seen some people just use black electrical tape to make the cover, others use cardboard, others use sheet plastic. This 3d printed part just makes it look more "real" IMO. Upper right flap vent box. I really thought this would be tough to draw but it turned out to be simple. The vent section prints as a separate part that fits into a pocket in the base. No more cutting of strips and trying to glue them together perfectly as this prints and looks great. The look is more akin to the UKWrath build than the game as the vents go all the way to the bottom of the part. The CRL also shows the vent flaps going lower. I can mimic this if people think matching the game is better than matching what most people seem to build? Lower left radio. I have made two files for the faceplate as it is larger than what my printer can fit. The top section is the "screen" and the lower section is for the knobs. I am still attaching this to the cut-down heavy cardboard "Memories" box as my printer can't make something that large for less than what the box costs. I have also made a file for the knobs with holes to screw into the plastic faceplate. They're roughly the same size as the plastic caps from the oil can base so either could be used but with holes perfectly centered on the printed part I'll just let the machine make them. Center right is the angled box with tombstone shaped vents. Per the game, this box is angled although most builds have it as a flat box due to limitations of scratch-building nice parts. Again, the faceplate is a separate part for painting and assembles with glue. There is a neat trick that if I print the box upside down, the face that points outwards will have some drooping plastic bridges that look like vent media underneath the faceplate (see the pic of my test pack). I've removed the corner screws from the original part and added those screws to the outside of the base instead. Lower right Drop Siphon. Again, the upper black section and the lower tapered grey section are printed in two parts. I have left a lug on the tapered section and a hole on the upper section so that they will easily line up for assembly after painting. Also, I needed this to print in two parts so that they would fit onto my printer. The upper section has the cap integrated into the design with the same rough size and shape as a juice lid used on many builds. The upper black section also has a flat base on the back to allow for simpler mounting to the oil can base. The grey tapered section has 8 1/8" holes evenly spaced around it for placement of real rivets. I could just integrate 3d printed rivet look-alikes but honestly I like the look of real hardware on the 3d prints to give it a bit more realism. And lastly are parts for the 24" PVC tube mounted on the right side of the pack. Instead of buying a vacuum formed TK shoulder strap or PVC caps I have just made files to print look-alikes. The tube stripe prints with the same diameter bend as the OD of the pipe so no need to heat it up with a heat gun and crinkle it to death. The caps could be sourced and cut down from a hardware store, but if I can print perfect parts that are ready to go right off the printer I'd rather just make the file. The biggest concern I have for making it approvable are my "clamps" that attach the pipe to the side of the pack. They make the tube stick out from the body of the pack a hair, but I don't think its enough to hurt. I know some people just screw them on or use toggle screws but I wanted something that looked a little more military and polished. The clamp first attaches to the side of the oil can with 1/4"-20 screws and then the PVC pipe is attached to the clamp via screws. I think it looks super neat and it is very, very solidly mounted so its worth the slight deviation from the norm. So.... please give me any input or criticism to make these parts more accurate, buildable, etc. I'd like to make any modifications to my files before I print up a second batch for another pack and before I release them to the wild on Thingiverse. I can also drop the files on FISD just have a backup source if I can upload STLs.
-
TK 90421 Requesting Access Please https://www.501st.com/members/displaymemberdetails.php?userID=29240
-
It is indeed not perfect. but I'm just trying to get approved for Basic so I can get in on some coin runs and then make improvements over time. Thanks for the pointers and I will certainly take care of them whether I get approved this time or not. I need to do a ton of tweaks and changes and updates but I just don't have a lot of free time to do all of them right now :\ -The biceps are being pulled up from the strap in the shoulder bell that goes across the bicep... I have another strap on the inside that lets them sit lower but per the CRL they have to have the visible strap across. If its a problem, just lengthening those straps should release the tension on them to let the biceps sit lower... or I can just go back to not having the straps at all if I get approved. If you go back through my posts you'll see in earlier pictures where the arm gaps are better. -The forearms are just held on my arms with friction via foam, I don't have a strap to the upper arm to hold them up and they had just slid down for the pictures. Size-wise, I was in a hurry when I put them together to make my first event and I was afraid of cutting them too small and then not having time to fix them. Making them smaller is on my list of tweaks to do eventually though. -I have the straps for the drop boxes between the snap to my ab and the rivet that holds the plastic belt to the canvas belt which seems to be right spot per screen-used photos but they can still slide around some since I don't have them affixed in place. I can slide it over as close to the rivet as I can get and tack it down with some E6000 though. -The chest to back strap keeps the chest and back from flaring out and flopping around as I walk since they are not connected to the kidney and ab to weigh them down -I placed the belt a little high on accident... I know its supposed to ride at just the bottom of the ab button plate but I guess I didn't quite measure correctly. I was trying to copy the dimensions from my first belt that is set up for the heavy weapons and wasn't 100 successful. -The ab buttons were way harder to paint than I expected... I have touched them up several times and I just can't seem to get them right. I have a second set of ab plates with dimples for metal buttons instead that I've been thinking about swapping to but I don't think they're accurate.
-
I submitted my application to the legion! Here are the photos I had taken for my GML. I think I should approve fine but we will see. After I am accepted as a TK I'm going to work on finishing up a couple other projects and then come back to finish the HWT pack and submit again as a HWT.
-
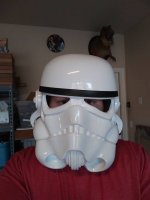
Woo a good update! I have finished a bunch of small tweaks to the armor: First the butt plate modifactions I made the other day are close to perfect! NO SQUEAKS OR POP OUT! Yaaaay! The only change I need to make is to trim another 1/2" or so off the bottom edge that goes between my legs. My thighs still rub some on it but that won't keep me from submission for Basic. For EIB I need to swap my snap plate for two snaps in the plastic so I will probably trim when I'm ready to upgrade for EIB. I also revised my thigh holding rig. The straps that hold the thighs to the belt were originally 3/4" elastic but the thighs kept drifting down over the course of a troop so I have swapped these for 1" nylon. I folded over the last 2" and glued it in place with CA glue to give it some stiffness, made a hole in the nylon with a soldering iron, and set the snap. I did not use a snap plate for this as I didn't want the extra bulk riding against my thigh but I did use a sacrificial plate to guide the soldering iron to the correct location so that this new strap will pop onto the existing plate on my thigh. Next I added a little piece of soft loop sided Velcro the inside front edge of my shin. It was starting to wear off the white on my boots so I figured this may slow down the wear. The next area of attention was the helmet. I added some more padding to the inside to raise it up on my head a little and I taped down the wires for my fans. Eventually I'm wanting to add a super ear and hovi mic tips so I'm not mounting anything with glue yet. The extra padding has the helmet wobbling on my head though so I think I will be adding a chin strap until I figure out how to pad it better. The last bit keeping me from wanting to submit were my helmet ears. I trimmed them down a little more to try to close the gap but they still aren't perfect. I think I will live with it though as I think I will have to start over if I want them to fit better. I know the originals all had gaps but I'm just being persnickety. I also touched up the paint on the vocoder, teeth, and ear bumps. Today is the day I take submission photos so hopefully I will be approved. I was going to try to take them yesterday at a troop but I didn't have shoulder bell straps across my biceps but I have them now... I think I'm good for the CRL requirements now.
-
Tiny update. I've been exhausted at work lately so work is slow going but its still going. I think I have cleaned the outside of all the armor of scuffs and smudges and glue residue. I want to wipe the insides down one more time with a sanitizing wipe before I put the armor back in the crate to be sure to kill any funky sweat smell. To get my armor ready in time for my first event I used Velcro to hold the shoulder straps in place. I was concerned that I was going to need to adjust them and just didn't have time to wait on glue to dry just to have to peel it back off so Velcro made sense at the time. Now that I like where they are, I have removed the Velcro and glued them on with a generous dab of e6000. Hopefully They stay in place and I don't have issues but I suppose if I ever do I can just hide that shoulder with the pauldron. I have added self-adhesive felt to the backs of the drop boxes and insides of the shoulder bells to try to reduce the clacking sound I get when I walk. I know I won't completely get rid of it but if I can reduce it a little that would help. Next up is the helmet. I am planning on cleaning it, fixing my ears so they fit tighter to the helmet sides, drilling holes for hearing assist, adding a bit more padding to get it to fit my head better, re-route the fan wires better, touch up some paint, and add the last screw on the bottom of the ear. Then that will make my kit ready for submission
-
So didn't get all my armor finished last week but I'm working on it this week instead. First I took all my armor out of the crates and disconnected all the strapping and wiped everything down with alchohol. This removed the bulk of the scratches and smudges and sweat stink. Also this gave me a chance to look everything over and patch up some small cracks with ABS paste. I have decided to re-do the strapping on my torso. The ab to kidney gap was a big larger than necessary so I will be shortening up those straps. I am also working on adjusting the straps for the butt plate. The butt tends to pop out of place and ride up onto the kidney plate so that every time I walk it makes an annoying squeak. I tried duct tape to keep it in place but eventually the tape would give way and the squeaking would resume. I think part of the problem was my straps were too tight and too low on the plate so I will be making my straps with a bit more slack after moving the snap plates up to just below the return edge. To also battle the butt plate slipping up I have added plastic tabs. I saw this in a couple other build threads and looks like it will help so I'm going to give it a go. When the butt plate return edge is flush with the kidney I do have difficulties walking so I think I need to trim a little off the bottom so my legs have more room but I will trim only after I have the new straps in so I can test them first.
-
Thanks guys! My local garrison, Oklahoma, is doing its first coin run as a garrison and I really want in on it so its incentive to finally get the last dab of little issues sorted on my kit. The goal for this week is to take all my armor out of my crates, clean them up, do some crack repairs, touch up some paint, trim a couple small armor bites, swap out some straps, finish the ears on my helmet, and take TK submission photos this weekend After I'm officially in as a TK, I'll get back to work on my HWT pack and get approved as a Heavy too
-
And I'm finally looping back to working on my Kit. I have been wearing it as-is to several events without any issues but I'm still not ready for approval, although I'm *super* close. I finally managed to get some good tube stripes printed off for my HWT pack. I switched to PLA plastic to make it easier to bend (lower melting point than PETG) and I increased the number of top layers to reduce "pillowing" of the plastic bunching up around the support structures underneath the thinner top layer. And being that my 3d Printer is currently busy with some other projects, I have decided to go ahead and get my TK approvable as a regular TK. This involves building a second belt with drop boxes, holster, and thermal detonator. The HWT isn't supposed to have visible holes in the belt from removing the holster so its simpler to just build a second belt and this makes it easy to swap back and forth between TK and HWT. First I had to measure the original belt and mark off for snaps for the new belt. After I attached the second belt cover with cap rivets I assembled the inner and outer shells for the drop boxes and then riveted those to elastic looped around the belt. Then I made aluminium clips for my thermal detonator by following the instructions in this thread: The instructions worked perfectly for me Next I glued the front plate onto the detonator and held it down with tape while the e6000 cured. While that was drying, I installed my holster. It is left over from my original Anovos kit so it came with 3/16 chicago screws which I reused. Since this is a stunt I only punched the bottom two holes per UksWrath excellent build thread. About three years ago I bought a disney E-11 blaster off Amazon. It lights up and makes noise but its not particularly accurate. I don't have a better blaster so I figured I'd just spray paint my Disney and troop with it till I get around to getting a better one. It turned out pretty OK, OK enough to sit in my holster or give to kids anyway. Here it is compared to my friend's Hyperfirm blaster: And that's as far as I have gotten. I'm hoping to get my helmet squared away so that I can get TK approval pictures taken this weekend as all I lack for basic is the small screw that holds down the bottom of the ear to the helmet. Once I'm finally an official 501st TK I'll get back to finishing up my HWT pack
