

Deadeye
-
Posts
70 -
Joined
-
Last visited
-
Days Won
1
Content Type
Profiles
Forums
Gallery
Articles
Everything posted by Deadeye
-
TK61673 requesting ANH Stunt Centurion status [AP]
Deadeye replied to Deadeye's topic in Request Centurion Status
Per Tony's comment, no value added in this post. -
Thanks for the links, Q. I hadn't thought to look over there but that makes sense. They deal with pouches much more frequently. I may try that RIT dye in the second thread. The results looked good and it didn't sound too complicated. Joseph, I thought I read somewhere that you wished you hadn't spray painted them. Maybe that was some else but as I remember it they were in a rush to get everything complete and decided to spray and weren't completely happy with the results. I just spray painted a bunch of clothes green for son's Toy Story plastic army man Halloween costume and the end result was pretty crusty and splotchy. Still, the pouches don't need to be as flexible so it seems like a viable option. Thanks for the recommendations.
-
I've been accumulating parts for my conversion of my TK to an HWT over the course of the last several weeks. I recently received my third Hyperfirm in the form of this DLT-19. I plan to mostly follow the ukswrath pack build so I found a really good deal on the oil drain pan and the Popit! containers. Acting on justjoseph's advice, I bought my pouches and pauldron from eBay sources. I actually have another pair of pouches on their way from the same seller so I can have two on my belt. I also went directly to the source and got a new belt, ammo belt and shoulder bridges from AP so I can keep my TK belt intact. I have a biker scout build in front of this one so I'll need to finish that up while I get the rest of the parts but I figured I'd post this here to ask for a recommendation. Obviously my pouches aren't the right color yet. Can anyone provide me with info on how they dyed their pouches? I've heard spray paint works in a pinch but I'd prefer to dye them if possible. What have people done that worked best. Thanks for any info you can provide. ----------
-
TK61673 requesting ANH Stunt Centurion status [AP]
Deadeye replied to Deadeye's topic in Request Centurion Status
I know that that was a suggestion in my EIB feedback but I've seen several Centurion approvals where they're visible including two within the last month or so. I'm hoping that it's just a "nice to have" and not a requirement. It seems like it will be much more difficult to trim them and ensure they're square and round the corners and all of that now that they're put together. Seeing the recent approvals was actually what gave me the confidence to move forward with an approval. I was already looking at shortening my thighs, which fixed one of my EIB suggestions so that only left the paint on the right-side snap to fix. -
To Tony's point, you can disregard this request. The thread can be closed or whatever. Nothing further required. Thanks.
-
Battlefront Magma Trooper Pack Build
Deadeye replied to CrookKnight's topic in Build Threads Requireing Maintenance
- -
If I remember correctly, the internal dimensions are something like 35x18x11. It's certainly pushed to the limit but I'm able to fit everything. There's no key like the big one but there are provisions to use a couple of padlocks. I've been contemplating building my TK into an HWT and that might be tough with the pauldron and pouches. Hopefully it'll all fit.<br><br> Allan, I definitely like the plaque. I'd like vet to get something like that.<br><br> Thanks all for the kind words. Now I gotta figure out the next project to work on.
-
Since I'm just sitting around waiting for my first-ever troop tonight, I figured I'd post some pictures of the TK storage/transport bin I've been working on for the last few days. I STRONGLY considered the large bin but wasn't sure it would fit through the door of my 300S and with the weight and size of it I wasn't sure I wanted to try to wrangle it in there. I "settled" on the smaller one once I assured that everything would fit and then I set out to outfit it. I bought a twin mattress topper on the recommendation of someone here and got three yards of a cool, thick fleece. Pretty much used every square inch of it, too. What do you think? ---------------
-
TK61673 requesting ANH Stunt EIB status [AP] [641]
Deadeye replied to Deadeye's topic in Request Expert Infantry Status
Thanks. -
I love your thoroughness and I appreciate you taking the time. I had seen the RPF thread and that Jim mentions people as "small" as 5'6". I know his stuff is more flexible so maybe that includes it's ability to be sized for a wider range. I imagine with the relative rigidity of ABS, KB and Anovos don't have as much ability to accommodate that range--KB's on the larger side and Anovos more up the middle. I've already looked into KB on mitcheg1's recommendation (to go with my new helmet--yay!). Might need to take a closer look at Jim's stuff, too. Thanks for your info.
-
Is this confirmed? Only reason I ask is because Daetrin kind of said the opposite about Jim's in this thread (at the bottom of the first post): http://www.whitearmor.net/forum/topic/11377-where-to-buy-armor/?p=141730 I'm not questioning your information--just trying to clarify as I'm also a bit smaller and am in the market for a FOTK kit. If Jim's is indeed larger, that's probably troublesome for me. Although I don't have much interest in waiting a year for the Anovos kits.
-
TK61673 requesting ANH Stunt EIB status [AP] [641]
Deadeye replied to Deadeye's topic in Request Expert Infantry Status
- -
TK61673 requesting ANH Stunt EIB status [AP] [641]
Deadeye replied to Deadeye's topic in Request Expert Infantry Status
Thanks. -
EIB submitted. Fingers crossed. http://www.whitearmor.net/forum/topic/38968-tk61673-requesting-anh-stunt-eib-status-ap/#entry521888
-
Trooper Information Name = Kurt Heydenburg Forum name = Lord Dark Helmet Garrison = Great Lakes Garrison Legion Number = 61673 Mandatory Information Armor = AP Helmet= AP Blaster= Hyperfirm Optional Height = 5' 7" Weight = 150lbs Boots = TK Boots Canvas belt = AP Hand Plates = AP latex Neck Seal = Darman Props Holster = Darman Props Full Body: Front Back Left Right Left side detail Right side detail Bucket off Armor Details: Abdomen detail Action shot Cod and butt plate attachment Internal strapping Helmet details: Front Left Right Back Hovi mic tip detail Lens color Blaster details: Left Right Butt Neck seal Thermal detonator Holster attachment Thank you for taking the time to review my submission and I appreciate your consideration.
-
New trooper TK-61673 requesting access. Thanks very much for setting me up. http://501st.com/members/displaymemberdetails.php?userID=22511
-
I think that at least for the time being, I'll be installing some industrial strength Velcro next to the snap closer toward the side/back. I'm hopeful that it is a reversible option but will be sufficient to hold the belt onto the snaps. I think you're right, Mark, that it is a little tight. I had mentioned in a previous thread the issues I was having fitting the parts together so I think I never really got it optimized. That combined with my concerns about the robustness of the popper snaps and it makes it tenuous at best. I think some big strips of Velcro will help. My only concern is how well it will stick to the canvas belt.<br><br> Thanks all for the congrats. Glad to join you troopers.
-
Just got word from my GML that my build was approved for Legion admission. Sweet. Just awaiting the formalities of full membership and my TK number, now. A few tweaks and I can submit for EIB and then Centurion.
-
I noticed that too. I measured them out like ukswrath recommends in his Anovos build thread but they don't appear to fit as tightly as I'd expected. I'm wondering if it's because I connected them with a snap in the shoulder bell rather than gluing the straps in. That extra inch of elastic to the snap probably adds some extra stretch as opposed to having them glued all the way up to the edge. I may need to move the sew-in snap a bit to account for the extra stretch. Thanks for the feedback. I'm also wondering if the elastic loops for the shoulder covers may help a bit. I see that on one side the white shoulder elastic is peeking out and that extra loop may hold all that stuff in place a little more. So I painted the knee rivets, I need to add the shoulder elastic loops and I plan to put some Velcro on the boots/shins to keep the sniper knee from wandering a bit. I think that will help clean some things up. I'm also strongly considering replacing the "screen accurate" popper snaps on the ab plate with some line 24s. The belt kept popping loose as I was walking around the house and if it comes off that easily I suspect it'll be a pain on a longer troop. Any thoughts on the robustness of poppers vs. line 24s for this spot?
-
And with that, the build was all done! Pictures taken to get started on the submission process. I remembered after these that I needed to paint the rivet on the knee ammo belt. Oops. Other than that, I think it turned out pretty well. I still need to install the small elastic ties to hold down the shoulder covers. I don't believe those are a basic requirement but it'll fix the sort of crooked back in these pics. Can't wait to see what my GML thinks. Hope to be trooping with you soon, Kyle. With that, I will say the suit was hotter than I thought, less comfortable than I expected and visibility is ridiculous. Can't wait to troop!
-
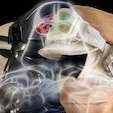
OK, I admit I've gotten a bit lax in my updates to the build thread. I started back at work this week and kind of got to a point where I would focus on getting stuff done and not have time to get to the computer. So in my last post I was starting on paint. I attempted to hand paint the tube stripes but really didn't like the results. I should have used a thinner brush and made multiple passes but tried to use a wider brush and one pass. When I had areas that looked weird and attempted to touch them up the stripe would get too wide. With lots of elbow grease and mineral spirits I was able to remove them and decided to use decals rather than make another attempt. Everything else was hand painted. The results are...acceptable to me but other may see more room for improvement. That then allowed me to spray an entire can of PlastiDip on the inside of the helmet once I masked everything off. Once the inside was coated I could mount the lenses and frown screen. I went back and forth with lots of different ideas for how to mount the lenses but nothing seemed to work as well as I'd hoped. I just punted and decided to glue in some pieces for now. I think I'll probably buy some thicker material and come up with a more long-term solution that allows for easy replacement but this works for now. The frown screen was pretty easy. I just sandwiched a piece between two pieces of rubber that I had laying around. That was then glued into place. Once all of that internal stuff was complete I was able to put the helmet together. The hard hat suspension was positioned just as I'd hoped. I haven't resized the helmet opening yet. It works for now and I wasn't sure how much I wanted to take off. I also haven't yet cut to length or installed the 'S' trim. The AP-provided trim was precut to length and will work for now until I have a final opening size. I still needed to glue on my hand plates so I used Sarah's (Alay's) suggested adhesive for that. I tried E6000 but it didn't work at all. Her idea worked well but I got a little overzealous with the glue and it turned out really messy. I think I may be making another pair of those. The only thing left to do was my one "semi-permanent" connection that I didn't want to have to mess with until I knew everything else was good. Rivets installed for the left side straps and then the elastic straps added over top. And then I only needed to paint the visible snap, screw and rivet heads.
-
You got this, Jaime. For me, it came down to a couple of mental milestones that gave me the confidence. First, I researched the heck out of it. I'm sure you've done a fair bit of that. Second, I found out about ABS paste. Even though I haven't needed it so far (knock on wood) I at least knew that mistakes had the potential to be fixable--even with a material that I hadn't worked with before and assumed was unfixable. Third, I came to realization that if I screw something up too much I could probably replace a single part for a reasonable cost and start over. I've read of others that even got parts replaced for free. The armor makers all sound like really good folks that just want to help people realize their vision and aren't likely to leave someone high and dry with crummy parts. Honestly though, if you're patient and careful and do your research first it's all very achievable stuff.
-
Thanks for the kind words, Christine. I'm amazed that I filled the whole six weeks of my time off with this build. I honestly don't know how people pull this off with a full time job. I have certainly been enjoying the build, though. I'm honestly ready to start my next one as soon as this is done. I've been contemplating a FOTK, a clone or maybe something completely different--a Mandalorian.<br><br> Thanks as well to Jorge and Brad for the kind words. The continued positive comments make me think I got things right so far so I really appreciate everyone that has offered them.
-
Thanks for the info, Sarah. For now, I'm going to attempt to wear it as is and see if the bends cause me issues while in use. I'm hopeful that the added plates that I put on the two sides will pull things together. If not, I'll definitely attempt your technique to get it bent to where I need it. I wonder if that would also work on the calves, as that seems to be the one part that is not cooperating and they are consistently fighting me for shape. Anyhow, I know that I've been really lazy in posting updates lately. All of this bouncing from spot to spot makes it difficult to think to take pictures before moving on. So here's another data dump of progress pictures. I tried to use grandma's old sewing machine to make my straps but I think it's just too long out of use and probably needs too much maintenance. It proved to be too unreliable and problematic to use. I know Marc (CTID) suggested I could just folder over the straps and punch the holes but that was causing me some issues measuring things out and punching through both sides cleanly so I just went ahead a hand stitched enough to hold them closed. I still heat sealed the ends like he suggested. I don't have any in-process pictures of making straps but here's the body all strapped up. I also strapped up the arms. I wanted to be able to disconnect the forearm from the bicep so I added snaps at that end but kept the traditional glued-in elastic at the forearm end because it's already pretty snug. I also added the glued-in straps to close the right side of the body and the riveted cod closure since these pics. I didn't get pictures for it but I installed traditional calf closures so far. We'll see how they go and if I want to augment with tabs or go with something completely different at some point. The calves are my nemesis in the build since they seem so misshapen and don't close properly. That pretty much wraps up the body and limbs (except for the painted ab buttons). So the only thing left is finishing up the helmet. I started by trying to integrate the hard hat suspension. I don't have pictures but I basically emulated what MoSc0ut did by cutting out the retaining points and gluing them in. I lacked his confidence in just gluing them in so I did a bunch of test fitting and stuff to try to position them. I think I got it but until I get it all put back together I won't know for sure. I then went to work on the teeth that Luc agreed needed some more refinement. I think these turned out much better. Then it was on to painting. You can see here laying out the grey around the teeth. I wanted to draw in all the painted areas to ensure I didn't get too sloppy. Again borrowing a page from MoSc0ut's build I used his technique to replicate the decals into hand painted tube stripes. Here's an in process pic. And the result. I then drew in the vocoder paint lines before grabbing the brushes. And I used ukswrath's technique of masking out the ab buttons. Here's a progress picture after the first coat of grey. I've since also done the first coat on the tube stripes and the vocoder. So that's where I'm at to this point. I'll be going back out in a few to put on some more paint. Tomorrow is my first day back to work since the heart attack. This whole process started before that and while it was certainly an unplanned event I think that the time I've had off has been very beneficial to make quick progress on this build. I know it would have taken much longer if I had to work every day. I was really hoping that I would have everything done and be taking my submission pictures tonight but at this point I'm guessing that's not possible. This Humbrol paint seems to take a long time to dry and there are just a few too many small things that need to be done before everything is ready to go. I need to do a second coat (at least in some areas) of these base colors and once those dry I'll need to add the black outlines and touches. Then I have some Plasti-Dip to coat the inside of the helmet. After that, I need to figure out how to mount the lenses and the frown screen. Once all of that's done, I can put the helmet back together and test out the hard hat suspension. With all of that done, I still haven't trimmed the helmet opening at all so I want to do some of that and then I can cut the 'S' trim to wrap up the bucket. That at least gets me to submission photos and once I have the build complete I want to buy my helmet electronics and integrate fans, hearing system and TrooperTalk. Really close but I don't want to rush and mess up all of this progress by being careless.
-
Another day of doing lots of different stuff. I started by unclamping the sniper knee and checking out how it looks. I think I did pretty well at getting it level and I really tried to get the edges to line up at the top. Take a look and let me know what you think. Bear in mind that the side view pictures are tipped toward the camera a bit so you can see the top of the calves and how they line up with the knee return edges. With that done, I took the magnets off the thermal detonator control panel to see how that turned out. The caps are just pressed on at this point and will be glued after the clips are screwed in place. Next up I finished up the clips, made from ukswrath's instructions in one of his build threads. I think I still need to bend the ends back at which point I'll probably install some fuzzy white velcro but these are pretty close. Still trying to find slotted-head screws to mount these but once I do this will be done. Once I had this stuff done, it's pretty much all done except for snaps and straps so I wanted to try everything on to see how it looked. Here's some taped together fitting pictures. Obviously some stuff is woefully out of place and looks ridiculous but I'm pretty stoked with how it all looks. By the time I got a useable back picture the parts were all falling apart and look kind of silly. In these pictures, the shoulder covers are just taped on. Once I stripped everything off, I glued those in place and then I got to work measuring and installing snap plates. I centered them 1" out from the edge and figure I will make my straps about 1.75" center to center on the snaps to put them under a little bit of tension to hold the pieces tight. Any thoughts on that plan? That's all the backside pieces, and then I'm out of clamps. Tomorrow, the clamps come off the shoulder covers and all of the snap plates and I can do the fronts. From there, I need to finish the TD and start cutting, heat sealing and putting snaps in my straps. I may or may not sew some or all of those. I also need to figure out the calf closure. I'm debating using SpiceCredits method with velcro or MoSc0ut's approach with tabs and straps with bra clips. I'm leaning toward that one at the moment. With that stuff done, I should be able to move on the helmet finalization and painting. Getting really close but the remaining steps seem more daunting to me than most of the stuff I've already done. And I keep forget the drop boxes from the belt. I need to find a rivet gun for that so I keep putting them off. I also kind of screwed trimming one of the parts so I may need to make some ABS past to patch that up. Not sure yet.
