Engineering trooper
-
Posts
140 -
Joined
-
Last visited
Content Type
Profiles
Forums
Gallery
Articles
Everything posted by Engineering trooper
-
 Ok, latest update: Starting to put the snaps on, did a fitting last night, and getting closer.. Need to fit my garter system so to glue in the snaps on the thighs, but found doing the snap plates first on the ab area is a necessity! Going to use double snaps on the back, as I need the reinforcement. Will experiment with the front to see how it goes.. Also, I got a thread from Trevor about making original style hooks for the connection between the biceps and the bells, see this link for details: http://www.whitearmor.net/forum/tutorials/article/37-howto-create-a-bicep-strap-hook/%27 After a lot of trial and error (tried to use boiling water, other issues) got it done. I used a candle versus the lighter recommended in the thread, with quick passes to avoid scorching, then did the bending slowly bit by bit. So next more snap plates, getting the tricep hooks done, and perhaps more fitting... Getting there!
 -
Ok, more progress: 1. Back cover strip for right calf complete. After drying will do Velcro 2. Applied Velcro to left back calf, glued sniper plate 3. Some trouble with back cover strip on right thigh: The top edges are about 1/4 inch off. Any suggestions? Do I trim the back top? Next will be finishing back strip on the right thigh, riveting the ammo pack. Then, onto rivets, snaps, and assembling the main torso! Right back cover strip glued... Velcro next! Mismatch at top of back right thigh Cut Velcro strips.. Sniper plate in progress...
-
So the holidays are done, despite a lot of family events, got some work done, so progressing. Left thigh is glued, ready to take the magnets/clamps off. And, reglued part of the right calf, again.. Will work on that this week to get it finally together. probably a bit more trimming.. Next goals are to finish the right calf, front and back, put the velcro on both calves, and get the right thigh done. See pix of my progress below..
-
Further update, 1 step forward, 2 back.. So the initial gluing for the right shin did not work well, misaligned, and was a bit too wide under the strip. So will be doing some trimming and regluing. So, with that, a couple of questions: 1. Should I strip off all of the glue from the shins/cover strip before regluing? 2. Had a small mishap with the sandpaper, got a scratch on the armour. Any thoughts on polishes, etc for this type of issue? On the good side, the left strip turned out great, and with some brainstorming (thanks to Shannon for the idea), used a chalkline type setup to set the line on the inner calf piece. That is now glued in the front, so hopefully tomorrow will be to do the back, and reglue the right side. See pix below. Also, got a really nice DeWalt storage box for my kit , 38" x 23" x 24" so will hold armour and my HWT backpack.
-
A few more updates: Got the right front calf strip glued (seems it was trimmed to the 20 mm length), and put the front strip on half the left side, will use the glued strip to measure cutting down the outer part and then gluing that part tomorrow. Will be using Velcro for closure in the back, putting the fuzzy part on the inner calf per recommendations. Here's a couple more pix>
-
Don't have the button plates glued on yet so that may be the difference?<br><br> Randy,<br> Thanks for the clarification on the strips. Now I can trim them and glue with more confidence!
-
Was working on my Stunt build and wanted to confirm the cover strip widths for shins and thighs. My RT Mod kit came with strips that are about 21 and 23 mm each, so wanted to make sure I apply them right.<br><br> I have seen that the front calf strips are about 25 mm, but wasn't sure about the back as I have seen 20 and 25 mm used.<br><br> The thighs are 20 mm both front and back?<br><br> Would appreciate any confirmation .<br><br> Thanks!
-
Grappling hook and comlink
Engineering trooper replied to RLH2515's topic in Build Threads Requireing Maintenance
Joseph, <br> Please add me also!<br><br> On a side note, there is a Bluetooth Comlink offered by Disney, got one off of EBay. <br><br> Thanks! -
Ok, so finally getting back to the build over the Christmas break. With the help of my future handler (Shannon) and my son, did a first fitting on all parts, excepting the legs. Pictures are attached, would appreciate any input, as I'm not sure if we got the overlap right at the certain joint areas. Seems like there is a big gap in the chest part, pointed at it in one of the pictures. Also did work on the calves, will be sanding and gluing within the next day. See attached, would appreciate any input. Thanks!
-
Latest update 12/13/16: So in the last week, I worked on my forearms. A bit harder to cut and measure, but with help from the family, got it done. Measured up with my undersuit, ended up cutting a lot of stock off, but that's what's needed for fitting. Hardest part was to draw the line for the 7 mm cut on the raised portion. Ended up that I pushed the piece down to the cutting board to make it flat, had my wife draw the line. After gettng that done, used the lexan scissors to cut (easier as the line is not straight), and did sanding. See pix below. Right forearm was done earlier, but waited a few days. Glued the left last night. Another learning moment was with the snaps. I posted that I'd done all of my web plates, and after watching a video by Ukswrath on doing snaps, found I had used the wrong side of the anvil (concave), so the male snaps had a curve. Luckily I tried last night to restrike the snaps on the flat side of the anvil, and it worked. Now more to correct today... Next, on to the calves... And yes Randy, Santa brought me more magnets from Lee Valley Tools, (even though I probably haven't been good, just annoying ). So progress should speed up a bit. See pix below, more to come! One last note: Thanks to everyone for the advice, offers to help and such. With the combination of information, the build is going much better, and with a variety of methods and designs that will make this a unique build!
-
Ok, so it has been a while since I have updated everyone, been a lot of things going on with work and home, as well as the confusion on my armour (how to do the but joints), but am finally moving forward. After a lot of input from Eric (Tolo) and Ukswrath, as well as a video sent to me by Rob at RT Mod, I was able to figure out how to do the but joint, and am working with the armour as I got it. Turns out even though the edges don't match, you can do a but joint with the raised edge fitting to the flat edge, just takes a little bending to get them to fit together. So, here is where I am: I trimmed the raised edge on the biceps (first cut was the hardest..), and did a fitting (using info from a You Tube video for a RT Mod build done by Panda Trooper), and got the markings for the proper fit. I found that using Lexan scissors to cut the curved edge, then a utility knife on the straight portions worked best. I used the score and snap method to take off the edges, which gives a pretty clean edge. After some sanding, I struggled with glue and magnets to get the right bicep together, but finally got it aligned. You will notice the trim strips are a bit long, will trim those after the glue sets. At this point, I only have enough big magnets to do one piece at a time, so it will be a slow process. I also built several snap plates in preparation for assembly. Had bought a set of nylon web plates with holes already done from Redforce, so I only had to do the snaps. Was fun pounding on the anvil... I plan to try to do a fitting for my forearms either tonight or tomorrow, want to keep progressing this week as the next several will be filled with a lot of holiday cheer, and no armour build time So here are a few pix of my progress.. 1. First cut is the deepest... holiday trimmings ! 2. Right Bicep finally glued and hopefully ready to go! 3. Web plates ready to go.. now to the rest of the armour!
-
Just to clarify the picture of the forearm armour is from Ukswrath's build. Waiting to get some confirmation on the attachment.<br><br> Also contacted Rob at RT Mod just to be sure what I received was was was ordered.<br><br> Should get confirmation soon, then on to building ...
-
With respect to the thighs, I think that was the initial problem I think when putting them together, my mistake. I updated the post, showing the raised edge to flat edge. Got some feedback from Tolo and Ukswrath on build, hoping that this clears up the issue. If I understand their feedback correctly, seems I should trim the raised edge down to about half of the cover strip (7.5 mm), and then but the raised/flat edges together, gluing with a cover strip. Picture from Ukswrath's RT mod build below. (Thanks Tony!!) Not sure how this will work on the inside strip reinforcement, but will check the pictures. Thanks to everyone for your input, hope to be back on track soon!
-
Found another problem: Seems the thigh pieces have same issue? One has raised edges for the strip, the other does not. See pix. Would appreciate input from anyone who has done a RT Mod kit.
-
So, hit a little snag on the way, hoping to get some feedback. Had a member of the local garrison stop by to review my kit, and give some advice (Thanks Trevor!) I had asked about the forearm parts, as they seemed a bit big, and not to fit together, as I had requested but joints. Trevor checked them, said looks like the back side had the joint cut off. Same for the upper arm pieces. So, am posting pictures to get a general opinion, as I think something went wrong with the kit construction as received. Another surprise was that the front cod piece is not attached to the lower abdomen. Rob from RT Mod indicated in the instructions that this was part of original build. Does anyone see an issue with having those attached with a snaps? Would appreciate any input! See below, missing the raised edge for a proper but joint. First fit for ab/kidney armor. A bit snug, but I can suck it in Shows separate piece for front cod piece..
-
So, the big box of plastic arrived today... and ..oh my... Good news is had been prepping for it, so got most of my materials ready. The bucket is already preassembled, so got a start there. Going to use Ukswrath's Anovos build as a guide. He's given me a lot of great advice.. I got my kit from RT Mod, so if anyone has any lessons learned from a build using that kit, I would appreciate any input. Here's a list of what I have as far as materials, and build: Neck seal - Darman Boots - TK boots Thermal detonator clips - Evilboy Gloves- Trooperbay Hand covers - justjoseph63 Canvas belt - Rob Kittell Holster -Gazmosis E11 - Hyperfirm with Trooper bay D ring, lenses and scope/counter (see pix) Underbody suit - Champion Varitherm amd Microfleece (going to try both ) Armour - ANH Stunt RTMod Materials: 1. Cut resistant gloves 2. E6000 (3 tubes!) 3. Plastic /metal spring clamps (30 or so) 4. Paints: Humbrol/Testors from TrooperBay set 5. S trim from Gas Pump Heaven (for bucket) 6. Utility knives 7. Tandy Leather snap set (along with a few special screw types given to me by one of the local garrison (Thanks Mike!) 8. Web plates (from TK-10666) 9. Garter system from Pencap510 10.. Rare earth magnets lent to me from another member of the local garrison (Thanks Trevor!) 11. Elastic (to be purchased soon!) So here is the stuff out of the box, and a a couple of pictures of my E11. Going to try for Centurion, (lofty goal, but worth the effort) , then add my pack/pauldron/pouches for HWT after acceptance of my ANH Stunt.. Let the games begin...
-
Thought I would post my build for the scope riser for my RT-97C (Hyperfirm purchased from Lewis). As the blaster came with a scope, but no riser, I had a few options. There is a nice 3 d printed version available from Europe that Lewis mentioned, includes the riser and scope, about $90, requires assembly, parts are resin I believe. As the scope Lewis sent was pretty nice already, and matched the main blaster, I wanted to try to make a riser first, and if that didn't work, get the 3 d kit. Did a few trial and error attempts using copper tubing and a 1/2 inch metal tube, but came up with the following design: Here's what you need to build it: 1. Brass Craft 3/8 in ID Hose Barb Tees (3) (available at Lowes) 2. 1 set of 2 8-32 Wood Insert nuts (2) (Hilllman brand worked for me, available at Lowes) 3. 8-32 x 1 Socket Hd cap screws (2) 4. 1/2 inch pipe (not plumbing type) for sleeve (comes in about 3 foot length) 5. 5/16 inch threaded rod (comes in about 2 feet lengths) 6. E6000 glue 7. 2 radio type knobs with long stems (got mine at a flea market) Build steps: 1. Cut 2 pieces of threaded rod about 4 inches and 3 1/2 inches respectively 2. Cut a piece of the 1/2 inch pipe about 1 1/4 inches 3. Take 2 of the tees, cut off one end flush, the other cut the barbs so there is about 1 and 1/4 barbs left. 3. Use a drill bit 17/64 size and drill out the 3 tees (both ends for the uncut tee, along the length where the barbs are cut of the cut tees ) I used one a size up by mistake, so the fit was not as good with the threaded rod. 4. Thread in the 4 inch long rod through the longer portion of the tee, so threading sticks out on either end equally. Next thread on the cut T pieces. 5. Using a rubber mallet, hammer the assembled T into the 1/2 inch metal tube. Should go up to about 1 barb on the long part of the barbed tee. 6. Thread the 3 1/2 inch long rod to the bottom of the main tee 7. If the threading is loose, take the pieces off of the rod (s), coat them inside with E6000, then reassemble them to the rod. Glue should not be needed for the tube/tee fit. 8. Screw the wood insert nuts into the uncut parts of the tees, as seen in the picture. Leave a few threads out as they work well to fit in the holes for the scope. 9. Paint assembly (matte black works) excepting exposed threaded rod 10. Using the 17/64 drill bit drill into the pylon mount on the main RT-97C blaster, to a depth of about 1 inch 11. Coat the inside of the hole on the blaster using E6000 12. Insert the assembled riser, with the sleeve onto the blaster, and let dry Knob assembly 1. Drill out the opening of the knob to snugly fit the socket head of your bolts.. 2. Secure the socket head bolts with E6000. Final assembly is just to fit the scope on the riser, then screw in the knobs. For reference, I oriented my riser as I had seen in most of the pictures, with the knobs facing on the opposite side of the braided tubing. I also bent the middle Tee a bit so it fit the holes better on the scope (put it at a slight angle) For a more detailed build, I also drilled out parts of the molded scope to put in lenses, used a couple of Halloween props (steampunk monocle for the smaller end, spyglass lens for larger side) Hope this helps a few troopers. Worked for me! Here's a few more pictures of the completed item:
- 1 reply
-
- 1
-

-
Pack is pretty well completed, excepting putting on the harness, some inner padding and some battle damage. All credit to my son Luke for coming up with the idea to make paper templates for marking the holes for the drywall screw mounting. Take a look...
-
PM sent, requesting 2 please! Payment sent.
-
Just got my RT-97C from Lewis, and it is amazing !<br><br> I would highly recommend anyone who wants this model of blaster to get from him!
-
Build progressing well, all boxes completed, did my first initial fitting on the oil pan base tonight, picture attached. (Just noticed I had the radio upside down, will fix that in final fitting ) Will do the cutting of the oil pan in the next few days to secure the boxes.. a bit nervous about that, but got great guidance and diagrams from Joseph to help the process. Harness fitting will have to wait until the armor has been completed, but will do some weathering on the pack to continue the work.
-
Thanks for the advice, got one from Lewis. He said that I would need to get a scope riser as he doesn't mold that part . Anyone have a pattern or 3D file for that part ?<br><br> Thanks!
-
Anyone know where to purchase an RT-97C ?<br><br> Thanks!
-
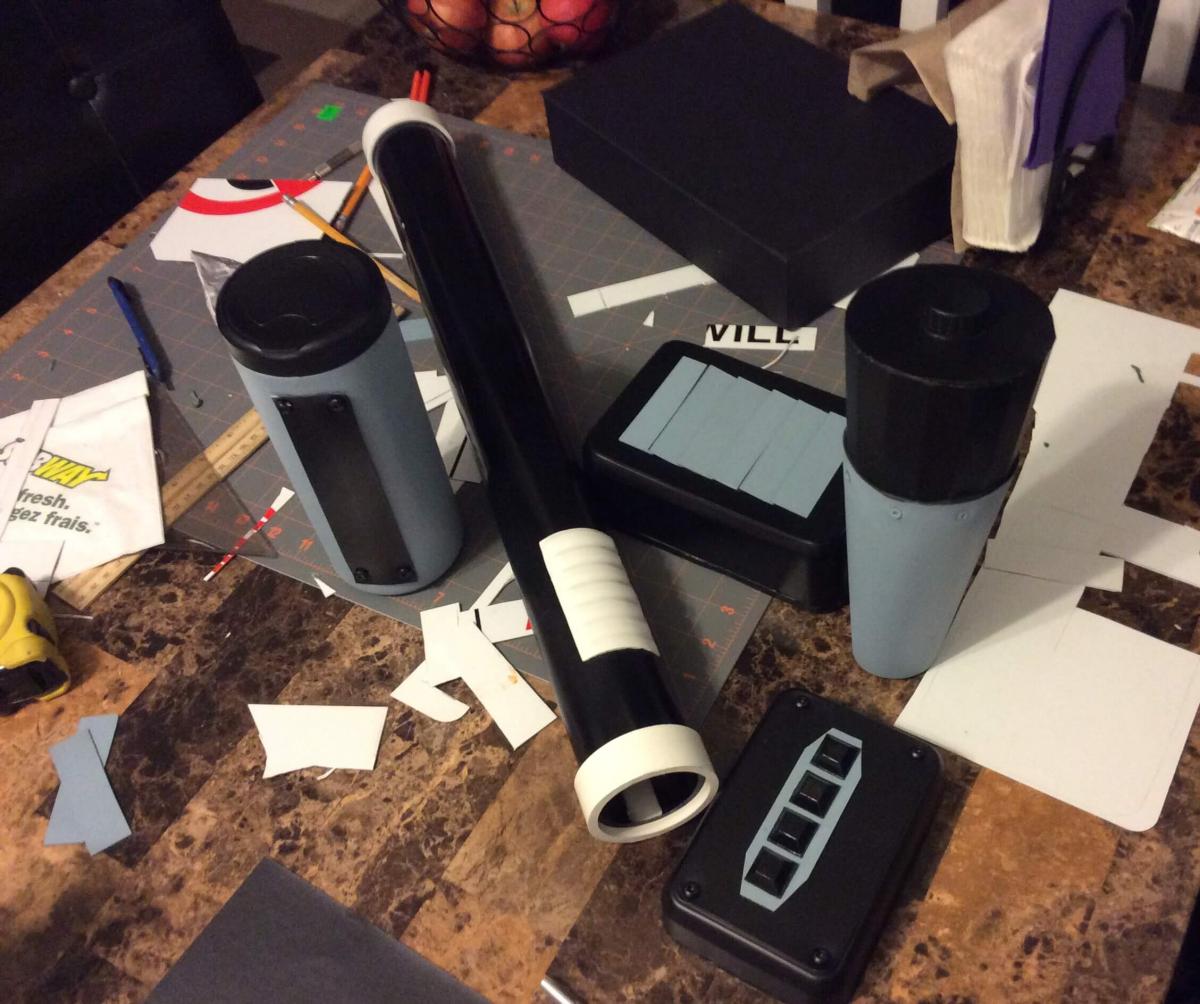
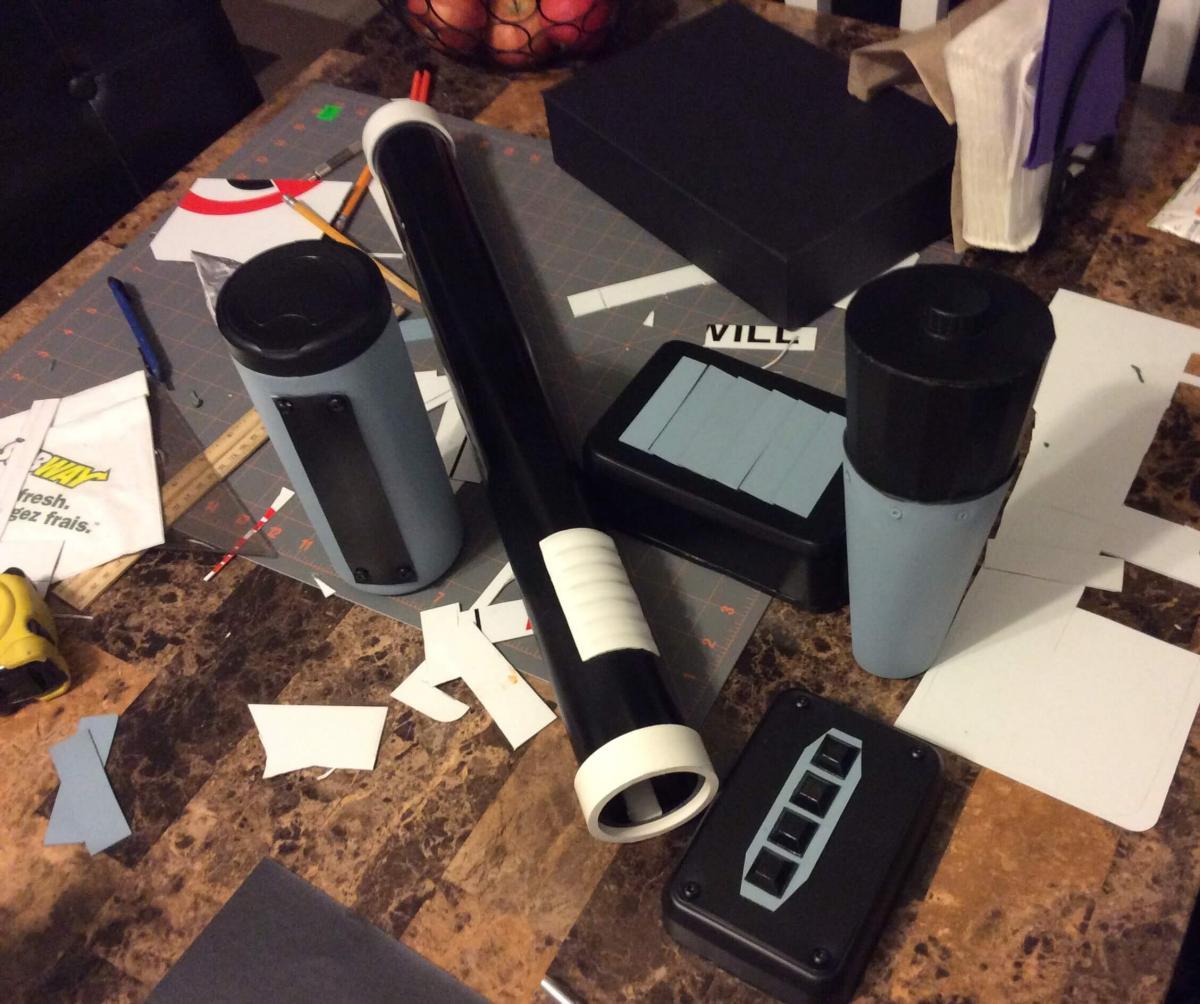
So, as I am still waiting for my ANH stunt armour to arrive from RT Mod, I decided to get started on my HWT pack, thanks to Tony (Ukswrath) for the guidance and encouraging me to document the build. Also, thanks to Joseph (justjoseph63) for providing input and advice on using the alternative oil pan for the build. <br><br> Bought all of the materials over the last few months, some of the supplies in Canada, other specific items (like Valspar spray paint) could only get in the US while visiting family. It was a bit of a difficult start as the armour strap I purchased was really hard to cut, so ended up using a pot of boiling water to soften it up. After trimming it, then rubber banded the strap to a piece of the pipe and used the water to mold it to the pipe. <br> Did the cutting of the boxes using a band saw at my Father in law's workshop, pipe caps at my Dad's shop (as they each have awesome sets of tools and lots of space!).<br> Assembled and painted the individual assemblies back home in Ajax. <br> I used the plastic signs for the covers on my boxes just for a little more durability. <br><br> I have about half done, see picture.<br><br><br> Will probably finish soon, but final assembly will have to wait to see how it will fit on my stunt armour. More details to come!
-
Thanks! Will keep checking.