


darthanael
-
Posts
118 -
Joined
-
Last visited
-
Days Won
1
Content Type
Profiles
Forums
Gallery
Articles
Everything posted by darthanael
-
 TK-12207 requesting 501st access. Link below. Thanks! http://www.501st.com/members/displaymember.php?userID=26383&costumeID=124
 -
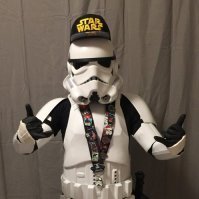
So I'm uber close to taking my submission photos. Just sent my application in for the 501st membership. Been in contact with my GML. The build is almost complete! Just need to finalize some TrooperTalk details and install my fans (which I finally got a switch for). Wanted to share some photos real quick. I'm a pastor at a church and I actually got to use the suit already in a volunteer appreciation event that we had. It's was pretty fun! Everyone flipped out when I entered the room in that suit! And then for Halloween we had a Trunk or Treat event and my wife and I did a Disney trunk. And since Disney owns SW now, a Stormtrooper kinda makes sense, right? Lol. Either way I didn't care, I was gonna wear my suit!! So here's where the bummer part comes in. I noticed half way through the trunk or treat that the edge of my forearm was eating away at my right rubber hand guard. There's some pretty serious damage and now I'm worried I won't be able to take my submission pics until I fix it. Any thoughts? Has this happened to you guys? Sent from my iPhone using Tapatalk
-
So lemme back track from my last post a bit. The glove fiasco has finally been solved. I had first posted about use CA glue to attach the hand guards, but it ended up completely back-firing on me and peeling up. Someone suggested using the Loctite plastic bonding system so I purchased that. Turns out it was completely dried out from when I bought it at Home Depot so I just tried using E6000. Everyone says that's what they used so why not. I traced my hand on an old, foam workout mat I had and cut it out. I used that inside the glove as a flat surface to apply pressure to. Then I weighted them down with dumbbells and cardboard. I waiting not 24 hours, but 48 hours before checking again! I also forgot to mention I thoroughly washed the gloves and guards three times each to make sure there was no oil or dirt that might jeopardize the gluing process. I also slightly sanded the glove and the back side of the guard. I did everything!!! But sadly, behold... Once again, the glue stuck perfectly to the glove and not the guard. What is it with these things??? I pretty much immediately determined I was going to keep the E6000 on there, NOT order new gloves yet again and finally try using the Loctite plastic bonding system like my initial plan entailed. I went back to Home Depot and this time made sure it wasn't dried out before purchasing. I once again washed the guards three times with soap and even with rubbing alcohol as well. I followed the instructions for the Loctite and watched the anticipation. It worked! I can't believe it actually worked. This stuff is truly magical. It basically made the guards one with the gloves. No issues any longer. Problem FINALLY solved! Sent from my iPhone using Tapatalk
-
Thanks Gary!! And yes I couldn't stop smiling! This is a dream come true. Sent from my iPhone using Tapatalk
-
Alright so, I've been a little busy as you can see, haha. I plan on going back and documenting the rest of my build, but I couldn't help but post this shot out of sheer glee and excitement. I feel like I'm looking at someone else's build, is this really me??? Obviously I'm missing the drop boxes (waiting on a friend to borrow their riveter), but other than that, how do I look?? Sent from my iPhone using Tapatalk
-
Hey guys! I painted and removed the stencils on the vents. It looks like this one got a bit close to the edge. Will that be alright for approval? Sent from my iPhone using Tapatalk
-
Hey guys! Finishing up the helmet details! Below I've applied the trooper bay stencils for the vents. I've also painted the ear bar, how does it look?? Sent from my iPhone using Tapatalk
-
Ok perfect thanks! I need to keep my OCD in check lol. Sent from my iPhone using Tapatalk
-
Hey guys got a calf question. This my left calf. I'm wanting to apply the Velcro, but the edges still have a slight gap (pictured below). I tried to hot water bath it so they lay flat against each other, but it's being pretty stubborn. Would a slight gap be acceptable for centurion? Sent from my iPhone using Tapatalk
-
Wow did not know this! Thank you guys for the pro tip! I will for sure make that edit. Sent from my iPhone using Tapatalk
-
Yeah that makes sense to me too! I'm for sure gonna use that storage method and removal technique. And great to know about the Velcro! Thank you! Sent from my iPhone using Tapatalk
-
Ok one more thing for the night and then I'm going to bed! I painted and glued the button plates. Wow they really make the ab plate come alive! Ok I'm done! Goodnight! Sent from my iPhone using Tapatalk
-
The next round of paint happened on my helmet. Man this thing is looking amazing. Did the second coat on the frown, second coat on the vocoder, second coat on tube stripes, cleaned up the tube stripes with a tooth pick, q-tips and brush cleaner, applies the first coat of grey to tears, ears, and all traps. Let me know what you guys think of the tube stripes and the border thickness on the traps! Oh and I installed the hovi's!! Please let me know if the positioning is cool on those! Dang this helmet though. Beautiful! Sent from my iPhone using Tapatalk
-
I've installed my sniper plate and I'm stoked with how it turned out. Taking a pointer from FencingCorvetteTrooper's build thread (https://www.whitearmor.net/forum/topic/42075-fencingcorvettetroopers-triple-trooper-build-ap-anh-stunt/), I pushed one side of the left shin up to help with the "warpness" of the sniper plate install. I also gave the sniper plate a boiling hot water bath to give it some help. Here's how the back looks without me forcing it into shape. And here's how the back looks forcing the top to align (which I eventually do permanently using the hot water bath method). It took a lot of manipulating with the hot water to get everything to align, but I'm very pleased with the final product. I really wanted the sniper plate to sit flush against the cover strip and that was not easy, but not impossible! See below. I glued the front and the sides at the same time using E6000. Only thing now is one more hot water back to have the back edges sit flush with one another in order to help the Velcro stick. The other shin is already done with this process! See below. I used the 25mm typical cover strip measurement for the back of the shins. Industrial strength white Velcro is being used to attach them. Only thing I'm worries about is that I used the adhesive that comes on the back of the Velcro. Just wondering if it'll be strong enough to take the wear and tear of trooping. We'll see! Sent from my iPhone using Tapatalk
-
Oops forgot to post this pic of the kidney and cod strapping plates installed. Sent from my iPhone using Tapatalk
-
Alright guys just a few updates. I've been producing and installing my snap plates! I've been cutting strips of 1" wide ABS and then cutting those down to 2" long pieces. Then I measure and mark the holes which is easy (divide an inch in half and then measure in a half inch on both ends of the long side). Needless to say, I'm doing the double snap, elastic strapping method. And then for the parts that need a bit of a curve, I'm using the same measurements on nylon. I'm making marks with white-out being that its black. And then using a soldering iron to burn the holes. I'm also using a lighter to burn the edges so they don't fray. For spots like inside the shoulder bells my measurement is a bit different being that I'm only using single snapping on the arm pieces. Those snap plates I'm measuring to be 1" L x .75" W. For the snaps I'm using the Tandy Line 24 snaps and using a basic snap setter/anvil system. As long as you hammer straight down on a solid surface it turns out alright. I've also been carving off the edge of the hole in the abs that the snap goes into, if that makes sense. This is in order for the snap to sit flush against the abs. Sorry don't have a pic for that. Sent from my iPhone using Tapatalk
-
Got your email Mark! This really helps! Thank you so much for your help!! Sent from my iPhone using Tapatalk
-
Alright guys, something else, lol. Need some input on what to do about the shoulder strap covers. I got from one thread that there should be 3 bumps over the chest plate. But when I do that on mine, the back of should strap covers go way too far back. Do I need to lower the chest or back plate? Or can I shift the shoulder strap cover more to the front? Once again, aiming for centurion! Thanks in advance!! Sent from my iPhone using Tapatalk
-
Thanks so much Dan! That helps me!! Sent from my iPhone using Tapatalk
-
Alright guys, would love your input on my thigh ammo belt. I did a ton of research and couldn't find where to drill the holes on the actual ammo belt. The CRL simply says they need to be in the upper corner. I ended up doing 12mm in and 10mm down. Hope that's okay! Also, I tried to use Ukwrath's suggestion of placing the ammo belt 1/4" in from the edges, but mine didn't quite wrap around that far. It's more like 3/8" in on each side. Is this okay?? Goin for centurion here!! Sent from my iPhone using Tapatalk
-
Hey guys! Sorry again for lack of updates lately. There's been a lot of birthdays going on and I've also been once again doing a lot of research, specifically on helmet electronics (Talking system and fan system), but more on that later. My new leather strapping came in for my holster! As you can see, the color looks spot on! And the width is perfect as well. Excited to install these! I also finally assembled my TD pack!! This has been a long process being that my first go at the painting ended up dripping so I had to completely sand all the paint off and start from scratch. But here we are! I bent the edges in a little because I wasn't happy with how it was laying on the pipe. I wanted it to be more fit to the curve of the pipe. Stoked that Mark has already painted the heads on these screws to be black, one less thing I gotta do! I also applied some soft Velcro to the brackets to prevent scratches to my beautiful armor! I got this amazing tip from another build thread (I plan on giving a reference list of all the threads I learned from at the end of my build!). And then I began gluing some more snap plates in place. The finish line is in site!! Sent from my iPhone using Tapatalk
-
Hey guys! Question for ya. Does the bottom edge of the ab plate need to align with the edge of the kidney notch cut out? The rivet side on mine lines up perfectly, but then the right side is a little off. Will this still pass for centurion? Left side (rivet side): Right side: You're help would be appreciated as always! Sent from my iPhone using Tapatalk
-
ANH Original Stormtrooper Build-Anovos Kit
darthanael replied to Admiral Snackbar's topic in ANH Build Threads
Stoked for you! You got this! Your next step would be to start digging into the forums and researching various builds. I'm not fully done with my build yet, but one thing I've learned is that building your suit is about 75% researching and 25% actually building! Sent from my iPhone using Tapatalk -
Hey Jeff! Thanks for the kind words! Honestly, I've seen some other troopers do it and I just think it looks cool haha. I've also heard it makes it harder to see your into your helmet so you can maintain that mean Imperial persona haha. But the cooling thing definitely sounds like it would make sense. I'm just figuring this all out as I go! Let me know if you need any help!
-
Took a break from building and cutting in my hot and humid florida garage and started painting the bucket today! Woohoo! First coat is on everything. I free-handed it. I feel like masking sometimes gets in the way and it can actually create more work in the long run if things don't go according to plan. While I had the blue Humbrol out, I hit the button plates too. I traced circles with a pencil first. For most of the buttons I used the 15/32 circle and for that top right, smaller button I used the 13/32 circle. Does that button need to be smaller or should it be the same size as the others? Either way, I think one coat is gonna do it for those buttons. The layer of paint I put on there is pretty dang thick already. Side note: nearly poured out all my blue Humbrol on the table by accident. That wasn't fun. These dang cans are so tiny and hard to handle man!! Also, I desperately need paint thinner. Been trying to use all kinds of other things to clean these brushes, but to no avail. Gonna pick some up tomorrow. Let me know what you think guys, thanks! Sent from my iPhone using Tapatalk
