


johna1177
-
Posts
55 -
Joined
-
Last visited
Content Type
Profiles
Forums
Gallery
Articles
Everything posted by johna1177
-
Well I've been making slow progress on assembly and even slower progress on posting. currently working on gluing all the required pieces, but thought i would post an update on some of the components recently purchased or on order. Boots from TKBoots. Received these as a gift from the wife and daughter. Gloves. I've been crossing into Windsor, Ontario lately for work and thanks to the tip in MechaPumpkin's build thread I stopped in at DollarRama and picked up a couple pair for $2 CAD/ pair. Latex Hand Guards. Courtesy of justjoseph63. Great quality and service (and they smell good too). you can find these in the Ongoing Sales here E-11 Blaster Picked up this beauty from Brett at Quest Design. His contact is [email protected]. Eventually the plan is to build my own, but this makes a fine first piece to the start of my collection. ...and finally, on order, a set of Hovi Mic Tips from keith. They can also be found in the Ongoing Sales here. Hopefully in the next day or two I will post another update. This time on some actual armor progress of the completed forearms and biceps. Those forearms are giving me fits.
-
Cut more cover strips between last night and today. My lesson for the day...ALWAYS score the ABS with the glossy side down. It seems obvious, but when i started I wasn't paying attention to that detail initially, but learned my lesson. Additionally, scoring with a utility knife tends to leave a small lip along the cut edge on the side its cut on. It's a much cleaner appearance to sand the edge of the side that will get glued to the armor. I spent an hour and 57 minutes between the two days cutting strips in addition to the 57 minutes i spent originally, but now i have an assortment of 15mm, 20mm and 25mm cover strips along with some surplus that are 23mm. Total time cutting strips: 2 hrs. 54 mins.
-
Ok, so i just spent the better part of an hour cutting finish strips. For my efforts I now have five 27" long sets of 7/8" wide strips. I'm currently using a razor knife and straight edge, cutting one side flush then a second cut 7/8" over from the flush cut. As a result I have the following questions: 1) anybody have a solid method for cutting consistent strips quickly? 2) My strips are about .08" (2 mm) thick. Is this a typical thickness? This is approximately 33% thicker than the armor itself. I assume this is because the strip material provided with my armor is perimeter material which is not subjected to the vacuum forming process and as a result is not drawn out like the armor. Total time: 57 mins.
-
Thanks. I'll check those out.
-
I'm looking for sellers for some purchase products. I've researched them on this site but some info is years old. I would like to get additional, current feedback on the available vendors for the following: 1) Hovi mic tips 2) affordable boots - I have actually acquired my trooping boots from TKboots but I'm looking for a backup/ display pair. My intention is to display my armor in my recently completed home theater so I am looking for a very affordable pair of backup/ display boots, even if they require painting. 3) neck seal 4) glove details
-
Reworked the TD control panel. Removed, scribed, trimmed, sanded and glued. Here's a side by side comparison of the original (left) and the new TD (right) Total rework time: 53 mins.
-
so after pulling the control panel off my TD I squared off a piece of PVC pipe and laid the square end against the end of my control panel and scribed a new line. the result...my control panel wasn't square. So I cut and sanded each end square. This is the dry fit result (please ignore my finger). I'm waiting for it to thaw out before gluing it. I think the result is much more consistent.
-
makes sense but i just took a scale to the control panel. the width of the panel is 5-1/4" through the middle. it's nearly 5-1/2" wide at each end. I'll try that. thanks.
-
I just took a look at it and although the pic distorts it slightly, it is not a consistent gap between the end caps and the control plate. I hope the E6000 is as forgiving as everyone says it is, because i'll need to pull that apart and trim/sand the corners to bring them in line with the rest. good catch though, thanks.
-
Then i got to work on something that was actually rewarding...building of my thermal detonator. For this I used TK bondservnt's tutorial, Thermal Detonator Assembly AP/TE - How to assemble, which can be found at http://www.whitearmor.net/forum/topic/32042-thermal-detonator-assembly-apte-how-to-assemble/?p=412959. I think the only thing I did differently from this great tutorial was the following: 1) I applied a couple layers of painters tape to the areas where the holes would be drilled to reduce slippage of the drill bit. 2) I used 0000 steel wool to polish the aluminum straps 3) I used loctite on the screw threads inside the TD instead of super glue. This was mainly because it's all I had at the time. Here are some pics of the finished product. I have a feeling I'll be making more of these in the future. Total TD construction time: 5 hrs 10 min
-
After cutting everything it was time to clean up and smooth out all the edges. For this I used various devices, including the edge of my knife, a rotary tool and a sanding sponge. However, the tool i used the most was simple sandpaper. I found 3M's SandBlaster Pro did an excellent job and held up well also. Its available at the big box hardware stores as well as some local options. Total sanding time: 3 hrs 14 min I found it best to sand from behind the finished surface as opposed to in front. If I slipped off the edge i was sanding it would mark up the interior of the armor not the visible, shiny exterior.
-
I should note that the areas where the cover strips will go were trimmed generously. I will trim those more as i begin fitting each piece.
-
While i have been working periodically on my build I haven't been as diligent about posting. Thought I'd do some catching up in that department. I purchased an untrimmed AP kit (except for the helmet) so i spent a lot of time trimming. As a result i though it might be a good idea to share some of the tips i learned along the way. Additionally i thought it might be useful to some other new builders like myself to know how much time i put into each step. I'm a little particular and sweat the details too much most likely so anyone trimming their own kit for the first time may find it doesn't take them as long as it took me. some of those tips are: 1) I found a great resource for trimming techniques can be found on YouTube. Just search trooperbay and you'll find a 10 part series containing some good information on trimming (and assembling) a kit. Another good source for info is whomever you purchased your armor from assuming they are one of the vetted supplies. 2) If you are using a razor knife to score and snap your ABS, i find it best to make the first bend away from the cut. 3) Make several shallow scores as opposed to one deep one. If you think you're pressing too hard you probably are. You'll find you have greater control making very light cuts. 4) where you have a corner at or near 90 degrees I drilled holes in the corner first and cut up to the hole leaving a radius in the corner that is more resistant to cracking and tearing. 5) always draw a pencil line in advance, tracing the location you intend to cut. Its much easier if you can readily see a guideline where you are cutting. 6) In areas with multiple curves, I made relief cuts and first snapped at the relief cuts prior to snapping along my cut. 7) some areas had very little extra ABS requiring trimming. This made it difficult to bend at the score by hand. For these instances I used a set of linesmen's pliers (regular pliers would work as well) for added grip and leverage. 8) Probably not my greatest tip, but I will occasionally use my gloved hand as a stop block as i'm trimming to prevent the blade from cutting into the ABS as I'm rounding or approaching a curve. Total cutting time: 9 hrs 22 min sample of pre-drilled corner hole Relief cuts Use of pliers where it was difficult to snap by hand for my shoulder bells there was a double bend that had to be trimmed away. I made an initial rough cut along the flats adjacent to the bells. After removing the material from the initial cut i was left with a bell that laid flat on my work surface. From here I used a carpenters pencil (flat) and placed it on top of 2 washers, stacked, to draw a uniform line on the bells and trimmed along that line.
-
AP Armour with ANH Centurion as Goal - Build Thread
johna1177 replied to MechaPumpkin's topic in ANH (Stunt and Hero)
Where'd you buy the resin cast blaster? -
Well I finally got to work on my build. its been about 5 month since my big brown box arrived. Today I trimmed the forearms and tried them on for fit, which of course brings me to my next series of questions: 1) How tight should the forearms fit (or any pieces for that matter)? should they fit tight enough that my forearms hold them in place or should they be loose enough that the elastic between the biceps and forearms is the only thing that holds them in place? 2) Is it ok to cut the connecting strips at a taper or should they be a consistent width from one end to the other? I taped them together temporarily, replicating a 5/8" strip. The result is this: The pic below shows slightly more clearance at the wrist which is why I ask about using a tapered strip.
-
that is an awesome idea. i've been painting various things for years using masking templates and never once considered that. thanks a million.
-
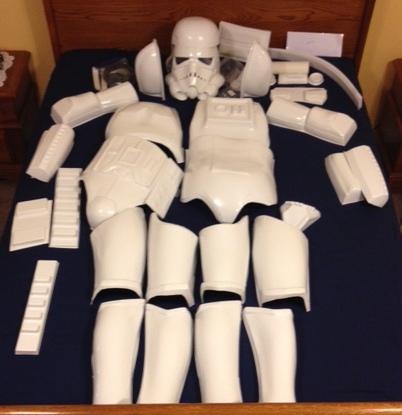
Big brown box day arrived. Special thanks to the guys at AP. I think i'll resist the temptation to start with the most rewarding piece (helmet) and start small. I'm thinking thermal detonator or forearms. My build will be ANH stunt. In the mean time I do have a couple of helmet questions that i'm hoping the experience available on these forums can help me with. I'm planning on painting the helmet. 1) i've seen conflicting info, even on whitearmor, as to the color of the tube stripes. I've seen French Blue and Mediterranean Blue. Which is correct? I'm in the US so testor paints are more readily available to me. 2) for level 3 certification "Tears/traps shall be hand painted or use decals that emulate hand painted ". Is the use of a masking template still considered "hand painted"? Thanks to all John
-
does it need to be painted gray or is the natural gray color of the conduit acceptable for all levels of approval?
-
Is that 2" gray PVC pipe?
-
Supply list for your OT TK build....
johna1177 replied to justjoseph63's topic in Getting Started - Read this First!
anyone else unable to see the first photo? -
i've seen a few posts warning against originalstormtrooper.com. anyone use one of their DIY kits for their armor? if so, were you successful at obtaining membership into the 501st? thanks

