

SupRsloth
-
Posts
182 -
Joined
-
Last visited
Content Type
Profiles
Forums
Gallery
Articles
Everything posted by SupRsloth
-
Progress update 1 for the week. Finished both forearms including internal cover strips. Finished both biceps but still need to add the internal cover strips. Might be wearing the wrong shirt but it's good for getting dirty.
-
Even better! Sent from my SM-G900V using Tapatalk
-
Thanks for the feedback! Definitely had the under suit on when I did my fitting. So I think my sleeves will be OK. Just concerned about getting the glove through with the flexible hand guard attached. Think I just maybe need to try it out. Sent from my SM-G900V using Tapatalk
-
Super excited tonight. Finished my first piece of armor (left forearm). Silly question.... So the Anovos kit comes with Velcro strap on hand guards. I plan on utilizing glued on flexible hand guards. It appears that this will be a pretty tight fit to have the gloves on and then put the forearm on. Should I have made the lower forearm a bit larger to accommodate this?
-
Very little progress this week. I spent 2 hours on the left forearm and this is as far as i got. I measured, remeasured, test fit, remeasured again, cut, test fit again, and then finally glued on my first cover strip. I'm thinking the next ones will go faster.
-
Thanks for the feedback kman! I was worried about the bell tearing as well. Reinforcement scrap ABS piece added and seems pretty sturdy now. I'll add the triangle to the frown this weekend (I never would have noticed that so thanks for pointing it out) Thanks again. Sent from my SM-G900V using Tapatalk
-
 Could just e6000 a small scrap piece behind the crack. Worked great for a similar crack on my shoulder bell Sent from my SM-G900V using Tapatalk
 -
Added some army tactical helmet padding in place of the hard hat liner (found on amazon.com for cheap). Much more comfy and seems to keep my bucket from wobbling. Repainted the frown as well... Looks cleaner than it did before but not sure if it's good enough. I'm not much of a painter...... That's all for now.
-
A little more progress this weekend. Slow and steady. Finally finished trimming all the pieces including removing the return edge from the forearms. Took advantage of the warm weather and plasti dipped the inside of my bucket. I did three coats with spray on plasti dip and a bit of brushing in the tough to reach spots. Seems to have added a nice bit of rigidity.
-
Correct. I used the score and snap. I did fine on all the rest of the pieces just got careless on this one. Appreciate the advice. Where's a good place to get the Lexan scissors? Amazon? Sent from my SM-G900V using Tapatalk
-
Put a small piece of scrap on the inside with a little E6000. Worked like a champ. A little sanding and it will be good as new! ----------- Sent from my SM-G900V using Tapatalk
-
Great idea. Definitely have enough scrap laying around[emoji1]. I want to make sure the cut doesn't spread to the outside and reinforcing should help. Reading all the build threads that contained lots of bandaids I thought it was a good idea to invest in some cut resistant gloves. [emoji12] Sent from my SM-G900V using Tapatalk
-
Thanks pattrooper. I'll give it a shot. Sent from my SM-G900V using Tapatalk
-
Got a little careless with the knife when trimming my shoulder bell. You can see the cut towards the outside of the bell on the very top of the picture. Any recommendations on the best way to fix?
-
Last work for today. Finished trimming the thighs, the cod piece, and the chest. Getting quite the pile of scraps.
-
Progress for this morning.... Finished trimming the forearms and shoulder bells. However I was a bit careless with the knife on one of the bells. In the picture below at the very top there is a line that extends to the left where I accidentally cut through the return edge. Anyone out there have suggestions for how to repair!?!? I'm fairly certain that if it doesn't get repaired it will rip through to the outside of the bell. I'm quickly learning I am not the greatest with a knife.
-
Was only able to get the biceps trimmed out today. Used an X-Zacto to score and snap based on the trim lines. That was a lot harder than I thought but I started to get the hang of it on the second piece. Sanded down the edges with a dremel and took a final pass with some regular sand paper. Feels like progress.
-
Started with cleaning up the return edges on the bucket. Before: After: Lenses put back in: Will wait to do the other work of plasti dipping the inside of the bucket, putting in padding in place of the hard hat system, and cleaning up some of the over spray on the teeth. It's 8 degrees F here in Iowa today and plasti dipping in my basement is probably not a good idea. So onto the trimming.
-
Getting things unboxed and setup.
-
This is my very first armor build so any tips, tricks, and suggestions are very welcome. It's definitely going to be a slow one. Working full time and attending grad school, so I'm trying to squeeze some build work in as I can. You can find my E11 Blaster build here. http://www.whitearmor.net/forum/topic/32624-suprsloth-doopydoos-e11-blaster-build/ And of course we'll start off with the big brown box pic.
-
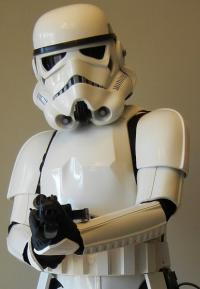
Here's the finished product. Definitely not as detailed or awesome as a lot of the builds I've been following on this site. But I'm still pretty happy with the results.
-
1. The screws for the grip to the body are different lengths. One was about .5" and one was slightly shorter. They go all the way to the inside but not past the black plastic inside the main barrel. This is because the receiver bolt needs to pass over top of this area. I also used two pins towards the front where I couldn't put screws as well. 2. I drilled out and used full length screws in the muzzle. Don't use very long screws and I found tapping the holes helped as well. Thanks for the positive words. It's been fun and challenging.
-
1
-
Finally had a chance to make some more progress this weekend. Ground out the end cap. Added some hardware to the scope Made a scope rail Mounted the counter and the scope to the rail. Painted all the parts. Started with a grey primer. Then a simple flat black for all the parts except for the grip which I did in gloss black. Letting everything dry over night and hopefully finish assembly this week.
-
Thanks for the feedback. Much appreciated. Already have the broken items repaired just waiting for the glue to fully dry. I thought the dowel is a bit big as well. I'll see what the next smaller size looks like. Sent from my SM-G900V using Tapatalk
