


shaunpug
-
Posts
196 -
Joined
-
Last visited
Content Type
Profiles
Forums
Gallery
Articles
Everything posted by shaunpug
-
That's perfect. Thank you so much. I knew something like this was on here!
-
Hey all! In preparation for Halloween (we're a Star Wars family!)I'm trying to find the best way to outfit my three-and-a-half-year-old as a stormtrooper... I myself have multiple TK's as well as a biker Scout so I'm not an amateur with builds, but I honestly have no idea what the best way to do this would be... I haven't been on the forms in a while so I thought I'd ask first to see if there have been any great builds for kids? Sent from my SM-G965U using Tapatalk
-
Would love to know some more details on the paintjob...pai ting up a DLT-20a right now and would love some info on your workflow/paints used Sent from my SM-G935V using Tapatalk
-

Freduster's ANH Stunt TK build (RS Props, aiming for Centurion)
shaunpug replied to Freduster's topic in ANH Build Threads
They forgot mine as well [emoji58] Not only that, but they made other small mistakes with my accurate assembly pack...I think maybe they were in a hurry but it's frustrating nonetheless. Sent from my SM-G935V using Tapatalk -
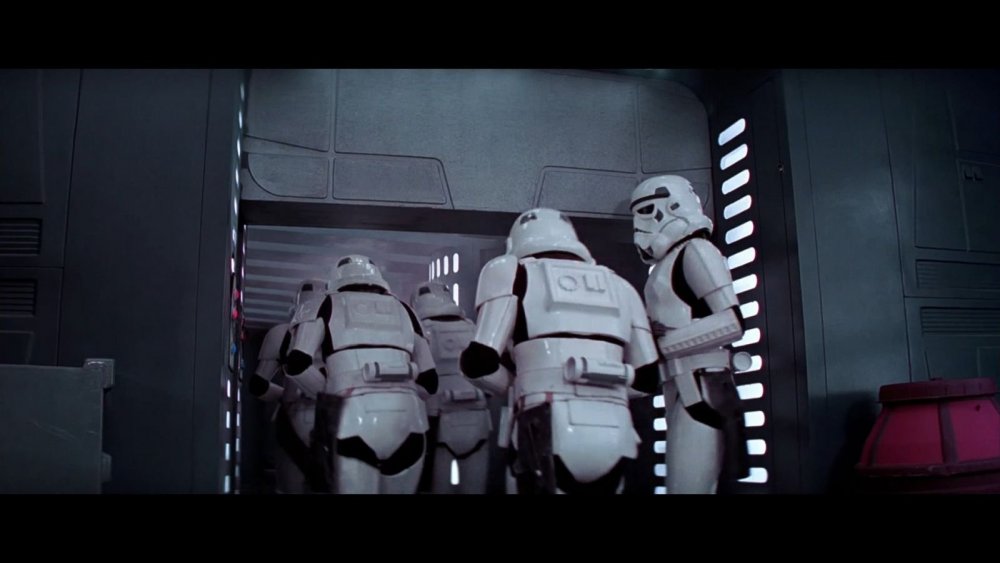
Hey guys! Putting together a couple belts and as I was working I grew confused as to which side of the belt closure overlaps... In this screen you can actually see both sides being used... So which is it? Left over right or right over left? Does it matter?
-
Just checked it out. Could be a good place to start. Interesting that there are so many ANH versions but no ESB! Sent from my SM-G935V using Tapatalk
-
Hey guys, does anyone either have an existing 3d model of ESB handguards, or otherwise be willing to make a model for printing? I have seen many ANH 3d models, but no ESB. Any help would be amazing! Sent from my SM-G935V using Tapatalk
-
I've always wanted an MKII! Sent from my SM-G935V using Tapatalk
-
Walter deserves this 100%. Wouldn't have my armor finished if not for him and Tony.
-
TK-25415 Requesting ESB Centurion Status [Anovos] [329]
shaunpug replied to shaunpug's topic in Request Centurion Status
Thank you guys! Awesome! Sent from my SM-G935V using Tapatalk -
TK-25415 Requesting ESB Centurion Status [Anovos] [329]
shaunpug replied to shaunpug's topic in Request Centurion Status
Just realized I made a mistake in the thread title. I forgot to add "ESB" and (ANOVOS). I apologize for the mixup! -
LINK TO EIB: http://www.whitearmor.net/forum/topic/37273-tk-25415-requesting-esb-eib-status-anovos584/ Name: Shaun Pugmire 501st Id: TK-25415 FISD Forum Name: shaunpug Garrison: Golden Gate Garrison 501st STATUS: https://www.501st.com/members/displaymember.php?userID=18734&costumeID=126 Information Armor: ANOVOS Helmet: ANOVOS Blaster: Sterling Conversion Height: 5'11 Weight: 150lb Boots: TKBoots Canvas Belt: Kittel Hand Plates: TM Neck Seal: ANOVOS Holster Maker: Gaz Sorry it's taken so long!
-
Phoenix Props Aluminum pipe build with Arduino!
shaunpug replied to shaunpug's topic in Build Threads Requireing Maintenance
Hey T-Jay, Ya, everything is mounted to the ruler rather neatly (I have a few videos of ukswrath and I putting it together...I was going to share those a bit later), but accessing it after attaching the trigger grouping is much more difficult. I'll have to grind down the JB weld to detach it. Hopefully it's an issue I can solve without doing that. I'm looking into it now, and in the meantime I'm working on putting together my M19 kit from Brian using the lenses from that monocular you gave me! -
Hey everyone! I'm an avid scale model builder and am currently working on a bunch of the Bandai kits. I've hesitated to start on my Stormtrooper kit in earnest however, because I really want to mod it into an ESB (the kits come ANH style by default). I have access to a friend's 3D printer but I'm in need of some 3D scans and model files of some ESB handplates that I could scale down and print out for my kits. Does anyone already have this, or might possibly be able to make some easily? I have ESB plates of my own, but no way to scan them (and also no knowledge on how best to do it.)
-
Phoenix Props Aluminum pipe build with Arduino!
shaunpug replied to shaunpug's topic in Build Threads Requireing Maintenance
Made quite a bit more progress bit I hit a snag...I got everything installed into the barrel (video to come on that later), and also got the trigger grouping mounted with JB Weld. I routed the trigger button and weapon switch through making sure to test everything along the way. Installed the T-tracks (more successfully this time!) and started brainstorming a way to mount the trigger in such a way so that when the trigger is pulled the hammer pushes down the trigger button. Everything was working great until suddenly there was no longer sound!! After so much work this is extremely disheartening. I don't know what to do! Sent from my SM-G935V using Tapatalk -
Phoenix Props Aluminum pipe build with Arduino!
shaunpug replied to shaunpug's topic in Build Threads Requireing Maintenance
Laying everything out...I'm thinking of mounting everything up on this ruler (I'll paint it black first) and sliding the whole assembly down the pipe. As far as power is concerned, I've found a more elegant solution than a battery...a portable cell phone charger! Using a micro-b extender, I will connect the power to the Arduino nano. This way I can just unattach the clip and recharge the battery. Sent from my SM-G935V using Tapatalk -
Phoenix Props Aluminum pipe build with Arduino!
shaunpug replied to shaunpug's topic in Build Threads Requireing Maintenance
Gracious, it's been ages! Having a kid does that to you! I should be posting significant updates soon on this. So far, I've finished the code and wired everything up! Here it is working, albeit with just 1 LED. I'm going to add few more. http://cloud.tapatalk.com/s/5816df002f353/VID_203730628_043536.mp4 Sent from my SM-G935V using Tapatalk -
Phoenix Props Aluminum pipe build with Arduino!
shaunpug replied to shaunpug's topic in Build Threads Requireing Maintenance
I'm trying! Haha \m/ -
Phoenix Props Aluminum pipe build with Arduino!
shaunpug replied to shaunpug's topic in Build Threads Requireing Maintenance
This has been one of the hardest things to get right. I think part of what looks wrong in my most recent pictures is due to the fact that none of the screws are in. They really tighten things up and put things properly in place. \m/ -
Phoenix Props Aluminum pipe build with Arduino!
shaunpug replied to shaunpug's topic in Build Threads Requireing Maintenance
Absolutely! I'm not one for diagrams but I can take plenty of pictures. I'll also post the code when it's done. \m/ -
Phoenix Props Aluminum pipe build with Arduino!
shaunpug replied to shaunpug's topic in Build Threads Requireing Maintenance
Ground the trigger assembly down (still need to grind down the hammer...I need all the space I can get.) It fits properly flush against the receiver now. Also did some more soldering and planning today. Code needs some work to accommodate the specific pieces I have, but it's coming along! Also opened up under the receiver. This will allow wiring to travel into the trigger assembly. \m/ -
Phoenix Props Aluminum pipe build with Arduino!
shaunpug replied to shaunpug's topic in Build Threads Requireing Maintenance
Quick update! Tested everything on a breadboard and it all seems to work well! Currently we are wiring everything up and trying to plan placement. This is definitely the most tedious part of this whole build as things are continually changing. The lack of space for electronics in an ESB blaster has been challenging but I think I've got it figured out where everything will go. At this point my to do list looks like this: 1) Hollow out remaining bits of Resin bolt (We needed the extra space). -Doing this means that essentially there is no bolt. There is only a thin piece that once was the bolt that now carries all of the controllers. The Arduino Nano, SD card chip, and audio amp chip are all going to be housed here. 2) Acquire different speakers: Even the new speakers I bought won't work for this. While they sound great, they are much too small to output good volume. The solution to this problem came from a round speaker my buddy had laying around that wound up being the perfect size to fit in the receiver. One speaker will be placed at the back of the "bolt" and the spring actually fits perfectly into the speaker....hard to explain but it will make sense with pictures. The other speaker will be placed at the front of the bolt. This should put out enough volume. 3) Grind down trigger assembly: Still haven't done this, but it needs to be done in order for the hand guard to sit properly on the receiver. After this is done I won't have a place to screw the trigger assembly into the receiver. I'll now need to attach it to the receiver using JB Weld like the other parts. Doing this actually gives me a bit more wiggle room for wiring so I think this will end up being a good thing. -
Phoenix Props Aluminum pipe build with Arduino!
shaunpug replied to shaunpug's topic in Build Threads Requireing Maintenance
I purchased some different speakers than skyone recommended because they were too big. I technically have less space in an ESB build for electronics than there would be in an ANH build so I'm having to be a bit more creative. The speakers are 20mm wide compared to the much larger speakers. \m/ -
Phoenix Props Aluminum pipe build with Arduino!
shaunpug replied to shaunpug's topic in Build Threads Requireing Maintenance
Waiting on my friend to get back from vacation to help me test everything and then it's just a matter of stuffing the wiring in! \m/ -
Phoenix Props Aluminum pipe build with Arduino!
shaunpug replied to shaunpug's topic in Build Threads Requireing Maintenance
Started on hollowing out the resin bolt and clip to make room for the battery and various chips and wiring. I decided to essentially only keep a very small thin portion of the bolt as it will be stationary in this build. It will be a shim of sorts to shield all the wiring. \m/

