

Somatophylax
-
Posts
255 -
Joined
-
Last visited
-
Days Won
2
Content Type
Profiles
Forums
Gallery
Articles
Everything posted by Somatophylax
-

TK-? My AP build
Somatophylax replied to Somatophylax's topic in Build Threads Requireing Maintenance
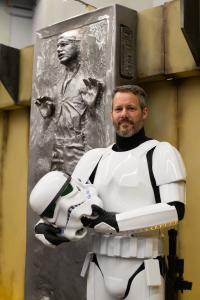
Hello everyone! While still waiting for my application to go through, here are a few more pics... Me and R2-T54 Nice gang picture (I,m just left of the droid) Me (on the left) and the rest preparing for a fight -
TK-? My AP build
Somatophylax replied to Somatophylax's topic in Build Threads Requireing Maintenance
Good morning Troopers! I just had my first trooping experience with the 501st at the 2015 Montreal ComicCon. It was painfully awesome! Painful because my feet and shoulders hurt But after spending 15 hours in the armour over 2 days, I already miss it. Here are a few shots: Me (on the right on both pics) Me and Godzilla Me getting Force-choked. Look at the guy's t-shirt Elevator selfie. I'm in the far back, left Buckets off. I'm right next to R2-T54 And the 501st group pic! For the next trooping experience, here are new items to add to my gear: - Dr. Scholl's gel soles - Advil - Extra set of cotton gloves to wear under the rubber ones Cheers! -
TK-? My AP build
Somatophylax replied to Somatophylax's topic in Build Threads Requireing Maintenance
Both ideas are interesting. I'll see what I can do. Thanks! Stéphane -
TK-? My AP build
Somatophylax replied to Somatophylax's topic in Build Threads Requireing Maintenance
Merci! J'ai cherché pendant au moins 1 mois avant de me décider. Bonne chance! -
TK-? My AP build
Somatophylax replied to Somatophylax's topic in Build Threads Requireing Maintenance
Hello again, So... after a lot of testing with both a headset and a throat mic, I have decided that the headset is just too impractical. However, the throat mic is not easy to set up for me, probably because I have a skinny neck and it doesn't hold tight enough on me, even with the neckseal on. This was annoying because unless I really raise my voice, it won't pick it up. So I decided to do a cheap experiment with a thin strip of masking tape. I simply tied both ends of the mic together like this: I don't really feel it. It's comfortable. And since masking tape doesn't stick well anyway, it doesn't leave marks on my skin. But most important... the mic performs wonderfully now! It picks up my voice easily, even if I speak softly. And under the neckseal, it won't show anyway. So, I'm glad that this issue is solved. I also set the iComm to only one specific static burst because some of them I find too loud and annoying. Cheers! -
TK-? My AP build
Somatophylax replied to Somatophylax's topic in Build Threads Requireing Maintenance
Hi guys, Still waiting for that Legion approval to come in... I tried to do something about the thicker green lens, but to no avail. Heat gun, boiling water... It simply will NOT change shape. No matter what I do with it, it turns back to its original flat shape. So I guess that was a waste of money. I would have liked to see if there were videos on the TrooperBay site about this... but their site has been down for quite a while and I don't know what's wrong with them. So I guess I'll keep the original thinner light green for this coming event on the weekend. Stay tuned! -
TK-? My AP build
Somatophylax replied to Somatophylax's topic in Build Threads Requireing Maintenance
Hello, Still waiting... So I got the box to carry the outfit around. Seems like quite a common format as far as I've seen. I live on the 3rd floor of an apartment building. Damn thing is heavy! Even when empty. Once the armor is in, I can barely lift it! Wow! They could have put handles on it on the sides. Right now, there's no real grip on it. I guess I'll have to roll it down, one step at a time (up and down). That suck. But I need something to carry it all. So I should suck it up and deal with it. Maybe I'll buy a house next year... a house with no stairs So... to all you more experienced troopers out there: Aside from the armor, boots, accessories, and undersuit... What else do you carry in it? Tools or anything for repairs? Superglue? Tape? Spare batteries? Cheers -
TK-? My AP build
Somatophylax replied to Somatophylax's topic in Build Threads Requireing Maintenance
Hello everyone! While waiting for my application to go through... I decided to follow Germain's advice about the shoulder bridges. So I prepared a pot of boiling water in order to dip the bridges (one at a time) for a minute. Honestly, I was mostly scared that the heat would affect the E-6000 where it is glued to the chest. But it seems all is well. I did it twice per bridge... holding them with work gloves because the ABS was hot. After about 30 seconds, I dipped them in cold water. I think it went pretty well. Here's the result: Merci Germain! -
TK-? My AP build
Somatophylax replied to Somatophylax's topic in Build Threads Requireing Maintenance
So... Here's another puzzle for you more experiences builders. I am trying to put in the darker, more solid green film that I got from Trooperbay instead of the light flimsy one that came with the suit. So I drew a template with a piece of paper, then added about a centimeter extra, and cut them. I them wrapped the edges with hockey tape. But here's my problem. That lens is so stiff it won't let me put it in the bucket. No amount of tape will force it into the curved surface inside. It will just pop out after a few seconds. So now I'm stuck. Any suggestions? -
TK-? My AP build
Somatophylax replied to Somatophylax's topic in Build Threads Requireing Maintenance
Hi I was sure the tube stripes had to be. But you are right... The CRL for Centurion only specifies the other areas (the grey ones)... not the tube stripes. Yeeehhh!! One major thing I won't have to do! Thanks for the intel. -
TK-? My AP build
Somatophylax replied to Somatophylax's topic in Build Threads Requireing Maintenance
Thanks for the suggestions. I'm not sure how I would proceed with the boiling water thing now that the bridges are glued to the chest. I tried it in the past and got a slight curve out of them. But not as much as I had hoped. As for the chest, I'll try to put it on higher, and have the back a bit lower at the same time. The top opening depends really on how much I need to be able to pass my head through the hole. I tried with a shorter chest/back connection, but my head wouldn't fit. Next time I can put on the armor, I'll check it out. Thanks -
TK-? My AP build
Somatophylax replied to Somatophylax's topic in Build Threads Requireing Maintenance
So now... what size BOX do I need to carry the suit around? Are you able to put the bucket in it as well or do you carry that in a bad separately? -
TK-? My AP build
Somatophylax replied to Somatophylax's topic in Build Threads Requireing Maintenance
Here you go fellow troopers! My application (with pics) has been submitted. I'm waiting now. With my special Emperial-issued lunchbox Thank you all for your support, your help, your suggestions! Can't wait to go trooping with you! ZERT FINISH LINE LIST: - For Legion membership: - Take pictures and apply for membership - For trooping: - Velcro on boots/greaves to prevent them from spinning Cheers! -
TK-? My AP build
Somatophylax replied to Somatophylax's topic in Build Threads Requireing Maintenance
Hello fellow troopers! What a beautiful day! And tomorrow is a holiday here in Quebec. So... What's in the news today? I received Echo's fan system. It is now in my bucket. It fits so nicely I don't even think it needs velcro. And I can hide the battery packs behind it. Then, I decided to install the helmet pads inside. But I came across a problem. You see, when I put the bucket on, my eyes are already leveled with the bucket's eyes. So as soon as I put a single pad in the top (inside), my eyes wouldn't go higher than the nose of the bucket. So, unless the pads I got are too thick (they are regular air-soft pads), then I got them for nothing maybe. But, I decided to place a few, mainly above each ear and near the forehead. That helps the bucket remain snug on my head and prevent it from wobbling. And now... the moment you've been waiting for for the last 2 days... the Sniper Knee Plate experiment! I removed the locking clamps and, with a huge sigh of relief, the plate remained in place. Like I said yesterday, it's not perfectly aligned on the right (which is between the legs), but the left side looks great I think (and that's the side that shows more from other people's point of view). YES!!!! My armor is officially completed for Legion membership! Tomorrow, my friend will pass by, help me don the full suit, and we'll take all the pictures I need for Legion, EIB, and Centurion applications. FINISH LINE LIST: - For Legion membership: - Take pictures and apply for membership - For Centurion level: - Paint the tube stripes (i.e. paint over the current decals) - For trooping: - Install Echo's fan system in the bucket (when it arrives) - Install padding in the bucket - Velcro on boots/greaves to prevent them from spinning Cheers! -
AP Armour with ANH Centurion as Goal - Build Thread
Somatophylax replied to MechaPumpkin's topic in ANH (Stunt and Hero)
Hey Trooper! I tried with the helmet padding (similar to the ones you installed here) Oddly enough, it doesn't work for me. I also have an AP build. But I realized my eyes naturally are leveled with the eyes. As soon as I put one pad on the top (inside), my eyes won't go higher than the nose of the helmet. So unless my pads are much thicker than yours, I guess I got them for nothing You didn't have a problem with them? -
TK-? My AP build
Somatophylax replied to Somatophylax's topic in Build Threads Requireing Maintenance
Good evening Empire! Well... The final stage of armour-building has started. After glueing the central part of the Sniper Knee Plate last night, I now glued both wings. I had to buy locking clamps to do it because the regular spring clamps I had kept sliding out of position. Now, when I remove the clamps tomorrow, I wonder what will happen. Will it stay or will it pop off? From both sides now. The left looks good and is the most visible anyway. The right is less perfect, but it will have to do otherwise I'll be pissed. And now that "building" and glueing is done... I decided to attach the aker/iComm system in the chest. I've made a few tests, with both the throat mic I got and the one that came with the aker. I can say I cannot find an easy way to use it well. It seems I need to speak loudly enough for it to pick up my voice. As for the throat mic, it works 100% well only if I hold it tight with my hand. Otherwise it won't pick up my voice half the time. I don't know yet if I just haven't found the right place on my neck or if it's because I have a skinny neck and the mic is not tight enough. I'll have to experiment some more. But this is kind of annoying. I hope I'll figure it out before my first trooping on July 4-5th. I also got a postal notice today that my order from Echo (his bucket fan system) has arrived. So I'll pick that up tomorrow after work, So, this Wednesday is a holiday here in Quebec. If I can get someone to help me, I will do my Legion application pictures. YESSSSS!!!!!!!!! FINISH LINE LIST: - For Legion membership: - Sniper plate on left greave - Take pictures and apply for membership - For Centurion level: - Paint the tube stripes (i.e. paint over the current decals) - For trooping: - Install Echo's fan system in the bucket (when it arrives) - Install the iComm/acker system in the chest - Install padding in the bucket - Velcro on boots/greaves to prevent them from spinning Cheers! -
TK-? My AP build
Somatophylax replied to Somatophylax's topic in Build Threads Requireing Maintenance
Hello, I had a VERY busy weekend with my other costuming group specialized in historical re-enactment (mostly vikings) - It's them here: http://www.whitearmor.net/forum/topic/31514-festival-du-film-des-riverains/ And I had my daughters with me for father's day during that viking weekend. Now... back to the Empire! I finished making all the snaps for the ab/kidney/crotch-butt plates. And... drumroll please....... The initial glue with the Sniper Knee Plate! I just glued the middle after determining again and again the best position in order to facilitate the 2 sides after. It's crooked by I don't care because that's what we have to endure with that EVIL piece of equipment. To be continued tomorrow. Again, the Sniper Knee Plate is the final thing in order to apply to the Legion. Cheers -
AP Armour with ANH Centurion as Goal - Build Thread
Somatophylax replied to MechaPumpkin's topic in ANH (Stunt and Hero)
LOL. Love the blood spill! Stéphane -
TK-? My AP build
Somatophylax replied to Somatophylax's topic in Build Threads Requireing Maintenance
Hello again, I wanted to make a post about accessories. Aside from the armour and blaster... there are other things all good TKs need. So here's my tribute to: - Gloves - Boots - Garter belt - Imperial-issue socks - Aker/iComm/throat mic set - Neckseal All hail... the accessories! -
TK-? My AP build
Somatophylax replied to Somatophylax's topic in Build Threads Requireing Maintenance
Well hello Empire! A bit of work done this morning. I decided to finish the work on the right thigh. So I riveted the battery pack in place. I used double-capped rivets like these: At first, I tried to hammer it in using a punch and a hammer (duh!). But the angle was so bad I ended up crooking the rivet itself. I was scared it would break off but I managed to fix it a wee bit. Next I tried with vices. You need the kind with a c-shape end... not one with the cutter in-between (of course!). And so... Double-cap rivet from the outside and the inside: BUT, before putting on the 2nd rivet, I added a little piece of industrial-strength velcro at the bottom of the front ridge, and inside the battery pack. This should prevent it from flapping up and down if it turned out to be a little loose. And voilà ... Fully assembled right thigh: I also painted the rivets on the battery pack and the ab/kidney pieces (yes Eric... I left the crotch rivet as is). Although it'll need a 2nd coat when it's dry. So, what do I have left to join the Legion? Glue the Sniper Knee Plate. That's it! I'm almost there! FINISH LINE LIST: - For Legion membership: - Battery pack on right thigh - Sniper plate on left greave - Paint the ab/kidney/thigh rivets white - Take pictures and apply for membership - For Centurion level: - Paint the tube stripes (i.e. paint over the current decals) - For trooping: - Install Echo's fan system in the bucket (when it arrives) - Install the iComm/acker system in the chest - Install padding in the bucket - Velcro on boots/greaves to prevent them from spinning Cheers! -
TK-? My AP build
Somatophylax replied to Somatophylax's topic in Build Threads Requireing Maintenance
This one. On your right thigh, there's almost no horizontal ridge at the bottom -
TK-? My AP build
Somatophylax replied to Somatophylax's topic in Build Threads Requireing Maintenance
Ok. That's a relief I noticed on your pic that you trimmed a lot of the back ridge on the thighs... That made them shorter and surely helps you walk or bend down better. Right? -
TK-? My AP build
Somatophylax replied to Somatophylax's topic in Build Threads Requireing Maintenance
Do I need to cut off the last inch of the front strip? On the right leg, it will be hidden anyway. -
TK-? My AP build
Somatophylax replied to Somatophylax's topic in Build Threads Requireing Maintenance
Well... I might as well post #100 in my tread. I just want to say "sorry" for stuttering on #98-99. I guess I pressed POST twice with the mouse. -
TK-? My AP build
Somatophylax replied to Somatophylax's topic in Build Threads Requireing Maintenance
Greetings, After a break yesterday, here's the progress report for today. I got a set of rivets today (thanks Eric!). So I measured and drilled holes and installed the rivets on the ab & kidney plates. I have to paint them white now. as well as the crotch area (don't you just stare at my crotch please) Note that all these rivets are purely decorative because I'll use snaps to attach the sides and under parts. So here are all the necessary snaps being glued. I also have a pair of rivets for the thigh battery pack. But I'm not sure how to proceed to install them. The tutorials and treads I've checked so far all show the final results... but not how they did it. So it will come soon. FINISH LINE LIST: - For Legion membership: - Crotch and ab/kidney rivets to install (when they arrive) - Battery pack on right thigh - Sniper plate on left greave - Paint the ab/kidney/thigh rivets white - Take pictures and apply for membership - For Centurion level: - Paint the tube stripes (i.e. paint over the current decals) - For trooping: - Install Echo's fan system in the bucket (when it arrives) - Install the iComm/acker system in the chest - Install padding in the bucket - Velcro on boots/greaves to prevent them from spinning Cheers!
