


MoSc0ut
-
Posts
519 -
Joined
-
Last visited
-
Days Won
4
Content Type
Profiles
Forums
Gallery
Articles
Media Demo
Posts posted by MoSc0ut
-
-
Welcome and good luck with your build! Let us know if we can be of assistance.
Sent from my iPhone using Tapatalk
-
Brian, I truly admire your dedication to perfection. Your stuff looks great. The scopes I ordered never showed up so I am reordering more today and will be doing a build thread on them when the new ones finally get here.
Sent from my iPhone using Tapatalk
-
 1
1
-
-
Congrats on your approval! Time to start collecting smiles!

-
Welcome! If you have any questions, don't hesitate to ask.
-
Welcome! If you have any questions, don't hesitate to ask.
-
Welcome! If you have any questions, don't hesitate to ask.
-
Welcome! If you have any questions, don't hesitate to ask.
-
To add to what Joseph said, it is also a good way to see sets of completed armor and ask questions as well. I think my garrison has just about every type of armor available and you get to see the various details up close before pulling the trigger on your chosen set.
Sent from my iPhone using Tapatalk
-
1
-
-
Out of curiosity, is the contact information provided on page 1 still relevant? I've been thinking about getting the AM trooper kit if I'm gonna go OT style....problem is when Iwent to the website listed on another forum there was almost no contact information or numbers or ANYTHING that would help me acquire or find out what I need to do to get it. I come across ebay stuff all the time but like it's been said, don't buy the ebay junk, it's junk.
The first post is constantly updated. It is the "go to" place for new troopers. The contact info for AM is listed in the section about the armor. Send an email and they'll get back to you. Patience is the key, they get a lot of requests and for most of the armor makers it is a side hobby. Like the rest of us they have jobs and families and pull armor in batches. Every vetted maker is on the list because they are good communicators and have demonstrated a history of a quality product and reliable customer service.
Good luck with your journey in becoming a plastic space man!
Sent from my iPhone using Tapatalk
-
1
-
-
Just came across this after taking the plunge and going with a WTF kit. Bookmarked for building reference thanks!
If you have any questions feel free to hit me up! I tried to cover as much as I could but when you get in the fog of building your forget to take some pictures.
Sent from my iPhone using Tapatalk
-
Every time you post an update I am floored at your talent and skill. I wish I had a third of your knowledge! Great stuff! Thanks for sharing with us.
Sent from my iPhone using Tapatalk
-
1
-
-
That's my helmet too!
Sent from my iPhone using Tapatalk
-
1
-
-
how do you know Which one is left and which one is right?
The bottom part swoops forward kind of like a human ear. Cup your hand around your ear like your trying to hear something better, that's the shape to use as your guide.

Jim - TK50899
-
Hey Emma! Good to see you back! <br><br><br>
The gaps look fine to me. But... and I hate to say this... to me on my small phone it looks like you've got the ear on the wrong side. I've been looking at a screen used lid to compare... and I can't get the link with the pic to work from my phone. <br>
Can anyone confirm this?
.....um.....yep......that ear is on backward/the wrong side
 ....
....
Jim - TK50899
-
Welcome back Emma! We've missed seeing your progress. We had an impromptu armor party in my garage today! Worked on some shimming and how to use ABS paste today.
Your gap will be fine. If you want that third rivet to hold you need to use a back up washer on the inside. As you discovered the ABS is too soft to hold that together by itself. As for being asymmetrical, well it's supposed to be, the ANH stunt helmets are all kinds of wonky! Looks great by the way. Can't wait to see more!
Jim TK-50899
-
2
-
-
I need to make tool box with these special tooling ,, checkering and a tool to take scopes apart LOL
Adam Savage ( Mythbusters / Tested) makes some awesome cases he does a neat video on weathering a faux NASA case that he built for his microscope.
Jim - TK50899
-
1
-
-
Not that my opinion matter a whole lot, but I agree that the painting of the recesses and the weathering / shading is what gives it the "animated" look. I think it's less environmental weathering and more like a "reverse highlighting" to make the details really stand out. That's my two cents. I was always a champion of this costume mainly for the fact that a lot of the kids we interact with would recognize this instantly. Many parents nowadays will let them watch Disney Channel long before introducing them to the OT.
Jim - TK50899
-
2
-
-
It looks right to me. In fact I think this is the same guide I used. Instead of nylon webbing I used a piece of rubber matting that is used to line the bottom of tool boxes. That way it will last much longer and without stretching. It was a pain in the butt to set the split rivets, because the material is much thicker, but in the long run it will be worth it.
Jim - TK50899
-
1
-
-
Looks great. You'll surely be done by the R1 premiere at this rate!
Jim - TK50899
-
1
-
-
So after some brief testing, the magnetic closures seem to work really nicely to keep the shins closed up. Very happy with how they turned out so far. I even had someone try one on while wearing jeans. I made him move around a bit in it to see how it would perform, and I didn't see any signs that the shin wanted to open up. I'll need to troop in 'em before I feel completely comfortable giving these the thumbs up, but it's promising so far. They stay closed on me while going up and down stairs, so... yay!
I finally tackled my replacement kidney and butt pieces this past week. I created a new return edge on the kidney (at the bottom only! I've learned from my mistakes...) and shaped both pieces in hot water baths. I had to use a heat gun to flatten out the creases in the return edges after shaping the pieces in hot water. (I finally have my heat gun techniques down! Woo!) I haven't done much trimming on the sides of the kidney and butt at all.
Last night I was able to get all the brackets assembled on the back/kidney/butt pieces and try it all on together. Just about everyone kept assuming that I was a Legacy. Just because I'm a woman in white does not make me Legacy, thank you.

My first thought after seeing the pic below was, "Um, does this armor make my butt look big?"

And the answer is, "That's no moon..."

The back plate has been resized to fit me, but the kidney and butt plates need some trimming in a major way. I also have to trim more at the shoulders where the back and chest pieces meet. I will tend to that this week for sure.
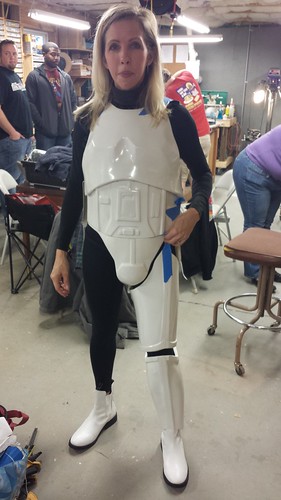
The front seems good, though, so that's a start. I still need to trim my thigh tops more than I expected to. This was the first time I had tried on so much of my armor at once. In the past, it's always been an arm section here, a shin there. It's kind of cool to see how it's all beginning to come together, but I'm also seeing that I still have (what feels like) a long way to go.
Here's what's left:
- Thighs trimmed and fitted. Cover strips to complete.
- Sniper knee and ammo boxes added to shins.
- Trim kidney and butt plates to size.
- Complete inside strapping at kidney, shoulders, and cod
- Install snaps on ab and cod
- Install snaps/elastics on shoulders
- Install shoulder bridges (want to reinforce these before installation, see here)
- Create garter for thighs
- Paint bracket screws white
- Assemble belt/drop boxes
- Rivet holster to belt
- Attach button plates on ab
I'm not including the work I still need to do on the lid. The hurdle on assembling it is a very low one for me because I've already completed my ATA bucket. When I finish my armor, I'll get to the helmet, and I know it'll be a quick assembly. So I'm not counting the lid for now.
Huge thanks to David, Leigh, Melissa, Sarah, Brent, and others at the armor party for helping move my progress along.

Everything is looking good! This is the point where everything just starts falling into place. You'll be trooping before you know it and just in time for the R1 premier!
I suggest using Chicago screws with a bit of thread lock on the holster to belt attachment. Rivets tend to leave a little pokey bit even when done right. They are approvable up to centurion plus if you ever want to switch out for a different/better holster you can more easily.
Jim - TK50899
-
2
-
Yeah finding a original mg81 flash hider is a daunting task.... im sure very few made it to the states.... The grease gun flash hider wasn't used very much and was not made with the same quality as the mg 81. This one has been kept clean and dry I bet most have rusted away. You do not see a lot of pictures of the grease gun using the flash hider.. Every mg81 had one
When I first joined the Army in 1993 our units tracked vehicle mechanics still carried "grease guns" part of the BII (required equipment that goes with the item) was the flash hider. Our armored was constantly misplacing and ordering new ones mostly because we never had them mounted on the weapon. When we finally turned them in we found dozens of them all over the supply room and weapons vault. We turned in 4 with the weapons as required and the rest got tossed in the metal recycling on post!
 Had I known I would have grabbed these up!!
Hindsight is always 20/20.
Jim - TK50899
-
1
-
-
Grata idea! I may upgrade my shin closures in the near future with this! I just love magnets. I think I may make a wood template to do the "ABS button holder" so I don't use up a magnet.
Sent from my iPhone using Tapatalk
-
1
-
-
Wow! Great Job! I have a question. I've been looking at armors, and I had been trying to decide between anovos and ata before is tumbled upon your thread. The armor looks great. My biggest concern is that I have zero experience building anything but the occasional model kit, so I'm admittedly somewhat terrified, but I want to give this a shot. Do you think I could get this armor together using time, patience, and other peoples experience such as yours?
Absolutely! Think of it as a big model kit. I had never done anything like this beforehand. I consider myself pretty handy meaning I am familiar with tools and how to use them. I learned everything from reading threads like mine. I just filled in some gaps and kind of compiled together what I learned as best I could. Feel free to message me with any questions and I'll be happy to answer or point you in the right direction!
I really love my WTF kit. I have several friends with ANOVOS kits and they are not holding up so great. As for ATA the only negative is that you can wait a considerable amount of time to get it bug it's a great kit. It's what I almost bought.
Sent from my iPhone using Tapatalk
-
1
-
-
That's not humbrol blue. Gawd.
Humbrol French blue you mean.
Lol!
Sent from my iPhone using Tapatalk
-
1
-
M38 Hollow Core Scope Project 2016 - Bulldog44
in Build Threads Requireing Maintenance
Posted
Ack! Sorry! I should have been more clear. The monoculars I ordered to to strip for parts didn't arrive. Your kit made it just fine and is amazing! I've been wanting to put it together for some time. In the mean time I have been practicing my weathering techniques!
Sent from my iPhone using Tapatalk