


usaeatt2
-
Posts
1,134 -
Joined
-
Last visited
-
Days Won
6
Content Type
Profiles
Forums
Gallery
Articles
Everything posted by usaeatt2
-

New thread does not appear in forum New Content scroll...
usaeatt2 replied to usaeatt2's topic in Forum Help & Support
Problem solved...I'm an idiot. Found the options with Germain's visual reference - I had it set for "Content I have not read". I always go back an re-read for grammatical errors after posting (which is why nearly all of my posts are edited). Since I've re-read them, they disappear from "New Content". I changed the setting to "Past 24 hours" and I see my posts now. Thank you, Derrek and Germian! -
THANKS ROY! $40 a set PLUS free shipping from the Netherlands? I'm in! YOU'RE THE MAN!!!
-
Too bad I can't LIKE something more than once...
-
New thread does not appear in forum New Content scroll...
usaeatt2 replied to usaeatt2's topic in Forum Help & Support
No options to the left. The only choice I see is "View New Content". Maybe I need to update my browser...nope, doesn't work with Google Chrome either. Is there a setting to show other options? -
HOLY COW! Thanks for all the spirited responses!!! My FISD dashboard was lit up like a Christmas tree this morning! I love the look of the fiber. Painting over it WILL hurt. There would be A LOT of controversy and ultimately, no FISD approval if I left the receiver unpainted. Maybe I can airbrush it with a dark, translucent color so it looks flat black from 10 feet, but allows the carbon fiber to peek through when seen up close? Mish-mash means Doopy, DVH, metal, plastic, Sterling and whatever else works. Wow, some of my real parts were "real-ly" heavy - like the magazine housing. While you can't get better than real parts, I think I'm going for the ultimate in light-weight on this one. Going from one extreme to the other. I'm curious if it will be necessary to change bits or not... My step bit ("Golden Christmas Tree" - thanks Andy Pope, I'll NEVER get that out of my head! ) made it through the entire steel pipe build just fine. Not like new, but still quite sharp. Lube every hole, you know... Thanks! I can hope and maybe inspire someone with a better skill set for this... From what I've seen in your build, it might be possible your resin parts are MORE accurate than real parts... Man, wouldn't THAT be awesome? 100% carbon fiber. I might get a little "misty" if I saw that. I'm new to carbon fiber, but I don't think you can make sharp corners with it - kinda like fiberglass. Corners and edges must have a slight radius. I'm not positive, but I think that's how it goes. Thanks! I'm gonna need all the luck I can get to do the proper justice with this... As stated above, I think I'm going for the ultimate in light-weight on this one. Going from one extreme to the other. LOL, I'll probably be checking every 10 seconds anyway... I MIGHT use real parts for some of the SMALL externals, but definitely not things like the magazine housing or bolt. With the work I've seen on some of the recent resin builds, I think you'd be hard pressed to tell the difference on the spot. BUT, you make an interesting point for a "win". Hopefully, others will jump in and try this. The carbon fiber tube is pretty much IDENTICAL to the steel tube I used on my other build. Same OD, ID and wall thickness...plus stronger and lighter. THAT'S a win!
-
Funny, I emailed Roy last night and essentially asked the same thing about custom dimensions. 10" is too long. The longest piece I needed was about 7", so I requested pricing for a set of 8" (20cm) strips. Just enough to get the job done without burning your fingers and not have a bunch of excess left over. Still, $50 is less than $80 if you're looking for the ultimate in accuracy. I was hoping by reducing E-11 set sizes from 10" to 8", the price would come down to the $40-$45 range. At $40, it would be a NO-BRAINER decision. Slightly more than Marv for better accuracy and 1/2 the price of Gino... Just sayin'.
-
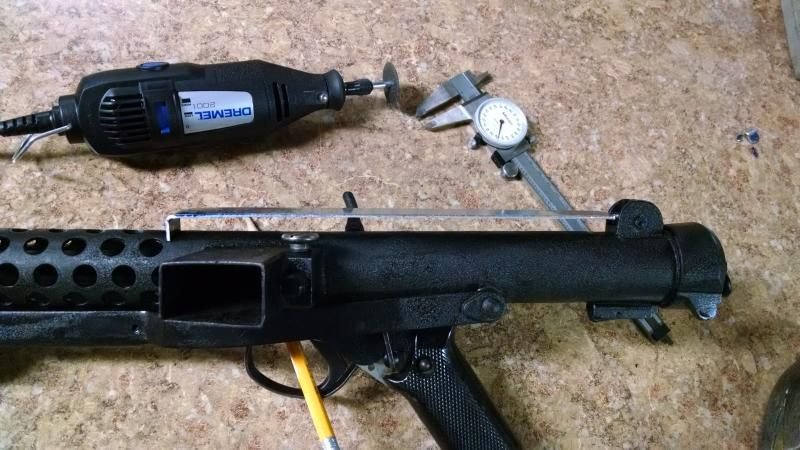
Hi guys! I've been sitting on this for a few months, but Ian (Sith Lord) and Brian (Bulldog44) have inspired me with their INCREDIBLE DD builds. This will be a mish-mash of extra parts and some learning, since I've never worked with this material before. I'm very comfortable with metal working, but NOT so much with composites, resins and plastics. First up is the basis of the build from "carbonfibertubeshop.com": Item# LG1430F - 1.5" OD x 1.375" ID x 0.060 wall carbon fiber tube - roll wrapped fabric = $96.19 USD + shipping and handling. It weighs 0.181 lbs/foot. That means I'd need about 5-1/2 feet of the stuff to equal 1 pound. Expensive? Yes. Light? Lighter than titanium tubing. Side by side, it makes my PVC pipe feel like lead. Strong? Many times stronger than steel by weight. Cool? I think so now, but we'll see how the machining operations go... It sure is fun to look at all those microscopic fibers under deep gloss resin! I started by cutting templates with a fresh razor blade along a steel ruler. I laid out the templates and taped off the first cut. I'm going leave a little extra and sand to length (in case the resin chips out along the cut line). That's all for tonight...sorry! Too much at stake here to start cutting when I'm tired. 'Interstellar' tomorrow night and picking up a new dog Saturday morning. Maybe another update Saturday evening... Stay tuned! Aaron
-
I agree that $50 for 6 strips of plastic is madness, but $80 is even worse. That said, no one has ever 'found' the screen-accurate storm door/window track, so Gino and Roy made tooling for custom extrusions. The price offsets the cost of the tooling. Still crazy, but I understand why. The price to pay for accuracy?
-
Marv's don't completely cover the width of the holes, but they work great if you're doing resin and only drill out the front and back holes. Roy's look like they'll cover, so they're more screen accurate at a better price than Gino's.
-
Hi guys, Roy responded to member requests and started offering sets of 6 x 8" (20cm) pieces for $40 USD (and free shipping). He added the option in his web shop: http://wannawanga.co...oducts/t-track/ Here's a description thread from the RPF: http://www.therpf.co...r-parts-228132/ COMPARISON PHOTOS: PROFILE CLOSEUP - GINO (LEFT), ROY (CENTER), MARV (RIGHT) TOP CLOSEUP - GINO (LEFT), ROY (CENTER), MARV (RIGHT) CLOSEUP PERSPECTIVE VIEW - GINO (FRONT), ROY (BACK) SIDE CLOSEUP - GINO (LEFT), ROY (RIGHT) TOP CLOSEUP - ROY (TOP), GINO (BOTTOM) NORMAL VIEW - GINO (LEFT), ROY (CENTER), MARV (RIGHT) Note: GINO track is shorter because this is a remnant left over from my E-11 build. I believe GINO tracks are 10" long. MEASUREMENTS: (taken directly from my samples with a Starrett micrometer - sizes may vary slightly due to manufacturing tolerances) Base width: Marv - 11.4mm Gino - 12.8mm Roy - 13.2mm Height: Marv - 8.3mm Gino - 6.8mm Roy - 7.0mm Bottom arc width: Marv - 5.2mm Gino - 7mm Roy - 7.3mm PRICES: To my knowledge, these are the current prices for a enough T-track to do an E-11 blaster : $30 Marv $50 Roy $40 Roy $80 Gino HAPPY BUILDING!
-
HOWTO: Hengstler Counter Maintenance and Adjustment
usaeatt2 replied to usaeatt2's topic in ANH BlasTech E11
It's possible someone before you already did some polishing/cleaning and removed the original cadmium plating in the process. Without the plating, I think the unprotected pot metal would oxidize to a dull finish. Just be careful not to polish the sharp edges off the logo... -
Thanks tr00per! Seems like I'm seeing more large eagles these days...maybe because people are seeking them out due to their rarity. Here's the short story: When WWII started, the Hengstler company replaced the 'eagle' logo with an 'H' logo to avoid association with Nazi politics. I think the large eagle was an earlier version. Then they switched to the small eagle, then eliminated it altogether. "TK Bondservnt 2392" has provided a lot of background history over the years. If anyone KNOWS these counters, it's Vern. Here's a Hengstler maintenance and information thread I posted earlier this year: http://www.whitearmor.net/forum/topic/27374-howto-hengstler-counter-maintenance-and-adjustment/?p=346843 The paint I used is KG Gunkote. It's really more of a "high-tech" coating made specifically for guns. KG Gunkote was originally formulated for Navy Seals. The coating is baked on and has additives for lubrication and fingerprint resistance. It's also extremely resistant to chipping or scratching. I know it's not the usual wrinkle finish, but the benefits far outweigh the looks. Besides, I've seen tons of weathered E-11's - I wanted one that looked like it was a brand new issue from the Death Star... Here's a link to my build thread where I started working with the coating (post #117): http://www.whitearmor.net/forum/topic/26960-e-11-steel-pipe-build/?p=352292 Those were FUN days!
-
DVH Pipe Build with Extras
usaeatt2 replied to I'm Batman's topic in Build Threads Requireing Maintenance
Thanks! Nice job on that pipe! Even though a couple pictures were upside down, I still like seeing foreign cars (with nice rims!) and home center parking lot conunudrums (I thought those things only happened to me). -
DVH Pipe Build with Extras
usaeatt2 replied to I'm Batman's topic in Build Threads Requireing Maintenance
AWESOME! <rubbing hands together briskly> Can't wait to watch this come together! You've seriously done your homework, so this should turn out like the "best of the best". That's quite a list of heavy hitters on your spreadsheet!!! -
For those not in the know, Vern sold me the scope which was previously used on the Lee Malone Bapty. He was also kind enough to sell me the RARE large eagle counter. Thanks Vern!
-
My new thread apeared in the "Recent Topics" area, but does not appear in the New Content scroll. I likely messed something up when I created the thread...is there a way to fix this? Link: http://www.whitearmor.net/forum/topic/29057-completed-e-11-photo-shoot/?p=369190 Thanks!
-
A couple more pictures... I almost forgot about the scope!!! When the scope was originally mounted in a tank (or whatever piece of artillery it came from) it was likely mounted to a vertical surface. I say this because every scope I've ever seen has the range lines running from the center out to the right side. That doesn't make any sense on a gun, so I disassembled the scope and rotated the optics (about 30 times to get it perfectly aligned). Now, I can look through the scope and line the range marks up with the front sight. Getting a picture of this is tough since the "marked optics" are embedded about halfway through the scope. My photographer friend was not able to focus on them - I managed to grab an iPhone shot as the focus was auto adjusting... And a more realistic shot for Ian (with support rod and backdrop):
-
Thanks, Ian. I thought the same thing, but I wanted a few "super crisp" pictures. For me, the fun is in building things...so this may go up for sale, when my composite blaster is done. THANKS VERY MUCH FOR ALL OF YOUR COMPLIMENTS!!!
-
Hello all, A photographer friend owed me a favor, so we set up a little "photo shoot" last weekend... Before she arrived, I set up a grey back drop for contrast. To get the best shots without "propping" things up, I devised a mounting system. I removed the socket head bolt from the bottom of the grip, then replaced it with a steel rod (cut and threaded). I inserted the other end of the steel rod in a hole drilled into a large landscape timber. This allowed 360 degree rotation. When we were done with those shots, I bent the rod to allow top and bottom shots. I digitally removed the rod in Photoshop and played around with some "artsy" shots. Here's a few for your viewing pleasure! Aaron
-
E-11 PVC Pipe Build Templates (Imperial and Metric)
usaeatt2 replied to usaeatt2's topic in ANH BlasTech E11
Haui, WOW! I just had a chance to look at your files - VERY DETAILED! Glad to have these. Thanks for posting! -
E-11 PVC Pipe Build Templates (Imperial and Metric)
usaeatt2 replied to usaeatt2's topic in ANH BlasTech E11
Awesome! A one-stop thread for your international pipe template needs! Thanks for posting Haui! Thanks for the kudos, Ian! -
Hi guys! I've been wanting to do this for awhile, but never got around to setting up a Dropbox until tonight. Follow the links below, click DOWNLOAD, then download or open the files. Simple. HAPPY BUILDING! Aaron E-11 PVC PIPE BUILD TEMPLATES: Imperial Front: https://www.dropbox.com/s/i72nghlhz2hmyza/E-11%20PVC%20FRONT%20TEMPLATE.pdf?dl=0 Rear: https://www.dropbox.com/s/6aw5semfacsewnm/E-11%20PVC%20REAR%20TEMPLATE.pdf?dl=0 Combo (includes a Sterling instruction manual to help familiarize you with the parts): https://www.dropbox.com/s/mi700j3bbnikmpv/E-11%20PVC%20TEMPLATE%20COMBO.pdf?dl=0 Metric: Front: https://www.dropbox.com/s/b82du4kucfz9nl8/E-11%2040MM%20PVC%20FRONT%20TEMPLATE.pdf?dl=0 Rear: https://www.dropbox.com/s/kfbhebdvvfg0h7t/E-11%2040MM%20PVC%20REAR%20TEMPLATE.pdf?dl=0 FRONT SIGHT MEASUREMENTS: Imperial: Front Sight Block: https://www.dropbox.com/s/0yecc20a8948lv3/Front%20Sight%20Block.pdf?dl=0 Front Sight: https://www.dropbox.com/s/jyd1yb4iszgwvlr/Front%20Sight.pdf?dl=0 Metric: Front Sight Block: https://www.dropbox.com/s/mt20fysqnd8gekm/Metric%20Front%20Sight%20Block%20for%20A4%20paper.pdf?dl=0 Front Sight: https://www.dropbox.com/s/wxyo7w2f6zu6vu8/Metric%20Front%20Sight%20for%20A4%20paper.pdf?dl=0 TRIGGER GROUP 1:1 SCALE PDF: https://www.dropbox.com/s/b7e8l87ufkiwz6t/Sterling%20SMG%20Trigger%20Group.pdf?dl=0
-
NICE!!! Great news about getting bolts machined! Although I wanted a super clean, "new" version, I like the original finish on your parts. The weathering is built-in and REAL! Thanks for posting the deac photos too.
-
Much better! I've seen several different rail variations; some about the same as yours, some lower. Look at many screen shots. For my final version, I made the front slightly lower than the rear. A lot of times, I think the rail height is based on the hardware used to attach the scope. I used low profile allen head bolts to attach my scope because I thought regular sized allen head bolts looked too tall. Low profile are almost impossible to find at a hardware store - I ended up ordering nearly all my blaster hardware from McMaster-Carr. Nice work carving out that rail! It's tough with aluminum - even tougher with steel!
-
The rear sight should fold down. It might be stuck. Push forward on it. The idea is to be able to change ranging with two different size sight holes. The rear of the scope rail should not be bent - just a narrow tab sticking straight back to fit between the sides of the rear sight. What you have right now looks good, but it's way too high.
