valo
-
Posts
93 -
Joined
-
Last visited
Content Type
Profiles
Forums
Gallery
Articles
Everything posted by valo
-

Doopydoo's E11 blaster kit build
valo replied to valo's topic in Build Threads Requireing Maintenance
Thank you Tim. I've been following your wonderful build thread. Can't wait to see it finished! -
Doopydoo's E11 blaster kit build
valo replied to valo's topic in Build Threads Requireing Maintenance
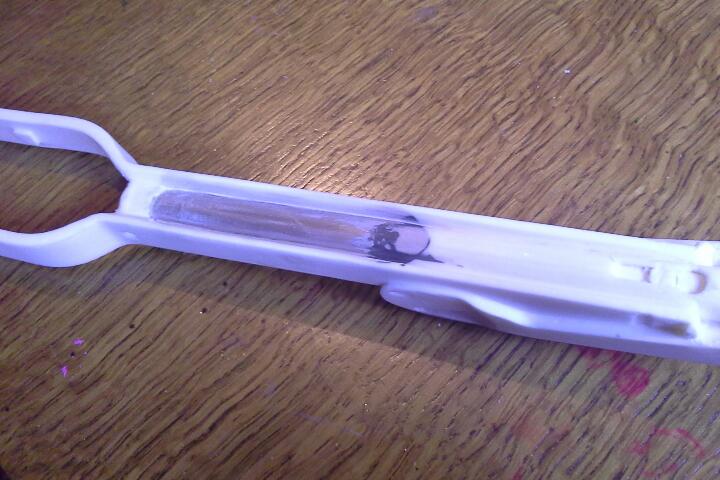
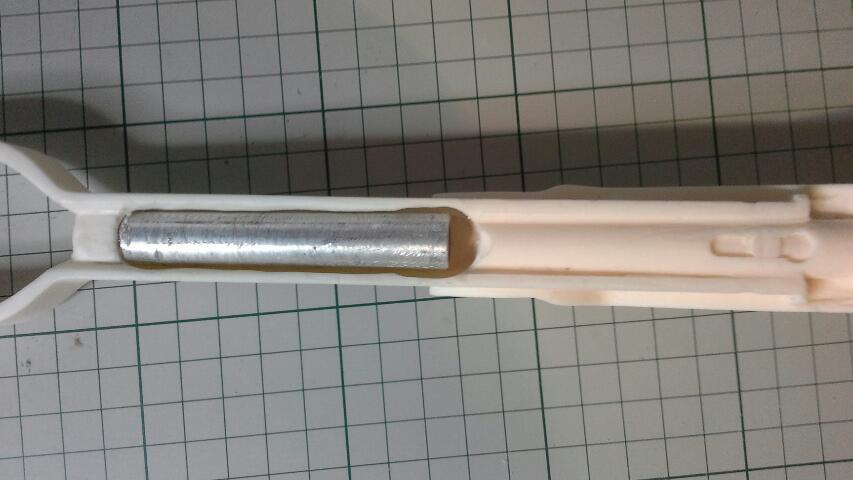
I was going to work on the Hengstler bracket next, but decided to work on the Bolt return spring and charging handle instead. Here's an update of todays work I found a piece of dowel that I cut down to size so it would run the length of the barrel to the point where the bolt should stop. Then I thickened up the bolt end with a piece of ABS plastic heated up and wrapped around the dowel. I fixed it in place with super glue. Then I gave this whole piece a coat of black spray paint (hammered and then flat black). In this picture, the piece that has been cut out of the dowel allows for the space needed inside the body of the blaster for my scope rail to slot inside. This is how it looked when I had inserted the dowel into the body of the blaster. I had been a little concerned about making the spring but I found it ok. I just wrapped some wire arount the same size dowel, using quite a few pictures of Sterling SMGs for reference. I had to adjust it slightly once I got it off the dowel. Once it was inside the blaster I was pretty happy with the result. For the charging handle, I just sanded it down so it fit inside nicely, drilled a small hole, put in a pin made from the same wire I made the spring from, drilled a hole into the dowel in the right spot and superglued it in place. I wanted to raise the level of the bolt past the charging handle to make it look like it lined up with the part that is cast into the main body of the gun. I know other people have done this with doopy kits because the thickness of the resin makes it look set too far back from the rest of the bolt. I think it looks better this way when the level is cheated up a bit. So I cut out two strips of 2mm thick ABS plastic to the right size and glued them together. Then I added another strip of plastic to make the detail that needed to line up with the rest of the bolt. Here it is as I tested the fit. After a quick lick of black paint, I superglued this piece in place and then painted both parts of the bolt with a steel humbrol acrylic paint. I'm pretty happy with the results:) I also gave my scope rail a test fit One of the last things I did today was to give the t tracks a coat of flat black to make them stand out differently to the rest of the blaster. I had used a hammered black spray for the rest of it, so this didn't look right for the t tracks. I think it makes a big difference The very last thing I did today, was to test out a bit of weathering. I painted the blaster in layers - primer, silver, hammered black, flat black. I tested a little bit of chipping away at the black so the silver shows through. I will eventually do some dry brushing also when I come to weather the finished blaster, but I like this method of chipping away at the paint. You just have to be careful not to go to heavy otherwise you just chip away down to the bare resin! Thats it for now. I need my scope to arrive so I can fix that on and the Hengstler. I can't wait!! -
Doopydoo's E11 blaster kit build
valo replied to valo's topic in Build Threads Requireing Maintenance
Next on my list is to make the bracket for the Hengstler. I managed to get hold of a real M38 scope through ebay, which I'm waiting to arrive. Hopefully it will come during the week so I can set it up with the hengstler and fix it to the blaster! There's still quite a big to do list after that but I'm excited about how my blaster is looking! Its keeping me busy until I'm ready to order my armour kit at the end of the month -
Doopydoo's E11 blaster kit build
valo replied to valo's topic in Build Threads Requireing Maintenance
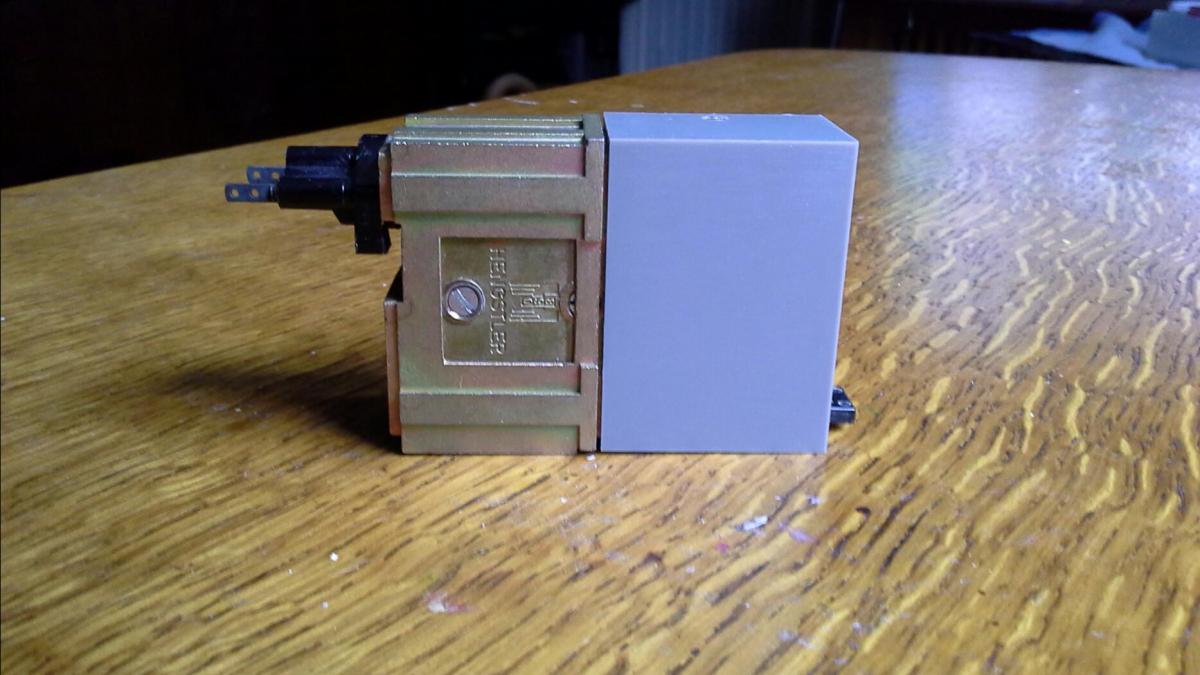
I've sprayed up the main body and all the small parts now. I fixed in the trigger with a spring and made the hinge from a piece of wire that I super glued in place. Then fixed the trigger guard on with epoxy. For the folding stock, I epoxied it in place and then set a screw into the front end to fix it and filled over this with bondo. I also painted up my real Hengstler counter (thank you Dennis) I made this scope rail also from strip of aluminium. The front end slots into a vent and the rear will screw down to the rear sight. -
Doopydoo's E11 blaster kit build
valo replied to valo's topic in Build Threads Requireing Maintenance
Thanks for the nice comments guys. I haven't had much time recently to work on the blaster. I've been cracking on with it this weekend though so here's a few more progress pictures -
Doopydoo's E11 blaster kit build
valo replied to valo's topic in Build Threads Requireing Maintenance
Thanks for the kind words guys. I haven't had much chance to do a lot more today with the build apart from spraying some parts with a primer coat. I took some more photos though of parts I have worked on. As I mentioned, I'm getting a little carried away with the enjoyment of doing this build that I keep forgetting to take photos while I'm making! Here is one from the other night, gluing the magazine/ receiver in place. I drilled a hole in the grip and then drilled a smaller hole which I tapped and screwed in a real M6 bolt For the selector switch, I drilled a 4.5mm hole and then tapped it to 5mm and screwed in a piece of M5 studding. With the selector switch glued to the end of the studding it can be turned Heres a better close up of the work I did to the front sight. I used a small flat head screw driver bit and filed it down for this. And from the front I wanted to make the trigger functional too and read in SorenM's great build thread http://www.whitearmor.net/forum/topic/24823-another-doopy-doos-e-11-pimped-build/ how he had used the spring from a pen. So I drilled out a hole in the trigger and grip and slotted in a spring from a pen I managed to find in the house I'm using a piece of 2mm steel wire as a hinge which I will cut to size and glue in place I have already pre painted the folding stock. I primed it first, then sprayed with silver and finally a hammered black spray. When this had dried fully, I very lightly sanded it just a very little with a fine wet and dry sandpaper (1200 grit, i think). Not enough to really remove any of the black, but just dull it down a little. I'm pretty pleased with the results. It looks pretty metallic The stock still needs some weathering but I will do this all together. So far I have primed the main body of the gun and the small parts such as trigger, guard and selector switch. I'm going to paint the main body and these small bits separately and assemble them properly after. Heres the main body all primed and drying out in my little workshop I'm not too sure how much i will get done during the coming week. The next big job I want to tackle is making the scope rail -
Doopydoo's E11 blaster kit build
valo replied to valo's topic in Build Threads Requireing Maintenance
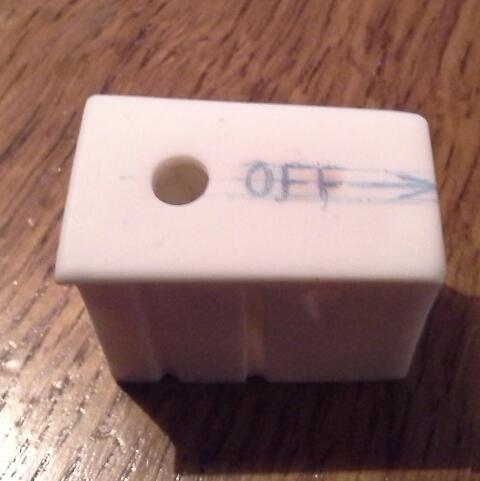
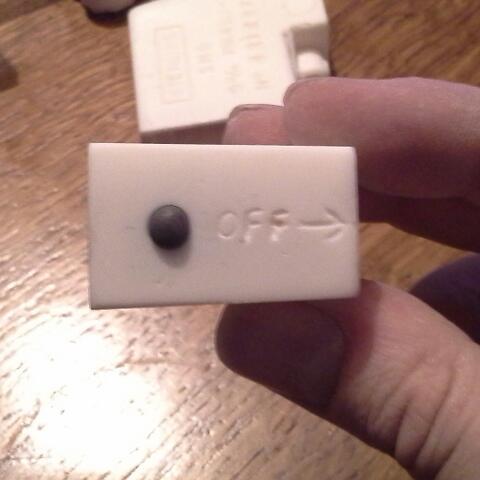
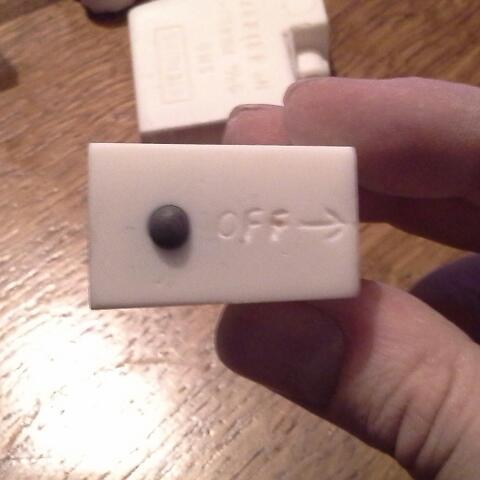
For the magazine, I drilled a 6mm hole and then mixed up some epoxy putty which I pushed in behind the hole to make the floor plate release button. I had read about making the button in this way in dm101's great build thread http://www.whitearmor.net/forum/topic/19872-dm101-doopys-e11-blaster-build/ I marked out the OFF and arrow and then carved them with the tip of a needle file Thats all the pictures I have at present. I got a bit too carried away with the build to stop and take pictures! I will take some and post more later. So far I have also painted the folding stock. I sprayed it silver first then hit it with a hammered black spray. Ive also glued the majority of parts together on the main barrel. Ive been working on a working trigger and selector switch too
-
Doopydoo's E11 blaster kit build
valo replied to valo's topic in Build Threads Requireing Maintenance
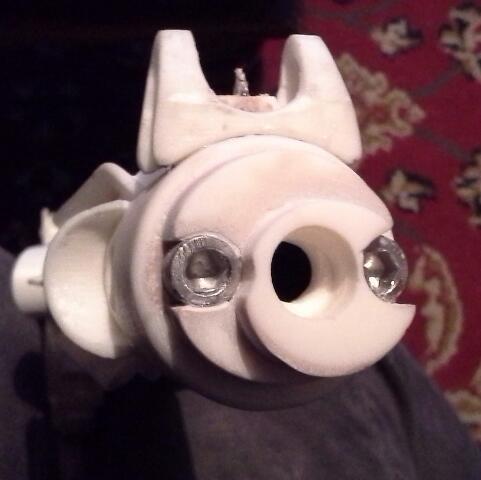
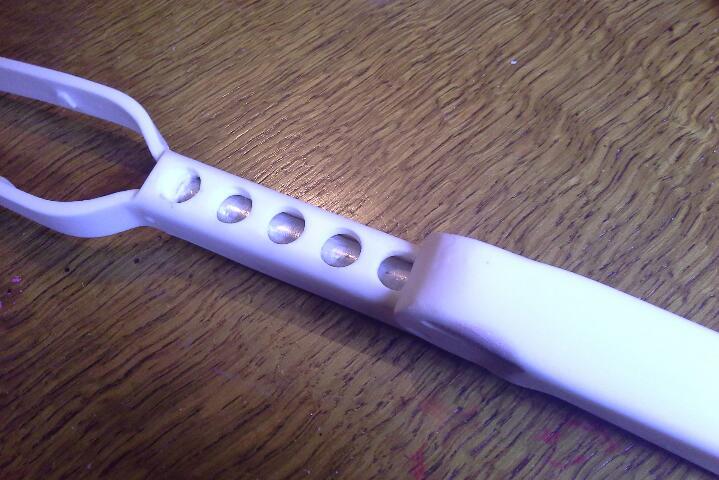
Its taken me a while to get started with this build! Ive spent quite a while staring at the pieces and reading and searching. I have been quite busy with it over the past couple of days though so I thought I would post some progress. First thing I noticed as I started working on the muzzle was that it was the wrong shape. Has anyone else has a doopy kit that looked like this? Anyway, I decided to go ahead and file it down. I used ZeroRoom's fantastic Sterling templates from his thread http://www.whitearmor.net/forum/topic/16705-the-best-sterling-templates-ever/ They were a great help and by the time I had finished and added M6 bolts, it looked like this. A mixture of dremeling, filing and wet and dry sandpaper! Im pretty happy with the results Also in this picture you can see the front sight. I used a small flat head screwdriver bit for this which I filed to the right shape. I was still working on it in the above picture and don't have great photos of it yet. I'll post better ones later I decided to do a bit of work on the folding stock so I dremeled away the resin from this part and inserted a piece of aluminium tubing Then I filled and sanded it with epoxy putty and bondo I wanted to add a bit more detail to the underside and be able to see a bit more through the holes in the stock. I think it worked out ok.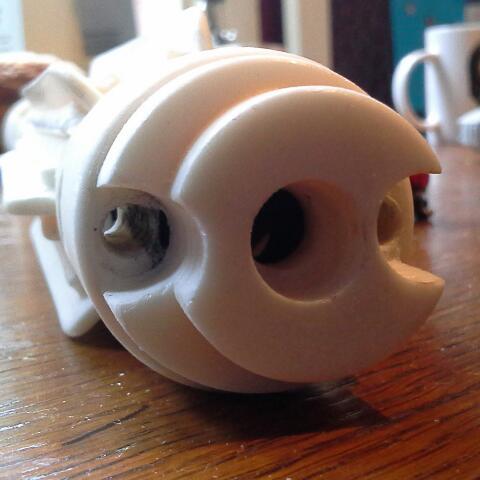

-
Thanks for the reply. I missed out this time but now I know that I can use the A2 version and mod it I'll keep looking and include them in my search for a scope!
-
Thank you both for your replies and information. That helps a lot
-
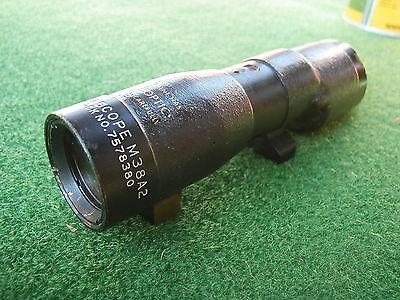
Ive been looking for a M38 scope for my ANH E11 Blaster build. I came across this M38 A2 scope on ebay. Is this an acceptable variation for me to use? Were these scopes ever used? I was just after a bit of advice before I bid on it. Ive been searching for ages they seem pretty hard to come by :/
-
Doopydoo's E11 blaster kit build
valo replied to valo's topic in Build Threads Requireing Maintenance
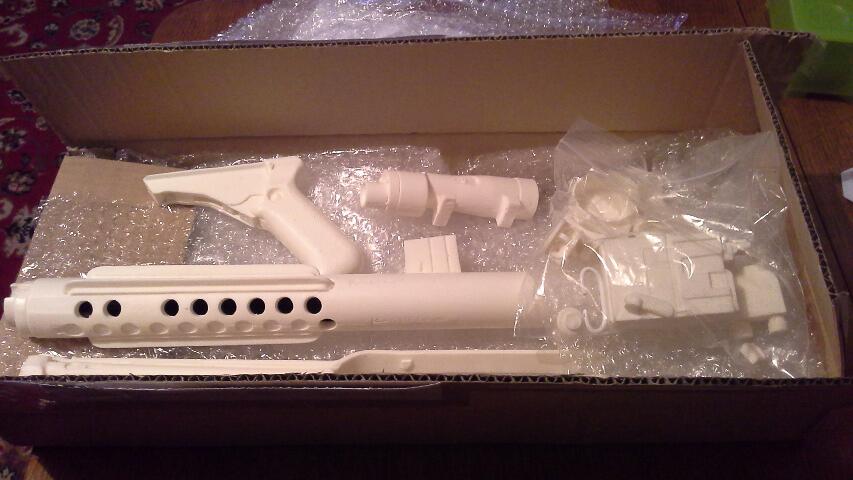
This box of goodies arrived this evening! Just checking everything is present and correct and reading through a load of build threads tonight! Very excited!!
-
I'm about to start my Doopy E11 kit build. Something I can get my teeth into while I make my final decisions which armour and helmet kit to go for My kit is on its way, I've had the 'dispached' email from Doopydoo's so Im expecting delivery before the end of the week! I can't wait!! There are so many wonderful build threads here that I've been scanning through in great deapth! I thought I'd start my own and share some of my experiences and hopefully pick up some awesome tips from all you guys and girls along the way! So, the kit should be here soon. In the mean time, I've got hold of an awesome Hengstler counter from Dennis (TK-50101 Blue Snaggletooth). Its in great condition and arrived super fast to the UK from Germany. I've been looking at it since it arrived I'd like to try and find an original scope for this build too. I've been looking around. But nothing suitable has cropped up yet. If anyone out there knows where I can get a scope from or might have one to sell then please let me know I'll post some more when my kit arrives and I get cracking with the build!!

-
I feel your excitment! I'm waiting for my Doopy kit to arrive! I can't wait to get started!!! Good luck with the build. Looking forward to progress pictures
-
Thanks for the replies guys. At the moment I'm weighing up whether to go for a 1.5mm ABS kit from RS or a 2mm acrylic capped ABS kit from TM. On the one hand, I love the idea of the prop accuracy of RS with all the lumps and bumps that go along with that. On the other hand I also like the idea of something that feels a little harder wearing and TM's 2mm acrylic capped armour does look lovely and smooth and shiny! Still a bit of a decision to make! I just want to get building!
-
I am about to start an ANH TK build in the next month or so. I have yet to 100 per cent decide where to buy my helmet and armour kits from but so far I am thinking either RS or TM. I have a Doopy Blaster kit on the way and have just received an awesome Hengstler counter from Dennis. I'm intending on sculpting and making my own latex hand guards and I already have a pair of TK Boots and may also make myself a pair of painted chelsea boots for added accuracy I was just wondering what the requirements were for Expert Infantry and Centurian, regarding strapping systems? Must I use the same strapping system as the original screen used uniforms to gain either of these awards? Im very excited and any useful advice would be very greatly appreciated
-
Just ordered a doopy kit today! This build thread is simply awesome! So much great information and advice! Thank you for posting! Cant wait to start my build!