

Barcoder
-
Posts
405 -
Joined
-
Last visited
-
Days Won
3
Content Type
Profiles
Forums
Gallery
Articles
Everything posted by Barcoder
-
 Alrighty. Drop boxes. I had a issue with them. lol The ones I had wouldn't fit inside each other (Very thick ABS). So I solved the problem by cutting the sides off one pair and used the tops to close off the other 2. I just stacked pieces of discarded ABS inside up to the level I needed. I installed the snaps on the butt plate, but had an issue. The back of the snap wouldn't close over the male snap...probably due to the thicker ABS. Solved that issue by gluing in a separate snap plate.... Tried my hand at Pandatroope'rs tutorial for making handguard strapping. Wasn't as quick as I first thought.... But I think they turned out very well. I like the fact I'll be able to swap out gloves with zero hassle! Side note - Pandatrooper makes everything look effortless & perfect....I am in awe.
 -
Thanks! I thought they turned out pretty cool too! I actually made them myself. I do a lot of work with "geeky" vinyl & stuff as a side business.
-
I had forgotten how much hand-sewing sucks... I had to adjust the placement of the female snaps 3 times to get the placement right for the shoulder bells. Too much tension pulled the shoulder straps & caused some buckling.... I love how the white thread on the black snap kinda looks like the Imperial cog... Speaking of Imperial cogs.... I have made some vinyl markers for left & right pieces of armour. I was tired of looking at pieces of tape on my armour. lol
-
So, I have finally dealt with the issue I was having with the left thigh...and I am happy with it now. This what I was left to work with after gluing.... ...and this what I ended up with. Now it looks like the other side. Finally got around to the strapping for the chest & ab section. Not as much of a fitting nightmare as I expected.... The parts I were dreading the most were the shins....They are currently gluing but I think they will work our nicely. I will be using the hook method on the back; Velcro just seems to bulky. Side note - industrial brown packing tape (the paper type) has been amazing for helping to hold things together while gluing. Good lord, that stuff holds tight! I recommend it. ...and some of the snaps for the belt are in place...
-
Thank you very much. Mandatory sewing class in Junior High has proved very useful over the years. lol I look forward to hearing about your build soon.
-
Remember to breathe. The overwhelmed feeling will go away soon. I am right in the middle of my very first build; I know exactly how you feel. Personally, I started with the small stuff first (hand guards, button plates, biceps) it helps to get a feel for working with the ABS. It also gave me some confidence. With every piece I'm starting, I looked up as many tutorials or posts I could find on the subject. You can learn a lot from what others have done, how to do things properly, learn about some things to avoid, etc… Get to know your armour. Take it all out, examine it, see where each piece will go, get a feel for how it will fit, etc... It's so exciting!!
-
Thank you so much! It's great to get some positive reinforcement. And yes, I am having SO much fun!
-
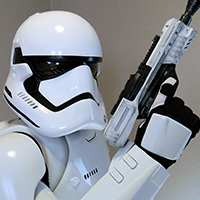
So, I found these gloves today... I am not sure if they will work for basic approval? They have a shiny rubber-like coating on the top... They were only $2.99 a pair at Army & Navy. I figured it was worth a shot?
-
The internal strapping for the arms is complete. The left shoulder bell feels a little tight around the top of the bicep. Might have to work on that later... Internal strapping for the back section is done. After an adjustment to the back plate snap length, it fits pretty good. I will post a pic of it on once the front section is done setting. Still trying to figure out the length of strap to join the chest to the ab section.... Trail & error I guess?
-
Thanks! It was a total pain to make, but I am happy how it turned out.
-
Finally finished the neck seal... Wow, that was quite the process. Not sure I want to go through that again... However, it turned out not bad. A little rough around the zipper, but hey, I've never sewed a zipper on before.
-
Are you ever too old to Troop?
Barcoder replied to DroidHunter's topic in Getting Started - Read this First!
I just turned 40 a few months back, while waiting for my armour to arrive. Now that I am in the middle of my very first build, I feel like a little kid! I am glad to have chosen this point in my life to do this. -
Well, today turned out to be a sewing day.... Thought I would take a crack at the neck seal... (Plus, I think I need a break from the E6000. Nasty stuff. lol) I found some textured faux-leather material and thought it could work (They had stuff with no texture but it was much thicker.)... I started by cutting up a bunch of 1 1/4 " strips to make the ribs... I then folded them in half and sewed them up... (Each rib was less than 1/2 "?) Then I sewed them on to my template for the neck seal. I over lapped the ribs as I sewed each layer... Once the ribs were finished I pinned and then sewed the stretch satin backing for around the neck. Stretch satin is much easier to sew than some of the other silky fabrics; it doesn't fray as much. And here is the result so far! (Sizing was quite the process...lots of trial & error) I am not looking forward to the bib attachment & zipper...
-
YAY! The arms are completely assembled and fitting is done! Strapping system is next on the list... I can't wait to try these on. (Finally starting to feel a sense of accomplishment & results.) Oh yeah, and I sewed the belt today. Surprisingly, it was trickier than I thought it would have been.... I have left the ends open as I am not sure of the actual length yet. (and I have yet to insert plastic to support the holster?)
-
Seeing as I had time to kill while waiting for glue to set, I have begun working on the strapping system. After reading posts all day, I am still not sure how a few pieces will work... Did the strapping for the back & chest pieces... Started laying out snap plate positions on the back sections.... Glued the 2nd set of snap plates on the shoulder bells... My first try at snap sections for the back section. I used the ribbed elastic for more durability? We shall see how they actual hold up... I expect a lot of trial & error during the first actual fitting.
-
Thighs & shins are partially assembled.. Had a bit of a hiccup with the back of the left thigh. It looks as if it should use the over-lap method. With some advice from other troopers, I am confidant it will come together fine.
-
Advice needed-Thigh alignment issues & cover strips
Barcoder replied to Barcoder's topic in Assembly, Mods, and Painting
Alrighty, looks like I'm not in that much of a pickle after all. Thank you guys, very much! <breathes sigh of relief> I think I understand what I have to do now. As you can see from the fronts of the thighs, everything is in order there. My main concern was that the backs had to line up flush with a continuous curved edge, like the fronts. I have looked at some other pics of armour on here that's not always the case. My question about the covers strips on the back seemed to be answered as well. Thanks. Thanks again for your advice & help guys. Much appreciated! -
Advice needed-Thigh alignment issues & cover strips
Barcoder replied to Barcoder's topic in Assembly, Mods, and Painting
As requested. -
So, I have hit a point where I think I need some advise/help... The back of my right thigh doesn't line up flush, as the left does. I am not sure if this is normal for some types of armours or it has to do with my kit being recast. Anyway, below is a pic of the issue. I am quite positive I eff'd this up by not paying close attention. Here is what was trimmed off. Basically the same thing... Would this be an acceptable option? I would end up with an angled seam that would require a much larger cover strip... Do the edges need to meet flush? Any suggestions or advise? As you can see, the left thigh would join with no issues. My other question is about the cover strips on the back of the thighs. To get the screen accurate 20 mm in front, the backs will end much wider than 20 mm. Would the cover strips end up going over the entire back (red arrows) or use 20-25 mm strips as normal? (blue arrows) Any help or advice would be greatly appreciated.
-
So, I've had my first experience with a heat gun... It went better than I thought it would. Once I trimmed & fit my left thigh, I had some alignment issues... first thought was to just trim it off, but I would be left with no return edge. As I don't have a hobby iron, I gave the heat gun a try. (I practiced of a few scrap pieces first....as I was nervous as hell.) It wasn't a major issue to begin with but it gave me some confidence using the gun. The back of the thigh turned out even better. Forgot to take the before pic.
-
Alrighty, finally doing something other than sanding... Cut the ends of the belt to the required 45 degrees... Finally gluing some parts together!!! Silly as it sounds, it was very exciting. lol Working on the biceps and forearms... My God, E6000 smells awful! I had no idea what to expect from all the comments, but I did not expect that. While I wait for parts to dry, I will keep myself busy with other stuff. Making snap plates thanks to Pandatroopers tutorial using rivets... As I am sick of sanding, I chose to use the cross-hatch method...giving the glue something else to hang on to. Gluing the snap plates in place on the back panel & shoulder bells. I have decided to add plates to where I'll be gluing the black elastic on the shoulder bells. If I ever have to replace the elastic I figure it might be less of mess on the armour?
-
Thanks for the info. The curve on each half of the left forearm doesn't exactly match; one end flares out much more. I figured it might be tricking lining them up when gluing. Maybe I'll try gluing one side at a time? I have read so many threads as well; they do tend to blend together. lol
-
While I continue to wait for supplies, might as well tackle the mic tips... As I mentioned earlier, the ones that came with the kit were very basic. Plain black with no mesh. A coat of flat black and white on the insides. I thought about buying new ones but figured I could use the experience of finishing these ones... I had no idea fitting wire mesh into the tips would be such a pain... Very annoying. However, I think they turned out not bad. (After a bit of swearing and numerous jabs to the fingers from the wire.)I had no idea fitting wire mesh into the tips would be such a pain... Very annoying. However, I think they turned out not bad. (After a bit of swearing and numerous jabs to the fingers from the wire.) Couldn't find the mesh that is normally used so I went with the woven wire kind. Easy enough to find; a strainer form the Dollar Store. I think I may go over them again with a semi-gloss black. I don't think flat black is correct? I managed to paint the ab buttons, with the correct colours. Testors 1138 & Humbrol French Blue.
-
The return edges on the arms are done.I assume this is enough? I think the left forearm is gonna give me some trouble. One side is bit more flared/curved than the other... Might be trying my hand at using a heat gun to re-shape it.
-
Might as well trim the rest of the armour while I wait for some ABS sheets to arrive. (Trooperbay looks to be a great “one stop†shop for a lot of stuff.) I have already done a lot of running around for supplies but decided to use Trooperbay for the cover strips, helmet assembly kit and the lenses. Here’s some of the the progress... The suggested amount to leave for the return edges seems to vary and seems to be based a lot on comfort? (Minus the 501st requirements on specific pieces of course.)