


AsBlondeAsLuke
-
Posts
379 -
Joined
-
Last visited
-
Days Won
3
Content Type
Profiles
Forums
Gallery
Articles
Media Demo
Posts posted by AsBlondeAsLuke
-
-
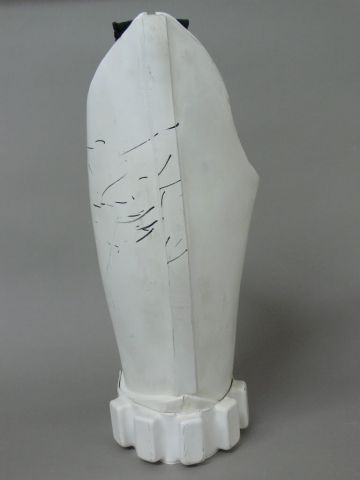
So, I could use some guidance on the belt. The reference diagram here recommends approximate placement of the holster at 3/4" from the edge of the ammo pack.
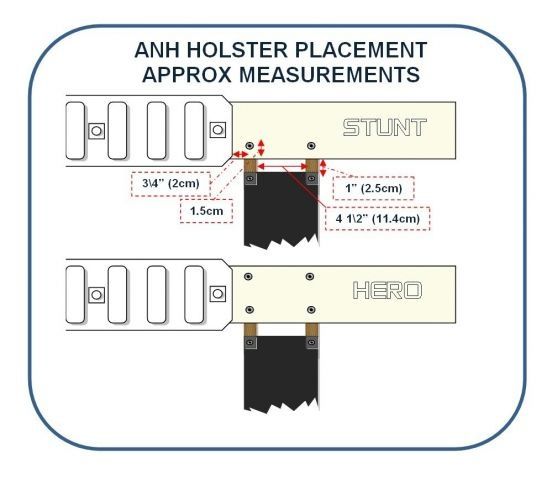
However, the RS belt has a marking on the back marking the holster at 1 3/4" from the edge of the ammo pack to the placement of the holster.
This is what the holster placement would look like if I followed the above reference diagram.
Pictured below is the RS marking "dot."
This is what the RS placement of the holster would look like.

This looks very much like the RS reference photo from the album: "RS Suit. Photo References." by Locitus
So, which is the correct positioning? Do I split the difference?
-
I believe you would want to cut off any excess at the wrist, and maintain the detail at the elbow.
Fantastic work Diana, you guys have really come a long way.
Almost there, just a bit further.
The anticipation must be killing you....
Kyle told us the other day that the hardest parts of the project are starting and finishing. This seems to be true. It is the little finishing up details that have proven to be challenging. Missing parts. Pieces that aren't lining up perfectly. Snaps that won't snap. Great anticipation for me, but a few grey hairs for my engineer who is also under a lot of strain from work. I give him a lot of credit for staying with the project to the very end.
-
First, if i were to trim the arms, i would do it at the wrist ends.
However maybe your problem for bending your arms is just due to your biceps dropping too low. Have you ever thought about biceps hooks? It will keep them up, as preventing them a bit from twisting.

And wait for the drop boxes to be strapped in place before fully understand all the rattling you will do when walking

Hi Germain-
Thank you for the suggestions. I will try the bicep hook and see if it helps. I noticed there was an excellent tutorial on how to create a bicep hook.
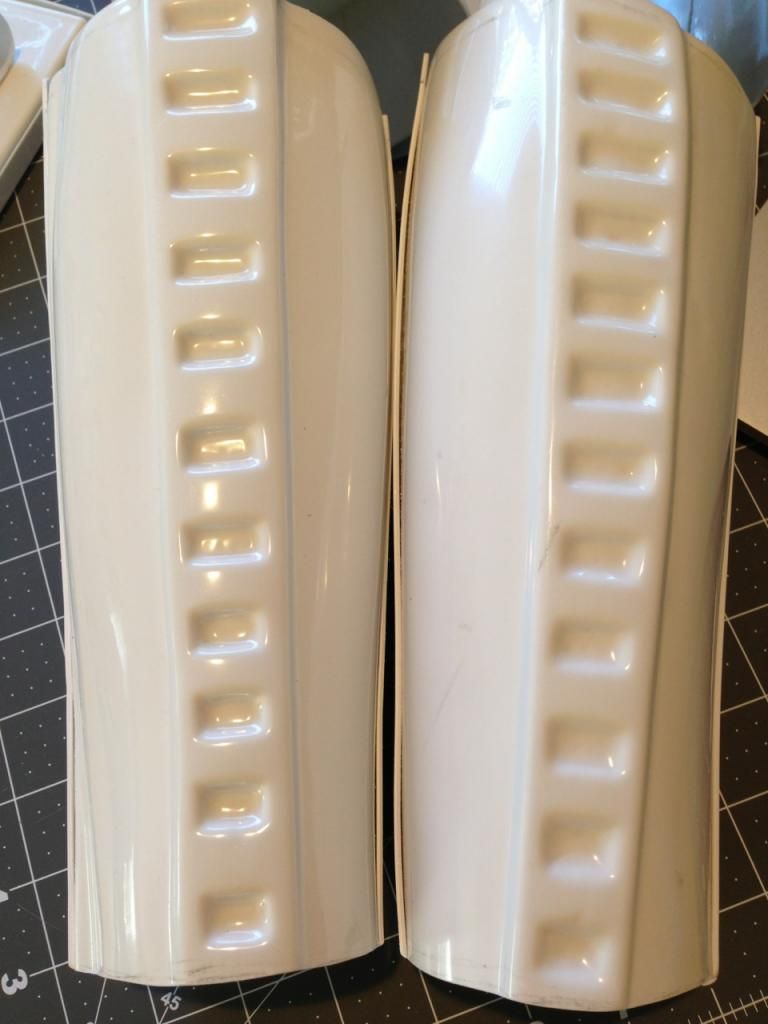
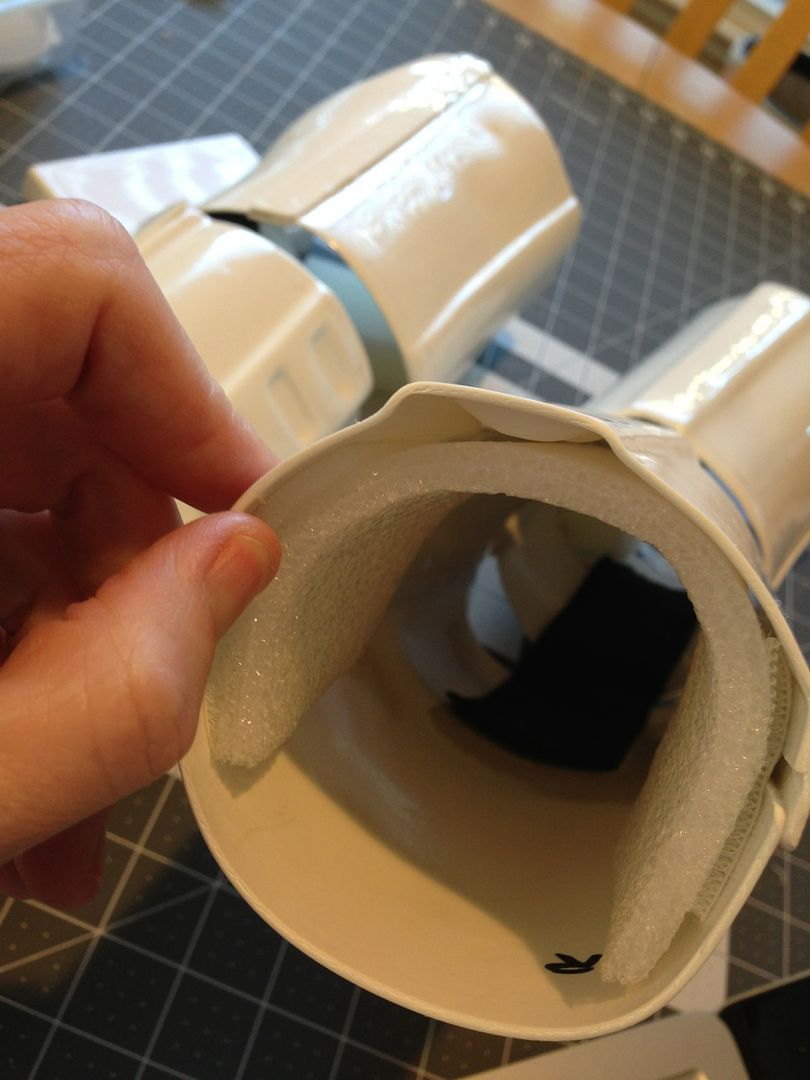
With regards to trimming at the wrist ends, I was wondering how much more it would be OK to take off? We are getting close to the detail at the end. I know there needs to be 11 bumps on one side, and 12 on the other. I was worried about cutting into any of these and losing any of this detail. I did find a thinner foam and pad the inside by the wrist section to try to ease the scraping on the wrists. This is also Velcroed in so it can be yanked out at any time.
-
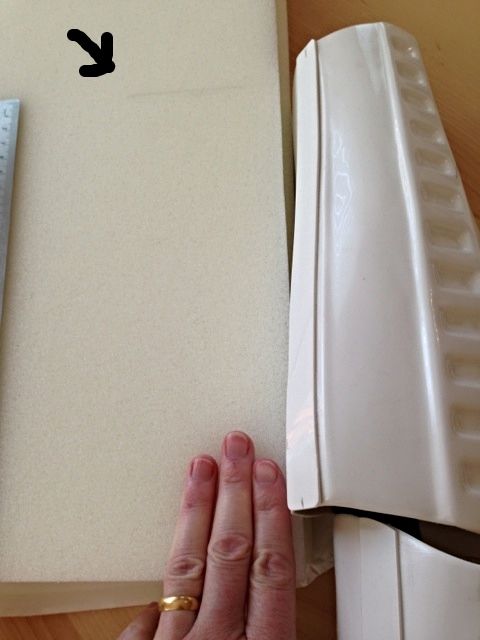
There were plenty of foam choices at the craft store. Conveniently, it all came in white.
Since my arms were very oversized at this point, I decided to start with a bigger cut of foam and knew I could always trim it back later.
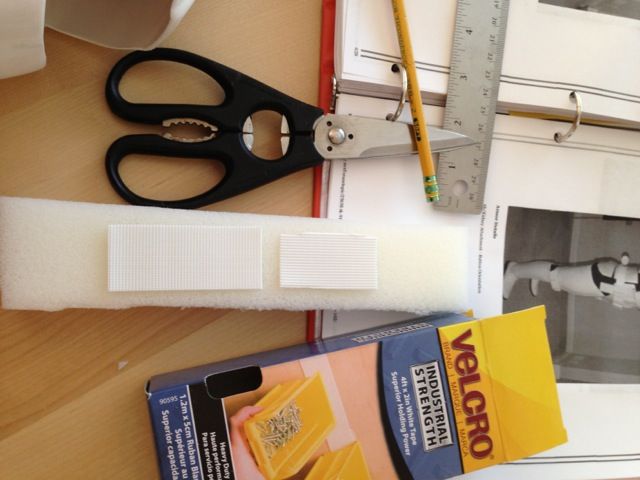
I attached the foam with Industrial Strength Velcro so I could easily yank it back out if it annoyed me. There was still something nagging me about the arms, so I kept looking up a lot of arm reference pictures as I was working. Yes, some people watch the news or soap operas. I stare at pictures of stormtroopers.
Yikes! Why didn't I see it before? As I was stuffing the padding in, it suddenly hit me what had been bothering me about the arms. The cover strips lined up on one side, but not on the other. We didn't see it with the fitting because my arm pieces were falling off.
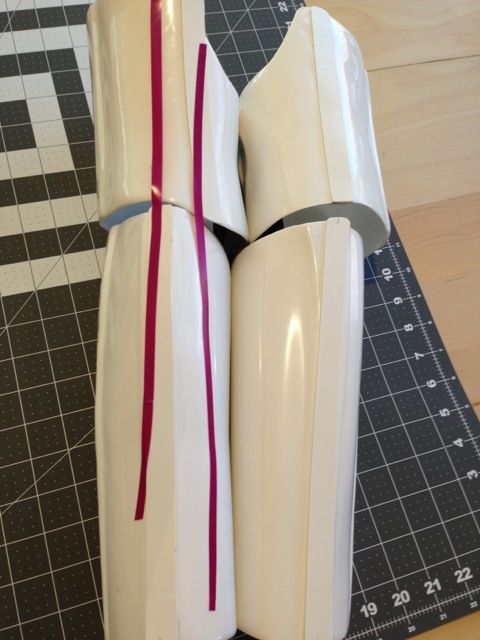
Well, the good part about the arms being too big is they could still be yanked apart and these pieces made to match up properly. And, hey, then they might actually fit better, too. Good thing the padding wasn't actually glued in or I'd be ripping out foam right about now.
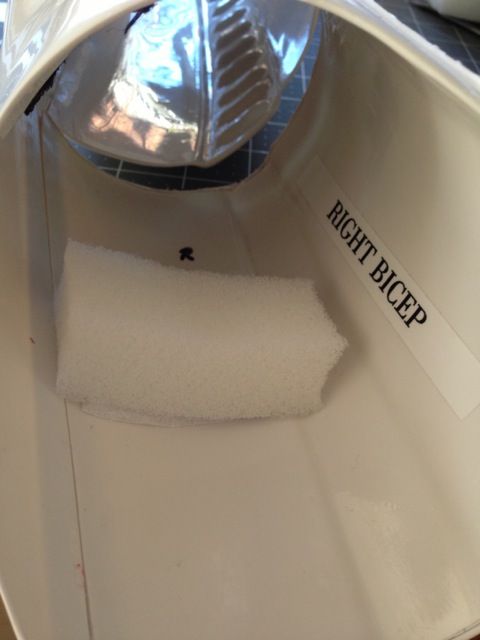
I did add in a piece of foam to the bicep so that piece would at least stay on. But, this piece was also added in with Velcro so it could be yanked out and moved if necessary.
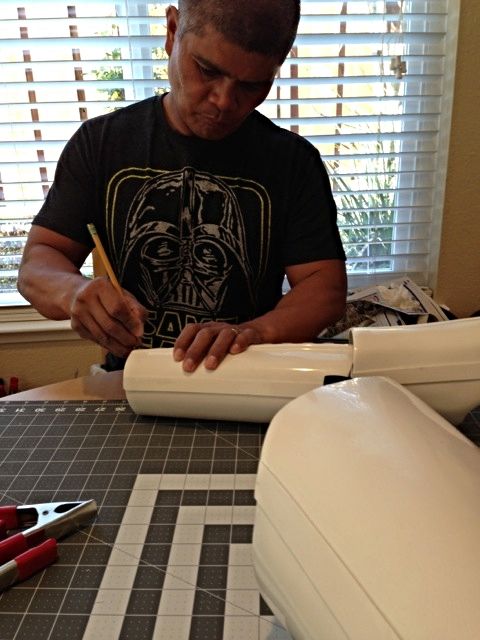
This past weekend, my engineer worked on cutting open the arm pieces and getting the strips to line up properly.
I focused on finalizing the other pieces, sanding off any rough edges. Love the plumber's sandpaper, (courtesy of cousin Walter.) Yes, I had to be vacuumed by the Dustbuster when I was done.
So, the piece was corrected and the strips line up on both sides, but I'm still concerned about the length. I'll put the full kit on today with the body suit so I can your opinions today on the overall fit on everything. But, it still feels to me like the arms are too long. I can move my arms like I'm holding my blaster and reach my arms up as if I'm putting my helmet on, (which Kyle said is an important test of fit.) But, the edges of the arms are hitting my wrist bones and that is both annoying and painful. I'd like to trim the arms back some more, but my engineer is worried we'll make them too short. I promised to consult the collective wisdom before we did anything. I did mark a possible trim line at the top. Advice, please?
-
Yes, and I have to admit the paint on the helmet came out looking great. The engineer knows his stuff.
We're still wrestling a bit with the arms. Been harder time to find work on the armor lately as schedules have gotten busier. So, we've been hunting for little free minutes to try and complete the project. Last fitting pictures were taken nine days ago when the strapping was completed.
Now, the belt wasn't done yet, and the snaps for that are not in place. And, the arms are sitting all wrong, hence the great arm debate.

Here's the pic from the back, unedited and marked up with all the areas we knew we wanted to fix.

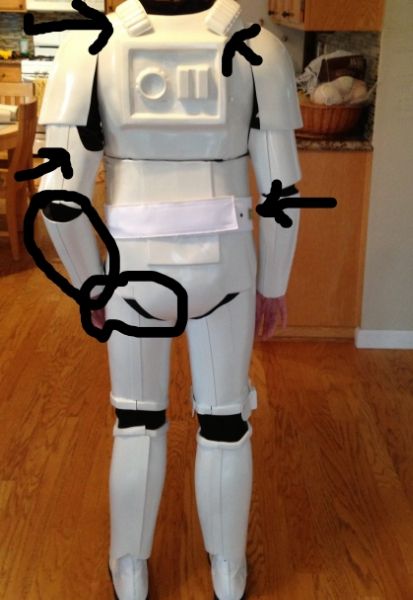
1. The shoulder straps are too long and are touching the backplate. This is probably due to my height. I trimmed off "one rib" from the back and resanded. Will try another fitting today and see if they are still touching.
2. Because my biceps and arms were much too big, they wouldn't stay on unless I kept my arms crooked at all times. This is fine if you are constantly holding a blaster, but meant I could never straighten out my arms. I asked Kyle how to solve the problem. "Eat more protein?" Wise guy. He then said others with the same problem have fixed it with foam. Ah. Now, that is helpful. Will go shopping foam. Right after I finish this enormous nerf steak.
3. Belt. Blegh. Working on it. Kyle warned to be careful about the positioning of the snaps on the abdomen since so much else was resized on the armor. Have not placed the snaps yet.
4. Thigh pieces sitting too high and are hitting the butt plate.
Readjusted the thigh pieces down and they still hit the butt plate.
After the first full test fitting in the armor, I did the first full test walking in the armor.
"Uh... is it supposed to make that much noise when you walk around?" my husband asked.
"No," I said, laughing.
I sounded like the garbage compactor scene on the Death Star.
"Keep walking and let's see if we can figure out where it is coming from," the engineer grabbed up the curved Lexan scissors and started chasing me around.
There were two primary areas causing the "rattle."
The first area was the thigh rubbing up against the buttplate. My engineer trimmed it slightly so it followed the contour of the buttplate. It immediately quieted things down considerably. This is the type of fine tuning adjustment where you absolutely need another person.
The sniper plate was also hitting the lower leg when I walked. My first thought was heat gun, (as always), but we actually decided to try something else first. This is the piece that already looked like it took blaster damage to the clamp incident. While this might add to the delightful wonkiness of the armor, I didn't want to overdo it.
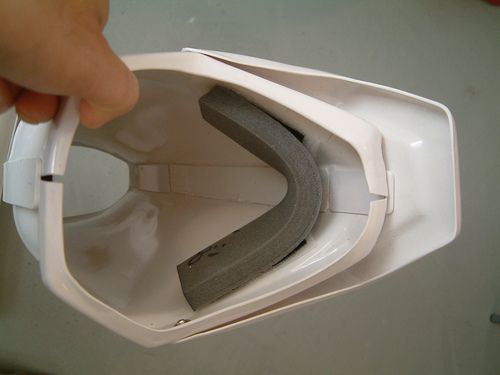
A picture from the "Thigh and Shin" tutorial had stuck in my mind due to the comfy looking piece of foam right under the kneecap. At the time, I'd thought the foam was there to prevent the armor from chafing uncomfortable against the leg on long troops. But, now it occurred to me the foam might have been placed there to push the sniper plate out. It was definitely time to go foam shopping.
-
So, last night we had dinner with Kyle and his family and returned his armor. Before we did, I did some comparison shots of his RS armor to my RS armor. Kyle has a "screen accurate" body type at a height of 5'10", (5'11" in armor.) I'm the exact same height as Temuera Morrison, which must make me screen accurate for something.
Before I left, I did comparison photos of the two RS suits. You can probably tell the two apart, without labels.
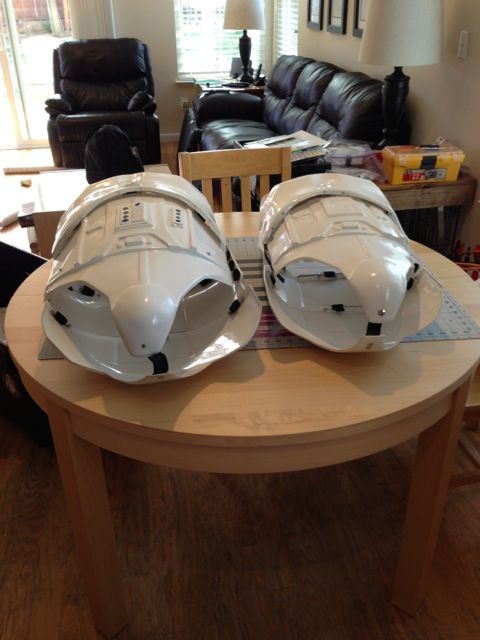
In case you need a hint, my armor is the one on the right. Keep in mind, these two kits were identical when they were first shipped from RS.
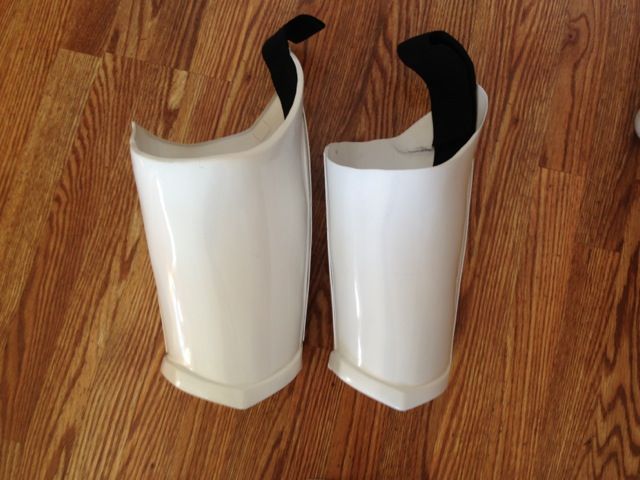
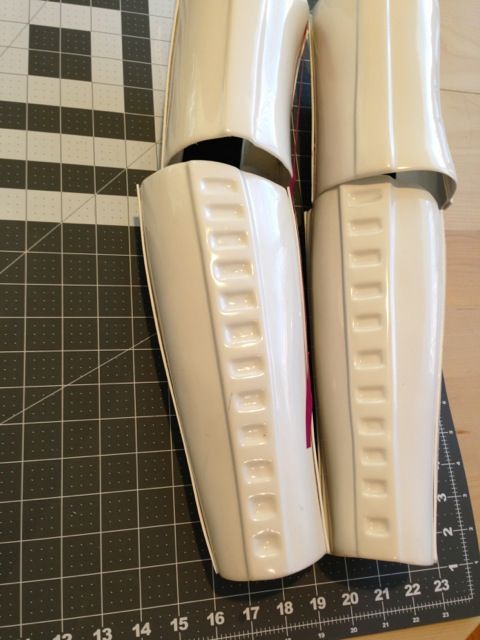
Kyle's thigh piece on the left and mine on the right.
My shin piece on the left. Kyle's on the right.
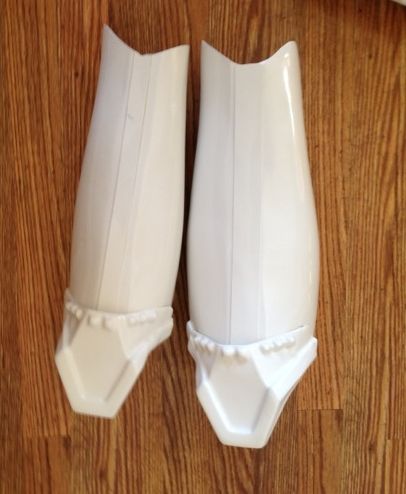
The arm pieces were interesting. I had to double-check to make sure I didn't grab the wrong pieces because they looked almost identical. Kyle's arm piece is on the left, and mine is on the right. I've been trying to tell my engineer my arms are too big, and he's been arguing if we trim them they will be too small.
OK. Seriously. What more proof do I need that my arm pieces are too big? We are still having the big arm resizing debate. I feel like C-3PO waving these huge arm pieces around.
-
We had great weather today for painting this weekend, and Scootch had been sitting patiently for a week. So, we took him outside to enjoy some of our abundant California sunshine.
Searching for any rough spots before the next coat. As husband described the process, it is like painting a car. Everytime you apply a coat, you need to sand it so you end up with a nice, shiny finish. "Honey, want to feel the helmet?" "Geez, for the last time, no."
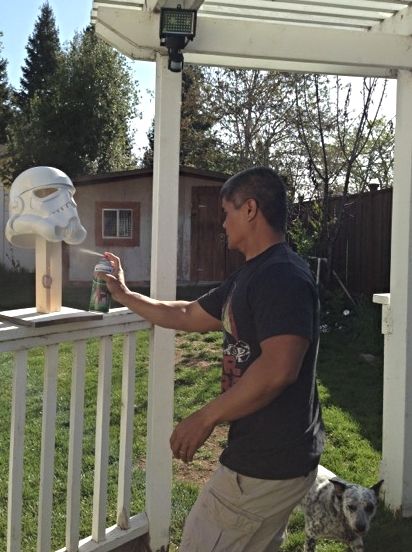
Painting Scootch along a surface that is already white. The fence desperately needed painting anyway. Cross one off the "honey do" list.
Question: Do we need to apply a gloss coat to the helmet?
-
It's starting to look incredible! That second torso shot is awesome

About the butt plate snaps, even though some armors had only one snap like you've done and like the RS suit, Centurion requires 2 to be present. Like three of the armors on the pic below:
Thank you for pointing this out. I like the idea of adding in the second snap, mainly because the cod wouldn't fit snug enough and it was annoying, (probably the reason why the second snap is there in the first place.) Anything to make the armor fit just a little better makes perfect sense to me. Thanks again.
-
I love the way you look at your parts and say "nah, that's not good enough." It really is resulting in one of the best builds I have ever seen.
Thanks, Todd.
We didn't put ourselves under the pressure of a deadline to get it done, which I think helped a great deal. It will be done when everything is done right. The way I see it, there will be always more events and troops. We're limited to getting things done on the weekends, but it's become a fun part of the routine in the household now. -
I don't know if that would be do-able, but it would be good to shorten the front cover strip so it ends before the bottom ridge:
Thanks, Germain. Very good to know. I will do my best to shorten the front cover strip and make it as screen accurate as possible. Thank you for pointing out this detail.
-
Kyle arrived with the five missing RS screws and the tool we needed so we could finally add in all the snaps. Our hero. We could finally finish the strapping.
My engineer had been getting a bit... ah... frustrated visualizing which little strap went where and compared the whole process to being given a couch to assemble from IKEA without a manual. "They give you all these parts and screws, but no instructions."
I shrugged. "And, so you have to search out other IKEA owners online and ask them how they put their couch together."
My engineer looked thoughtful: "Except they all did it a little differently."
I smiled: "Look on the bright side. When you're done, you get to join their Sofa Owner's Club."
Ah, but anyway, Kyle was kind enough to loan us his armor for a few days so my engineer could see a 3-D representation of the couch. Er, armor. It made a huge difference. We were able to fly through the rest of the strapping in a few, frustration-free hours. The engineer was very happy.
As beloved a tradition as these build threads are, and no one loves them more than me, has anyone ever considered actually writing an armor building manual? Does one exist? Just a thought.
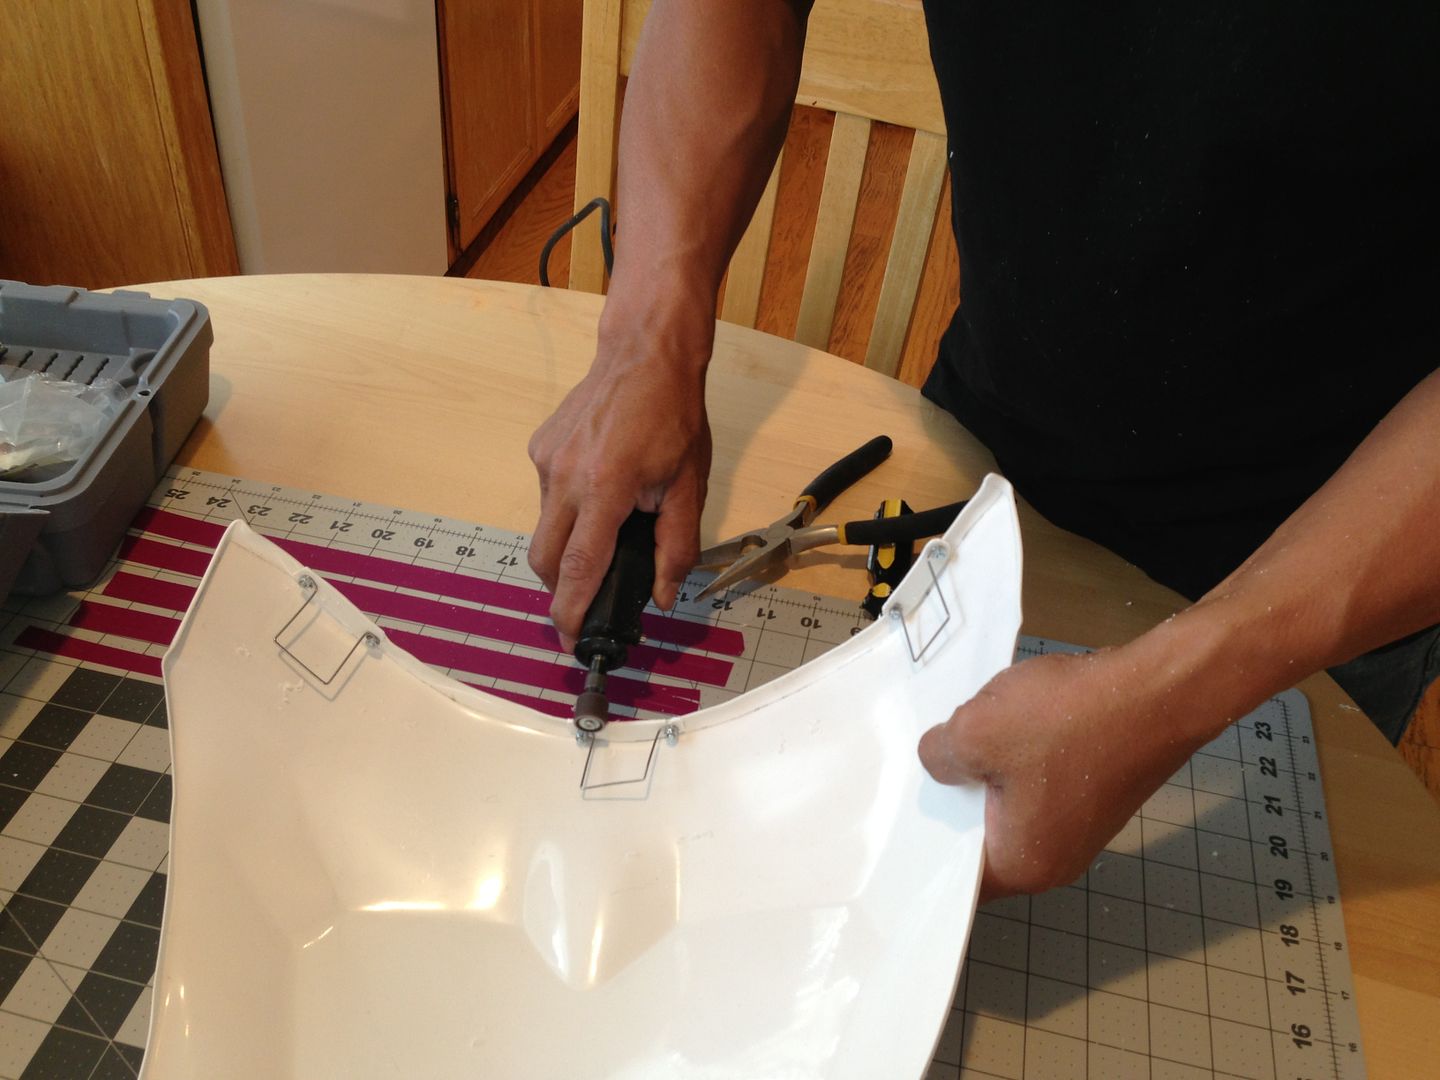
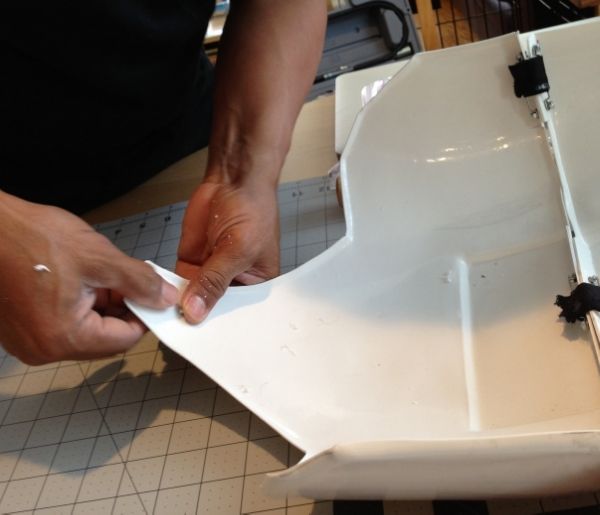
So, we used the Dremel to sand back the shims we'd added in. We needed these because our return edge wasn't quite large enough, but we would have added them in anyway. They provide extra strength in a high stress area.
Since we now had the proper tool, we added the snap to the abdomen plate.
We discovered in doing fittings that the snaps were too big so we ended up adding in a second set to make it fit, but hey, it leaves room for that growth spurt I keep dreaming about.
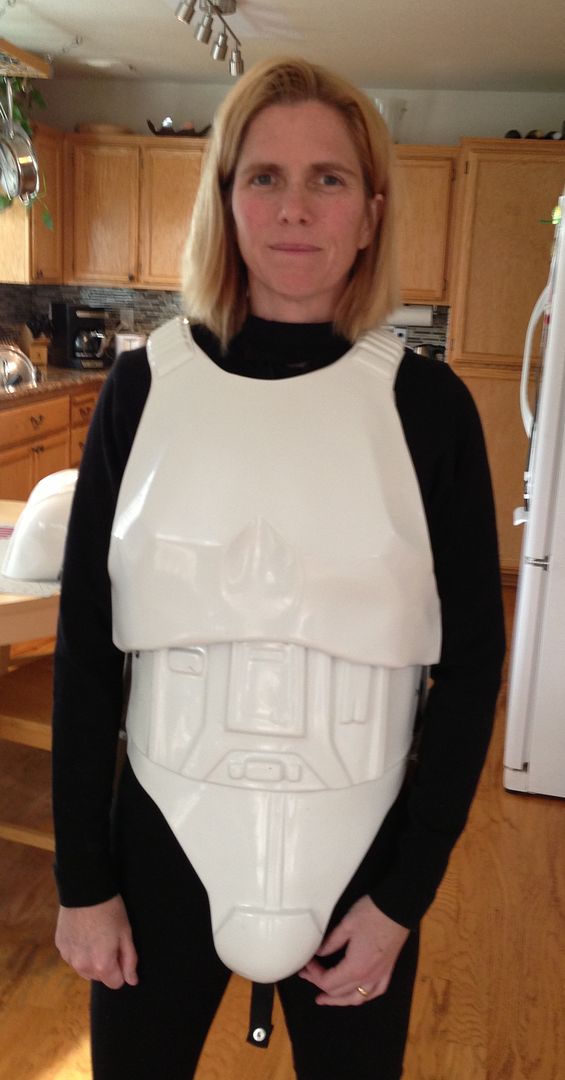
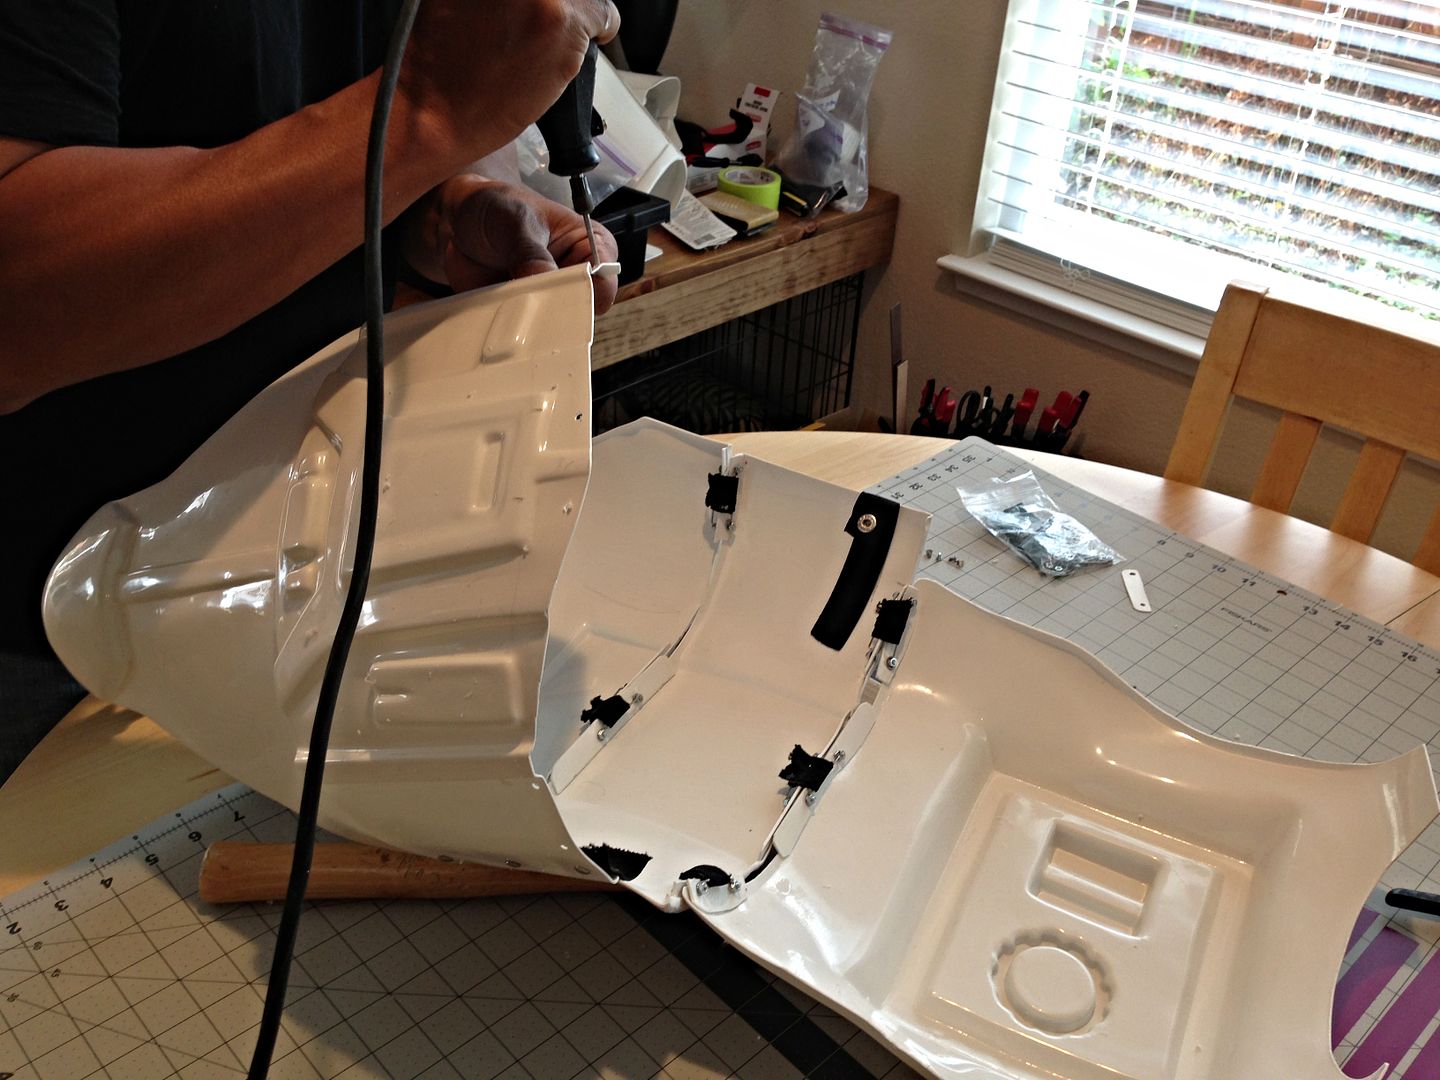
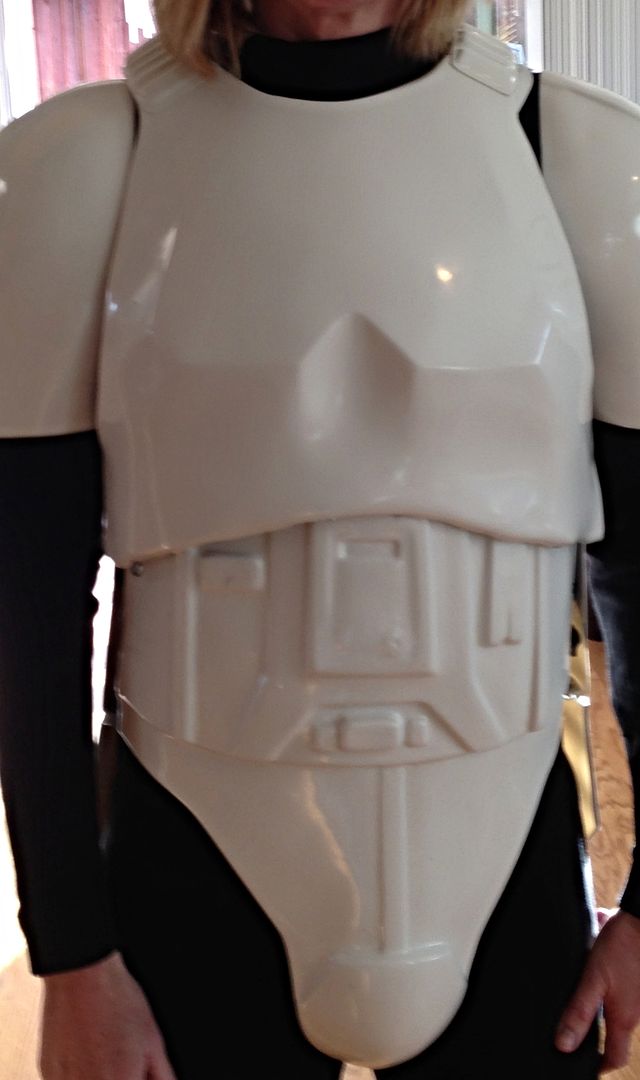
This meant I could actually put the armor on without tape. Forgive my unsnapped crotch. We weren't done with that piece yet. I looked at this picture and went: "Blegh. Chest piece is boxy." So, my answer to everything these days seems to be heat bending.
And, this is the chest piece after the heat bending.
And, we finished strapping up my cod. Huh. OK. Wow. That could sound strange out of context.
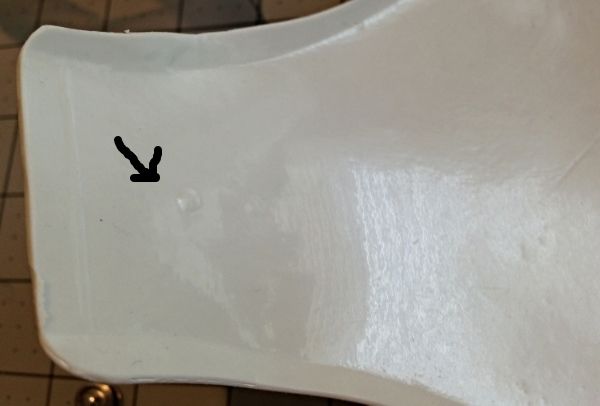
There's a helpful little marking to show where to put the snap.
And, now I've got a snap in my cod. Yeah. Not sounding any less weird.
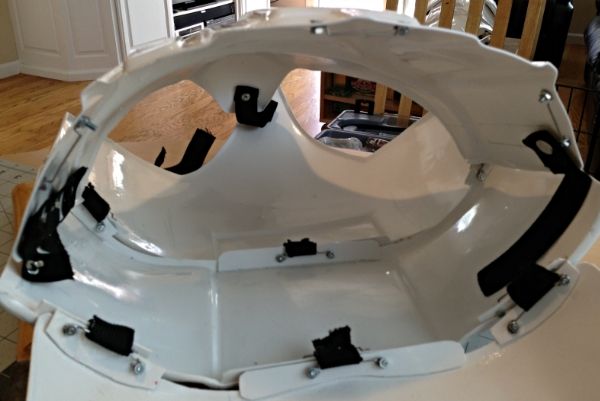
Shot of the interior strapping.
-
If it makes you feel any better, I end up with glue-covered fingers with nearly every build. I wear gloves sometimes, particularly in building my astromech, but then I just glue parts of blue latex glove to my work.
Gloves would probably be a wise idea. I did glue my fingers this week. I finally pried them apart with nail polisher remover. I thought I'd have to wave the Vulcan greeting at everyone.
-
The blast mark heat bended back out and husband did not fuse his fingers into a Mon Calamari hand, so we were good to move on.
The "assembling knee plate" tutorial included detailed instructions on how to rivet the knee plate and the engineer thought this sounded like a fine idea. But, something was niggling at the back of my mind from the costume requirements. We went to our trusty orange binder and looked it up.
There it was under level two certification:
"Sniper knee plate must not have visible rivets or fasteners attaching it to the shin."
Husband still wasn't convinced. "Not visible rivets could mean they need to be painted white."
True. So, we checked with Kyle. "Glue."
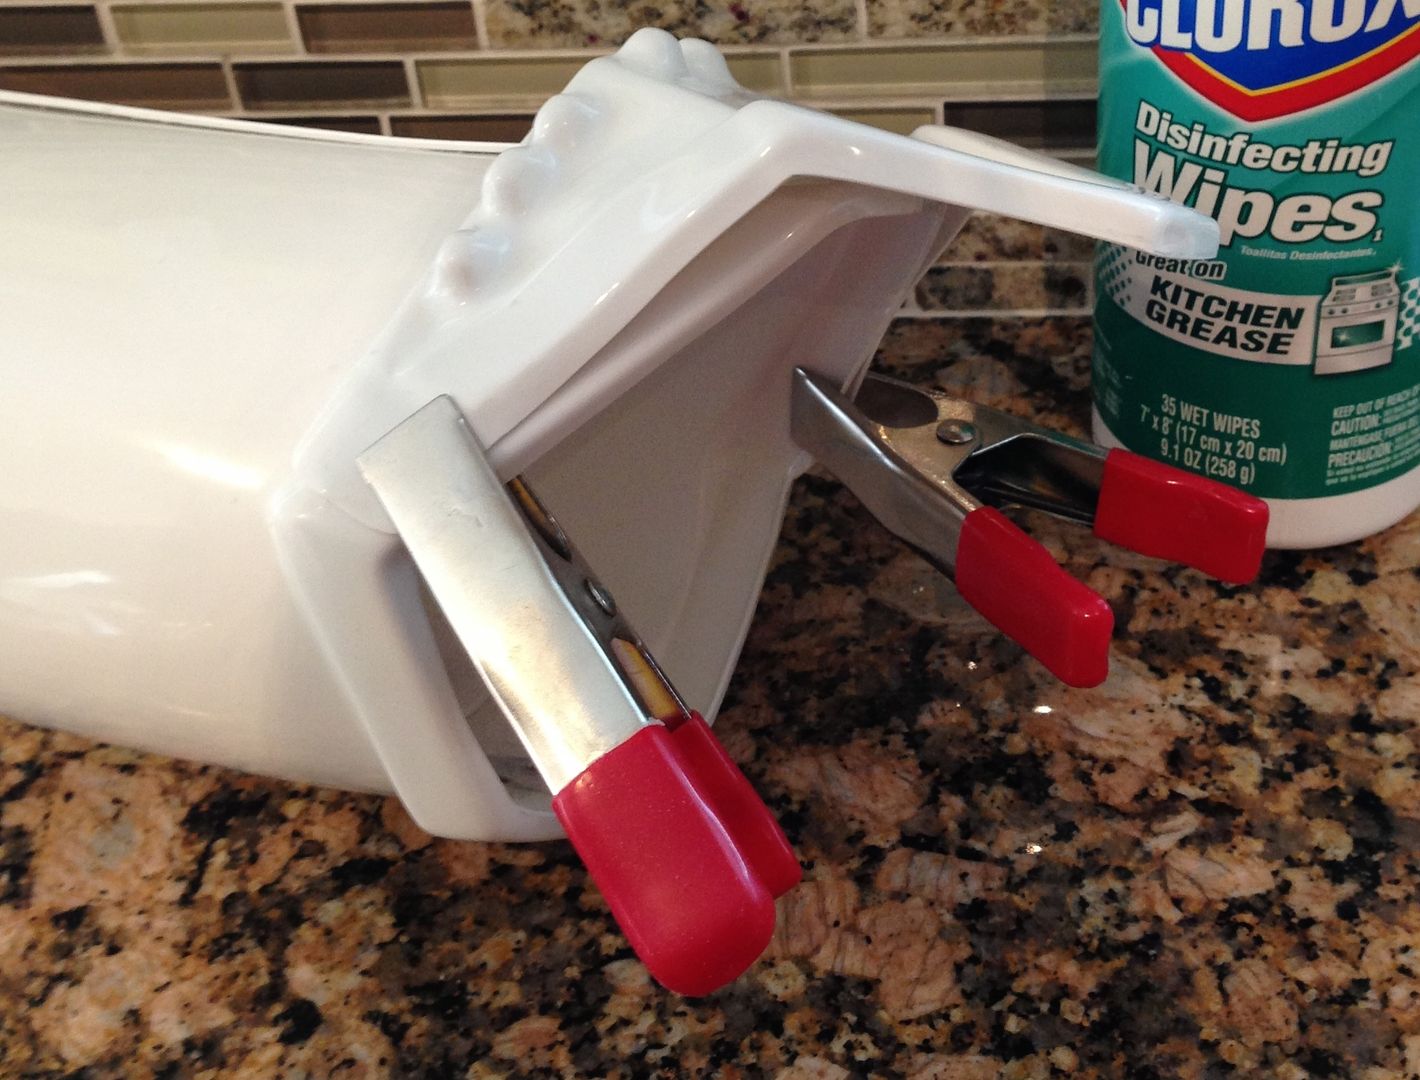
I felt bad for my engineer. He said the rivets would hold it better on my "small shin." Seriously. Not small. Buff! Anyway, we glued the sniper plate. And, ironically we had to put those clamps back on. The same ones that left the melty marks. And, as if glue already wasn't on the oogey list for day, some of it actually starting dripping down the side of the shin like thick 'ol Jabba drool.
Thankfully, there was a package of cleaning wipes inches away. Turns out those wipes are awesome at getting glue off before it dries. But, you only have to be lightning fast. Like Han-Shot-First fast. Once it dries, you either scrape it off with a craft knife, sand it down, or join the Mos Eisely Police Department. Definitely a handy item to have when gluing.
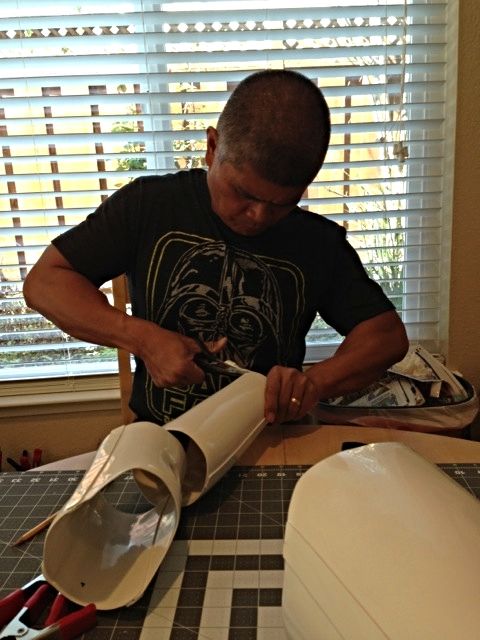
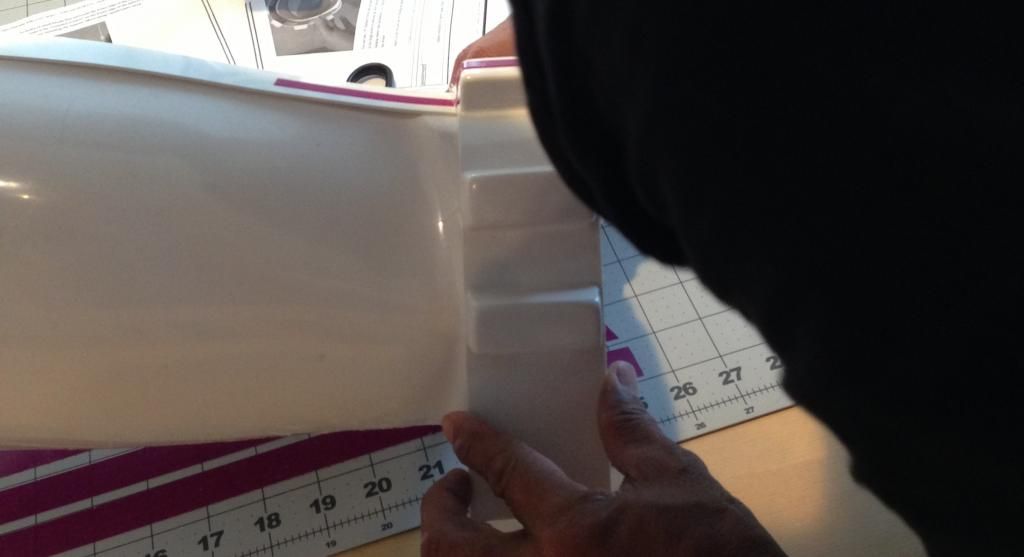
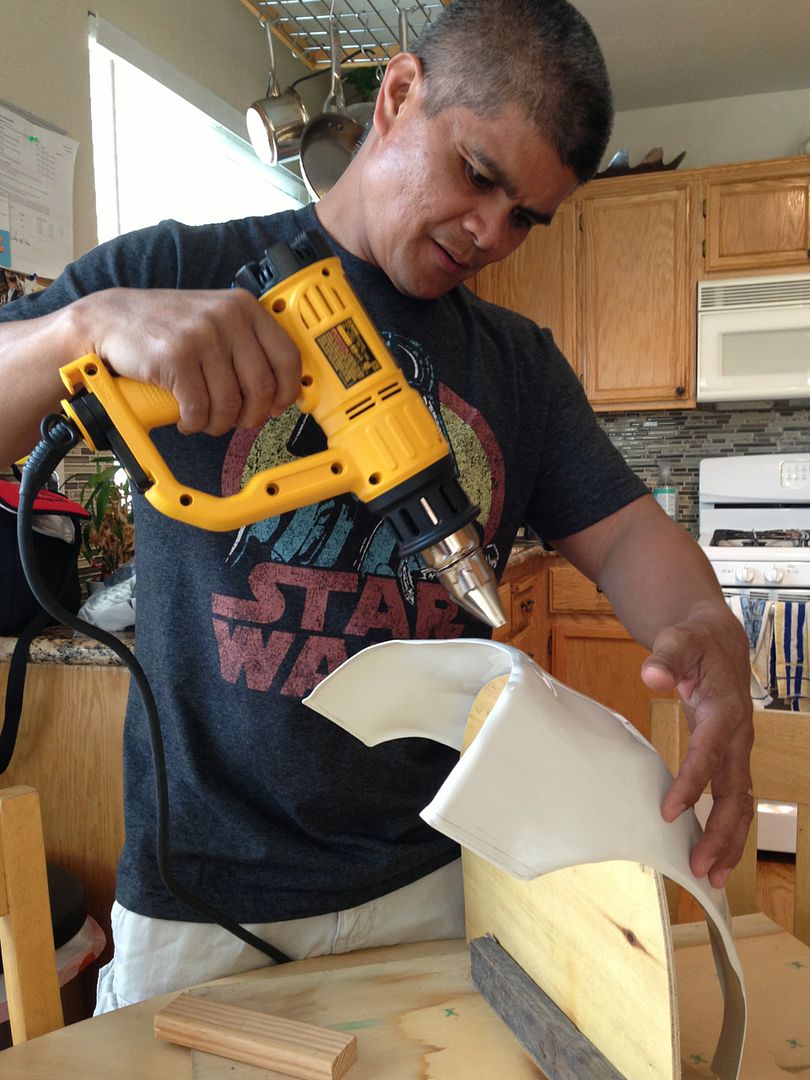
We moved on to the ammo pack.
We loved the reference picture in the Tutorial on legs.
The engineer decided to achieve this affect using a mug from our favorite coffee house. We drank the coffee first. Mmmm.... coffee.
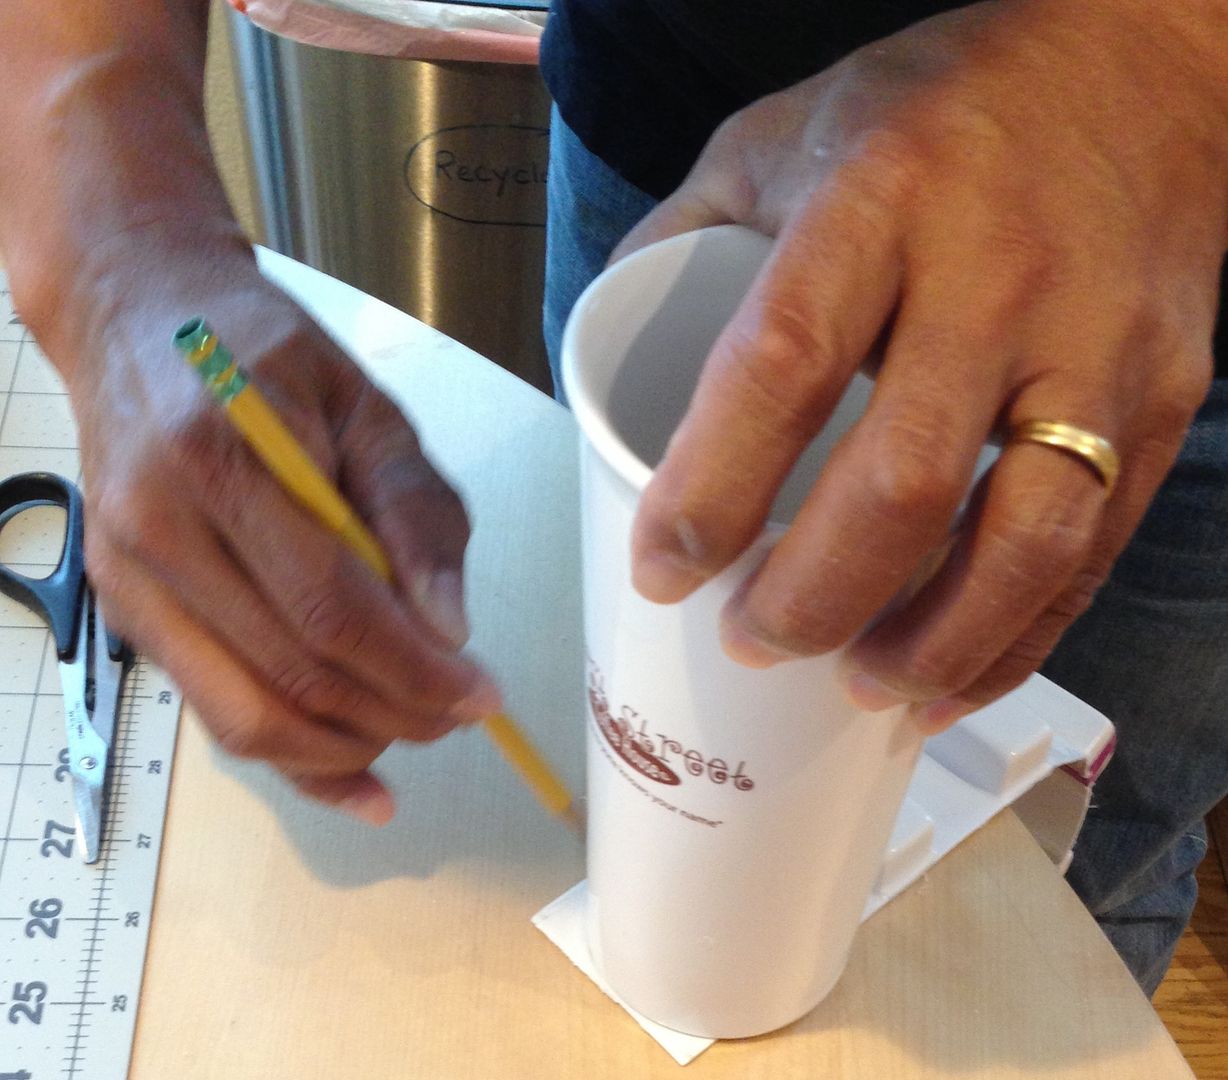
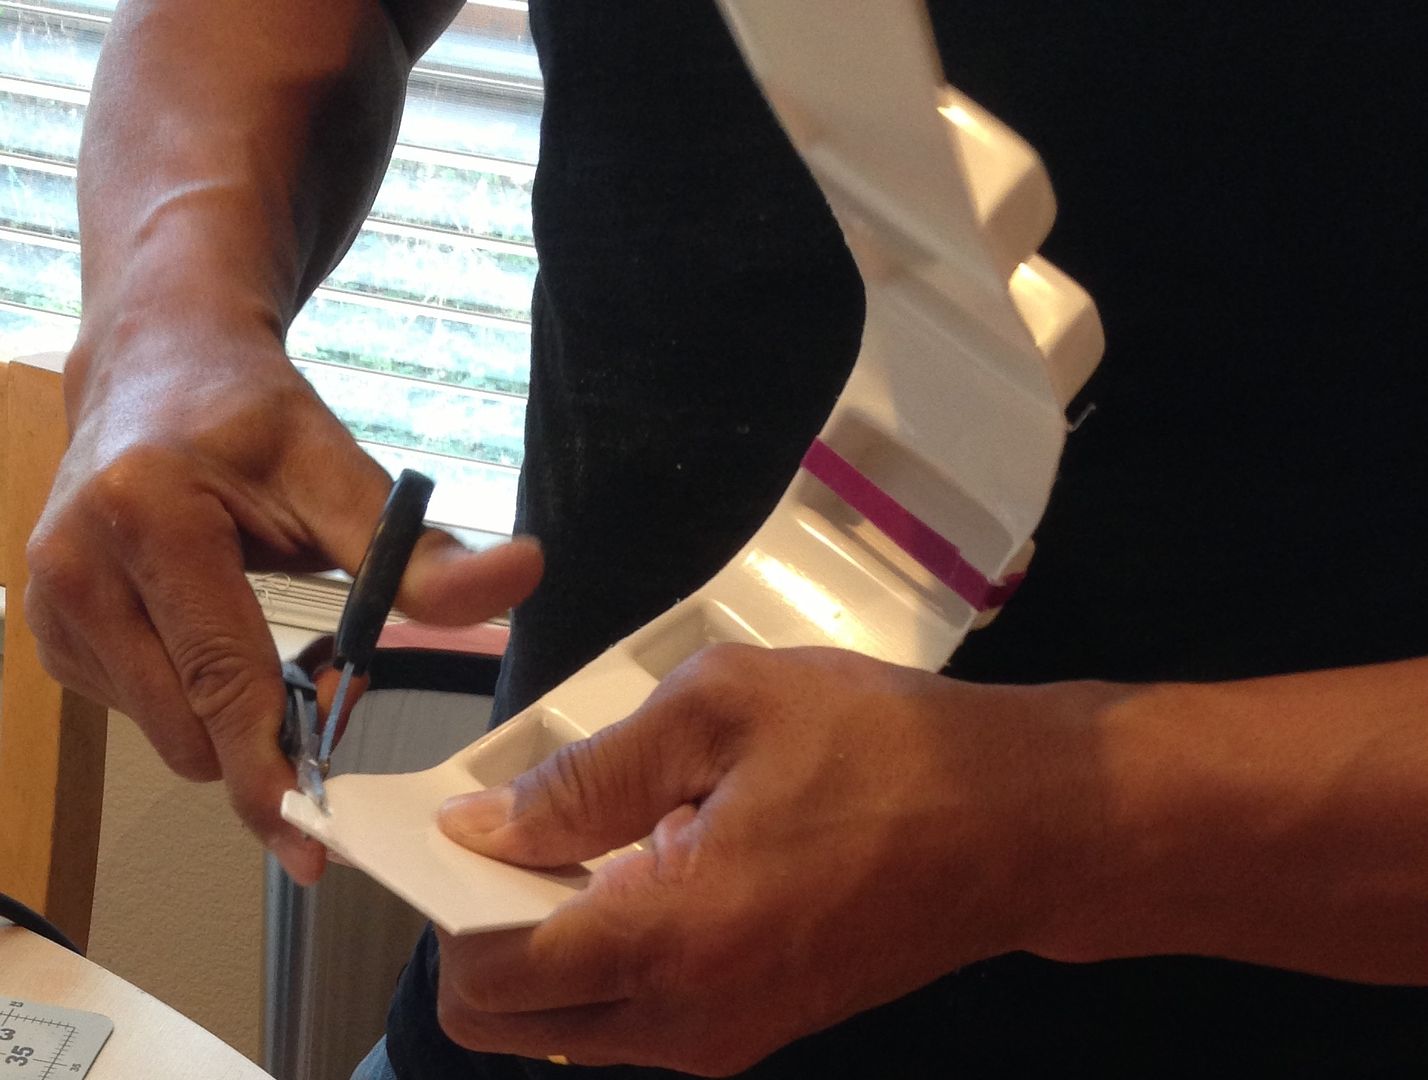
Used our curved Lexan scissors to follow the trim mark. These scissors have been awesome. Just right for trimming the RS armor.
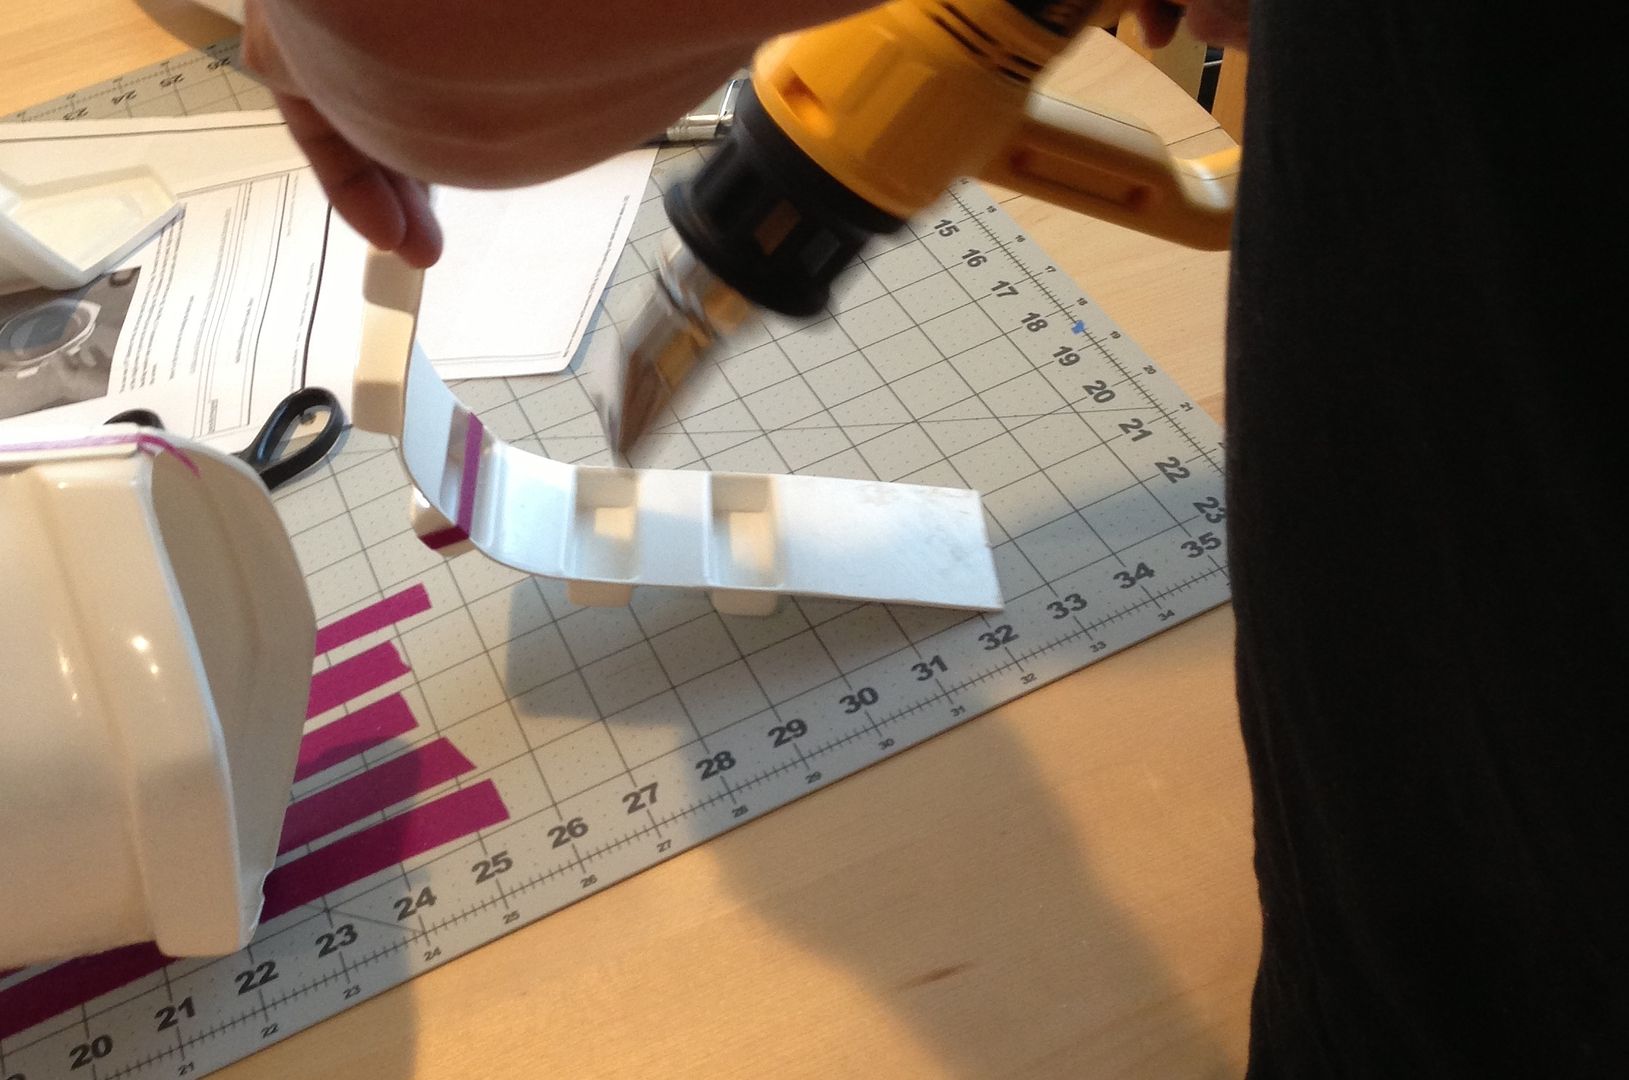
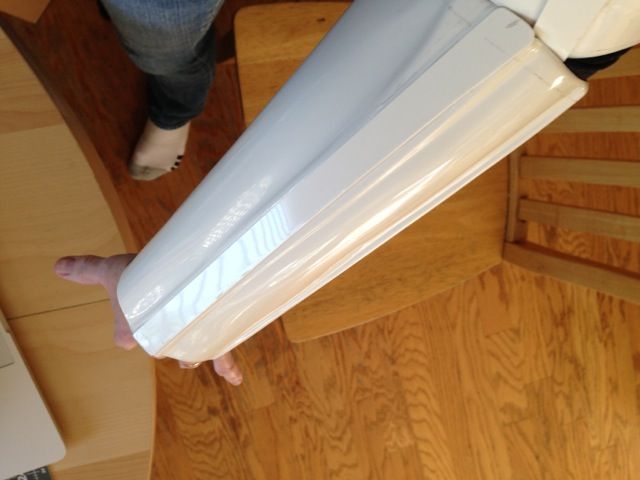
Getting a heat bend onto the ammo belt.
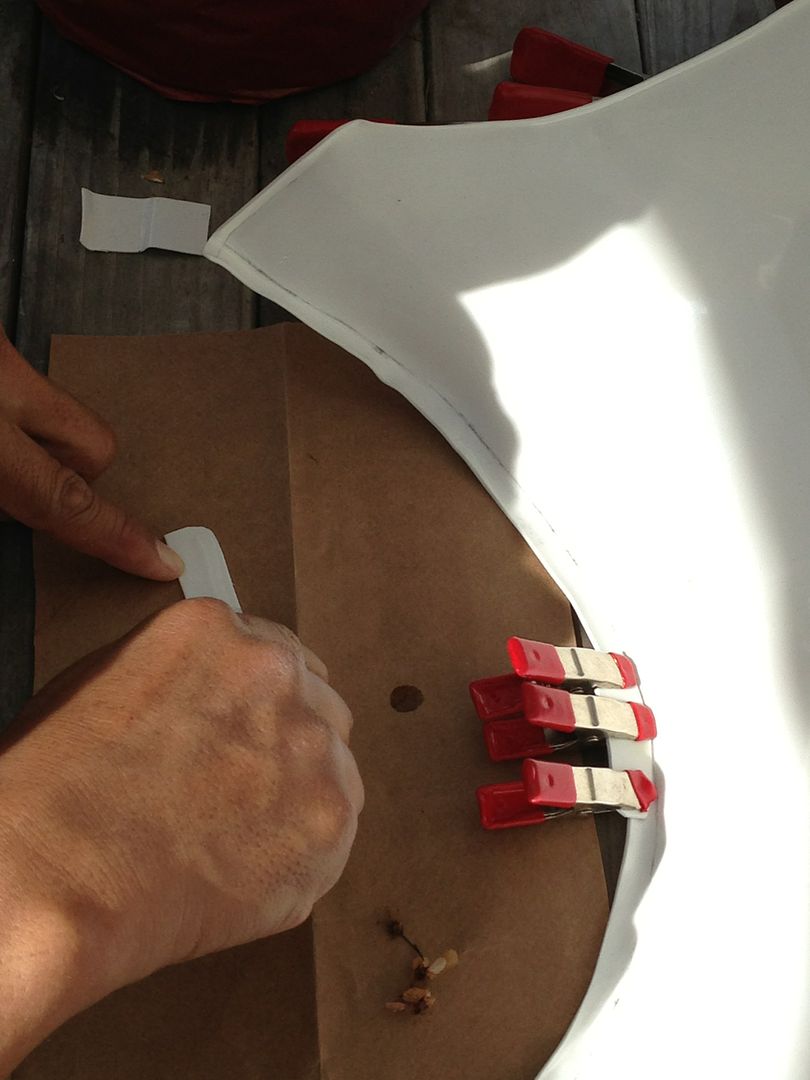
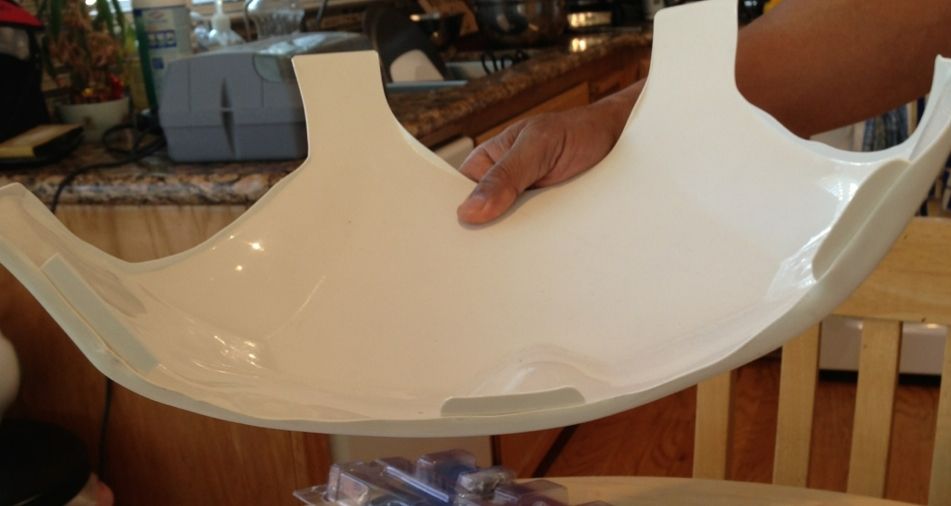
Re-used the "half moon" rig from the chest plate to create something that would hold the thigh in place for adding the ammo belt.
Modified chest rig with holding the thigh in place.
Ammo belt being added into place.
Finished piece.
-
We built all day on Sunday. This is the first chance I've had to update the thread, although husband has been gently reminding me everyday.
The interest, enthusiasm and time he's given the project has been amazing.By early Saturday evening, we ran into a "roadblock" and it looked as if we couldn't go any further. Not only we were missing missing five screws on the chest brackets, but the tool we had for punching snaps was not compatible with the RS strapping. The snaps that came with our fancy kit were 3/8" and our plier kit was 5/8." We hit every store in our town and the next look for a 5/8" kit and came up empty. We texted cousin Walter, and he'd suggested an alternate tool that had worked on his armor. We found the tool at our local hardware store, (and we'd had to go out to get paint for the Scootch anyway), but the tool stubbornly refused to comply with the RS snaps. We were tired. We were frustrated. It wasn't a good frame of mind for building. We decided to call it a night.
I spoke with Kyle the next morning and was updating him on everything we'd done the day before. I told him about the 3/8-5/8 issue.
"We can't do any more strapping without that tool. So, we're going to order it online, and once it comes in we can finish the strapping."
"Uh, Diana? I have the tool for the RS straps."
"Can I borrow it?"
"No. I'm going to selfishly keep it from you."
Wise guy. Kyle was swinging by my side of the county later in the day anyway and said he'd drop it off. He also had spares of the screws RS hadn't sent. Whoa.
While we awaited the arrival of Santa Kyle, we decided to finish up a few last pieces. We still needed to do the sniper pack and ammo belt. Shouldn't be too hard, right?
Hah.
So many of these tasks would probably go much faster if I was just four inches taller and thirty pounds heavier. But, few of us have a screen accurate body. So, you work with what you have and make the armor fit a real world body.
"Your shin is too small and the sniper plate is too big. It's not going to fit," my engineer stared at the two pieces.
"Heat bend," I said. "We just have to make it work."
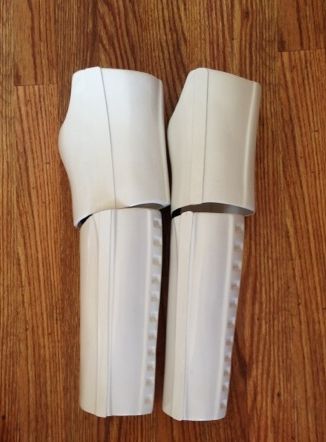
We found the following tutorial very helpful as worked on the shins. It is entitled: "Assembling Greaves/shins" and includes a tutorial on bending armor using a heat gun.
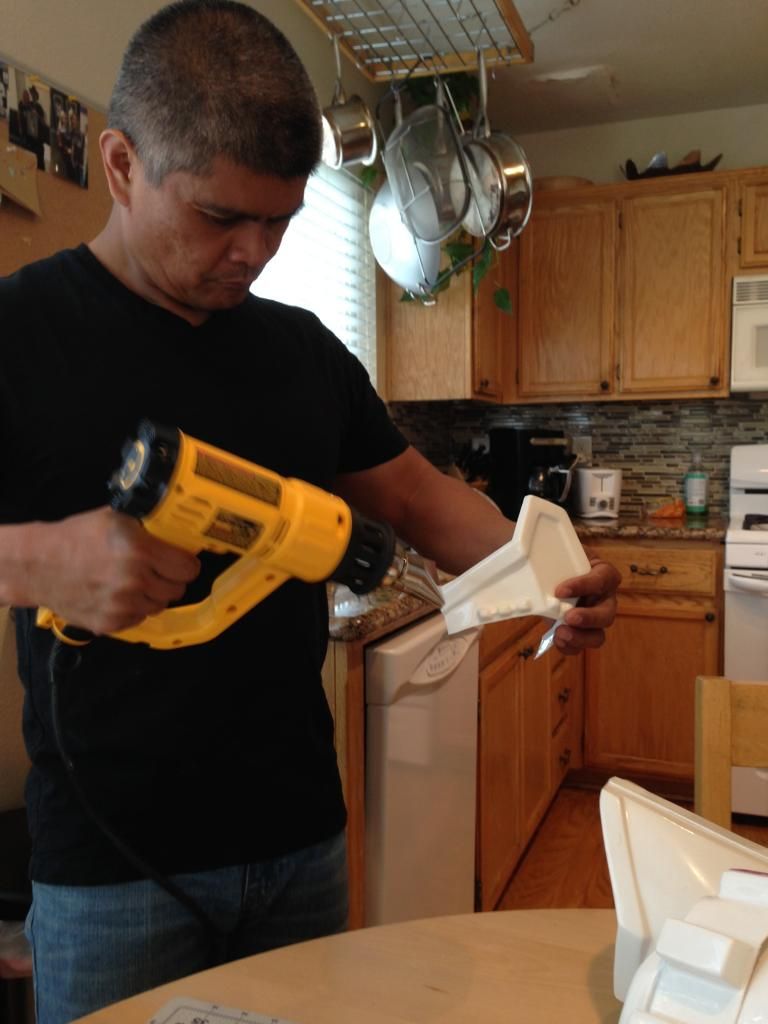
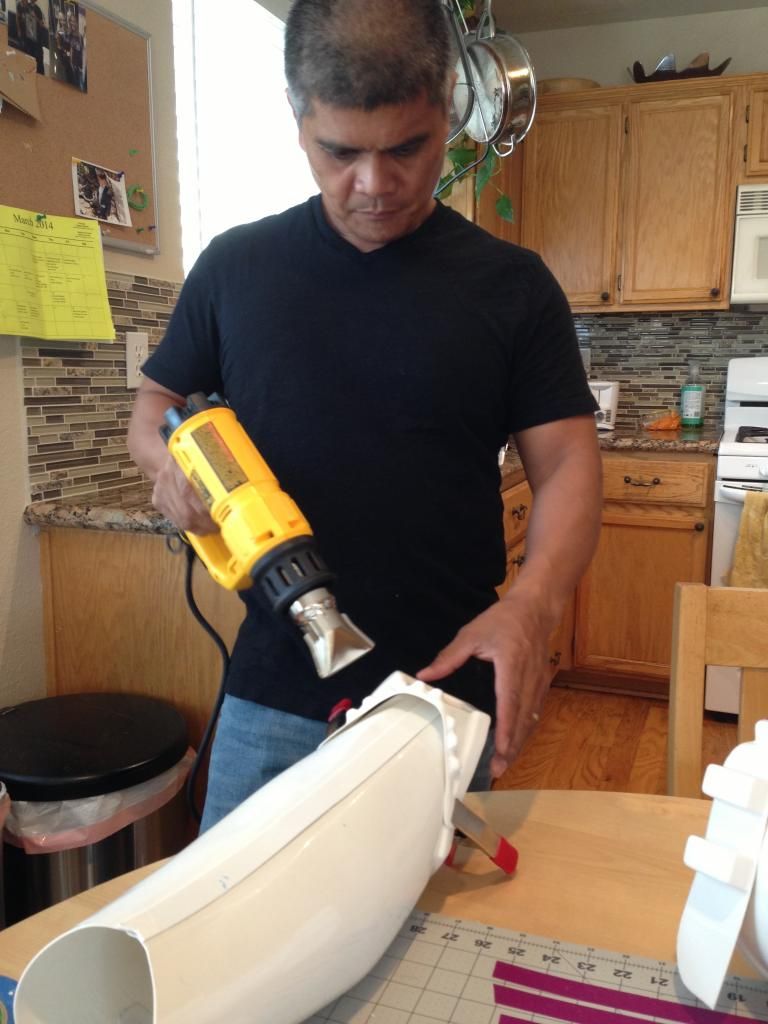
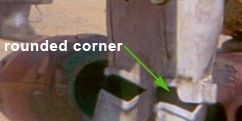
Molding the sniper plate to fit my "too small" shins as husband refers to them. Seriously, I think they're quite buff. Not sure if there is a better way to hold on the sniper plate using something other than a clamp? On one side, the clamp left a melty mark. The engineer sort of bent it back out again, but there's definitely a little section there that looks like it took a bit of blaster fire.
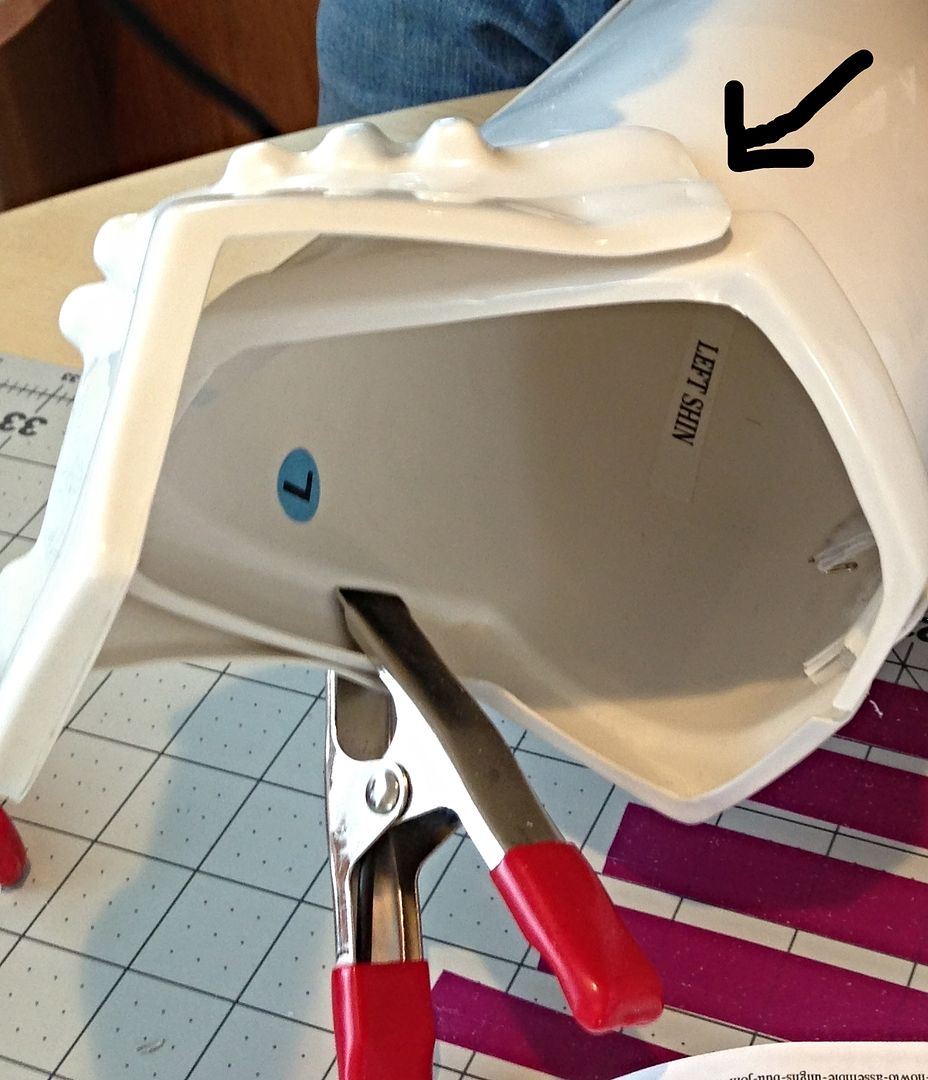
Was hoping I got a picture of it, and I did.
This is the blasted area right after the clamp was removed and before husband started cursing and scorching his fingers trying to fix it. There was no clamp damage on the other side.More updates to come.
-
Great update Diana!!! Yes, let the helmet hang out for a week before you start up again.
Great advice. Thanks. Scootch is just hanging out on his pedestal enjoying being the centerpiece of the living room. Doesn't seem inclined to go anywhere.
Even though we're doing almost all of our building on the weekends due to work, (and then cramming a lot in at once), we're not planning on rushing anything. If we do, we'll just end up having to redo it again. Plus, we're having a lot of fun building the armor together. -
NICE!!!!!!!!!!!!!!!!!!!! I hope the helmet comes out great!!! I'm so happy that your "engineer" is totally involved. Please let me know when he "turns to the darkside" and gets his armor!!!
Won't be too long until we convert your cousin to our dark and evil ways. His armor is on order. He has tried to back on the whole idea. But, I told him to at least give it a try. He's my best friend and it's been such fun working on the armor together. He's not convinced, but he's willing to try. My mentor, Kyle, stopped with his family for a bit yesterday to help on a piece of the RS strapping. His wife was commiserating with my husband on being married to folks obsessed with Star Wars. I was thinking maybe we should start a support group...
"Hi. I'm Jan."
"Hi Jan."
"I've been the spouse of a Star Wars addict for 10 years. He says he is going to cut back, but it seems every year it something new and different. It never ends with him-"
The group would be full. I think.
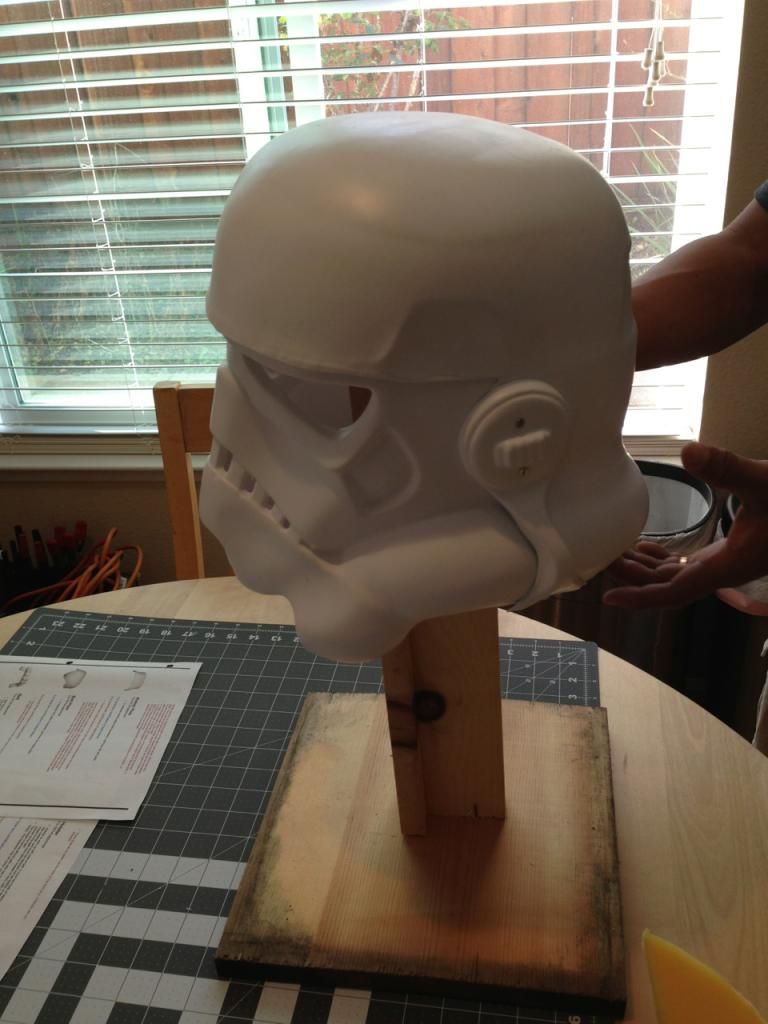
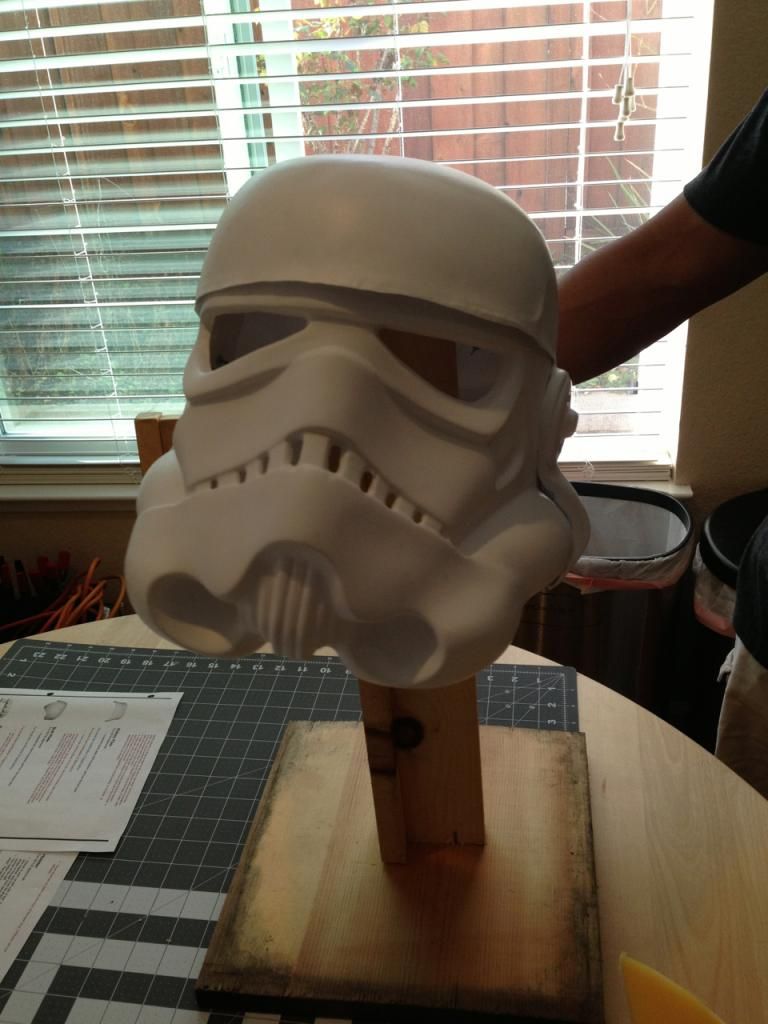
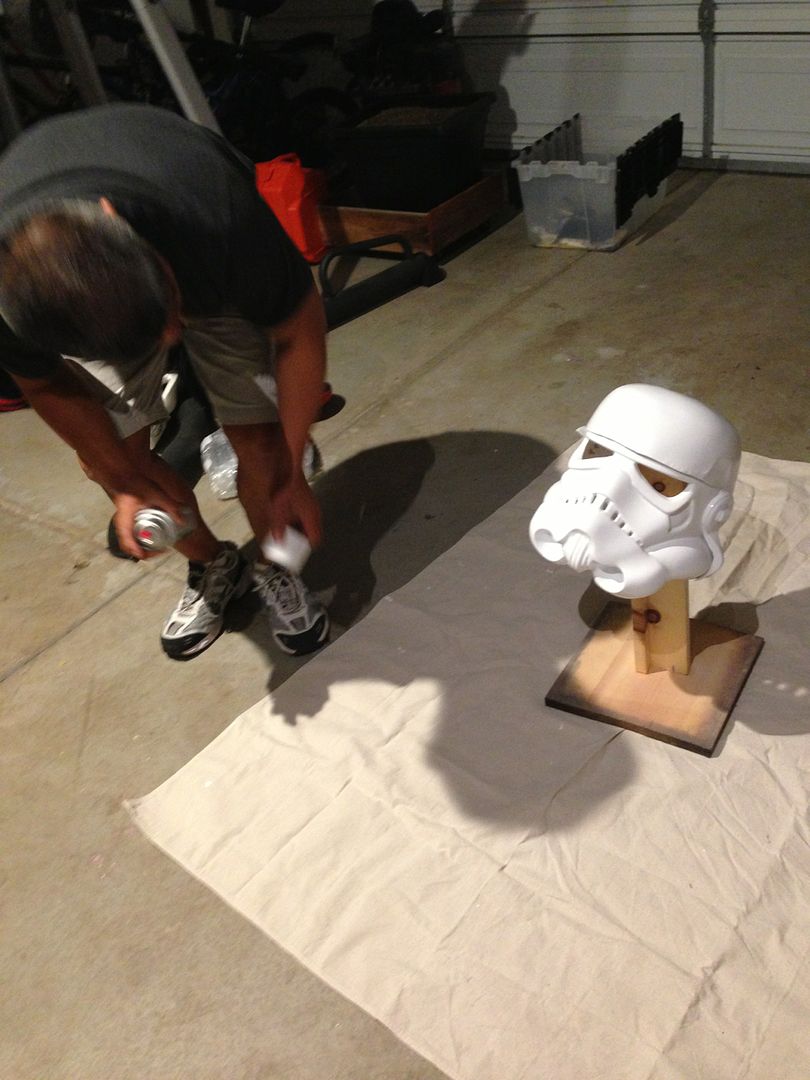
The helmet is looking good. Thank you for your guidance. We applied four coats of primer, let it dry overnight with a fan running, and then started on the coats of gloss white. Once all the coats of paint are on, we're going to let the helmet "sit" for a week, as per the paint thread that Germain forwarded above, to let the paint settle for a while.
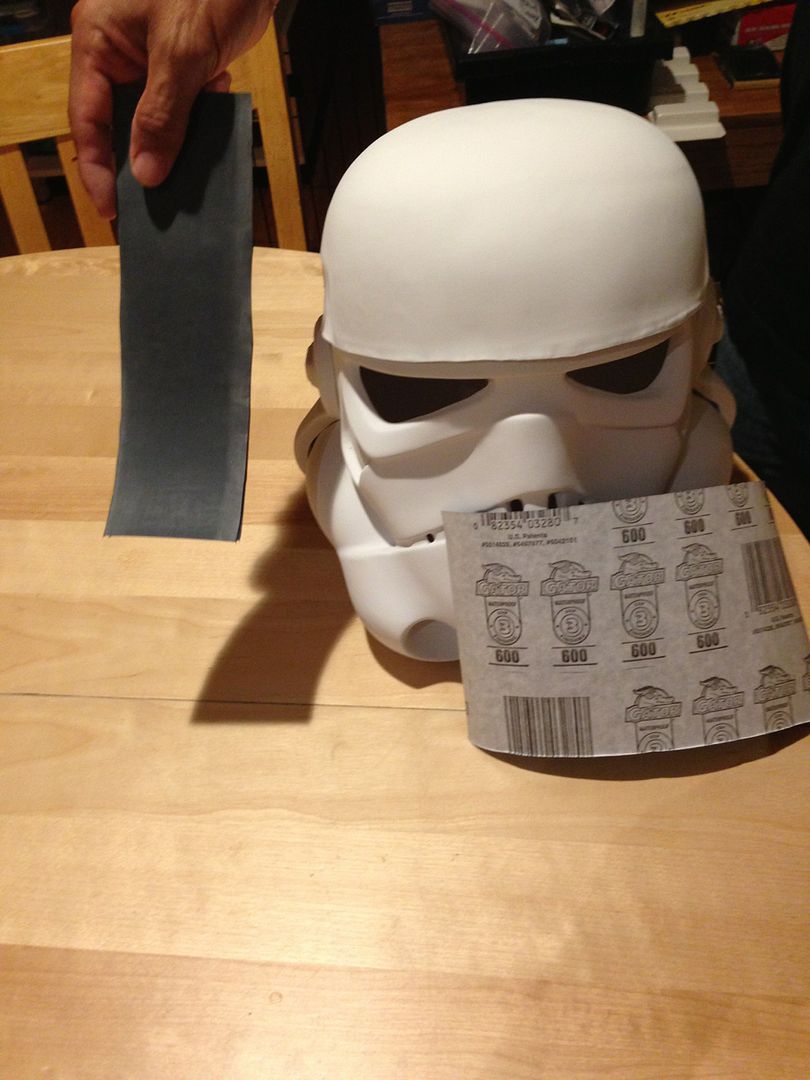
After the coats of primer dried, prepped for the gloss coats by sanding with 600 grit sandpaper.
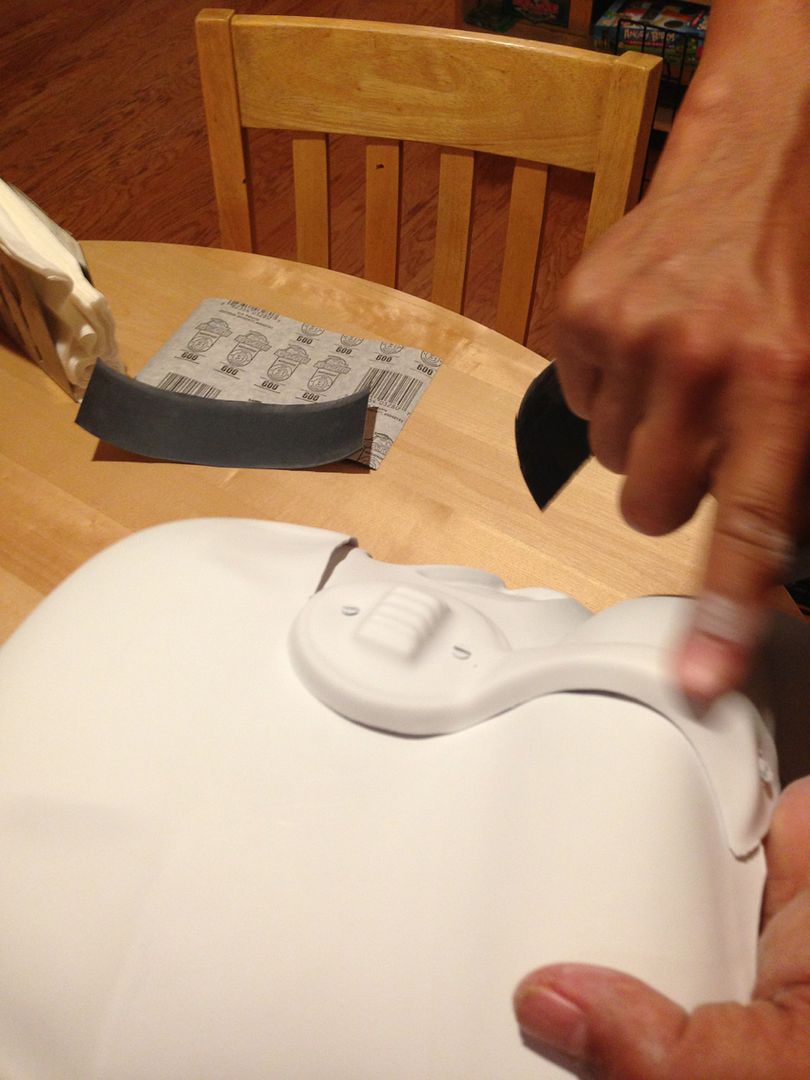
The engineer stressed you could by feel exactly where you still needed to sand because it has a slightly rough texture under your fingertips. Once everything feels smoothy and silky under your fingertips all over, it is ready for painting. He insisted I feel this for myself. Uh... OK. Right. This isn't weird.
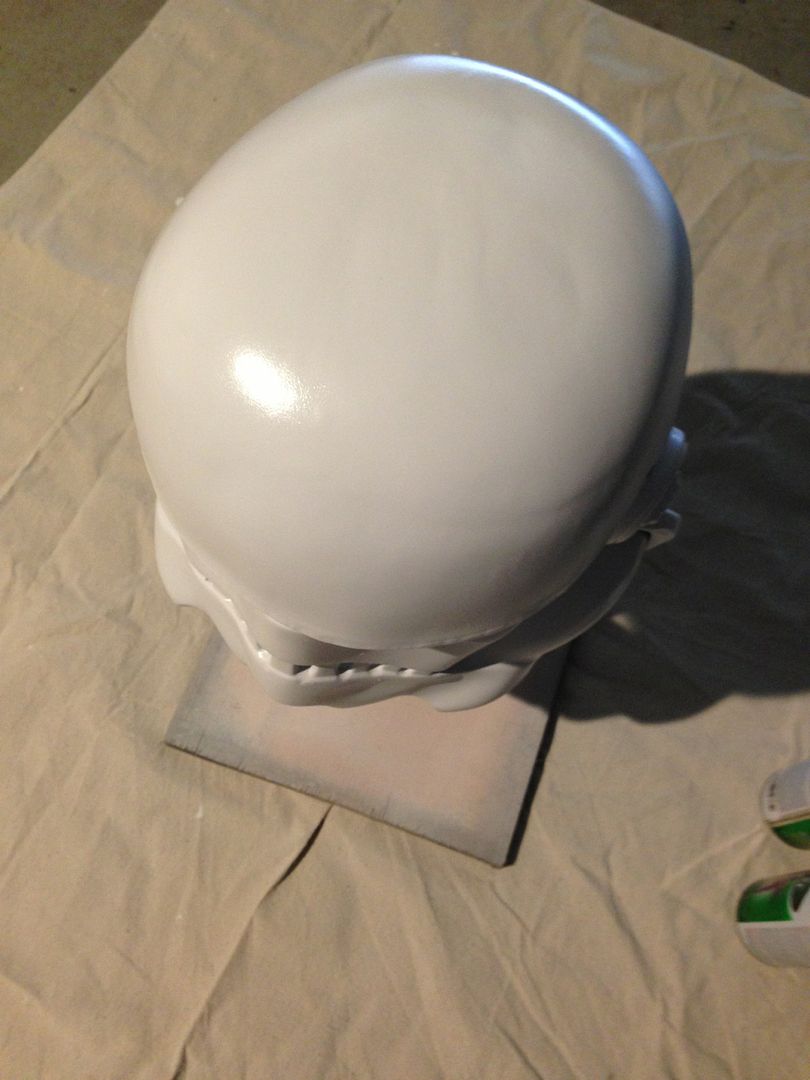
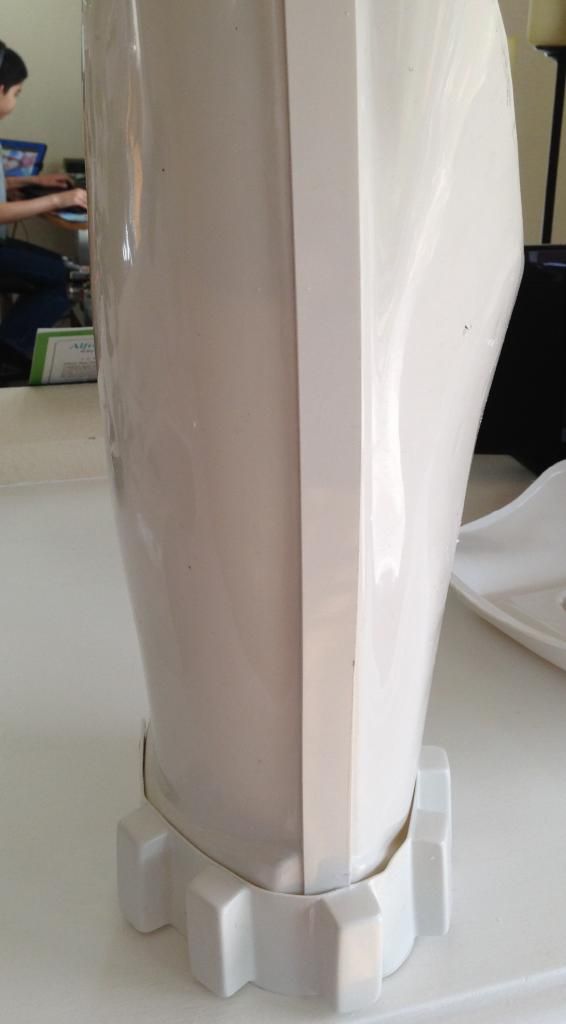
Check it out! Scootch is a shinie.
-
OK, I have a helmet question, what is an "S-trim"?
-
I've often heard "Krylon paint" when it's about painting a helmet, but a don't know about the accuracy.
This thread might be interesting for you to read. I'm sure there are others but i just found this one:
http://www.whitearmor.net/forum/topic/3348-move-along-helmet/
Thanks, Germain. I appreciate the reference thread. I loved the way my cousin Walter's Scootch helmet came out so I am using his build thread as a reference on this one.
Walter's advice to me was: "Make sure you spray light even coats. Three coats for the primer. Allow to dry one hour between coats, and then seven coats of the gloss white."
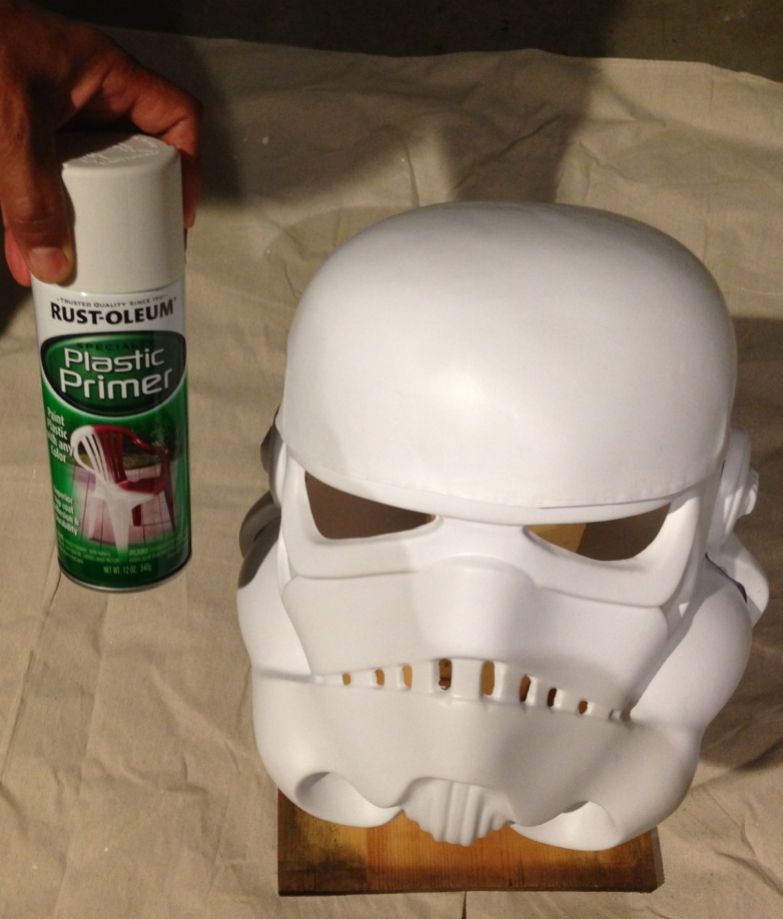
This is the white primer. We found it at our local Orchard Supply.
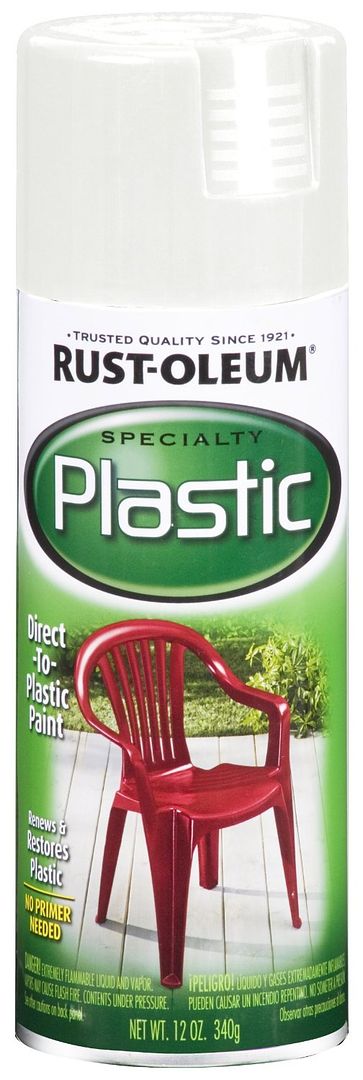
This is the paint we will be using. Both designed just for plastic.
-
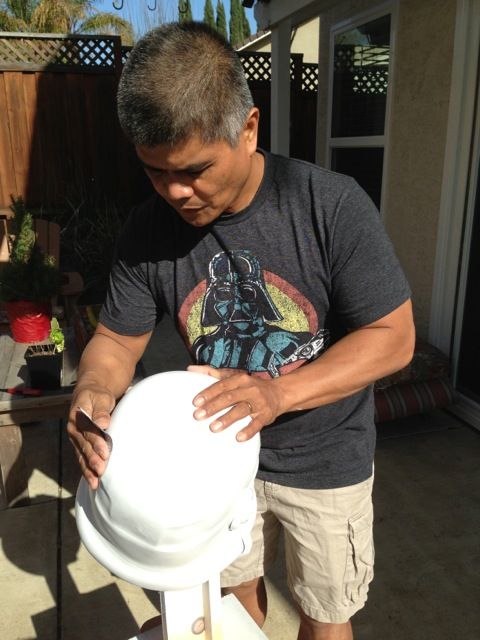
Time to paint the Scootch bucket. The weather is perfect for it this weekend.
So, the engineer headed outside to build a rig for painting helmets.
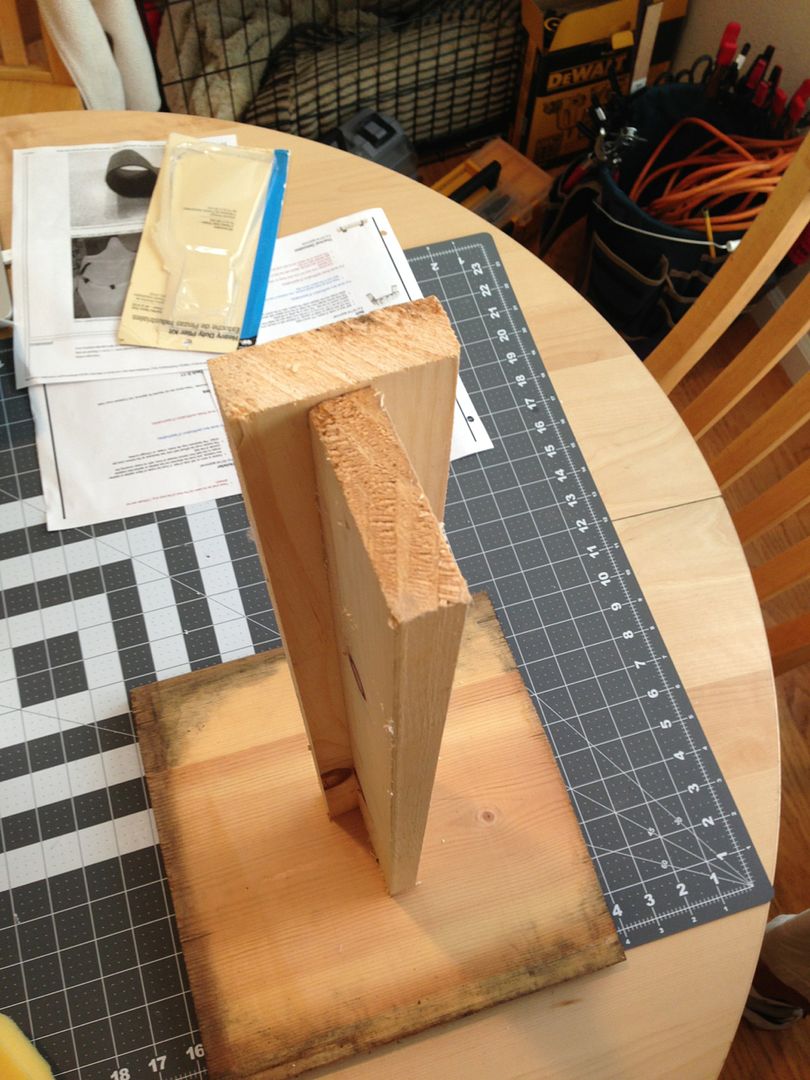
This is what he came back inside with a few minutes later. We always have spare wood around since husband likes to build things in his spare time.
This rig allows the helmet to be painted from different angles and turned. Allows gives it a place to dry.
I just loved it because it made my helmet look cool.
We weren't sure what kind of paint and primer to use, so we texted Kyle (my mentor) and cousin Walter (Haribon72). I love this picture of husband out in the mancave with the Scootch bucket. It is like the two of them are in a deep conversation about the mysteries of life.
-
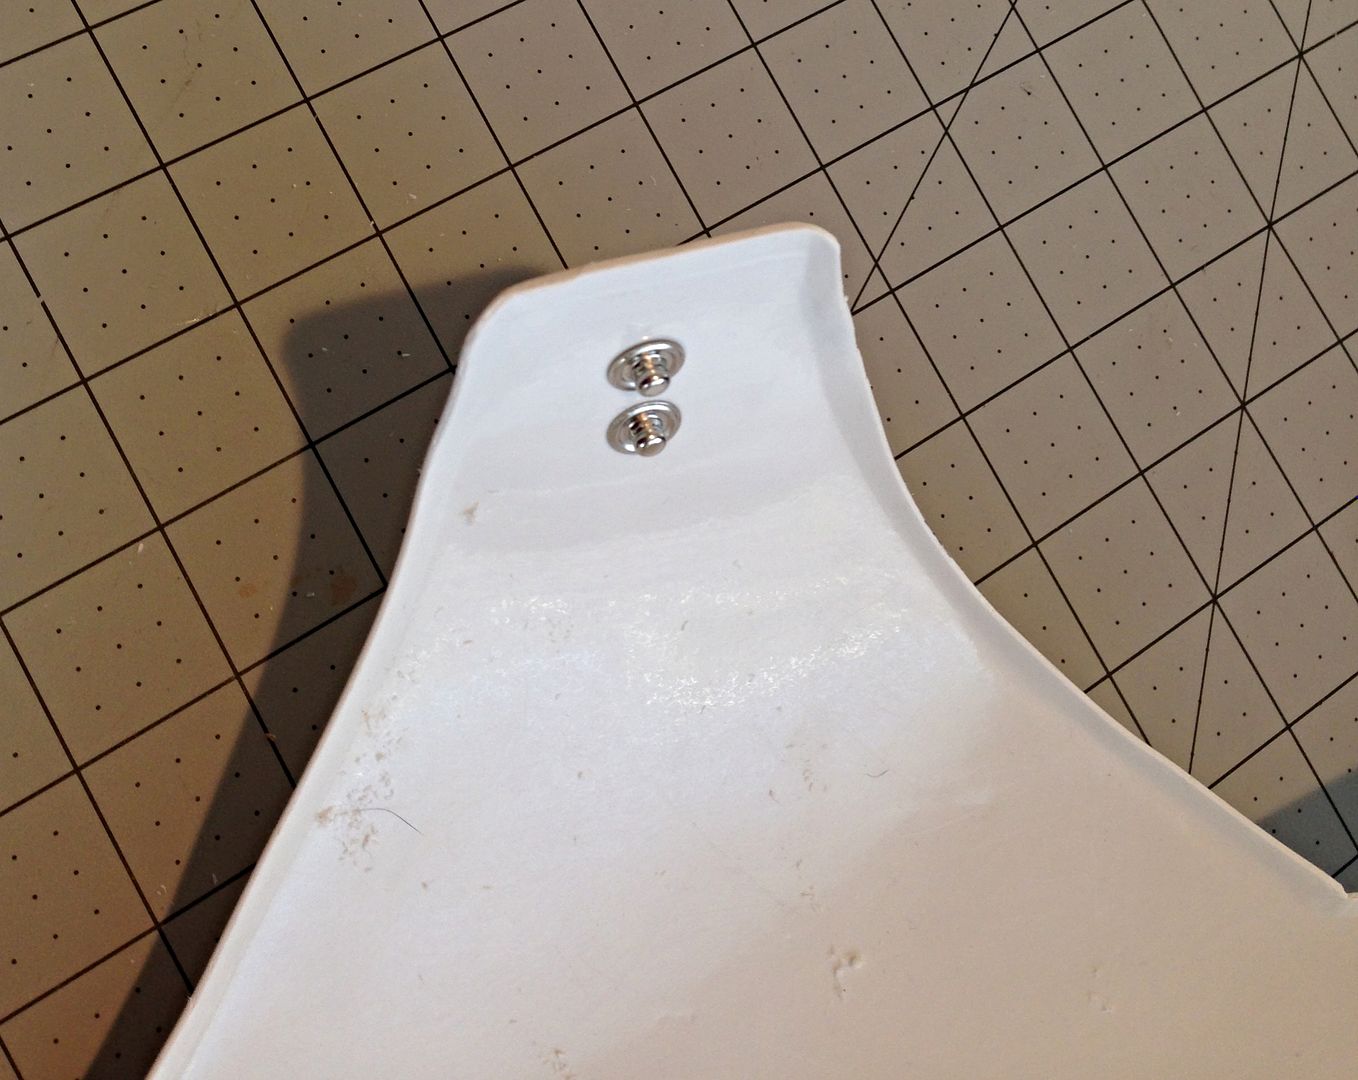
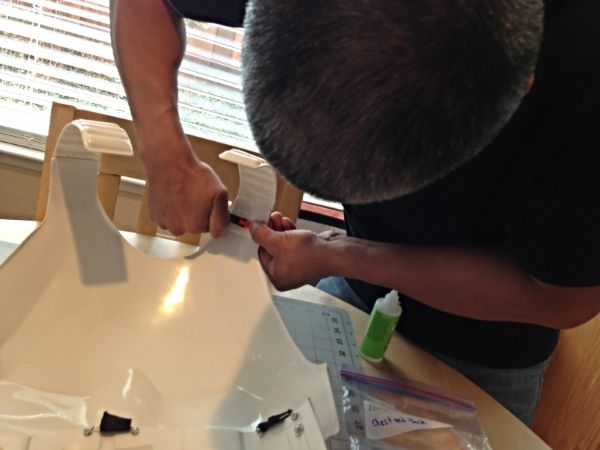
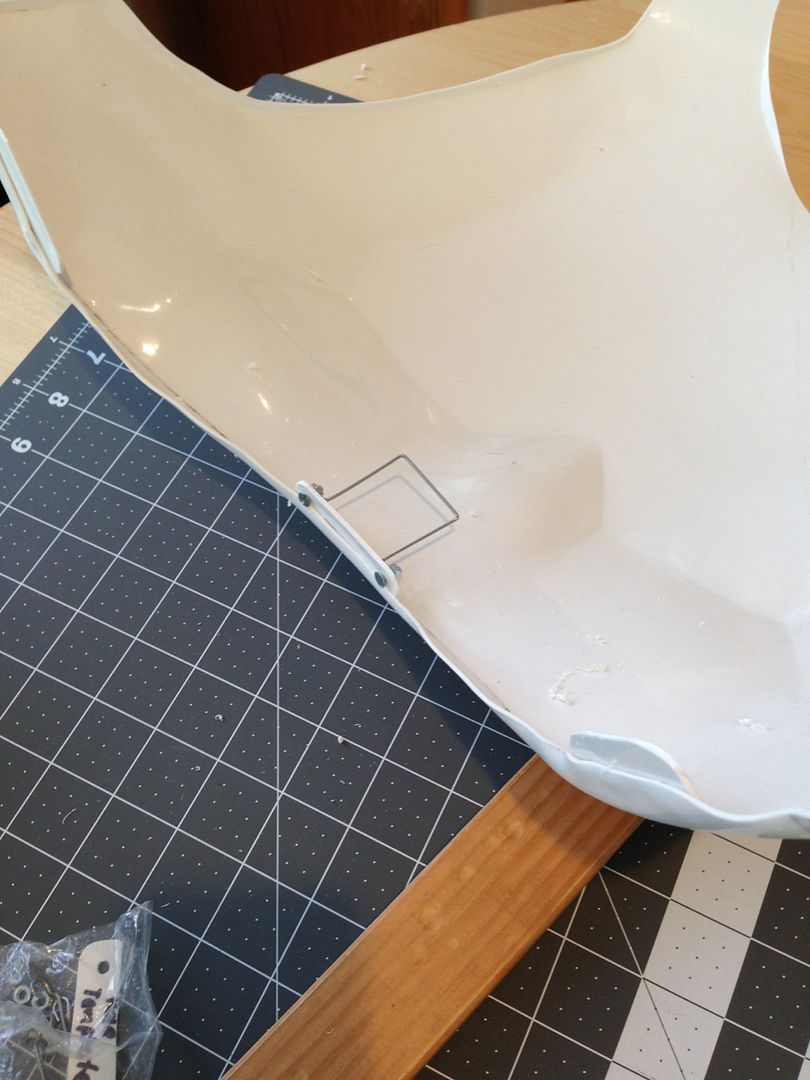
We moved on to the belt. Time to attach the dropboxes. Originally, we were going to make the dropboxes "functional." But, there's not really much you can put in these itty bitty little boxes. They're cute and all, but my current (rubber chemical) gloves are so clumsy I can't imagine having the dexterity to possible open those things up with my gloves on. So, we are sealing these little puppies up. Maybe I should write a little message inside of them first. Like a time capsule.
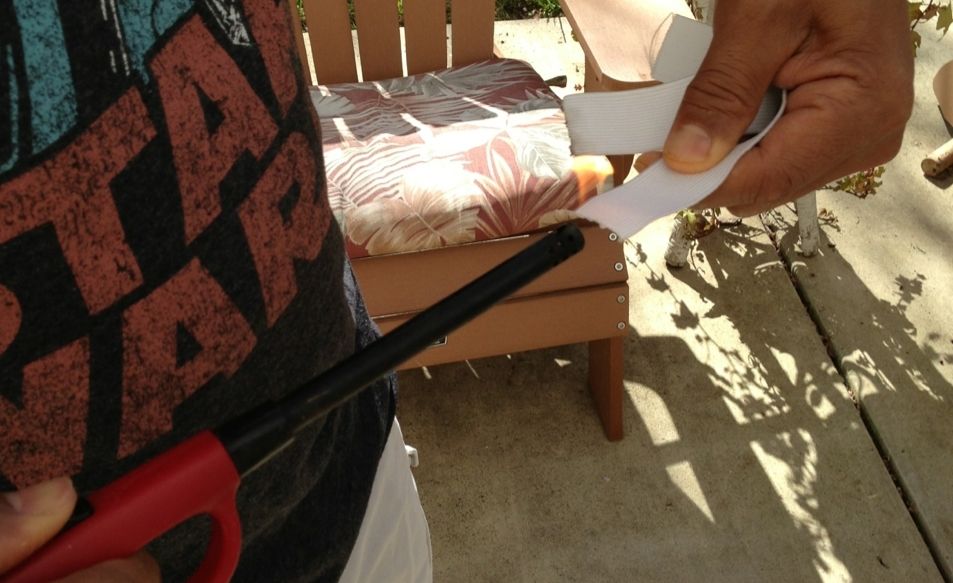
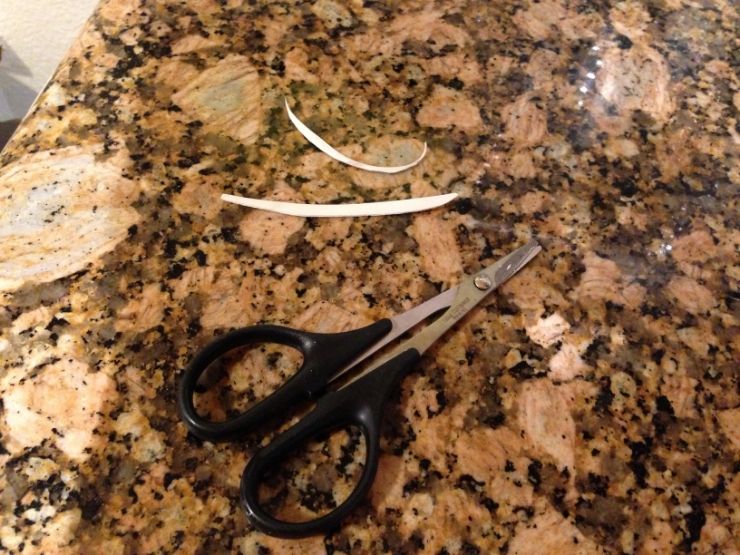
The ends of the pieces of the elastic are frayed. So, we hit 'em up with a bit of flame to get rid of the fraying. This is best done outdoors. The smoke detectors can be so annoying.
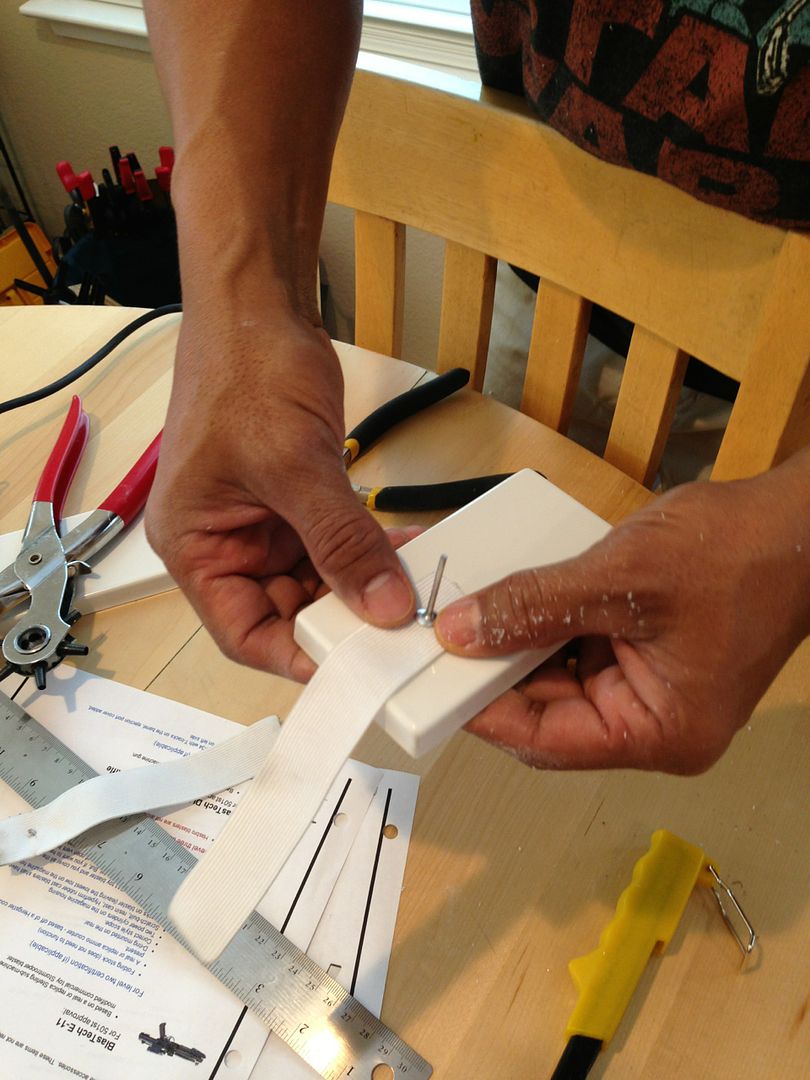
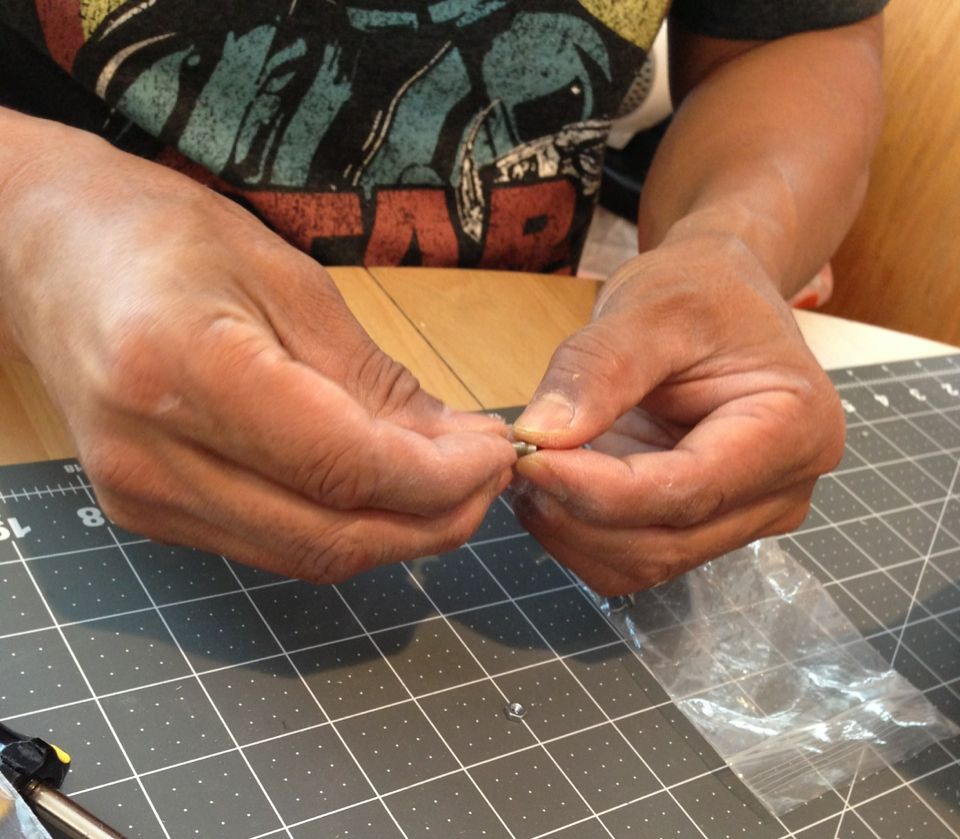
We decided to attach the elastic with a rivet.
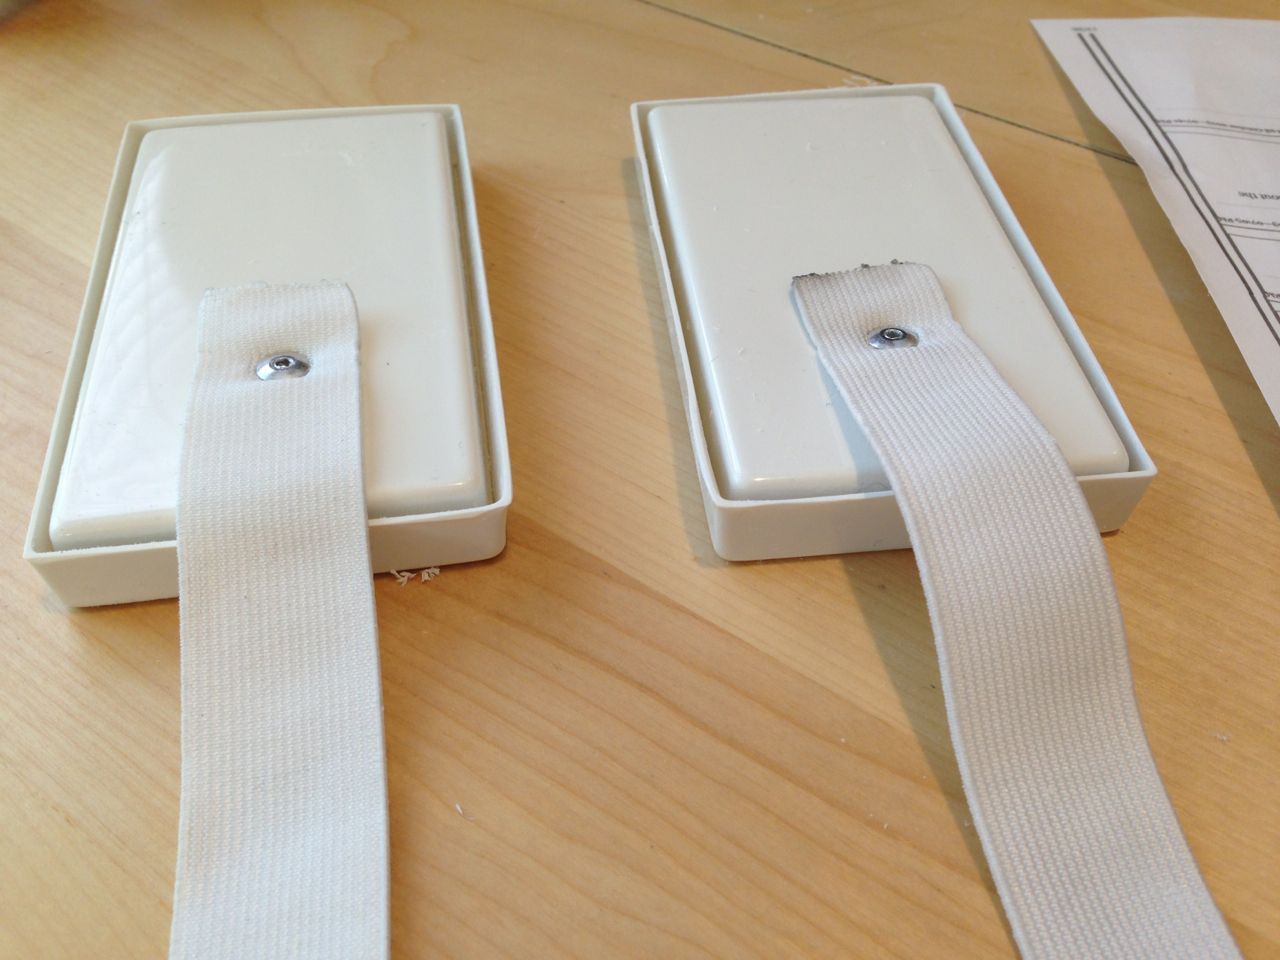
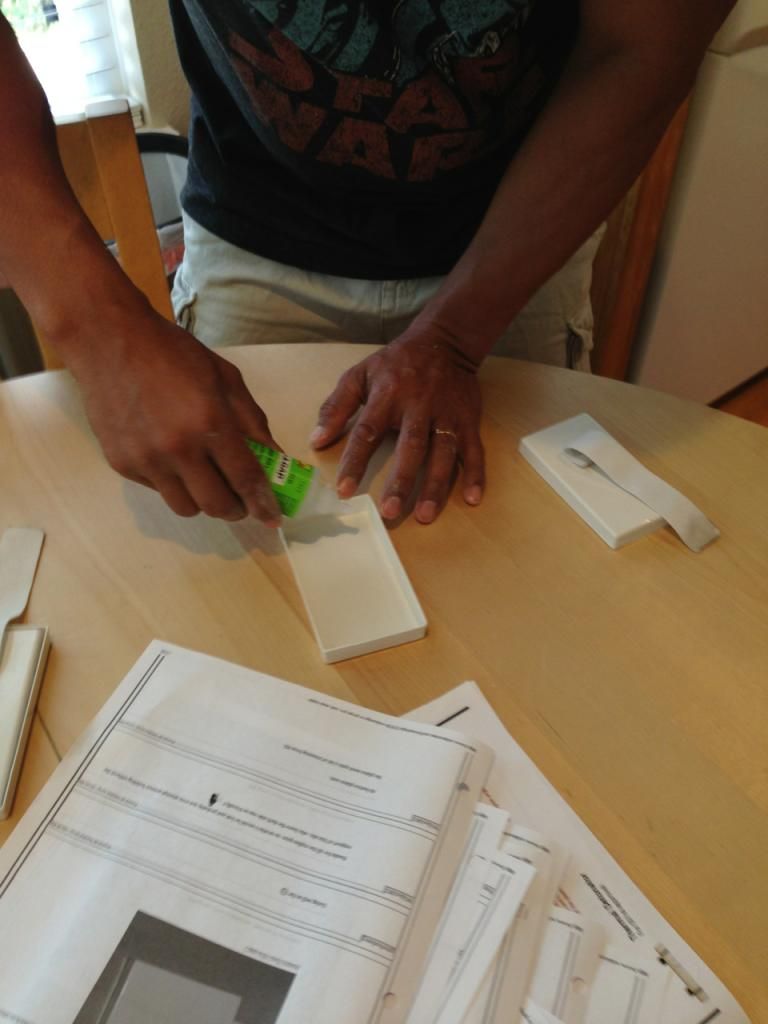
Sealing the boxes for all eternity. Gah. I didn't get to add my secret message. Sigh. Husband did want me to add to the build thread that you only need to put glue in the four corners of the drop boxes, and not all around. If you put glue all the way around the rectangle and then squeeze it shut, it will come out like a PB&J sandwich.
-
So nice having my engineer at home today. The weather was glorious and we were able to spend a sunny afternoon working both indoors and outdoors hammering out the nitty gritty final details of the build. There's not much left to do, but it seems all these little tasks are the ones taking the longest to get done.
Thank you to Darth Aloha for suggesting I increase the size of the pictures in my thread. I appreciate the feedback.
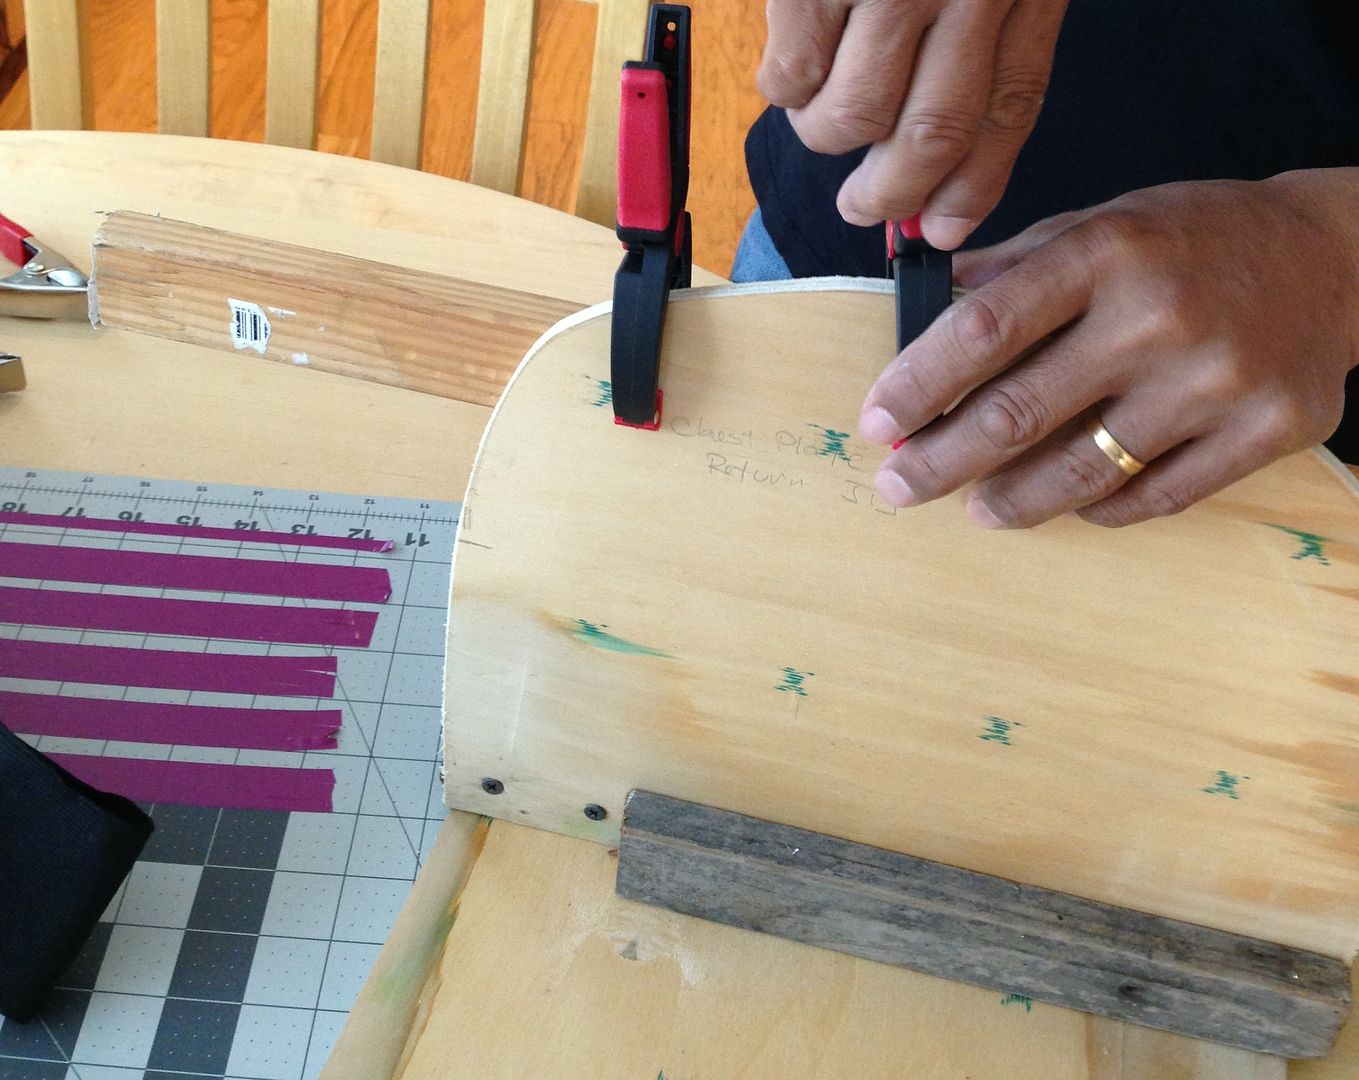
We added a new return edge to the bottom chest piece.
The return edge was easy to create thanks to the "half moon" rig. The other essential components are the heat gun and a block of wood.
For added strength, we also put little shims in where the brackets will attach. These are the most high stress areas, and most likely where you'll get cracks.
 Fu
FuFully reinforced chest piece
Chest brackets look great except...
RS didn't send us enough screws. We're short by five screws. We're not screwed, though, we'll just find some locally. In the meantime, we'll work on something else.
-
Congratulations on your celebrity status in the March newsletter! Looking forward to more build posts!!!
Thank you. I was very flattered to be mentioned. It meant a great deal.
For anyone who is interested, here is the PhotoBucket link with rest of the "Where in the World is TK pictures?" My son was on winter break so we spent five days in the Philippines, with a stopover in Japan each way. It was a good opportunity to take some interesting pictures. I headed home to get the boy back in school, and my husband continued on to Hong Kong and China for work. He took TK with him and got more pictures.
 I married the right man.
http://s974.photobucket.com/user/dianawolftorres/library/Where%20in%20the%20world%20is%20TK91305
-
This is such a great build!
Your husband is a brilliant, and you are adorable! Such a great pair!
I don't think I've ever been called adorable before. But, I am definitely not beyond accepting flattery. I like you already. Glad you are enjoying the build. My mighty engineer is back home again and we are resuming our team build today.
-
Welcome Christine! Looking forward to following your build thread as you get started on trimming down your new kit. You're going to look amazing in it!
Diana's RS Props Build- ANH Stunt
in Build Threads Requireing Maintenance
Posted
Thank you for the feedback. Forgive my shiny lack of knowledge in these matters, but what is a Simon's holster?