

mikedwelle94
-
Posts
852 -
Joined
-
Last visited
-
Days Won
2
Content Type
Profiles
Forums
Gallery
Articles
Everything posted by mikedwelle94
-
 Sshhh it's definitely the lighting lol. I know for sure I can bring the strap up on a thigh, and add padding to a shoulder bell. If you see anything weird anywhere else, do feel free to comment Sent from my SCH-R530U using Tapatalk
 -
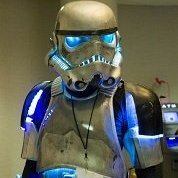
Crosspost from NEG: Did a test fit after taking nearly an inch off the tops of the thighs. Sorry for the picture quality - they were taken by my sister's phone. And just to prove it's me under that helmet: Just need to add the drop boxes and trim a little bit more off the thighs and buttplate. Other than that, the armor is pretty much "me" sized, and just needs a little padding in a few places. I'm starting bookkeeper training next week, which means early in, early out. I'll have 5 days next week that I can devote to finishing this armor. I'm thinking about debuting it at the St. Patricks Day parade in Boston Advice is welcome as always!
-
Shadow Troopers and Lightsabers.
mikedwelle94 replied to Jedi_Master_Doogle's topic in TK Lightsabers
http://starwars.wikia.com/wiki/Cuis_clone -
TM ROTJ helmet build 1.5mm
mikedwelle94 replied to mikedwelle94's topic in Build Threads Requireing Maintenance
Calling this helmet done after going back with the white paint pen and some acrylic paint. I might revisit the weathering and go for a dirtier look when I apply for Expert Infantry, but for now, this should be good to go. -
Steves Shock Trooper WIP
mikedwelle94 replied to spotter301's topic in Other Non-Approved Star Wars Costumes
Really? Who is the maker of the helmet kit? Do you have pictures of that and the ears? Any ear cap from any vetted maker should fit any helmet from any vetted maker, once trimmed properly. How's everything else coming along? -
Nice. It's a good time to be in the NEG, it seems! This is super convenient, considering Eric is the man behind the CRL and has already seen most of my reference material. Exciting times ahead for sure!
-
Now that I've done some detail work with a white enamel paint marker, some black acrylic and sandpaper, I can call this helmet ready to go. I'll more than likely re-visit the helmet weathering and try to give it a dirtier look when I apply for Expert Infantry, but for now this should be golden for base approval. I tried to replicate all the little paint chips and scratches on the red paint seen on the video game helmet. --- Does anyone know who the new LMO is? It's getting to be that time where I should get in contact with him/her and let them know where I am with this.
-
Meanwhile, I've secured the ammo belt to the fabric using split rivets. The drop boxes have been trimmed and painted - I just need to assemble the two halves of each box and attach them to the belt. I'm thinking I want to do it in such a way that I can store my ID, a credit card and some cash inside 'em for those visits to the conventions. At that point, the trooper should be done structurally, leaving only the paint and weathering work to do.
-
Yes, but after I get base approval. I'm thinking a backpack and a DLT-19 will happen sometime this summer.
-
Opened up the eye holes a little more and glued on the left ear. All that's left to do now is weather the helmet. And everything I have, spread out. To do list: - Paint red stripes on both thighs - Paint right shin - Rivet ammo belt to fabric belt - Weather everything - Touch up red paint on boots - Trim out backs of thighs and shins to improve mobility - Trim and assemble drop boxes and paint red, then attach to belt with elastic. One more full day's worth of work, and it should be there. This has been a fun build so far!
-
TM ROTJ helmet build 1.5mm
mikedwelle94 replied to mikedwelle94's topic in Build Threads Requireing Maintenance
Snapchat-337931459918057743 by Mike Dwelle, on Flickr -
I'd replace those boots first. Go to: http://www.imperialboots.com/product/421/ Also, the holster doesn't appear to be attached correctly for ANH stunt. I'd visit the CRL page provided above
-
TK-4510 ROTJ decals that came with my TM kit. You should look on Trooperbay for yours Sent from my SCH-R530U using Tapatalk
-
Steves Shock Trooper WIP
mikedwelle94 replied to spotter301's topic in Other Non-Approved Star Wars Costumes
Very nice sir. I would recommend taking some cotton swabs + paint thinner and tidying up some of your paint edges just a little bit. Can't wait to see this with some weathering on it! Loving the bubble lenses. The red paint should be reaching up to and meeting the bottom edge of the black frown - no white plastic should be visible between the bottom of the frown and that red paint. Easy fix. Subscribed and watching. -
Congratulations to our new Detachment Leader - Dark CMF
mikedwelle94 replied to Darth Aloha's topic in Announcements
A big thanks to Eric for all his help with getting the ball rolling on the Imperial Shock Trooper CRL. It would not be where it is now without his efforts. Tim, congrats on the new position and it is well deserved. I'm looking forward to working with you on the Shock CRL and watching it get the green light. -
TM ROTJ helmet build 1.5mm
mikedwelle94 replied to mikedwelle94's topic in Build Threads Requireing Maintenance
Will do, thanks for chiming in. That will happen tomorrow night most likely. The lenses are temporarily held in with sticky back velcro - easily removable. -
Looking for advise
mikedwelle94 replied to luis.e.gonzalez.1293's topic in Build Threads Requireing Maintenance
One of these days, I'm gonna need a TM ROTJ in black. I *really* want to do that new Battlefront Shadowtrooper. -
Just a quick progress shot on the helmet for those who haven't seen the separate thread. It's still far from done - the left ear still needs to be fitted, and weathering/fine detail will need to be added.
-
TM ROTJ helmet build 1.5mm
mikedwelle94 replied to mikedwelle94's topic in Build Threads Requireing Maintenance
Helmet masked off for spray paint. Toothpaste dabbed on for the paint chip effect (hard to see in the photo) Success! And a comparison to a CAP-W ANH helmet, just to show how radically different the TM ROTJ is in its shape. Using an ANH helmet for a Shock Trooper just isn't going to cut it for me, accuracy-wise - this makes me much happier than my MTK Shock. The left ear will be shaped and fitted on a different day. Weathering and fine details will be added later tonight after class. This bucket is far from done ~ -
Steves Shock Trooper WIP
mikedwelle94 replied to spotter301's topic in Other Non-Approved Star Wars Costumes
Imgur is just as easy to use if Photobucket doesn't work out. Just sign up, upload your images, and copy+paste the BBCode of the images in your forum post. Example: -
TM ROTJ helmet build 1.5mm
mikedwelle94 replied to mikedwelle94's topic in Build Threads Requireing Maintenance
I've yet to find the correct ratio of acetone to ABS scrap to make a good enough paste, but that's just me. Silicone caulk is easy to work with and it does the job for me. I'm sure someone could make ABS paste work, but it would be much easier to just not cut the holes out to begin with -
Just made a huge mistake! Please help!
mikedwelle94 replied to Pledford's topic in Assembly, Mods, and Painting
The CRLs make no mention of it on the thighs, so it's up to you really. I've seen some troopers with, and some without. -
Just made a huge mistake! Please help!
mikedwelle94 replied to Pledford's topic in Assembly, Mods, and Painting
Incorrect, return edges are supposed to be there to give depth to the armor. Some places are supposed to have it, some aren't. The thighs should have some return edge, but I think you can get approved without them. My Death Trooper currently does not have them, and I plan to change that before my first troop. -
Just made a huge mistake! Please help!
mikedwelle94 replied to Pledford's topic in Assembly, Mods, and Painting
No need to worry. You can create a new return edge with a heat sealing iron. http://www.walmart.com/ip/37286757?wmlspartner=wlpa&adid=22222222227025019252&wl0=&wl1=g&wl2=c&wl3=52456884735&wl4=&wl5=pla&wl6=79534071975&veh=sem There's a few threads around here on this topic. -
TM ROTJ helmet build 1.5mm
mikedwelle94 replied to mikedwelle94's topic in Build Threads Requireing Maintenance
It's a comfort issue. Some folks are going to want those holes cut out for ventilation, so I think it's fair to give them that option. People who change their mind and want to upgrade to Centurion can do so easily without buying a replacement helmet. All you have to do is glue some sign plastic behind the holes, fill them in with silicone caulk, and paint over it in black once it's dry. That MTK helmet in my first post has silicone in its frown. Sent from my SCH-R530U using Tapatalk
