piklz36
-
Posts
80 -
Joined
-
Last visited
Content Type
Profiles
Forums
Gallery
Articles
Everything posted by piklz36
-
If anyone has questions or comments, please feel free to post them up.
-
"Keep in mind this is a fan made piece, far from a professional piece just spit out of a mold. This is your chance to be one of a kind." hahaha That line is great. I like my "spit out of a mold" armor, and yes, thank you, it is from a pro. I suppose I'm no snowflake. Damn. hahaha
-
Yes. Stay away. There are so many things wrong with the look that you might as well start from scratch. The suit you've posted will require a lot of modification to pass, and even after the proper mods the Legion Higher-Ups won't want to pass it because it's FX. You're better off getting a kit from the vetted makers on FISD.
-

TK-42311 requesting ANH Stunt Centurion status [ATA][86]
piklz36 replied to piklz36's topic in Request Centurion Status
Hmmm. Alright. Thanks for responding Arnie_DK. I'll continue to look into it before I make any changes. I really appreciate the head's up. -
TK-42311 requesting ANH Stunt Centurion status [ATA][86]
piklz36 replied to piklz36's topic in Request Centurion Status
Nice. Okay. I wondered if it was still accurate to glue/stitch/etc the elastic to secure its position. A dab of E6000 should do the trick. Thanks so much for the advice -
Certainly take the advice already given. FX is not the way to go anymore.
-
TK-42311 requesting ANH Stunt Centurion status [ATA][86]
piklz36 replied to piklz36's topic in Request Centurion Status
Thanks, Jeremy. Not to shoot myself in my own foot, but I'm a bit concerned about the new drop box positioning. Most of the screen shots I've seen have the boxes positioned way more to the side, almost on the hips of the trooper. The above screen shot illustrates my point. Just referring to the 4 fully visible troopers in the front line: The one on the left is close to where my drop boxes are. Notice that the trooper is also taller than most of the rest. Left/center is way out on the hips. Right/center is further into the center, but still out on the hips more. Trooper is tall. Right is way out to the side too. I've noticed that the plasitc portion of the screen troopers' belts extend at least a few inches further than mine on each side. In other words, the plastic part of the belt is longer on the screen suits. I suppose it could also be that I am wider than the 70's troopers. Perhaps it's a combination of both a wider body, and a shorter plastic belt section? Look at the troopers behind Vader asking that rebel scum a few questions: They are also way out to the side. But, the trooper on the far right is more centered. I have seen 501st troopers who cut an oval out of the elastic holding the drop boxes to accomodate the rivet holding the canvas to the plastic. This way the boxes will sit a little further out on the hips. Perhaps that is the way I need to go? Perhaps I'm digging too deep into this? I don't know. I obviously just want the costume to look as good as possible. Thanks. -
TK-42311 requesting ANH Stunt Centurion status [ATA][86]
piklz36 replied to piklz36's topic in Request Centurion Status
Alright, we finally got a sunny morning, so here are some more pictures. The drop boxes are much more "free" to roam around with the elastic instead of the webbing. They now want to sit more "up front" than they did with the webbing. Do most troopers secure the elastic loops to the canvas belt in some way? Or let it be free? I've just noticed that they tend to migrate as I move around in the armor. The chest plate is holding much more securely than it was before. I shortened the straps that connect the chest to the ab, and switched the elastic out for a stronger version of elastic strapping. The elastic (instead of webbing) shoulder straps are much more comfortable. Thanks for bringing that to my attention, Mathias. Front: Back: Left side: Right side: -
TK-42311 requesting ANH Stunt Centurion status [ATA][86]
piklz36 replied to piklz36's topic in Request Centurion Status
I switched out the drop box webbing for a loop of elastic (secured with 1 rivet): Smoothed out the curve on the cod: Replaced the webbing shoulder straps for 2" elastic: And, here are the straps that attach the chest to the ab plate. I've shortened them slightly to (hopefully) help prevent the chest from sliding off of the ab: Should I take another round of suited-up photos for final clearance? Thanks again for all of the help. I'm pretty proud of my first build. On to working out my wife's Juno Eclipse situation. -
I, like Echo, got my TK # by looking to my favorite/most influential band . . . 311. I also included some of my other favorite pastime, reading science fiction novels. So, 42 = Douglas Adams' meaning of life (by way of Deep Thought) 311 = the band stands for Unity in all forms So, the "meaning of life" is "unity" (42 311). Cool thread. It's fun reading how you all come up with your #'s.
-
TK-42311 requesting ANH Stunt Centurion status [ATA][86]
piklz36 replied to piklz36's topic in Request Centurion Status
Rank Stripes are redone. Here's the new ears. Left side: Right Side: -
TK-42311 requesting ANH Stunt Centurion status [ATA][86]
piklz36 replied to piklz36's topic in Request Centurion Status
No worries. Thanks for clearing up the drop box issue. I might cut a small hole on the top of the drop box back to retrieve the old rivets and washers. It'll be covered up by the elastic. I'll smooth out the cod too. Hahaha. Nothing like sanding a cod piece down! As for the webbing at the shoulders. I'll pick up some wider, white elastic when I get the elastic for the drop boxes (and another box of snaps, hahaha). I've been having trouble keeping the chest overlapping the ab plate. I have a pretty low range of motion with my upper body because of the chest plate slipping up and off of the ab plate. I tried to lengthen the webbing straps, but it just lowered the back plate. Maybe the forgiveness of the elastic will help that situation too? Thanks again, man. I appreciate your patience with us noobs. I certainly don't have a super-trained eye for the details yet. I should be able to get most of this done over the weekend. -
TK-42311 requesting ANH Stunt Centurion status [ATA][86]
piklz36 replied to piklz36's topic in Request Centurion Status
Thanks for all of the replies! I'm shocked that you all have liked the quality of the build. The rank bar repaint is no issue at all. I assume Locitus is referring to the maybe 3mm on the ab plate in the detail picture of the 6 ab/kidney rivets? I'll see what I can do about this. I'm already pushing the gap size. Too many beers I suppose I do have a little concern about replacing the drop box nylon with elastic. I've glued the drop box back securely into place. In other words, I currently have no access to the other side of the drop box backs. Anyone have a good idea how I can drill out the rivets, then back the new rivet with a washer, without ruining the drop box backs? Thanks for all of the help so far. -
Name = David Steinweg ID = TK 42311 Garrison = Florida Squad = Tampa Bay Squad FISD = piklz36 Armor = ATA Helmet = ATA, hand painted by my lovely wife, no templates or decals Blaster = Hyperfirm E-11 ANH, with D-ring added and scope mod EIB Application = http://www.whitearmor.net/forum/topic/23506-tk42311-requesting-anh-stunt-eib-status-ata311/ Height = 5'11" Weight = 180lbs Boots = TKboots Canvas Belt = Trooperbay (with mod to the width (now 2 7/8")) Hand Plates = Karin's white rubber Electronics = none . . . yet? Neck Seal = Trooperbay Holster = self-made (build thread: http://www.whitearmor.net/forum/topic/23643-making-a-holster-for-anh-stunt/) Alright, here we go. A big THANKS to all who have given me advice so far. Front Full Body: Back Full Body: Left Side: Left Side Detail: Right Side: Right Side Detail: Ab to Kidney Buttons (Split rivets around 8mm diameter): Split rivet backs before I covered them with fuzzy velcro pieces: Separate Butt and Kidney: Hand Guards: Shoulder Bridge Back: Shoulder Bridge Front: Back to Chest Connection: Thigh Pack Attachment (it's a cap rivet): Sniper Knee Plate: Drop Box Backs: (I'm aware that these should be attached via a white elastic loop and 1 rivet. If that stops my Centurion approval, I'm more than happy to change it. I just don't have the white elastic right now, and if it really doesn't matter then I'll leave it the way it is since no one sees the back of the boxes). Cod and Butt Attachment: Split Rivet on Cod before I covered it with fuzzy velcro (because that could certainly leave a mark) : No Return Edge on Forearms: Black Elastic on Shoulder Bells: Helmet Front: Helmet Left: Helmet Back: Helmet Right: Hovi Mic Tip: Lens Color: S-Trim: Blaster Right: Blaster Left: D-Ring: Neck Seal: Thermal Det: Holster and Attachment: Hand-Painted Ab Buttons: I think that covers it. Please feel free to give me any feedback, criticism, critique, whatever. I'm all ears when it comes to the suggestions you all give. Thanks, again. TK-42311
-
TK42311 requesting ANH Stunt EIB status [ATA][311]
piklz36 replied to piklz36's topic in Request Expert Infantry Status
NICE!! EIB #311. 311 is my favorite band (and has been for over 15 years). Hahaha. Incidentally 311 is part of the origin of my TK#. Thanks for the help and advice. I'll be submitting a Centurion application soon. -
TK42311 requesting ANH Stunt EIB status [ATA][311]
piklz36 replied to piklz36's topic in Request Expert Infantry Status
I posted updated suited up pictures at the bottom of page 1. In those pics, I'm wearing the "new" belt. The tube stripes are re-painted too. Here's the most recent incarnation They're still hand painted (we just redid the right side): Right Left -
I love that the seller lists it as New. Then says "fairly new, with a few scratches" in the description, as if that's the only thing wrong with it. Hey, maybe it's worth the $1400 Buy it Now? Hahahaha. Thanks for sharing.
-
Thanks for noticing the snap color, Vern. I'll add that into the thread as another "don't do this, it's just a practice piece". The final product that I'll show does indeed have nickel hardware on it.
-
TK42311 requesting ANH Stunt EIB status [ATA][311]
piklz36 replied to piklz36's topic in Request Expert Infantry Status
@Funky: Yes, I use the exact same method as shown in the above photos. Those Billhag diagrams saved me so many times throughout the build. Hahaha. I'm thinking that I could move the male snaps on the ab plate up just a little. ATA's plastic belt portion is only 85mm in height (as opposed to Billhag's 100mm designation). I don't remember accounting for that during the initial build. Should be a simple fix. Thanks for the advice! I truly appreciate it. -
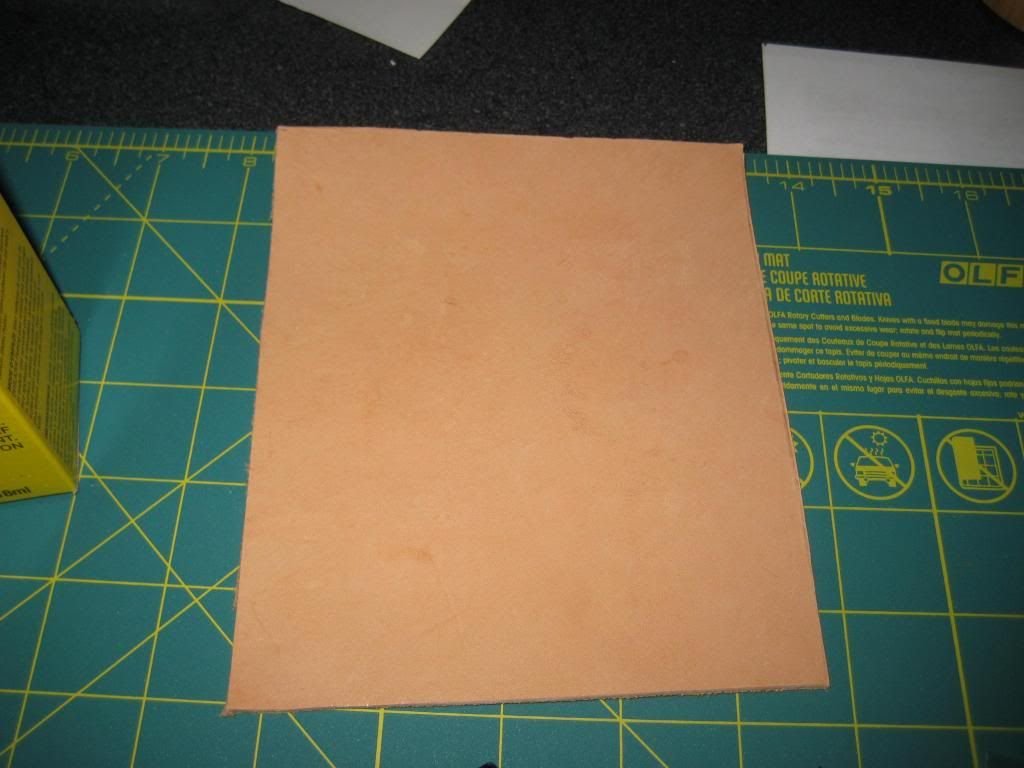
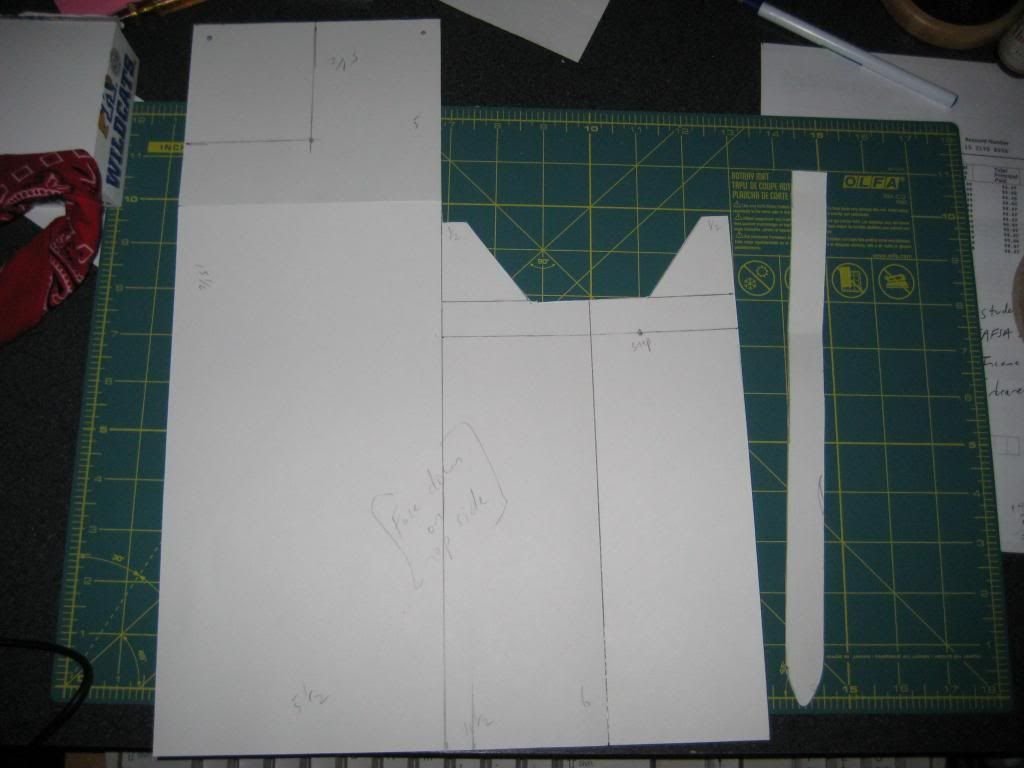
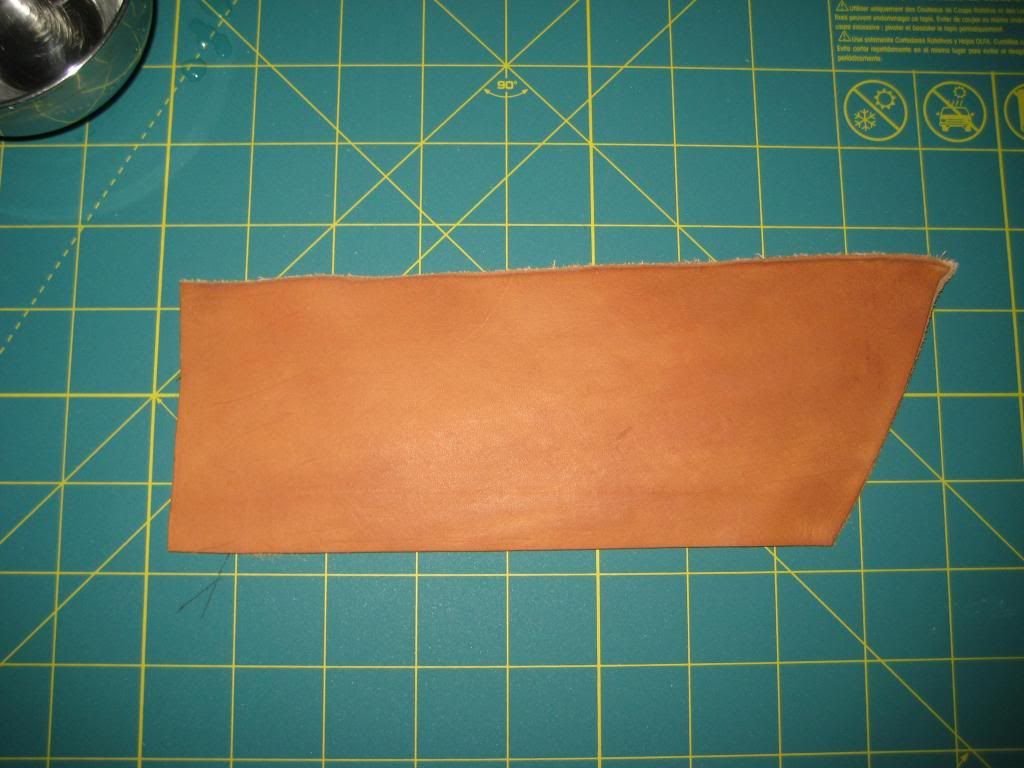
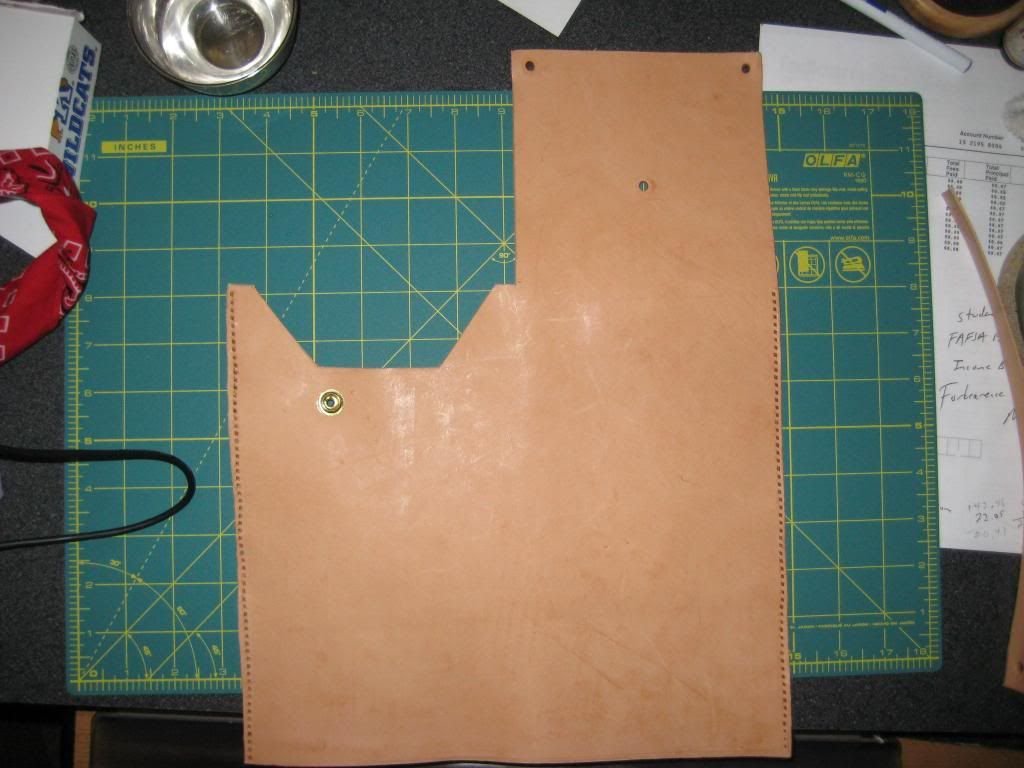
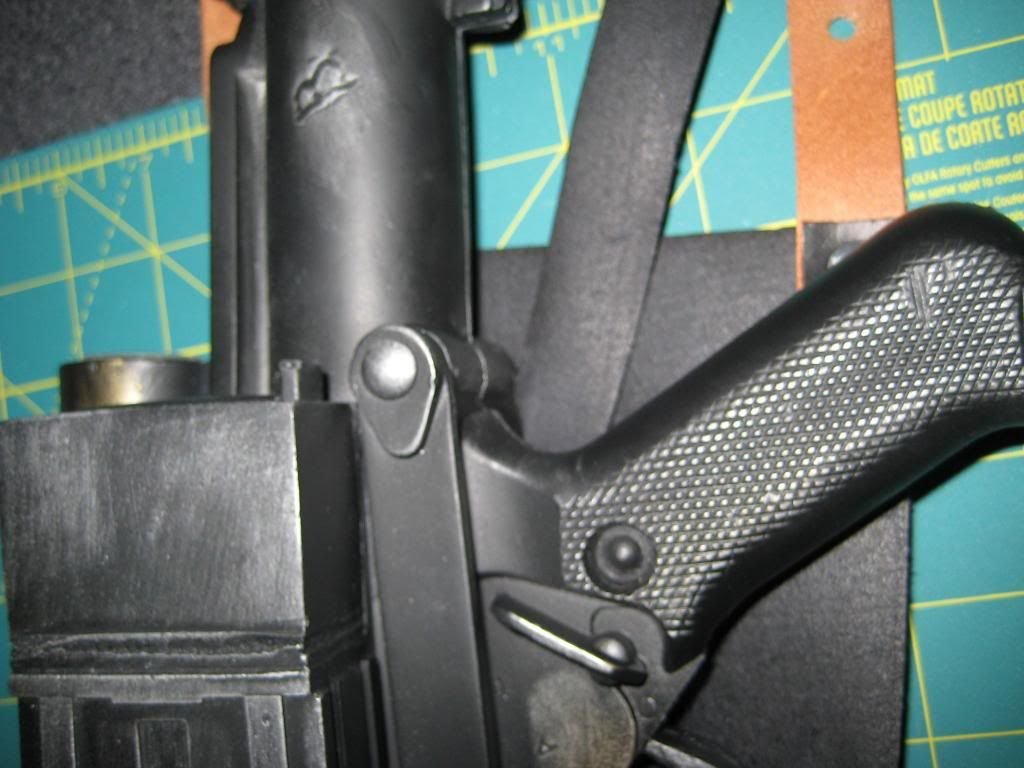
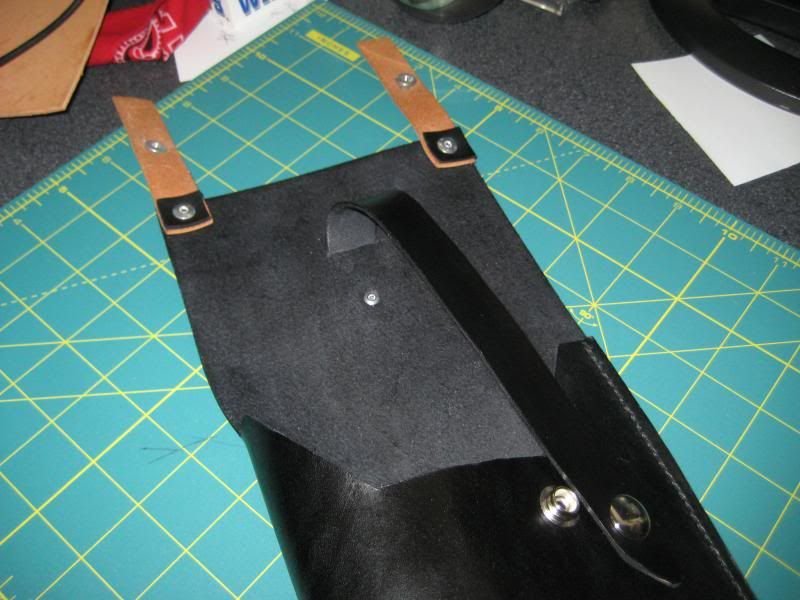
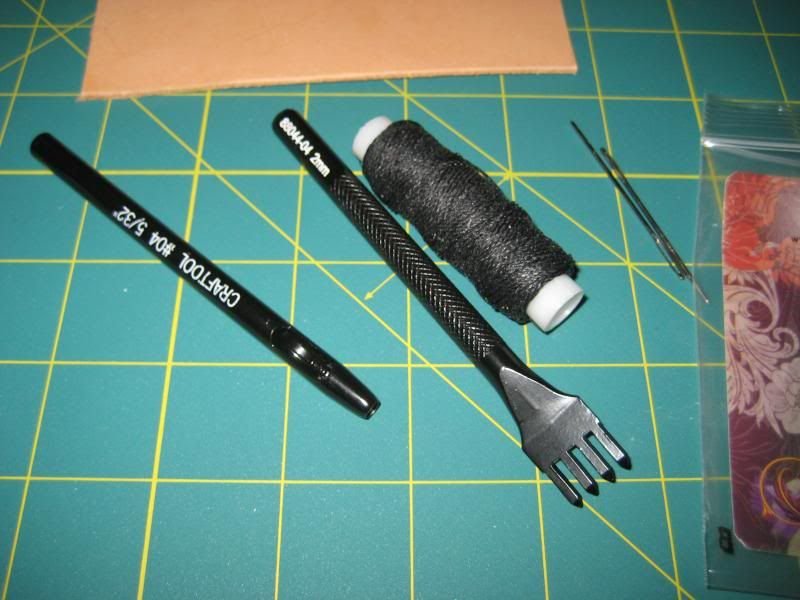
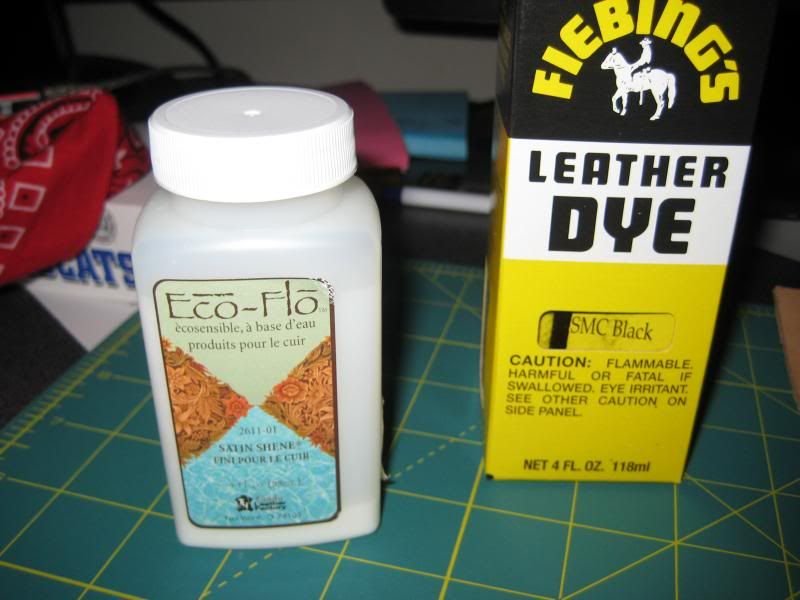
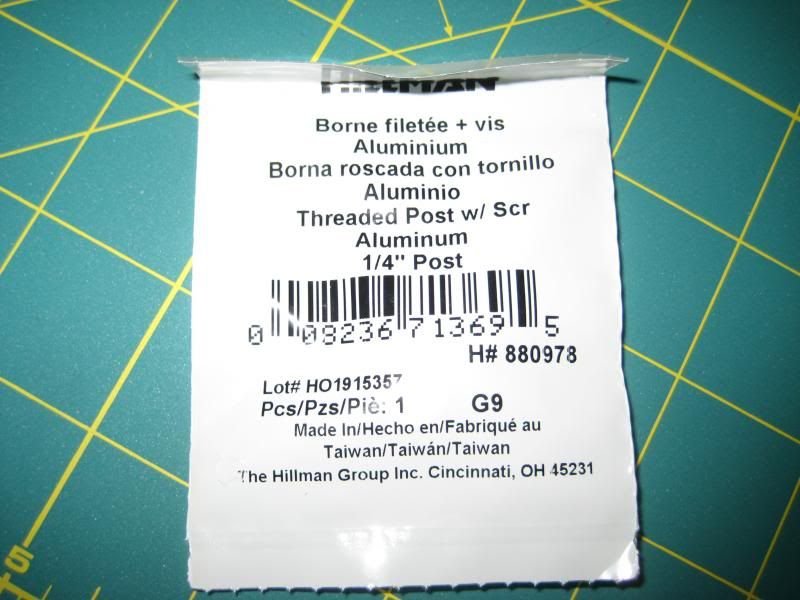
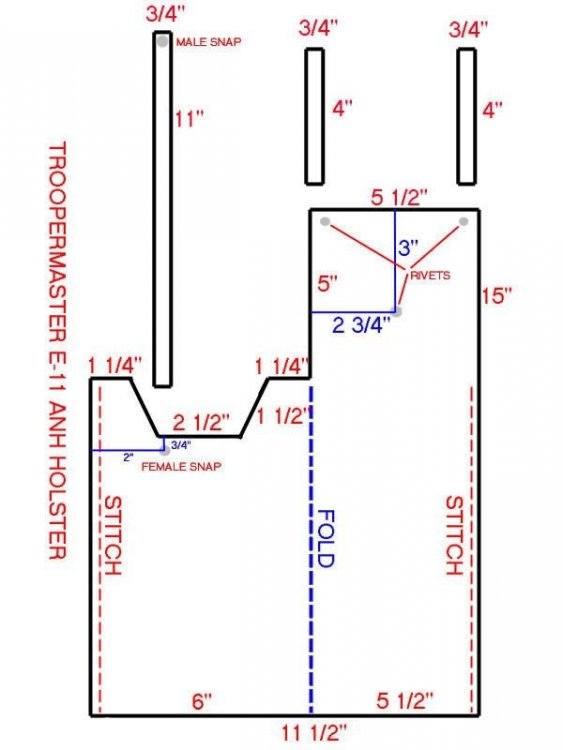
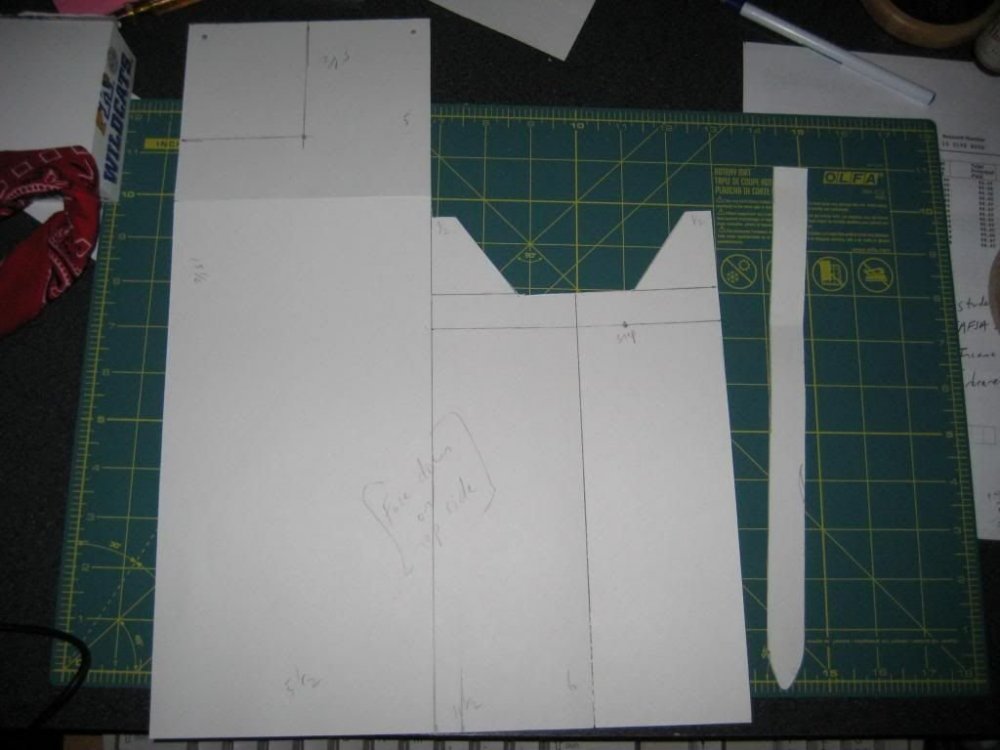
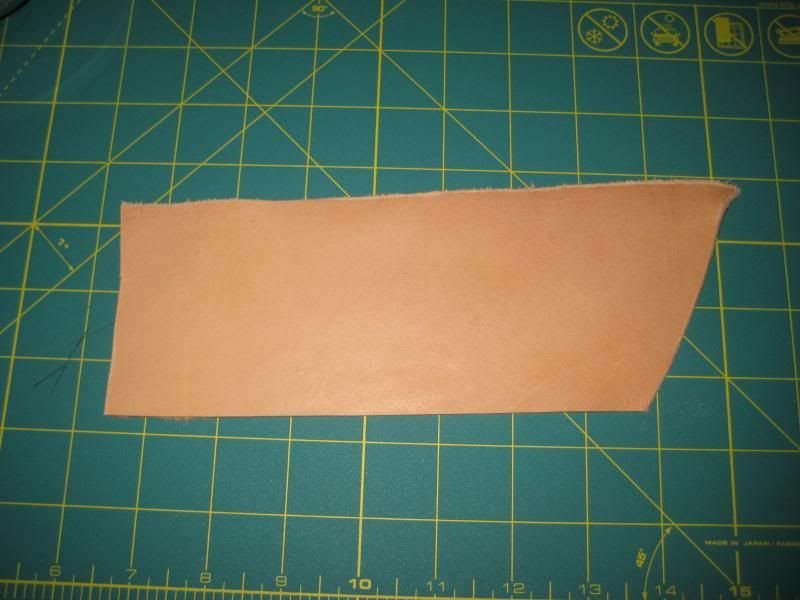
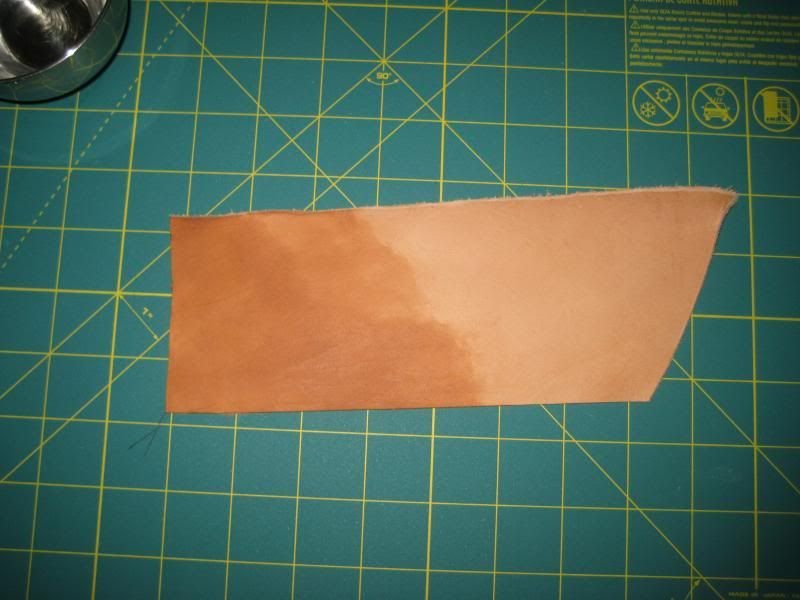
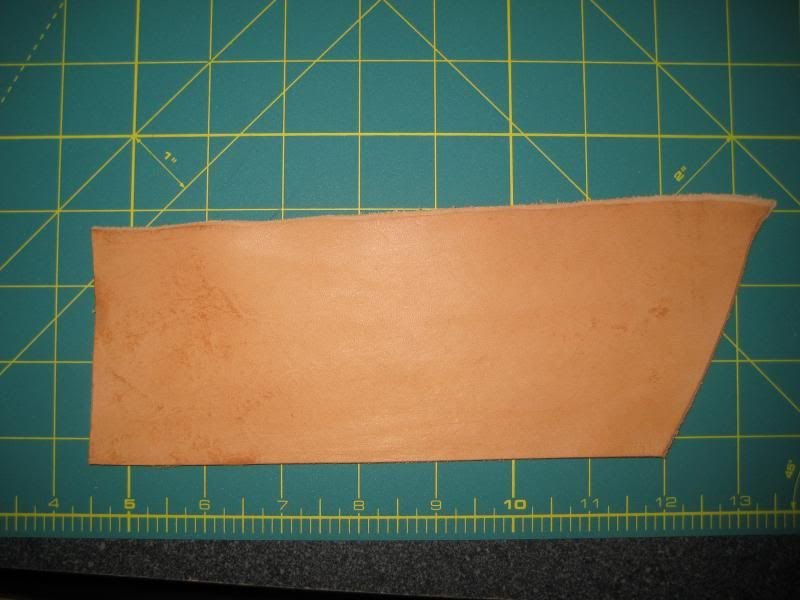
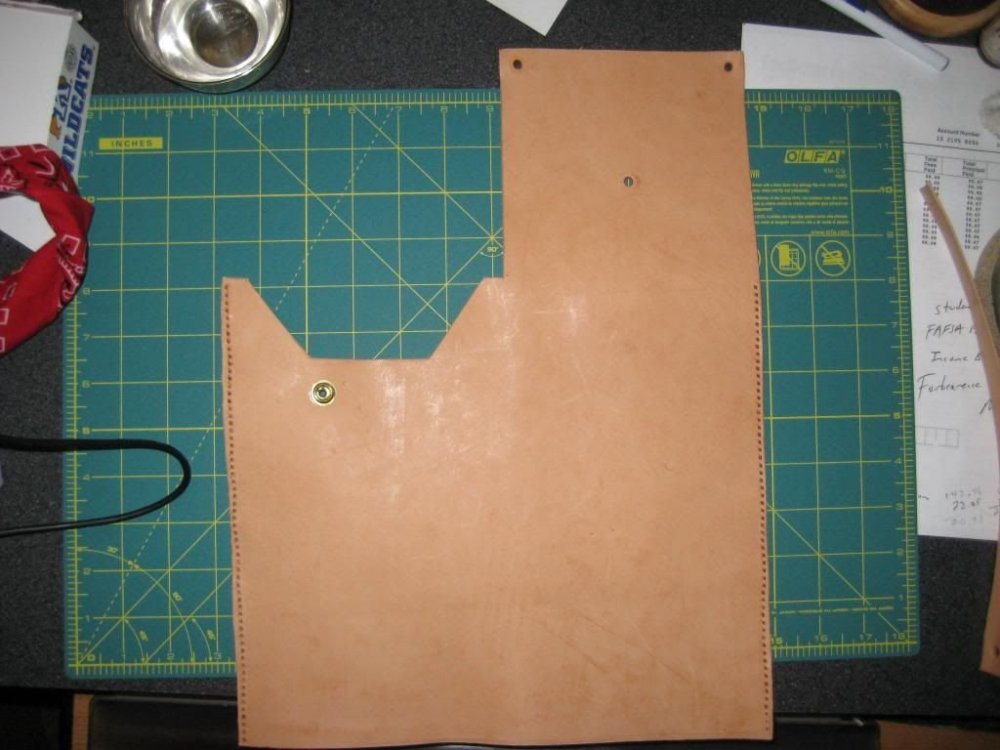
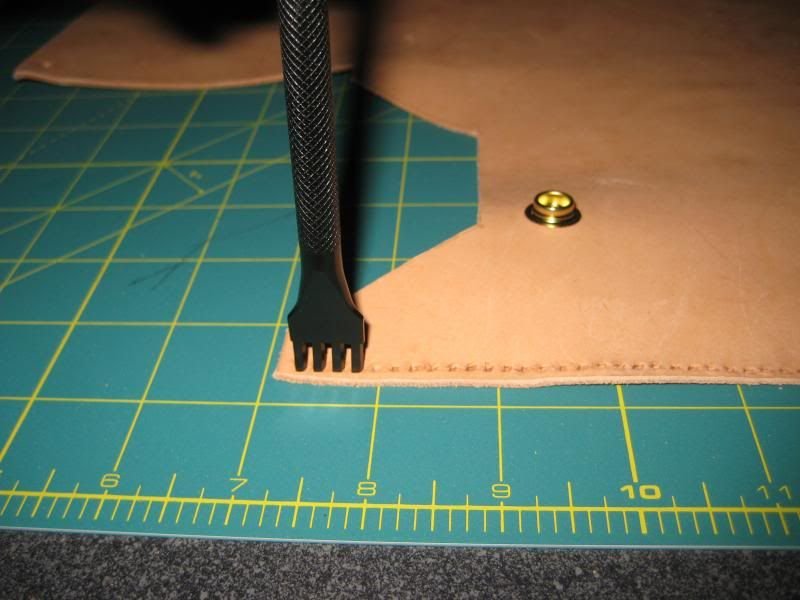
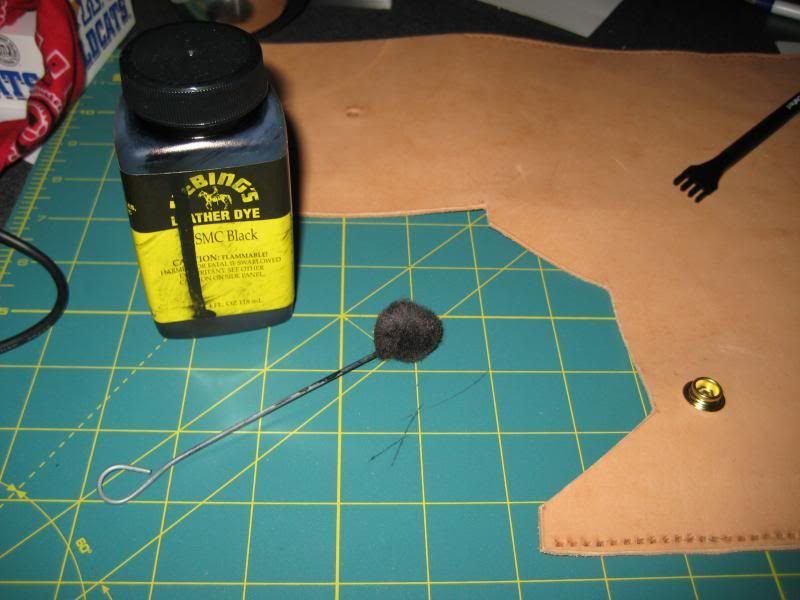
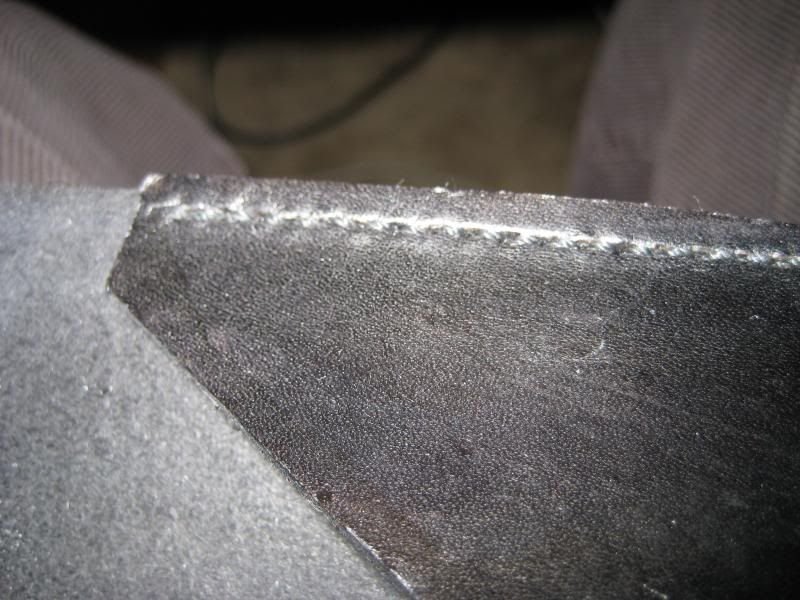
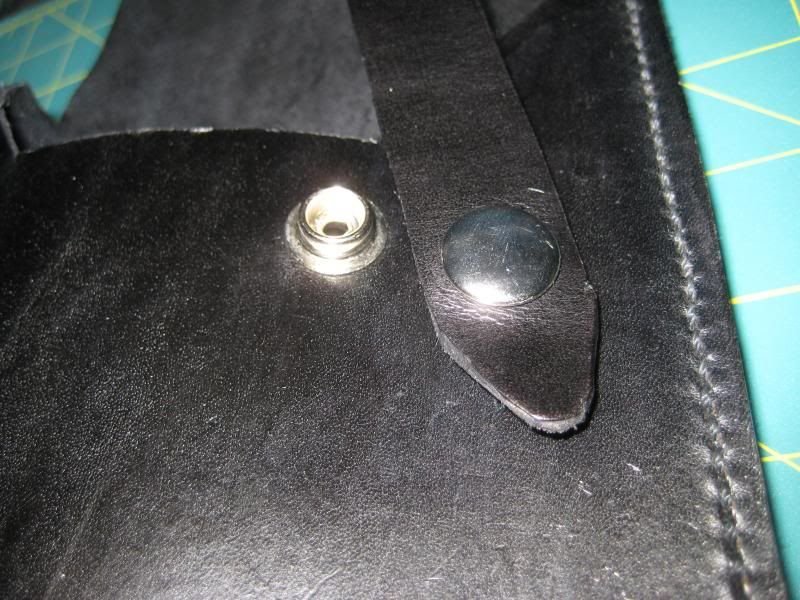
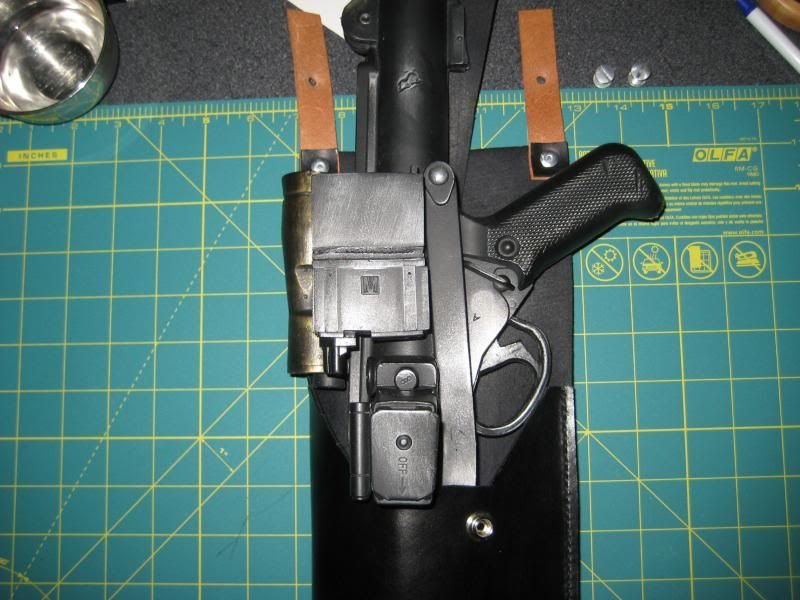
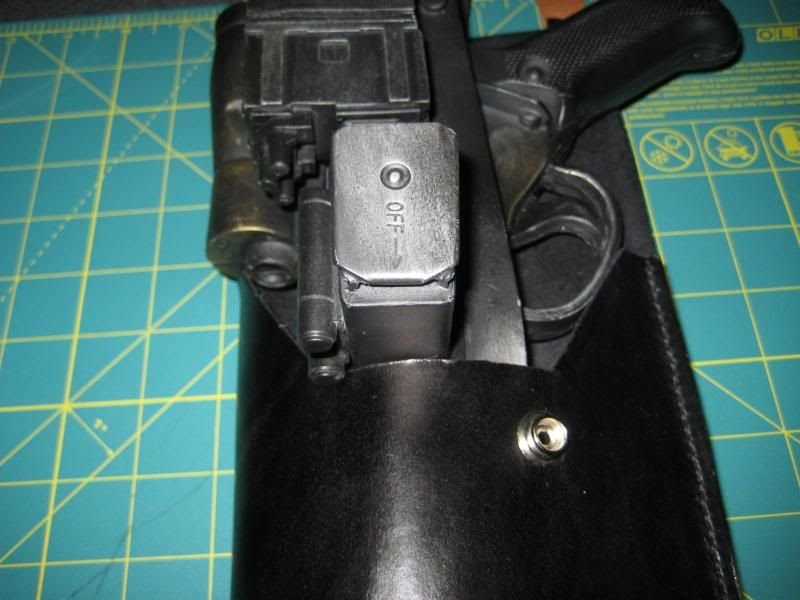
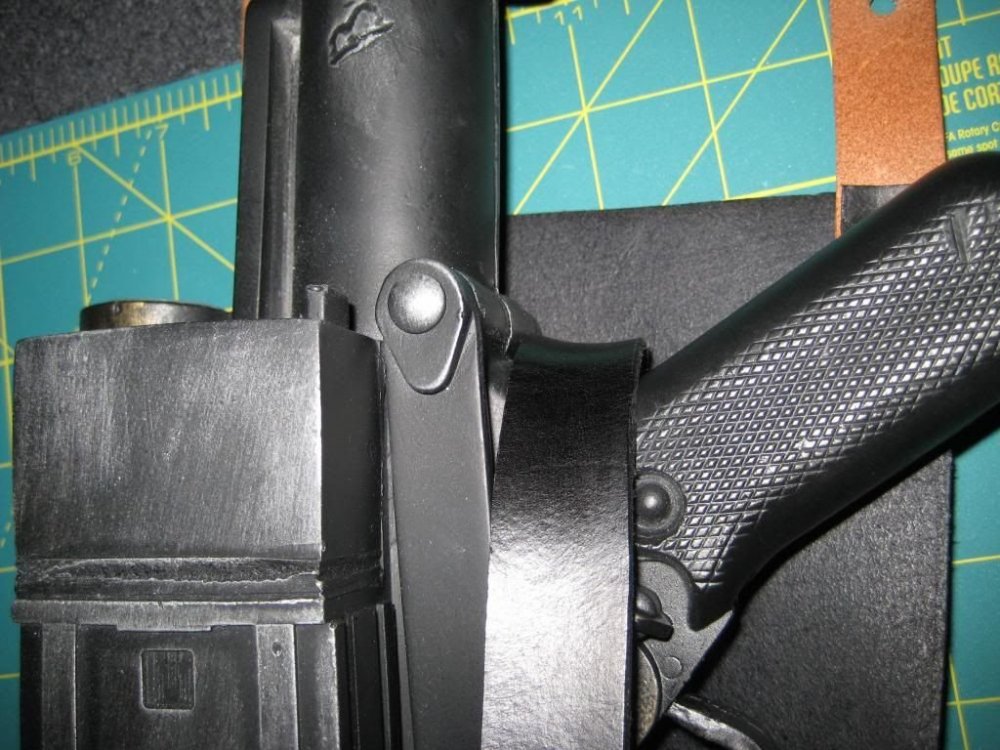
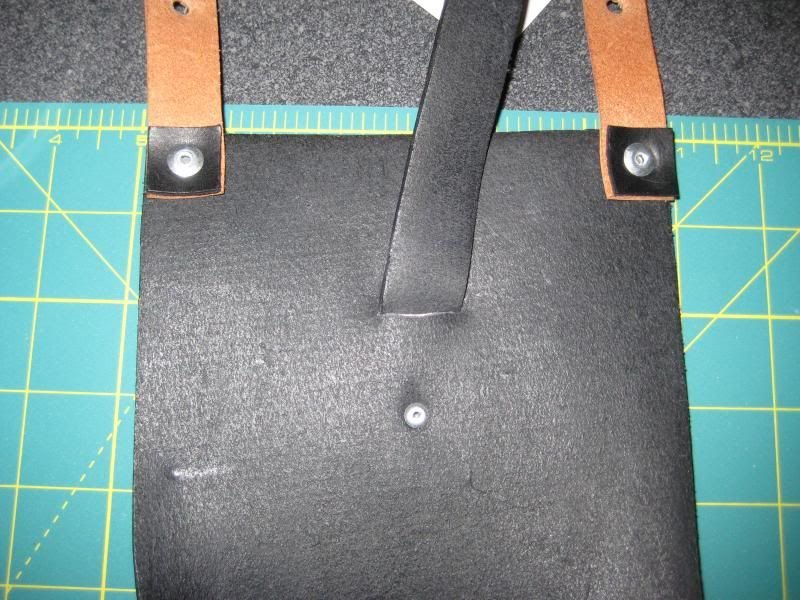
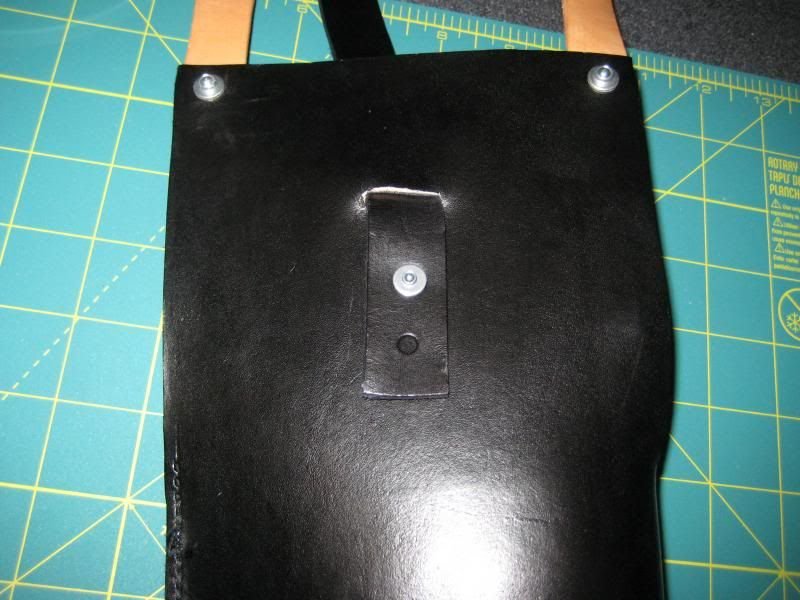
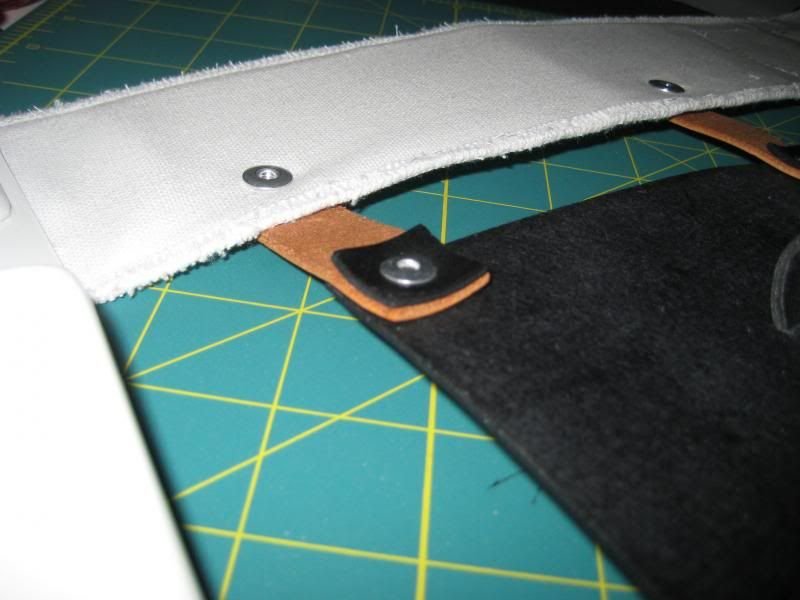
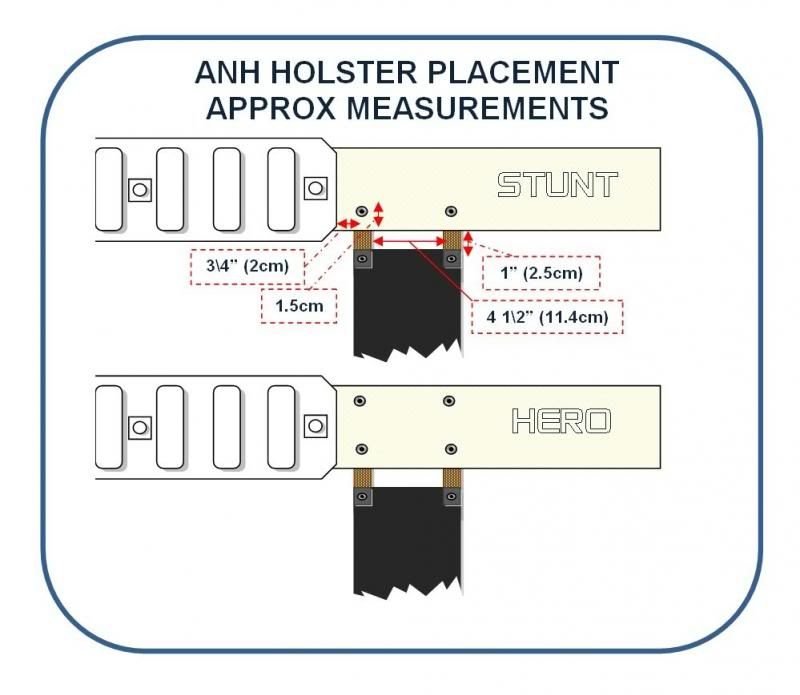
There are a number of tutorials on the FISD boards that describe how to make a holster, however, I wanted to share everything from sourcing materials, tools, and information, to the construction of a leather holster in the ANH style. I know that the holster may not be 100% screen accurate, but I think it comes pretty close. Before I start, I'd like to thank those that did the enormous amount of research to make the holster what it is today. So, thanks to TM, Billhag, and TKBondservnt for their expertise, hard work, and attention to detail. On to the tutorial: I live in the U.S. All of the tools and materials were sourced in the Tampa, FL region. Everything I'm using is available from Tandy Leather Factory. I'm sure you can source the materials from other vendors too, as I've used very common leatherworking tools. I had zero leatherworking experience when I started the project. Here's some pictures of the final product for reference: Total cost: $54 (for the leather tools and supplies). You probably have the other materials for your build anyway. Things you'll need: Cardstock (for your template) Pencil and eraser Utility Knife Ruler (at least 16" long) Veg-tanned Leather (at least a 16" X 12" piece, 7oz.-8oz. thickness) Small sponge and water 5/32" Leather punch (for making single holes) 2mm Stitching hole punch (4 prongs, also called a diamond hole chisel, for making stitching holes) Mallet or Hammer (be extremely careful if you use a hammer, you can easily damage the punches with too much force) Plastic cutting board (or something to put under the leather while you punch holes. High-end leatherworkers use granite or marble slabs.) Fiebing's Leather dye (SMC black) Eco-Flo Satin Shene Leather Finish Leather thread (heavy waxed thread) Leather Stitching needles (need at least 2). They are just thick, blunt stitching needles. Needle nose pliers or a Leatherman tool 1 Snap (Nickel-colored) 3/16" pop rivets and 3/16" washers (need 2 of each) 1/8" pop rivet and 1/8" washer (only need one) Aluminum Threaded post w/ Screw, 1/4" (need 2 for mounting on canvas belt) The pics below illustrate the leather working materials and special tools. This is what veg-tanned leather looks like. Obviously, this is too small for the holster project. It's just a sample: From left to right, hole punch, stitching hole punch, wax thread, needles: From left to right, leather finish, black leather dye Posts with screw for mounting holster to belt (I got these at Lowe's) Thanks for the idea, Vern: First thing to do is to measure, draw, and cut out a template using card stock. I followed TM's template (you will also need to cut two 3/4" squares of leather for the small, black spacers at the top of the holster): This is the template I made up. I draw on the nappy side of the leather (it takes the pencil lines better). I also flip the template upside down so I don't mark up the measured side when I trace it (that's why the template is in reverse). Just be sure to arrange the template so that the smooth side of the leather is on the outside when you fold the holster over. For the straps that attach the holster to the belt (including the little black spacer squares), I measured them out on the leather itself. No need for a template. I also added a taper on the end of the handle strap. I just free-handed the taper. The handle strap template is on the right side of this photo: Trace the template on the nappy side of the leather. Make sure to mark where to punch holes for the rivets and snap. Cut the holster out using your utility knife and a metal ruler for a guide. Be very careful with this step, obviously. I used a new blade to make the cutting easier. Also trace the straps and squares (again, marking the hole placements) and cut them out. You will now have the leather holster, two 4" strips that will attach to the belt, one handle strap, and two 3/4" small square spacers. Next, you need to case (properly wet) the leather to prepare it for tooling. Do this by wetting your sponge with water, wringing it out to remove excess water, and rubbing the damp sponge on the leather. Start with the nappy side, then flip the leather over and wet the smooth side. When you wet the leather it will darken. You should wait until the leather turns back to a lighter shade before you begin to tool it. When the leather gets back to its original color, it means that the water has absorbed fully into all of the interior grains. It should also feel a little cool to the touch. Wet all of the pieces, in their entirety, to avoid inconsistencies in texture and color. Here's a good video describing the casing process: Here's some pics: Dry veg-tanned leather: Wet on left side: Wet: After about 8-10 minutes (it's ready to go now, and cool to the touch): Once all of the leather pieces are cased, you can punch all of the 5/32" round holes for rivets and snaps. You'll need holes in the spots indicated on TM's templates. Two on the top edge of the holster, one in the upper-middle of the holster, one in the center of the holster, one in each spacer square, one on each end of the handle strap, and two on each strap that connects the holster to the belt. Make sure to follow the measurements. Here's a picture of one of my mistake holsters. Notice the orientation of the holster forced me to fold it so that the nappy side is out. Also, you want to use a nickel-colored snap, not a gold-colored one. Whoops. But it does show where the holes should go (I installed a male snap into one of the holes needed): Here's a picture of a practice handle strap. It looks so much better with a tapered end, I think. This one isn't cut very straight either. You can see how unprofessional it will look if you don't take your time cutting the leather straight, and paying close attention to measurements: After you punch out the round holes, you need to punch the stitching holes using the 4-pronged diamond punch. The template shows where you will stitch the holster together. I used a straight edge to mark a straight line for punching the stitch holes. I drew the line about 1/8" in from the edge of the holster to allow some leather to hold the stitching. Another trick is to punch one set of four holes, then use the last hole in the punched set as a guide for the next three holes. Here's some pictures of the process: Use the last hole in the set you just punched as a guide for your next punch (working left to right): With all of the round holes and stitching holes punched, you can now prepare a workspace for dying the leather black. You certainly want to dye leather in a place that is very protected from possible spillage. Cover your workspace with plastic bags. Consider drop cloths as well. Wear gloves too, or you'll be walking around with dyed fingers for a while. The Fiebing's Leather Dye I used came with a wool dauber. Use it to spread a thin layer of dye on both surfaces of the holster, spacer squares, and handle strap. Make sure you get the edges (and the edges on the inside of the holes): Here's a video from Tandy Leather that talks about dyeing techniques: http://www.youtube.com/watch?v=pvuE4nOtTxU. I let it dry for about 8 hours, then rubbed the leather (both sides, and a lot) with a clean cloth to get as much excess dye out as possible. Once the leather is dyed and buffed, apply a very thin layer of the Eco-Flo Satin Sheen Leather Finisher on all of the parts. Make sure to get the edges. Just use a clean, soft cloth to apply the finisher. I used an old T-shirt: I looked up a lot of information about finishing leather. Most say to let the first thin layer dry for about 4 hours, then apply another thin coat. Do this for 3 total coats. The point of finishing the leather is to seal in as much of the dye as possible. If you don't finish/seal the leather, it will bleed onto your nice, shiny, thigh armor. No good. So don't skip this step. After the final coat, I let it cure for a few days. You may notice that some of the dye will bleed out even after finishing the leather. This is normal. There are solutions to this all over the internet, but none of them seem to work perfectly. To my mind, it just takes time to get all of the extraneous dye out of the leather. It took maybe a couple of months for my holster to stop bleeding altogether. Just make sure to check your thigh armor after a troop, and clean it as necessary. Perhaps someone can chime in about how to prevent dye bleeding after finishing leather? So, now that everything is dyed, finished, and left to cure for a few days, you're ready to stitch up the holster. Rather than using tape or adhesive, I chose to actually stitch the seam together. I used a "saddle stitch" for this. The stitching is pretty easy once you get going. You'll want to use needle nose pliers (or, wait for it . . . a Leatherman tool) to pull the needles through the holes. The holes are quite small, and it gets tough on your hands if you don't use pliers to pull the needles through. I also pushed the needles mostly through the holes (before pulling them) with the side of the pliers. I found a great video explaining saddle stitching. The guy talks about some techniques at the beginning that are irrelevant for this project (e.g. carving a stitch groove and marking/drilling stitch holes). Obviously, I had punched the holes, so all of these techniques are not necessary. Here's the video link (start paying attention at 4:12): http://www.youtube.com/watch?v=olkoTw7izgA I'll attempt to sum up saddle stitching in words: 1. Measure the thread you'll need by running the thread down the length of the seam, then doubling back. Do this 4 times (I added a bit more to the length of the thread just to make sure I didn't run out). It's way better to have a little excess thread to cut off at the end, than to run out of thread in the middle of the seam. 2. Thread and lock your needles, one on each end of the thread. Use the locking technique described in the video. If you tie knots to lock the thread to the needles, it will be very difficult pulling the needles through the stitching holes. Believe me, you'll appreciate any help you can get once you start stitching. 3. Begin stitching on the 3rd hole from the bottom of the holster. Thread one needle from the back of the holster to the front, sending the needle through the 3rd hole from the bottom. Center the thread to the holster. 4. Take that same needle (from the front of the holster) back through the 2nd hole from the bottom. Both needles will be on the same side (the back) of the holster now. 5. Thread the other needle through the 2nd hole from the bottom (toward the front). Make sure not to catch the thread when you go through the hole. The needles will now be on opposite sides. Take the needle you just put through the 2nd hole from the bottom and send it through the bottom-most hole. Both needles will now be on the same side again (the back). 6. Send the first needle through the bottom-most hole (toward the front). Make sure you don't snag the thread. The needles will be on opposite sides, threaded through the bottom-most hole of the holster. 7. Now begin to backtrack (towards the top of the holster) by sending the needle in the front through to the back (both needles will now be in the back of the holster). Yes, you are going back over the stitching you just made. This will lock the thread in place without cutting it, or using any knots. 8. Continue stitching until you reach the top-most hole. 9. To finish the seam, backtrack 3 holes (just like you did to start the stitching). Most leather workers say that you don't need to tie any knots to hold the stitching, but I tied a knot on the back of the holster anyway. Then, cut off any excess thread. Almost finished. All you need to do is measure for your handle strap, assemble the straps, and add the hardware. This was certainly the most satisfying part of the build for me because it all starts to come together and look nice. I installed the nickel-colored snap at this point, in order to be able to accurately measure the handle strap length. The female snap goes on the tapered end of the handle strap. The male snap goes in the hole you've punched in the front of the holster: For the handle strap assembly, you need to fit your blaster into the holster. You want the handle strap to snug the blaster into the holster, but not too tightly. Here is the way the blaster (I'm using a Hyperfirm E-11 for these pictures) will sit in the holster: Notice that the magazine housing stops the blaster from falling through the bottom of the holster: You want to snap the handle strap into place, and run it up to the curved section where the blaster's handle meets the long receiver tube. The handle strap will nestle just inside that curve. Here's the curve I'm talking about: And with the strap wrapped over it: With the strap fairly tight, mark the back of the holster (on the nappy part) where you'll cut a thin channel for the strap to pass through to the rear of the holster. Make the mark a little behind the receiver tube of the blaster in order to hide the cut when the blaster is holstered. Also, make the mark a little below the curve in the blaster's handle. This way the handle strap will come up and over the curve in the handle, and will hold it in snug. Just use your utility knife to make the cut. This is what you'll end up with after you make the 3/4" long cut for the handle strap: Then rivet (using the 1/8" pop rivet and washer) the handle strap to the back of the holster. I wanted the rivet to be higher than the edge of the handle strap, so I just punched another hole. Here's what it'll look like from the back: Now that you've got your handle strap secured to the holster, all you need to do is attach the tan straps and black spacer squares to the top of the holster. Use the 3/16" rivets and washers for this. Make sure the nappy side of the tan straps face out when you install the rivet. You want the smooth side of the black spacer squares to face out. Here is a picture of the construction after installing the rivet: Finally, attach the holster to your canvas belt. I used Vern's idea of the threaded posts with screws for the attachment. I also followed Billhag's measurement diagram. There are other threads on the FISD boards about making sure the holster is mounted properly to fit your size, but I won't get into that here. This is the Billhag diagram I followed: Thanks for looking through this tutorial. I hope it helps someone along the way. Like I said in the beginning of the project, there are other tutorials for holsters out there, but I found it useful to combine a lot of ideas together during my build. I just thought I'd add another one to the list. Be well.


-
TK42311 requesting ANH Stunt EIB status [ATA][311]
piklz36 replied to piklz36's topic in Request Expert Infantry Status
Okay, I've suited up and shot some more photos. I heat bended the butt plate. Lo and behold, no more flare out from the sides! I've also got the rubber chemical gloves and Karin handplates on in these photos. I'm thinking I should shorten the straps connecting the kidney and butt plate, as there is now a strange "step" in between the parts. I also need to figure out a way to keep the belt up closer to the bottom of the ab button box. As far as the shoulder bells and biceps go, should the bicep be under the shoulder bell at all for an ANH stunt look? I lowered the biceps until they were barely tucked under the bells. It seems the bells do stick out at the base a bit. Maybe trimming the return edge on the bottom of the bells? Here's some pics of the return edge: I've tried to build for Centurion, so if you have any comments/critiques about the fit, I'd really appreciate it. I'll post pics of the Centurion requirements in the proper application. Thanks for everything so far. -
Try hand painting them for sure. This helmet build (especially pages 2 and 3) shows some great painting techniques: http://www.whitearmor.net/forum/topic/22534-ata-anh-stunt-helmetfinally-started/ If you mess up the paint (like we did at least 4 times) you can always fix it per these instructions: http://www.whitearmor.net/forum/topic/19815-dry-paint-removal-the-right-way/?hl=%2Bpaint#entry242105 Just make sure to mask off the rest of the helmet before spraying it
-
TK42311 requesting ANH Stunt EIB status [ATA][311]
piklz36 replied to piklz36's topic in Request Expert Infantry Status
Okay. My wife has painted these four times now (still no templates or decals). Hahaha. Obviously, we are committed to getting this right. I think we've finally got it. What you you think? There are 16 stripes on each side of the helmet. I've also got the canvas belt back from our tailor. We took in the width of the belt from 3 1/4" (which was stock from Trooperbay), to 2 7/8". I also had the tailor remove 2 1/2" from the length of the belt in order to take care of the extra "tail" behind my TD. I also trimmed more from the top and bottom of the plastic portion of the belt. If I go any further with the trimming, I will start to cut away at the boxes. The boxes on ATA's plastic belt flare out at the base. Here's a pic of the new belt setup: I'm going to take new pictures of the full suit within the next few days in order to show the improvements for the overall look. Obviously, I don't expect to seek approval without posting what the belt looks like while I'm wearing it. I just wanted to show the progress. On to heat bending the butt plate. Wish me luck! -
Sweet. Thanks again.
-
NICE!!! I need to clean up two pairs of headlights, and I didn't want to spend extra $$$ on a "cleaning kit". Did you use a scrubber on the end of a drill bit, or just hand scrub them? Novus 2, or 3? Thanks for the post.