

Brent
-
Posts
196 -
Joined
-
Last visited
Content Type
Profiles
Forums
Gallery
Articles
Everything posted by Brent
-
 Armor= TM Helmet= TM Blaster= Hasbro w/ Doopy Doo's Height= 5'11" Weight= 160 lbs Boots= TK Boots Canvas Belt= TM Hand Plates= TM Neck Seal= TK409 Holster= TM Armor Build Thread: http://forum.whitear...showtopic=19019 Blaster Build Thread: http://forum.whitear...showtopic=18583
 -
Great! It looks like with the recent posts box back it is ok on IE9 even in compatibility mode (except for some other weird alignment issues in the menu bars). IE10 only has a problem in compatibility mode too, but there is a javascript bug that prevents it working on IE10 normally so you are forced in to using compatibility mode. I've looked on the IP Board forums and they claim that the javascript bug won't be fixed until IE10 is out of beta.
-
Some more pictures
-
I think you're right about trying larger loops on the chest. I'll give that a try when I pick up some more elastic. I painted the screws and rivets and trimmed up the back of the thighs. I also added the bicep hooks, I was originally trying to see how it worked without them, but they seem to actually be a big help.
-
TK-7564 requesting 501st access. http://www.501st.com/members/displaymemberdetails.php?userID=14732 Thanks!
-
Never mind. I looked closer at your screenshot and it appears this is also happening on IE9 now. It was previously doing the same thing on IE10 before the update, but it looks like the update (or more likely removing the recent threads box) caused it to start on IE9 too. Do you need to have the site in compatibility mode? If you unselect the broken page icon in the address bar it will go to normal mode and I think that will render ok. I'm not sure if anything else will be busted though.
-
I believe that the alignment issue is only a problem with IE10. Welcome to the bleeding edge .
-
My wife and I had some friends that are huge Star Wars fans over for dinner. The friends had brought their black lab over, a very friendly and excited dog. Having just finished my TK, I stepped out to demo it as a surprise. I came out of a door while everyone else was talking at the dinner table. One of the friends had her back to me, while her husband and the dog saw me immediately. I was expecting some surprise from the people, but I hadn’t thought about the reaction from the dog. He immediately started pointing and barking. The wife was trying to calm the dog down, completely unaware that a stormtrooper was standing right behind her. The husband thought this was pretty hilarious and eventually clued her in that the dog was legitimately concerned about the armed stormtrooper standing just behind her and not just making noise for the fun of it. It then took a few minutes of calming the dog and me taking the helmet off before it was able to calm down enough for us to move on. The dog continued to keep its distance as long as I was in costume. After I changed back the dog greeted me like I had been gone the whole time and had missed out on the whole event. Anyone else have a similar experience? Does anyone ever have problems trooping with animals around? I was certainly happy that this dog is all bark and no bite, because I really didn’t want to test the strength of my armor.
-
Thanks Mathias! Thanks for the tips Paul. I'll definitely trim the thighs where you marked in the picture. Until I saw a picture of myself from behind I wasn't sure if it would look ok and I figured it was always better to trim too little then too much. Here's a closeup of that side strap: It could be a little tighter, but I didn't think it was too long. Were you looking at this photo from before when I glued it?
-
After a long break I was able to get back to my armor and made some good progress over the last few days. I'm pretty close to done. I still need to paint the rivets (side and knee) and the strapping screws. As far as adjustments go, I may want to trip the back top of the thighs since they came together uneven. I didn't think the join would be as noticeable as it is. If I do that I may want to trim the left thigh to be a little narrower. I'm hoping that would help with the sniper plate creeping under the knee. The torso also seems to be leaning a little to my left in the pictures. I didn't notice that when I was wearing it, any ideas of what I should look for to adjust that? Any other suggestions? I think I'm ready to submit for 501st approval .
-
Interesting. How do I find more info? How difficult is it to have one deactivated? The Sterling at Unique Canes looks like a nice option as well. It would be nice to retain the look of the bolt and spring tough. Thanks!
-
I've been keeping my eyes open for Sterlings and found this one on gunbroker: http://www.gunbroker...?Item=284279869 From the photos it looks like the body might be slightly bent, so I contacted the seller and he said: What should I expect for a deactivated Sterling in the US? It seems a bit pricy considering the defects (also: "The charging bolt has been replaced with a Steel Plug that is Welded to the Receiver in the open cocked position : Bolt handle is also welded to the receiver"). I haven't been looking all that long, but so far everything is either cut up in to small parts, re-welded together like this one, or converted to a longer rifle. Has anyone had much experience with these re-welded Sterlings? If I were to pay a premium for the real deal, I would want it to be as in tact as possible, including the paint. Do better ones come up in the US, or does a Sterling just mean a more involved restoration job?
-
And it's done!
-
Just completed the finishing touches. I added the final coat of paint and attached the T-track I got from Marv. I bent it in boiling water, then sanded down the ends so they fit in the holes. The fit snugly enough I don't even plan on adding any glue.
-
Formed some bicep hooks.
-
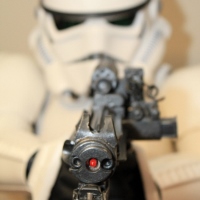
I took a break from armor to do a little work on the E-11. Another coat of paint and its starting to look like a blaster.
-
Prepping the belt and drop boxes. My understanding is the drop boxes should be about 10mm thick. On the belt I will trim the top and bottom as close to the ammo packs as I can. I haven't seen any measurements for the ends of the belt, but I've penciled them in with enough room for the rivet cover. I think I will move the diagonal corner cuts out by another millimeter or so from what I have penciled in the picture. After trimming, I'll need to set the cap rivets. Should I get a special tool for this, or do I just hammer them against a hard surface?
-
Some fitting, as half a stormtrooper. I'm noticing from the pictures that the torso seems a little twisted to the side. I might need to tighten my right shoulder strap, but it may also be due to me standing funny and only having one arm attached. The arm has a little tape on the bicep where the bicep hook will go. I think I can stand to trim the bicep a little smaller. When I move my arm the forearm pushes against the bicep and shifts forward and back a bit. I'm assuming that I should expect mobility to be limited so that is probably normal. The arm in various positions: The leg. The shin is already trimmed, and the thigh is overlapped in the back. I took two pictures of the thigh in different positions. On the left the cover strip is aligned straight up and down with the shin, on the right its rotated out slightly. I think having it rotated a bit is better.
-
I've been slowly working at trimming at assembling the limbs. Here's what's done so far: I've trimmed the shins and plan on trimming the thighs soon. I'll show a test fitting when I get a chance. I think there are still many little adjustments to make, which I would appreciate feedback on. I made a bit of a mistake when gluing the shoulder bells. One turned out well, but I screwed up and attached the snap elastic upside down on the other. It's not a huge problem, since it peels off easy and I can just flip it; but it does leave unsightly E6000 residue on the strap. You will only ever see it if I take the shoulder bell off, but I'll know its there. I'm trying to peel it off, but its pretty tough. Does anyone have any tips for removing E6000 from a strap? I'm hesitant to use any solvents since the strap seems more likely to be damaged then the glue. Lots more to do today, so I'm getting back to work.
-
A long overdue update; I've glued on the resin bits, and I finally got my hands on some Apoxie Sculpt. I ended up ordering it online since I can't figure out where I saw it locally. Here's the before: And after: I like the Apoxie sculpt. It's pretty forgiving and easy to work with, and when dried it seems pretty solid. This has freed me up to start painting. Masked off: Coat #1 I'm applying a coat of brass to the scope tonight.
-
Minor update today. I had a little time to work on things so I finished off the rest of the torso gluing. The only part I haven't attached on the torso now is the groin strap. I'm waiting until I can do a proper test fit since it will be fairly permanent once I attach the rivet. When I get a little more time I'm going to try tackling the limbs in earnest. I want to give myself plenty of time to make small revisions as I trim down. I've been nervous about that part because I've been unsure about how to do the fitting properly. My understanding is I basically want to go as narrow as I can, where I still have mobility and keep the proper shape. My plan is to use 15mm cover strips for the arms and 20mm for the legs and 25mm for the back of the shins. Where there is a raised portion I will try to get the proportion that is covered by cover strip as close to the LFL reference photos as I can, which should dictate how much trimming to do on the fronts of the shins, thighs, and forearms. That would mean any adjustability would have to be in the backs. Is that the right approach, or should I try to make sure I trim an equal amount from either side? Maybe I'm overthinking it.
-
Ok. I confirmed with TM that the elastic should be neutral. On with the riveting! I used a screwdriver and hammer and they went on pretty easy. Next I just attached all the elastic loops for the rest of the torso and it was time for a test fit. The goal of the test fit was to figure out exactly where to place the shoulder straps, ab closing strap, and cod strap. I think they are correct, but feel free to interject if you see any fit issues. My next step for the torso will be gluing those straps as well as the shoulder bridges and ab buttons.
-
I haven't made a lot of progress on my blaster for a while. Lately my free time has been used up by my armor build. Lucas, where do you get Apoxie Sculpt from? I swear I saw it at a local store sometime recently, but I can't remember which one and have had no luck finding it again. I should have just ordered it online a week ago and I'd have it by now.
-
Ok brackets attached I pre-punched and the drilled holes for he rivets I'm now ready to attach the side elastic and rivets One question though. I'm assuming that the elastic should hold the two pieces flush together with no tension, no overlap and no gap. To achieve this, I'm folding over the elastic in half and punching a hole through both sides where the rivet goes and the center of the elastic is on the edge of the armor. Is this correct? I'm worried about attaching it too loose so that when I put it on it forms a gap. When I test fit it the ab and kidney peices are able to touch edge to edge comfortably around my body.
-
Attaching the brackets. I have a feeling this will take a while. Comparison of my placement to archive photo: preparing to drill first hole (between 3/4 and 1" from edge based on previous comparison): Hole drilled. Second hole measured using the bracket, then the bracket put in place. I'll do these for all of the brackets before adding the rivets. Then I'll come back and undo all the brackets to put in the strapping.