

tbo
-
Posts
31 -
Joined
-
Last visited
Content Type
Profiles
Forums
Gallery
Articles
Everything posted by tbo
-
 Please set me up for 501st access! Forgot to do this a while ago. http://www.501st.com/members/displaymemberdetails.php?userID=14675
 -
I let it sit for like 18 hours the first time and came off fine. I sprayed a few other spots and after about four hours it appeared to look as it did at 18. I wasn't in a hurry so I let It sit I over night.
-
After trying to hand paint my RT-Mod helmet versus use decals I found myself having quite a bit of troubles with the Humbrol paints.. The end result was a very thick and nasty looking coating of something that sort of resembled paint. I had done a few searches trying to find things to remove it, and after finally making a post someone recommended using oven cleaner. This was done quite a while ago and I just recently found the free time to get back to my build, but I thought I would share the results. I take around the trap and sprayed it two or three times. It would foam up so I would apply more after it settled. It has been sitting for approximately 18 hours or so and it started cracking and bubbling up and one swipe with a rag showed a good clean removal with no damage to the plastic. Enjoy!
-
Hahah! Wish I would have read this a bit ago and I would have. Between being busy and work and waiting for some extra strips of plastic from Rob with RT-MOD I was delayed quite a bit... I finally got those strips so I seperated every piece of my gear, scraped the glue, trimmed and butt jointed it all. The first batch of plastic strips were not long enough to use as outside finishing strips so I use them on the insides since noone will see them. I am currently awaiting another shipment of longer abs strips to apply as outside finishing strips..in the past week or two I have removed all of my snap plates that had Dritz snaps and replaced them with the longer Tandy Leather snap plates. I have redesigned the strapping to use 2" elastic permanently glued between the kidney/butt plate and the ab/cod piece just as Soldermaster has used on his setup. This will, hopefully, allow me to have less snaps in the design so I have less snap failure to worry about. Tonight I plan on glueing 2" elastic suspenders and installing the permant snaps on the butt plate...then i'll be ready to suit up and if all that goes well then I just need to apply the outside finishing strips and a few other bits and pieces and it will be complete! It was definitely a bit daunting to rip it all apart and overhaul the whole thing with different snaps and butt jointing it all versus overlapping the pieces, but the extra effort is proving to be well worth it.
-
Oh no! I already convinced myself that I need to buy a TM sandy kit.
-
So I left my hack job dry because I ran out of paint thinner to remove it..now it won't come off! I try holding a tag of paint thinner on it and letting it soak but it appears my paint is too thick. I also tried Goof off, which I read about somewhere, but after testing on bare ABS that appears to do the same as acetone. Any thoughts?
-
Thanks Eric! I did a bit of searching and it appears they aren't worth but about double their retail value. Maybe someday loong from now they will be. I know my brother purchased them back when he was like 12 and left them unopened with hopes that they would be worth something someday.
-
So Ive been roaming around trying to find a price guide, but most I find are just books that I would have to purchase. I came across my brothers collection of all the "second wave" action figures. From what I gather they are the second distribution of action figures that was from 95' to 99'. Does anyone have any idea of their worth? I imagine its not much more than their original purchase price, but i'm just curious.
-
Pictures! I'm still waiting on my butt joint strips. I'd love to see how it goes together for you.
-
Got snaps? I got to work with my Tandy Leather snaps and hammered away. My back/kidney and chest plate are the only pieces still assembled and somewhat fitted to me, but I am going to wait till everything is rebuilt before I replace the Dritz snap plates On them with these Tandy ones. I have a list of things ready to be done it is just a matter of time to work on them. Tonight I installed my VaderDave ab buttons. The first concern, obviously, was to make sure that I got them as center as possible. I pulled a ruler and did my best to mark the center. It proved to be a bit difficult since the light was playing tricks with my eyes. I could have probably marked and done it from the inside, but I had no way of telling if each button formed the same through the vaccuform process I did not have any sort of center punch near by so I grabbed my soldering iron and melted a small hole in the center of my marks. My drillbit turned out to be a bit worn and I didn't feel 100% comfortable after the first hole to drill off that tiny dent for the rest of them. I grabbed my soldering iron and pushed it through a bit more giving me a nice little pilot hole to work with. It doesn't matter how slow I go and how much I double check my work I still am terrified everytime I am about to make a permanent modification to these bits of white plastic! I am happy with how it all turned out. I stuck a dab of E6600 on the black spacers that go on the inside and glued them down. Once those are dry I will put some loctite on and screw it all together. Next up I am going to finish stripping the rest of my haggard paint job on my lid and wait for my templates to come from Mike over at Trooperbay. Along with the templates I ordered everything else I need to reach Centurion. I am also waiting on the strips of plastic from Rob so I can really get this thing going. I picked up two 50oz bags of stuffing and plan to make some time to attempt my duct tape mannequin this weekend and possibly try and paint my vocoder. I've also been throwing aroudn the idea of spraying the inside of my armor black so the inside wont be so visible while trooping. As far as I know and have read having the interior black will not keep me from hitting Centurion..am I correct?
-
So I plan to install my VaderDave an buttons, and I was considering melting the holes with my soldering iron versus drilling. The only for fall I see to that is I may not be at I make them all the exact same size. Its not rocket science to drill a hole, but I used my soldering iron to put snaps on and it worked very well. Thoughts?
-
One step forward and two steps back.. So the plan is do it as right as I possibly can.. Soldermaster convinced me to butt joint everything so that is what I am going to do. I've spent some time stripping the pieces and removing all the E6600. I was using the Dritz pliers and snaps for convenience and time efficiency, but I have stacks of tandy leather snaps. The tandy leather snaps have a longer post allowing more metal to hold the male snap together when it is installed. The last thing I want is snap failure. I bought this suit to wear it, not look at it! Also, after discovering the duct tape mannequin DIY I decided to pick up some supplies. I was looking for a real mannequin, but I really like the idea of making one nearly identical to my body size and shape. I also placed an order with Trooperbay for a few bits to get my helmet up to centurion specs!
-
I wasn't quite sure if I should ask here or over at MEPD..I'm curious if any of you RT Mod owners have given this any thought or attempt?? I've been trying to rack my greenhorn brain with all the correct research to make a list of all that would needed to be done. I'm just trying to keep an open mind..though chances are I may just purchase a TD kit so my mannequin can have a friend
-
Thanks guys! I would remove with paint thinner and then do a once over with some rubbing alcohol. Does this sound correct? I'm going to stop by the craft store today and see if I can pick up some paint thinner, and quality brushes and give it another go.
-
I've opted to go for a hand painted RT-Mod lid versus stickers. The frown and ear bumps went over fairly well, but troubles came about when I was painting the rest. The first time around on the traps and everything else gray I used a #5 round with Humbrol 5. I put down a layer, but it was somewhat transparent so i let it sit for a while then added a coat and continued that process for 3 or 4 coats. I woke up the next day and it wasn't laying down evenly. I wiped it all clean and decided to try a larger brush..I went with a 5/8" flat and though it layed down flat I found myself with lots of tiny little bubbles. Any reccomendations on how to remedy my troubles?
-
One reccomendation I would make to you and to anyone who plans on painting is make sure you get a quality brush. Its been quite a while since ive done any painting of this sort and i keep having hairs fall off my brush literrally every minute or two. Its making things take twice as long as they should..especially when i have to go digging to get the hair out and i ruin a fresh coat in the process!
-
I spent the day off from work and after a long night out at the theaters enjoying Episode I in 3d, I got to work.. I opted to remove all the stickers and paint everything rather than have bits half painted and half stickers.. I could have gone the route of getting the hand painted stickers, but since the helmet was already pre-assembled from Rob I wanted to play with it a bit and make it feel like I did something of my own to it. It proved to be a bit of work to remove all the stickers and the nasty residue they left behind. I first started with the frown and my aged blue painters tape let a lot of paint leak through. By the time I had peeled the tape off it looked like a 6 year old painted it <_< I happened to have some acetone near by and although I knew it was not a good idea, I thought if i was fast it might not cause any harm. I was wrong.. You can sort of see it right above the lower right corner of the frown. I obviously am not happy, but things happen and there is nothing I can do about it now! I'm entirely fond of the super polished trooper look anyway and would perhaps someday like to weather it a bit...so maybe i can hide it later! I then hopped in the car and ran up to the local train/hobby store and picked up these two saviors. The microbrushes with a bit of thinner on them allow me to really do the final touches to the edges of the paint..it worked a lot better than i was expecting it to. I put down a first coat on the rest of the parts requiring gray, and hopefully in a bit ill be able to move on to the vocoder. I'm not entirely sure if the trapezoids on the traps were painted correctly.. On the other pieces i had taped off around the sticker before removing it. I decided to remove the traps and then tape them off since they were not symmetrically placed. I wasn't sure if only the flat bit was suppose to be painted or if you're suppose to paint on the raised edges? Other than adding the S trim to the base of the helmet and changing out the rivet on the lower bit of the ear to a screw, what else am I missing for a potential EIB helmet? The ears dont exactly sit flat to the helmet, but i'm afraid id end up destroying them rather than adjusting their fit. Once the outside is complete I'll be mounting my fan and headset as well as some chin straps. Ahh it feels good to finally get something done on this!
-
Game on. So it has been quite some time now since i've gotten any work done..thus the lack of updates. I'm a man of many hobbies and my armor definitely got put on the back burner. I also was convinced by Soldermaster to assemble my gear via butt strips rather than having them overlap, so that put me back as well. I'm currently waiting for Paypal to get there stuff together and get my payment through to rob so he can send me over some plastic! Anyways i've been killing some time by getting my paint on with my helmet. The frown and ears are already painted, minus the ranking stripes, but i'm going to go over it all again so it all has the hand painted look. After I get the painting handled then I'll be disassembling what i've already put together. The majority of my pieces are already glued, so i'm going to do my best to seperate them and prep them for when Rob gets the plastic to me so I can put it together the proper way. Oh, and I finally received a pair of size 11 TK boots..though they seem to be a bit loose on me. I wear a 10.5 normally, but these are definitely spacious. I'm going to try a cheap insole in them to see if that helps split the gap. The other boots I got and painted are looking a bit rough after my one night out on Halloween.
-
My biggest concern right now is whether or not the overlapping style of the RT Mod will be acceptable for Centurion? I could try and butt joint it all, but I don't think it would look correct considering the overlapping seam is raised already and for many of the pieces trimming is not needed. Understand what I'm saying??
-
Our Halloween costumes are very similar! I'm very curious to see how your elastic hook system holds up. Keep us informed!!
-
Annd here we go again! I originally had purchased one of mightytank's garters, but I feel like there is too much going on with it. I'm thinking of something a bit beefier like Stukatrooper has done here ( ). A 2" belt with a big buckle with suspenders attached..however I'm thinking of trying to strap my shoulder bells to the suspenders on both the front and back of me for more support. I am also trying to figure out how to attach the ab plate to me..The chest is strapped over to the back plate which is also connected to the kidney and butt. The ab snaps to the kidney on the sides, but I fear that is not enough. Other things on the Centurion To Do list includes painting and getting my hands on the proper rivets. I also need to order a few things like my o2 canister hooks, rubber gloves with the latex hand guards attached. I am currently on the waiting list for a pair of TK boots, and I need to try and get my hands on a hyperfirm e-11, but it appears I might be just a bit late on that. If that doesn't work out right away I can always shoot for Heavy Weapons Trooper too! Unfortunately any real progress wont continue on the build till later in the week or possibly the weekend. The girlfriend just got back from Vegas after being gone for a few weeks and apparently i'm suppose to pause the build to spend some quality time with her but she did bring me back this little guy!
-
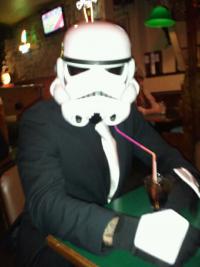
Hello and welcome to the roller coaster of a ride that is my RT-Mod build! Rewind a few weeks ago, and I was at the night of the release for Star Wars on blu-ray at my local Best Buy. A few members of the local garrison were there and I had a chance to talk with this guy for a few minutes about armor and how I've always wanted to be a TK. This fine gentlemen is the one who pointed me towards the 501st's website to find out more on getting a suit and to steer clear of Ebay. I went home that night and found the FSID and started research. Being that I am 6'2" 205 I was a bit nervous about finding something that would fit well, but luckily I found Rob with RT Mod. I contacted him and within a week I had deposit sent to put me on the list! My deposit was sent out on Sept 21st with a estimated delivery time of mid October. At this point I wasn't sure how things would unravel, but I started having hopes of being able to wear my suit for Halloween so I went on a bit of a shopping spree.. Needless to say I ended up spending a lot more than I originally had expected, and we all know this is a number that will continue to increase as time passes! After many weeks of waiting and trying to acquire everything for a quick and speedy build the holiday was fast approaching. Rob is a busy man just like the rest of us and I knew he would do his best to get it to me in a timely manner. The clock was ticking and I opted for that magical box to be next day shipped to me. I knew it was a gamble and wasn't sure if it could be done in time, but I like to think of myself as a crafty guy and saw a video of one guy doing it in one night! I was optimistic until i had this out in front of me.. I was hoping to document the process, but time was of the essence. I got started with it on Tuesday night and had to have everything set by Friday, because I was leaving Saturday right after work to celebrate out in Iowa City, IA 4 hours away. I put in nearly 35 hours of build time from Tuesday to Friday night. I didn't get much sleep. I wanted to be as quick as possible without ruining anything in the process. Anyways..here we go. The bi-ceps, bells, and forearms fit well as they were. Thankfully the majority of the trimming work had been done by Rob so I got to gluing and strapping those bits right away. The only trimming I decided to do was on the ab/kidney pieces. I figured I could go back after the weekend and sand the edges so I chopped carefully and started strapping. Fitting the upper body was relatively easy with the assistance of tape and velcro. The abs and thighs are where my troubles started. I've got some pretty thick legs, and thanks to my mother that is where all the extra weight I gain goes first. I got started and glued the front side of them, but wasn't exactly ready to close them completely. Velcro wasn't enough to hold them together and I was trying to be a Stormtrooper, not a half an impolite person-trooper. I had some issues with the sewing machine and I had plans to put extra velcro on my belt so it could be velcro'ed to the kidney, butt and abs to hold it in place. This is when I started to realize I wasn't going to get it done in time. That and I was nervous about the riveting on the knee plate and affixing the ammo belt to the thigh. That being said I decided to go the formal route for the weekend.. People got a kick out of it and with the voice amp I was definitely noticed in the bars. My tube stripe stickers were sent to me later in the week and I didn't have time to apply them yet so that's why they were not on. For the gloves I decided to use a pair of Champion brand winter gloves. I will eventually get some latex hand guards on rubber gloves so I wasn't too concerned about what I did with these ones. I only saw one other Star Wars related costume and it was guy casually dressed with a boba fett helmet on and a sign saying "Lost my mandalorian armor will kill wookies for money" however I forgot to snap a photo. Here are the few of the test fit photos that I did manage to take as well as my strapping system for the upper body..as well as a good shot of the mess that I made in the last few days. Now that the big weekend is over I have a bit of cleaning up to do and I will slow the pace down and perfect it as best I can! I would like to give a big thanks to Rob for offering such a awesome product, Darth Aloha for all his help thus far, and Trooperbay for getting me everything I needed in such a timely fashion!
-
Darth Aloha's RT-MOD ANH Stunt Build[*RT]
tbo replied to Darth Aloha's topic in Build Threads Requireing Maintenance
Looks great!