

daennika
-
Posts
127 -
Joined
-
Last visited
Content Type
Profiles
Forums
Gallery
Articles
Everything posted by daennika
-
Preparing for my first troop
daennika replied to Damon TK 6144's topic in Build Threads Requireing Maintenance
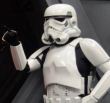
That's a really good looking suit, Damon! Congrats! As a new Stormtrooper who got back from her first event, I assure you that preparation is very important. My advice: practice walking around with your helmet on, and if you have stairs use them! I trooped at Virgin Megastore in Paris and it was a Stormie's nightmare. There were over 5 flights of stairs... I was in a lot of stress because I couldn't see where I was stepping, and my armor dug into my knees pretty badly. Right now I'm fixing my thighs with foam padding to reduce chaffing when I climb up/down stairs. Good luck! And if you worry a bit, remember: you look awesome! -
I was graciously permitted by my garrison staff to take my brand new Stormtrooper uniform for the Star Wars The Old Republic pre-launch event in the Virgin Megastore, Paris. I had a blast. Nothing but good memories for this troop despite me being concerned about the stairs, being stressed for my chest plate that would bump up occasionally (I had my Aker amp under there... what was I thinking? ) and not being able to see where and on whom I was stomping. Pictures speaking more than words, behold! There was a slight shin malfunction (the right one opened up and wouldn't close itself, the left one went up over my boot and it was killing me for a minute), the codpiece was digging pretty badly in my thighs which is ridiculous to say, and I think I was holding my weapons a little too high in most pictures.... And of course the chestplate straps were not elastic so I was snapping them back on every now and then. But otherwise I got comfortable after like an hour in the event. It's hard to get used to the helmet and all the dead angles. My old Scout self was crying inside but I felt damn proud to be a Stormtrooper that night People were eager to have their picture taken with me and only one person made a notice of my gender (though to me it looks pretty obvious that I'm female... trained eyes maybe). It was an overall awesome night and I can't wait to troop again
-
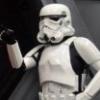
Hey again everyone! I was able to show off my new costume on wednesday as we trooped for the launch event of SWTOR. Being really nervous I tried to prep my kit as much as I could. The first thing I worked on was the fixing of the shoulder straps. I want to be able to disassemble my armor completely, that way it fits in my luggage. I made these out of white elastic canvas, one side glued to the chest piece, the other part folds from the bottom and has velcro loops glued to it. It goes up toward the back in order to keep the shoulder strap from detaching. The shoulder strap with velcro hooks underneath. The elastic strip with velcro keeps it holding on nicely. For the back I use snaps and thin white elastic bands that I made the day before the troop. You can see it fine in this picture. And here's an updated pic of my helmet's insides. I placed the fan at the bottom because I wear contacts, and too much flowing air makes them go dry, rendering an already half-blind trooper yet more blind! More pictures will be posted in a different topic I want to thank the FISD and everyone who encouraged me with this costume. It's not done, there's a list of things I need to modify on it so that I can keep trooping as a Stormie and get approved as "TK"
-
Inexpensive TK Gloves for Noobs
daennika replied to senna1rossi's topic in Boots, Soft Parts, and other Accessories
I agree with Luis. As long as they're black and comfy, you should troop with them. Keep your screen-super-accurate gear for the formal events and approval pictures! Here are my gloves. I ordered them from a German surplus store (www.asmc.de) for 6 euros. They're made of nylon and they're very breathable, also nothing seems to damage them with extensive use (since they are "search gloves") ----- -
Inexpensive TK Gloves for Noobs
daennika replied to senna1rossi's topic in Boots, Soft Parts, and other Accessories
Nice find I use those gloves for work (airport security) some of them come in a matte finish and not that glossy look... I find that they are snug and not too hot during prolonged use. -
Modding a Hasbro to pass the time
daennika replied to daennika's topic in Build Threads Requireing Maintenance
Fill the holes you mean? I forgot Simple as that! -
Modding a Hasbro to pass the time
daennika replied to daennika's topic in Build Threads Requireing Maintenance
Hey again guys! I realize I stopped updating this thread when I received my AP kit, and now... Well, I finished that work, so back to he E-11. Right? After applying primer, and 2 coats of silver paint, I lost the pictures... so until I find them again, here is the progress from yesterday. Forgot to mask the small portion that should've been gray/silver. -
Hey, thanks John. I see that you're using the foam system. Aren't you getting any lateral wobbly action with only those two pieces? I found that I needed to push my head against the back of the helmet in order to see through the visors, and not get my nose squished against the plastic film. Also I like your neck trim, is that the S-trim that one can find on TrooperBay? Because I just ordered that and should be receiving it soon. Lately I was given the opportunity to show my armor and do some mini trooping at a friend's party. It was great! I only had minor issues with my left shin kneeplate being too high, rubbing against the thigh plate. And my belt wasn't fastened tight enough so now I know how to deal with it. Suiting up has never been so difficult for me before Not used to asking people around to pick up pieces of armor for me! It was fun I was also able to sit on a stool for a while so that was a relief To go back on the topic of the build, here's an updated picture of my strapping system:
-
Hey Daniel, here are pictures of my mic tip with a screw that is too short I used ABS paste (scrap pieces with acetone) to make it possible to screw the mic tip in the helmet without damaging anything. Letting it dry for 12 hours, combined with E6000, and it's looking good!
-
This morning I figured that, in order to go to short distance troops, I don't need to buy a really tough transport bin! I can use my suitcase! At first I put the bracers and shins in the thighs and place them at the bottom. Boots on the other side with the shoulder bells containing the biceps. The holster and SE-14r rest on the side opposite from the belt armor. The canvas belt is rolled up with the thigh boxes. The undersuit, neckseal and gloves+handguards are with the thigh armor. In fact there's a lot of storage space in the armor pieces. Use them! Ab, black, chest plates on top. Taddah!
-
This is possibly... Day 20? anyway, in Week 3 of building this thing! Here is the belt, made with press fasteners after Mini Trooper's advice. That way I can disassemble it when I store my armor. And here you can have a peek at the new roomate, and he's asleep Right now I'm working on heat-bending the shoulder straps with the dreaded heatgun. Not easy. I'm wondering if I should use velcro to have those fixed to the chestplate but after trooping with Steve at a large convention I know that they can easily get pulled off. I might try with press fasteners! Not gonna use rivets, I want to be able to take everything apart for all transports. Flat part to the front, curved side towards the back. And here is my helmet interior: The padding I used is the MICH helmet pads and they're not fitting just right. I may need more of them or to place them in a different configuration. The neck seal S-trim is missing, I haven't found a cheap one yet... if there's anyone with a spare S-trim I'll gladly buy it! The other thing I need is to find a better way to fix my mic tips. The poking hazard is extreme.
-
Test drive! While I wait for the next shipment of press fasteners, I thought I'd see if my costume holds together well enough... Attempting to sit down and not have my codpiece fly off Having to pick it up from the floor is my new definition of hell. The shoulder straps are just taped on for show, I still have to heat-shape them a little more (or not?) and my shoulder bells could use some tightening from the top. What else... Feedback is appreciated!
-
Cool, Jancelot! Will look out for your build, it's always nice to know that I can help in any way. Yesterday I attached the accessories to the thigh and shin pieces: Decided to just glue the knee plate on because it was nearly impossible to fit rivets in there. I tried squeezing and twisting that bad boy but it wouldn't match the shin piece. So unless I would cut the whole top of the shin, there was no way I could make those two pieces fit together with rivets. Arms done Sadly, I ran out of snaps... should I use more velcro to make these hold while I wait for my next snaps shipment? Seems like a waste of perfectly good industrial velcro and straps. I guess I can take a break in the build, then! Next on the list of things done are the mic tips. First encountered problem were the screws which are ridiculously long. I haven't tried the helmet on at this point. Why? Because this looks dangerous. And OH NO! They're lopsided Today I've started on the belt: Not sure I should use rivets... But the holes are already made on the canvas belt (it has a plastic sheet inside) so I guess I'm winging this one, too!
-
So I made toxic silly putty with ABS and acetone, it worked pretty well for securing the poor glue job on one of my bracers. Then I had the idea to cover up the inside trims to make sure nothing would get caught on any edge, rendering the shims more solid in the process. Somehow and despite all of my efforts, I couldn't get anything cleaner than this. I had to reduce the diameter of the bracer so much that I couldn't get wide enough trim edges to glue together. Even with Rare Earth magnets, and pressing the two pieces together, the trim strip wouldn't align properly. Shoulder bells. I'm thinking about using velcro on the ends of those straps... Biceps curing!
-
Slow day today for my build, I only found the inspiration to work on my hand plate straps.
-
Day 9 (skipped a couple of real time days) with some more work on the legs and forearms! I had to trim a LOT from these guys, and there will still be a lot of wiggle room once fully assembled. These lines were cut off to allow walking. Velcro being glued on. I want to have the strongest holding velcro in the universe so I used E6000 for this job. Full enclosure for the thighs! Now that I look at this picture I realize I have to make those back-cuts even and more symmetrical... Creepy looking interior. First coat of acrylic paint for the inside of the helmet.
-
You know I did want to go for accuracy but I didn't feel courageous enough to widen the teeth holes, so in order to make the lines look even I had to paint a little a around the holes... If that makes sense. It looks just better this way in my opinion. Here are more pictures of the glue work. The shins didn't really fit all that well together, as I had read on several build threads that this occurs on most AP kits and that twisting the plates was in order... However I managed to assemble them without doing that. We'll see how that works out on the long run. This morning I glued the thighs which were reduced from the top, as you can probably see. Also it was nice outside so I did some spray painting The detonator tube is primed and will be painted gray later on. The modified Hasbro E-11 is also getting some love!
-
I hope you guys aren't bored yet, because here comes the update for Day 7! The shins were a tough part, I managed to get them to fit together with two strips (outside and inside), lots of glue and magnets. Here are almost all of the male snaps being glued in place. Ear piece paint, second coat on the frown.
-
Thanks so much, guys, for the advice. I thought the ears were going to be a disaster but I kept using the trim-fit-sand-fit-trim-etc technique and it paid off! This is Day 6 and the helmet will soon be finished. The decals are on, the frown and ears are being painted as well as the mouth section. I don't know how long Humbrol paint takes to dry before I add a second coat of gray and finish the ear squares. Next thing on my plate is the interior of the helmet itself that I wish to render in black, either with spray paint or more Humbrol... not sure yet. I don't want the smell of the spray paint to become a discomfort down the road. Or, I have dark gray primer and might just use that.
-
Day 4 & 5 Trying to squeeze costume work with a job is not easy Yesterday I prepared the legs and arms pieces before gluing. The finishing strips yet need cutting so I will take my time with them, I'll also try fitting the armor on myself before I commit to anything. This morning, using this tutorial I managed to finish assembling the faceplate to the helmet. I used a smaller rivet at the bottom. Washers were used accordingly. For the ear pieces, I need to trim them a bit more, and perhaps heat-shape them a little bit?
-
Hey again everyone! Yesterday was a work day so I didn't have much time to advance on the Stormie. I cut out the ab plate buttons and in the process however, noticed that the ribbed shoulder straps were missing from my kit. I instantly e-mailed my armor guy about it since they were nowhere to be found... Hopefully they were just misplaced during packaging. No idea when I'll ever get them eventually. Anyway, here's some face plate work. Day 3, sort of. Here are my new tools: triangular, round and flat filers. I ended up only using the round one with some sand paper. Some light trimming around the edges but it still didn't look satisfying enough. Also the right eye bump was a little too pronounced. I used the X-acto after all, with some reference pictures from starwarshelmets.com. Also for the frown holes, not sure if I should make them wider or leave them as they are. I'd reeeally like some feedback on this since I kind of have "trimming goggles" right now!
-
For the second part of Day 2 here's the advancement: My work station securely guarded by my cat, Timmy. Having finished separating the butt plate, I felt like something more challenging... The plastic was actually quite flimsy here, didn't even need to poke too hard. I call this the Poke&Twist method for drilling holes Carving from the inside out to control what I'm doing and not damage the "face"... Will finish this later with a triangular filer. Eyes ready to be carved out! Not afraid to snap some parts off, I was feeling good about myself. Hm, it will need to be sanded down thoroughly... The left eye looks okay I guess. Trimming the "cap" of the helmet. I don't have a hole-puncher to prevent it from tearing at the high corner (where the brow time stops) so I will need to be extra careful with this piece. Brow trim fitted. Preview of what it should look like before I rivet both pieces together I was so excited when I got the helmet to take this shape. I'm super happy with how easy the trimming is and how it's turned out.
-
I plan to trim an inch off the top of the cod piece, that's why! I love your build threads! And I'm definitely gonna take inspiration from your pictures when I do the fitting on mine since we're the same height. Your suit seems to fit you like a glove I have some Rare Earth magnets but they're too strong as well, I'll look up the N42's right now, thanks so much! Here are more pictures. Day 2 It's early in the morning and I thought I'd just stay in bed for this one The shoulder bells and a little show of how I go about the "Score&Snap" method. You probably can't see it but my hand were getting really sore at that point. The biceps. Ow. Some geometry to work on more complex shapes to cut out. Arms are all trimmed. Now attacking my butt plate with the X-acto! More coming up!
-
Hello everyone! I promised in my first introduction thread that I would start a TK ANH build, and I went for the AP kit. I just got it today, and here is my build thread. I'll try to make it as informative as I can. Day 1 I received my brown box this morning, actually I missed the delivery man but was lucky enough that he knew me and just dropped the package over my fence after giving me a call. Here come the pictures! A little bit of transport damage but nothing to whine about. Unpacking... Christmas came early this year, or what! Checking for damage, a few fine scratches here and there but, in the end, I'll be sporting a lightly "battle damaged" TK. Much like in the first scenes of ANH. Moving on. Not everything was unpacking here since I lack room. I'm currently sitting in the middle of boxes. So, armed with the following tools I started trimming the parts. I was pleased with how easy the process turned out to be after pulling my hair off with my E-11 Hasbro mod. I applied the score & snap method for trimming, and used the Tamiya curved scissors whenever I needed to cut out tougher parts and corners. The ABS is actually quite soft and thinner on certain areas and I didn't need to score in too deep before bending the sections I wanted off. After roughly 5 hours of this work, here are the pieces I've trimmed, but not fitted yet. Soon the question of thigh plate fitting has come up and I could use some advice from other short troopers. How much can I trim off the top front of the thighs, and do they need a return edge? I don't have a bending iron for plastic, so trimming those parts may make them look a bit gross... I might be confusing myself about this. I felt like starting on the helmet but sleeping feels more reasonable right now, since it's getting late! Better off posting pictures. Here are the things I already have: - Gloves (Mappa, MilTec Nylon search gloves) - Holster (AP) - Canvas Belt - Blasters (SE-14r, E-11 Hasbro mod soon) - Undersuit (from stormtrooperundersuit.com) - Neckseal (by sweetiepop73 on ebay) - TK Boots - Aker amp - Helmet pads - Humbrol paint - Frown screen What I still need to get: - Press-fasteners - Straps - Transport flight case or bin (I'm going to CVI) Can't wait for day 2!
-
Modding a Hasbro to pass the time
daennika replied to daennika's topic in Build Threads Requireing Maintenance
I don't know what brand of tape it is, but I had to do some sanding as well... A lot of it. But if I can find another substitute for the eyepiece it shouldn't be a problem. For now, I've almost finished assembling the resin parts.
