

Angevine
-
Posts
94 -
Joined
-
Last visited
Content Type
Profiles
Forums
Gallery
Articles
Everything posted by Angevine
-
TK Commander Build (Pic Heavy)
Angevine replied to Angevine's topic in Build Threads Requireing Maintenance
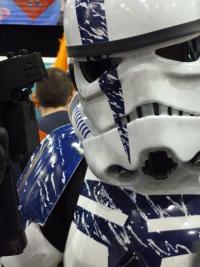
Over the past few days I have been attempting to finish the Blue weathering on my TK Commander. I've still got all the white work to weather yet but I am pleased with the way that the Blue areas all came out. Still a little bit more work to do, but I can see an end in sight. To Do: Smoke charing on all white areas Holster to attach Boots to paint and weather Vox Kit to purchase Final adjustments to strapping As usual, all comments, advice and guidance appreciated. -
TK Commander Build (Pic Heavy)
Angevine replied to Angevine's topic in Build Threads Requireing Maintenance
Thanks for the advice, i've still got all the weathering to do on the white parts as you've pointed out. The clone armour looks awsome, careful, I might be contacting you for a weathering armour party Will definately be working hard to get it right otherwise it does completely stuff the whole look of the armour. Will post more pics when I have done some more, having a break for christmas! -
TK Commander Build (Pic Heavy)
Angevine replied to Angevine's topic in Build Threads Requireing Maintenance
Sean, Ab plates are now attached to the armour and the correct way up Going to re-look at the scratches again and tone them down a tad! the main question I was asking was what size I should paint the Ab buttons. I had been advised that the whole in the centre of a CD/DVD was about the right size to use as a template for painting, but when I painted the buttons to that size they looked a bit large. The centre of a CD/DVD is about 15mm in Diameter, but I think the buttons should be about 11mm in Diameter at the most! -
TK Commander Build (Pic Heavy)
Angevine replied to Angevine's topic in Build Threads Requireing Maintenance
Thanks for the above but my ab button plates are already glued to my ab piece so I am looking for the correct size to paint them. I did find these to paint and glue onto the ab plates but unsure if they are the correct size etc. http://www.amazon.co.uk/Half-Ball-Cover-Buttons-Size-18-Pkg/dp/B004BPCLKM/ref=sr_1_1?ie=UTF8&qid=1324651489&sr=8-1 Will contact Paul with regards to Clips and Tube -
Hi Sean, I'm in the middle of building my TK Commander as we speak and have just found this thread. Amazing work and this has pushed me on to get mine finished. My current progress is viewable here: http://forum.whitearmor.net/index.php?showtopic=17989 Any comments or advice is appreciated.
-
TK Commander Build (Pic Heavy)
Angevine replied to Angevine's topic in Build Threads Requireing Maintenance
Thanks for the advice given so far, its been a great help. I have few more questions for you. 1. What size should the buttons be painted on the abs? I have used the centre of an old cd but it looks a bit large to me. 2. Anyone advise me of a good supplier of Thermal Detonator Clips? 3. My Thermal Detinator tube came as a piece of black pipe, I have three cans of Humbrol #5 Gloss Grey. Is this the correct colour for the pipe to be painted? Thanks for you comments and I look forward to getting some more pictures up soon. -
TK Commander Build (Pic Heavy)
Angevine replied to Angevine's topic in Build Threads Requireing Maintenance
Clam Shell -
TK Commander Build (Pic Heavy)
Angevine replied to Angevine's topic in Build Threads Requireing Maintenance
Two quick questions, Should there be any strapping between the chest plate and back plate? Also should the back plate be strapped to the kidney plate? I'm currently painting and weathering the thighs and ab plate as we speak, more photo's soon Any advice on the strapping is appreciated. -
TK Commander Build (Pic Heavy)
Angevine replied to Angevine's topic in Build Threads Requireing Maintenance
Been a busy boy and got a load more work done. Still got some tweeking, strapping to do but as you can see, we are moving on! The following pics are as I stand tonight Comments as always welcome -
TK Commander Build (Pic Heavy)
Angevine replied to Angevine's topic in Build Threads Requireing Maintenance
Yep, got the paint so no worries there :0) -
TK Commander Build (Pic Heavy)
Angevine replied to Angevine's topic in Build Threads Requireing Maintenance
The Armour is from loadingarea and the helmet is AP -
Thought it was about time I put some pictures up of my first ever TK build and where I am so far. Firstly, I managed to obtain the kit in a part built state. Arms built Chest and Back plate trimmed and painted Helmet - AP helmet previously used and EIB approved, painted up as TK Commander (Thanks Terry Cooper) I have been working none stop for the past month or so to get my kit built and so far I am enjoying the process, the errors and the build in general. I have attached some progress pics so far of not only the kit build but also a test fit for your comments. As I got the kit :0) I added my resin blaster and boots to this awsome kit and started to build in ernist: Terry Cooper, who I brought the kit off, had done an awsome job with the paint job so I have been scrutinising every page of the forum to ensure that I do all his hard work justice. This is where I am so far: Bells, Biceps and arms complete but not strapped Chest and back plate completed and connected via snaps and webbing, shoulder straps attached to front. Kidney plate and butt plate complete and attached to each other via straps Cod piece trimmed awaiting buttons and painting Thighs trimmed and fronts glued and strips attached (backs to measure and glue) Legs trimmed and fronts glued and strips attached (backs to measeure and velcro) Hand plates trimmed and attachment method to be sourced The pictures below are of a test fit of the upper armour but I still have the following to do: Shoulder Bells to be attached to straps to brevent bells sitting to far back Biceps and arms to be painted and correct positions to be measured and strapping system installed Right shoulder strap has a horrible twist which needs to be sorted. Can this be velcro'd in place at the rear or should I heat and bend? I think the back plate needs to drop down a bit more, easily done by adjusting the strapping Belt to be finished, and worn properly next time! Leather holster to be purchased. Anyone recommend a good supplier? Rest of strapping to be completed and lots of painting and weathering to do! Comments and advice as always appreciated.
-
SCREEN ACCURATE TK BOOTS
Angevine replied to Scum Hunter's topic in Boots, Soft Parts, and other Accessories
Try this:-------- -
I purchased the paint from here: ------------ but i'm sure there are other places that sell it. I just searched Google for Angelus paint under shopping and that came up as one of the cheapest. Hope that helps.
-
The Bottles state that they can be applied with a spray gun or air brush. The paint is thicker than the finisher so I imagine that it might need thinning to get the best result not sure as I don't own one. I only used 1/4 of the bottle of leather paint, if that. Got loads left from the 4 FL. OZ. Bottle. As for the finisher I have a probably used 3mm from the whole bottle.
-
I masked the sole off then started layering on the paint thinly with a piece of sponge. It took about 5 coats with 24hr drying time between each coat. I then put 2 coats of the finisher on, again with a piece of sponge. After drying though I did find that when the masking was removed some of the paint came away with it so I have done a repair with a small paintbrush where required.
-
With the excellent advice of Vern and Rob I purchased the Angelus Leather Paint and have now finished my Boots. The Angelus paint is excellent at covering the Black and I feel it is the best way to make your boots look more like the screen used version than anything else I have read or seen on this forum. I hope you like the finished result as much as I do.
-
I'm painting a brilliant set of boots up as we speak. Really comfy boots. Not got armour yet to try them properly but the tops are quite small. My small thread on these is below. ---------
-
Doopydoos all resin E-11 build
Angevine replied to MartinSivertsen's topic in General Weapons Discussion
Amazing! I'm going to have to buy another one now and try to replicate this! -
Thanks for the comments and thanks Vern for the tip on which "paint" to use. Would you recommend Satin or Gloss finish? I will post some pics when they are done.
-
Hi, I have managed to get a set of these off e-bay for only £25, do you think they are ok for turning into my first set of boots? For only £25 if they are'nt any good at least I have not wasted to much cash Comments appreciated.
-
Hi, Thought i'd show you all my first ever build of the Doopy Doos Full Resin Blaster kit. This is also my first ever Blaster so any advise would be appreciated. I hope you like it.
-
I have been putting this blaster together for a couple of weeks now and it does look good. Mine had loads of air holes in the top so quite a bit of filling and sanding was required. Just trying to source a scope rail. And sources or advice for this kit would be appreciated due to the end holes being filled in.
-
Armor Build Toolbox
Angevine replied to missingpieces's topic in Boots, Soft Parts, and other Accessories
Hi, i'm just starting out so this find is gold dust to me. Still deciding on my first kit (AP I think), but you need all the tools in place first to start your build! If this has been updated since, can someone let me know?