

Rebel Doughboy
-
Posts
91 -
Joined
-
Last visited
Content Type
Profiles
Forums
Gallery
Articles
Everything posted by Rebel Doughboy
-
 Other side of blaster Reflective scope back per TKDueno's method Taking a pic of the helmet now I will eventually upgrade my blaster to a SDS or hyperfirm. I will also shorten the holster, thanks for the feedback Terrell! I'd hate to have gone through all this effort to be off a lil'bit! Lighted up: Bucket: I am also going make a new bucket, the ears...just bug me on how I cut them. Though there are screen ones that look worse, I just want to get it for peace of mind <_< And yes I know the teeth are pretty cut out, but I don't think it makes a huge impact, I am adding wire in today so it doesn't look to blaringly...cut out? lol Thanks again to all who helped me. A HUGE shoutout to Terrell who was incredibly helpful throughout the build and was the one who provided the armor in the first place. Completely changed my life forever! Can't wait to get down and (dirty?)!
 -
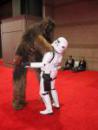
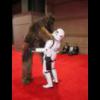
Thanks for the really nice compliment, I appreciate it! I started this build last year when I recieved the armor on August 28th, I was 16. Come September 2nd 2009 ,I hit 17. Thanks to musicals and school is slowed progress but I trucked on. There were many times where I found it overwhelming, but eventually got there with some hard work. But I think it payed off because I started off with the intention of being the youngest EIB, unless there is another! Being in the Legion has turned my life around for the better, and trooping is almost as addicting as making the things themselves Weird Al and the Doughboy, on my birthday and inaugeral troop! The day afterward was a Friday troop at a baseball game, why do kids love to hit our thermal det's so much? Modded Hasbro Seperated butt and kidney plate Anything else needed? Light up my lens? I have smitty's lens if that means anything. I can get a pic in the morning if need be!
-
I had no idea about the holster, I can easily fix it but is it needed to be EIB? (I'll fix it anyways because now it will annoy me lol). ATA comes with a seperated butt and kidney but it is no problem taking a pic! Much appreciated for the feedback Bondservant! And thank you! Noted on the thermal det, I can squeeze the caps in more, thanks again!
-
Hello fellow FISD(er's), Kevin R Skiera TK-9336 Rebel Doughboy Midwest Garrison I finally got approved today, and request EIB status for my ANH Stunt Stormtrooper (ATA)! This was my first stab at Armor making and Terrel was incredibly helpful throughout the build. I replaced a number of pieces just to make sure it was close to accurate as possible. I am actually a little scared I did something wrong...and being 17 didn't help too much either LOL. Though I turned 18 on 9/2/10 and had the GREAT chance to troop with Weird Al on stage, on the same day, a humbling experiance! -Elestic ties on shoulder straps -TK-4510's Helmet and Ab decals -Bernard Cushing Holster with Chicago Screws -Side rivets on Left side -Male snap showing on Right side -Fireblade Jedi's Cloth belt -TK Boots (the leather ones) -TK409 Neckseal -Rubber gloves -Correct Strip lengths and dimensions -Correct mic tips -Heavily modded Hasbro with M38 scope, drilled out cocking mechanism, T tracks and doopydoos. Only things missing- Frown mesh (getting it tomorrow at another troopers house) Correct handplates When you have a 1916 Doughboy helmet laying around, you must wear it!
-
Extreme Hasbro chop
Rebel Doughboy replied to Quebectrooper's topic in Build Threads Requireing Maintenance
Wow, man way to go the extra mile...taking hasbro to the limit, fantastic build! -
Thanks Andy! Much appreciated, so 18 gauge wire correct? Is there a certain prescribed way to attaching them? Kevin
-
Hello all! Here's my finished Hasbro E-11. The pics show the progression from start to finish...well from when I had it finished for a library troop in February, so I came back and finished it. This was my first shot at this...so hopefully I was mostly on target (albeit our screen counter parts who can't hit the broad side of a barn...) The scope needs the little target, and I have the magnifying glass, its taken from a eye glasses repair kit that cost a $1 at Dollar Tree, works like a charm! I first sprayed silver then painted gold on the scope. Following was a coat of Rustoleum black pro gloss, I then used steel wool to dull the shine and weather it, type #000. I am really happy how it turned out, I need a better camara then my phone but does it qualify for EIB (I know it's a stinkin Hasbro...but still?) Thanks! Let me know what you think! I am going to take higher quality pics once I find my regular camara and not just my phone...
-
Doughboy's ATA Build[*ATA]
Rebel Doughboy replied to Rebel Doughboy's topic in Build Threads Requireing Maintenance
Returning from falling off the face of the Earth! UPDATE! Since my first troop this past Saturday, has inspired me to pick up on the trooper and just get down and dirty. In the days leading up to the Wauconda troop, I quit procastinating and finished my E-11!!! And that shall be our first order of business. It is a Hasbro mod, only I took it a bit farther than the usual mods. Note: I still have to drill some more holes and slap some T track on, but thats it to be EIB approvable, are Hasbro's even applicable to EIB? I hope to make a blaster worth of the Dark Side Sith Lord's or TK-Dueno but I horribly lack skills to do so as a mere 17 year old... I didn't have time for the T track to arrive before the troop, so I left on the inaccurate fins on the hasbro. Some 6 year old youngin couldn't tell the diference, I hope! Firstly, I started with a Hasbro E-11, most generously sent to me from Rob, which I cannot express my gratitude for. From there, I ordered the resin E-11 kit off the bay from a chap in the UK, including a resin M38 Tank scope replica. To put the scope on however, required the greatest deal of work NO one has boldly gone before (because they are smart? lol). So I did. The scope on the hasbro consists of two caps, and is two pieces, since the gun mold itself is two pieces. Cutting out the molded scope took a little patience and being careful to not damage the box shape that housed the little speaker for the gun. I also cut two holes in box shape thanks to some inspiration on these boards! Plastic scope cut out and the gap sanded down. Testing how the scope fits...and seeing how much gap was to fill. More importantly, how to fill it? Another angle. So from there I decided to use left over plastic from my ATA kit, the sheet for the strips. It took some trial and error but I finally got the shape down and sanded the living heck out of it. Then I added a second piece to complete the box housing, trying to make it flow and be flush. I was really happy with the result, even if it took me around 13 hours altogether to get that, and the rest of the pieces on! I will also make note that the Hasbro has the grove lines where the cocking bolt would go. I drilled it out and sanded, didn't come out as nicely as I hoped because of a slip with the dremel, but it was able to be saved! What I used to fill the gap was the orange plastic that covered up the barrel holes. I cut down to size and it fit quite nicely. I opted to cover it because you could see the hollow inside of the hasbro plus all the little grooves for the screws to connect the two pieces. I plan on Putting something over the bolt I have with one seen on PVC blasters. M38 scope that I carefully hallowed out. Pic of myself from this last Saturday with the finished gun...I need to take pics of it! Lol, pics to follow for finished ones... Now onto the ARMOR. I finally got re-inspired and got back to work. With correct, measured strips from a new sheet courtesy of Terrell, plus a new set of thighs and a buttpiece I got back to work. So far, I have finished my right bicep piece and and sanded and ready for paint. I am leaving the other to cure tonight. I only glue one strip a day, with my 6 magnets. Helps achieve a full, tight seal, otherwise I would get really paranoid if the gaps show The right and left biceps are done...the other arm pieces are recut and ready for strips...bells are sanded and ready for paint. Helmet is ready for paint. I need to assemble the new thighs. Calf pieces I am glueing a 2 inch strips on the back and use velcro to secure the sides, or would that look stupid? On the back of my thighs I will use 1 inch strips on the back. Iglued the shoulder bridges down on both sides. I know the more canon way is to use some sort of piece to hold them down but I'd rather have them glued on and not move around. The last thing would be putting the holster on my TK belt, otherwise, thats it. I have a dilemma with my ab and kidney pieces, they just don't want to line up on my sides when I put on the armor. I have no need for shims, but want to put in side shims so no sliver of black to be seen. How does one get that flush looking clam shell? I don't think I am incapable of producing that... I am thinking this would be more comfortable as well. Other than the aforementioned, I will be a TK REALLY SOON! ...atleast until all this glue finally cures... Some Pics of the build, Sorry for falling off the face of these boards, I hope bringing my thread back to life doesn't bother anyone! I will honestly say when I started this build, with a smug grin I told myself, "Going for TOTAL ACCURACY, EIB baby!", now...being a mere 17 year old whose never done that can say I won't be EIB because I suck as armor building and hoping I can this blossom into at least a decent ATA suit! It's hard looking at this suit and of course seeing all the places where I made boo boo's, even though some of them take closer examination to find. I think the biggest mistakes I made was cutting the teeth on my helmet like a moron...well...more air intake? -
TK Undersuits -Now
Rebel Doughboy replied to TK-6162's topic in Boots, Soft Parts, and other Accessories
I know it might sound redoundent, but adding a poll might be helpful as well I am stateside and use the two piece Underarmor. -
Dark_GTI04's ATA build[*ATA]
Rebel Doughboy replied to DarkTrooper's topic in Build Threads Requireing Maintenance
Your doing an excellent job Daniel! I am having the same problem with my thiegh piece as well...my calf pieces are curing as I type, so the theighs, and lastly the thermal Det will be the last things to make on my suti. Naatsirhc's thread is the best tutorial I've come across in how to build a thermal detentator. The helmet looks fantastic, and great job on cutting the teeth I haven't been working on my trooper since October since my involvement in musical, and unforntantly I was cast as one of the giant roles so my building went to a stand still...but now I can get back to it. Keep up the good work! -
Doughboy's ATA Build[*ATA]
Rebel Doughboy replied to Rebel Doughboy's topic in Build Threads Requireing Maintenance
Hey Gos, yeah it fit beautitfully! Every thing was solid and very comfortable to say the least, the foam in the forearms really made a difference. The last thing would be to close the side gaps and the upper half of the suit is done, save adding the strips over the joins. -
Doughboy's ATA Build[*ATA]
Rebel Doughboy replied to Rebel Doughboy's topic in Build Threads Requireing Maintenance
Sorry to resurect my thread here...but I have a few updates. For some reason I kept forgetting to post my progress here as well on the MWG boards where I am a bit more active...sorry! The legs weren't even assmebled, calfs and theighs, so I just used industrial velcro to close them up since no one around my town would even know the difference. The helemt is off white because it is still being painted, as the rest of the suit is still unpainted or unprimed. I need all the cosmetic touches too, like the shoulder straps and belt buttons to hide the rivets...and drop boxes too. Everything else above the legs is strapped and mighty comfortable. I am really happy I bought some 1/2 inch foam, makes a world of a difference I might add! So disregarding the obvious, here's my jerry rigged TK that I patroled the streets with! So obviously there's alot that needs doing and even fixing. My helmet is whiter than the suit at the moment because it's still being painted, the rest of the suit I am painting once it's finished. The teeth are thiner than I would've liked to make them, but in the end of things I am happy on how it came out. It still needs the plastic mesh behind it... So I will be working on the legs more today, and calfs as well, and I can fit without the need for shims on the sides of the AB and kidney plates. So I can rivet one side and the other with two very small strips of black fabric to connect the other? I really want to thank Edlitmus over at MWG for continually helping me out! One more question ( I am chalk full of'em!) Is the holster attached with 1/8 rivets, jean rivets or snaps to the belt? I going Stunt, so two of the little buggers, but which kind? I am lucky enough to have Mark's canvas belt and Bernard Cushing's wonderful holster, so I thought I'd inquire from the pro's first before I touched a rivet -
Thanks for posting this Christaan! Yes it helps ALOT, I wasn't thinking of doing the elastic across my back and neck but want to try it now and see what happens!
-
Kevster's ATA build[*ATA]
Rebel Doughboy replied to kevster's topic in Build Threads Requireing Maintenance
Go slow, and trim conservatly! Better to have a little too much than be SOL with too little. I am working on my first build, realize you will make little mistakes...and it won't be the end of the world! There are a few completed ATA builds on here already, I know Christaan's and Gos' really helped alot! Good luck, and those pulls are certainly sharp for sure. -
Doughboy's ATA Build[*ATA]
Rebel Doughboy replied to Rebel Doughboy's topic in Build Threads Requireing Maintenance
Finished trimming the helmet this evening, I went for the square teeth look, now to find some black mesh to go under it...tell me what you guys think! -
Doughboy's ATA Build[*ATA]
Rebel Doughboy replied to Rebel Doughboy's topic in Build Threads Requireing Maintenance
Thanks man, I was actually able to order some Testors out of Ace, also where I bought my paint and the E6000, sorry I haven't updated this thread in a while, I finally have all the materails for this project, which is awesome. Infact, I got my decals today, thanks TK-4510! Now it's just a matter of putting it together. -
Got mine today as well, I am definitly impressed. I wear a 9.5 and the 10 fits really well. I am really glad I waited to buy boots then these guys popped up. Talk about good luck. Pretty comfy too...
-
ATA full armor pics, almost done
Rebel Doughboy replied to Sgt JB's topic in Hard Armor (General Discussion)
Awesome job Eric, glad to see a finished ATA kit! Now I have reference pictures to base my build off, I hope I can get mine to look that good -
The pics of the strapping helped so much you have no idea. Consider it like Han and Luke on the trench run, you just saved my butt, work should go 110% better for me! These are some of the best pics seen for how to strap the armor together, thank you. Great looking TK!
-
Doughboy's ATA Build[*ATA]
Rebel Doughboy replied to Rebel Doughboy's topic in Build Threads Requireing Maintenance
I was dissapointed at Jo-Ann, first thing I looked for was Lexans, no lexans. I plan on getting some eventually, for the finer points that Xacto'ing can't accomplish. Thanks for the link and info on the Champions. -
Doughboy's ATA Build[*ATA]
Rebel Doughboy replied to Rebel Doughboy's topic in Build Threads Requireing Maintenance
Pics are on the way...albiet it just my phone's camara. Gos, were there any logos on the back of the Champions? I was thinking of paying them a visit tomorrow. I was thinking about getting more snaps, darnit, should've! Also picking up Jo-Ann's jean rivets too. The two pieces I trimmed (after a little nervousness was overcome) were just cut out. I sanding the rough parts that were cut with the Dremel as well. Have to still fine tune with the sanding sponge. When I finish that, pics you will have BTW Great build so far Gos, helpin'me out for sure. -
Doughboy's ATA Build[*ATA]
Rebel Doughboy replied to Rebel Doughboy's topic in Build Threads Requireing Maintenance
Thanks Joey, that helped! Again, following your advice the Imperial march was played during trimming :headphone: Update: Parts are being trimmed, had some trouble deciding if I should've cut to the 2nd line present on ATA armor. I started at the butt piece, and went to the second line. I just finished the Ab piece, and followed to the second line. I am tracing the rest now since I'd rather do more reseach and do it right the first time. There are some impressive builds going on now. I am thinking referencing Stukatrooper's build, so far has been good! I will have to wait to trim more tomorrow, Dremel'ing in the late night, not the best idea... Since my last update, I have got a few things done, the latter of the lot this weekend.) -Ordered a cloth belt (Thanks Mark!) -Bought boots from TKboots (High hopes) -Neckseal being made (Nikkimat) -Got neoprene coated latex gloves in my size (it fits like a glove! Pardon the pun...acquired from Home Depot) -320 and 600 grit sanding sponges (Home Depot) -Ordered a Holster (Thanks Bernard!) -Ordered New lens (Thanks Smitty) -Ordered TK-4510 Decals (Oh yeah ) -Got black strap material, 1.5" and 2" (Jo-Ann fabrics) -White industrial velcro (Jo-Ann fabrics) -14 snaps and hammer tool (Jo-Ann fabrics) Still need, -Krylon White Primer -Krylon Glossy White paint -E6000 clear -Humbrol No. 21 black gloss enamel or Testors No. 1747 black -Humbrol No. 5 Dark grey gloss enamel or Testors No. 1138 Grey (Was that meant to be or what? ) -Humbrol No. 14 French blue gloss enamel or Testors No. 2715 -Undersuit, might go the Underarmor route because I have a plain compression top w/out logo. I divesuit if it's cheap -Blaster, Target and Wal-Mart you have failed me for the last time. Probably get the toy and Doopydoos Resin kit through the bay. -And of course, one always needs more cowbell! -
Just ordered mine today. Been talking with them for a good two days now and the communication I've experianced is excellent! Just my luck when Caboots ran out, I get this sweet real leather alternative, just in the knick of time I might add!
-
Doughboy's ATA Build[*ATA]
Rebel Doughboy replied to Rebel Doughboy's topic in Build Threads Requireing Maintenance
Thanks guys, I am pumped! I was concerned on the snaps, found great tutorials on here, so the brand to get is tandy. Understood, thanks for the tip! Hopefully picking up most of the stuff this week, can someone explain to me the difference of the wet and dry sand paper? And Firebladejedi, it was probably one the coolest experiances...ever -
Hi everybody! My ATA armor arrived today! (I decided on ATA over FX because I am smaller guy, and darn just holding it up against me untrimmed is close darn perfect fit) I personally recieved the GIANT brown magical box from the postalwoman, thought it wouldn't fit in my front door! I am still a padawan when comes to TK knowledge, but man I am impressed! Just taking out the pieces overwhelmed me for sure. Lots of trimming to go, and basically the coolest thing I've ever done! The bucket particularily stands out IMHO. Thanks Terrell! Its here, its here, it's here! Opening this while listening to the Imperial march is something I will never forget. Just like a kid on Christmas. Here it is! So, time to re-read all the awesome build threads on here...though I need tips on getting all the right needed materials- So far I know I need to get, -Industrial grade Velcro -The magical white paint, and thanks to kwdesigns for great advice via pm -Sand paper (what kinds, and the different between wet and dry sand paper?) -Snaps -black elastic type material -Lexon curved scissors -blue and gray paint for the frown, ears, and ab buttons -TK-4510's awesome decals -Underarmor suit -E6000 glue -Rubber or Nomex gloves? I am leaning towards Rubber ones -Ankle boots...Caboots is out of 9.5's darnit, maybe a 10 can suffice if they still have them. I am not looking forward to dying Jodhpurs then keep dying them after a couple troops. Anyother makers? I saw a pair on eBay, but they didn't look legit to me... -Neck seal, found one just waiting on it now. For the blaster I am modifying a Hasbro E-11 with a resin kit from Doopydoos. Electronics will be later down the road once everything is put together, a ROM/FX if I have the money. I was thinking putting it together, then painting the suit? I noticed some troopers paint the inside of the bucket black, is that needed for the Expert Infantry designation later down the road?
