Leaderboard


Popular Content
Showing content with the highest reputation on 08/12/2017 in Posts
-
my BBB came last July 6 The first i opened was the helmet box As always doc jim is the packing master The helmet unbox I didn't include the hovi tips in the pictures for i will replace them with resin or plastics ones minor damage on the armor but what is good with fiberglass is that i can be easily fix with CA glue Armor checked... none is missing That's all for now....1 point
-
Name: James Leach 501st ID: TK 41182 501st Profile: https://www.501st.com/members/displaymemberdetails.php?userID=23333 FISD Forum name: PhoenixUK Garrison: UK Garrison Armour: RWA Helmet: RWA Blaster: Doopydoo Resin Boots: ISD Belt: RWA Hand plates: ISD latex Neck seal: RWA Holster: ISD Sent from my SM-N910F using Tapatalk1 point
-
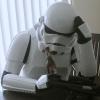
Massive progress this week. Still some adjustments to be made, but I was able to put the kit on minus the holster (which is in progress of be stained) for a test fitting. I hope to be able to take app pics by next weekend.1 point
-
I have padding, a wireless mic, hearing assist and usb battery pack all using velcro which is stuck to the plastidip and haven't had any issues with it yet. It's been around a year and a half since I put it all in. I didn't use cheesecloth though - just painted three coats of plastidip.1 point
-
Interesting photo, it looks off for some reason, but on at the same time. Lenses look flat, rest of the details match.1 point
-
Long time no post. Ill try to keep it up more frequently, nothing much to really update unless you want to just see "sanding" on every post lol. Bellow is one of the parts I was stuck in. there was too much of a gap and it was worse in person than in this first pic: Before After sanding the top and bottom sides. very scary, I practiced on the resin cast that came with the Anovos kit before committing to R2 Dans. (yes missing top plate ). looks so much closer and I haven't attached the nuts on the inside.1 point
-
1 point
-
Hello everybody In case the video does not play, here is the text: Almost 2 years after building the first E-11, it is now time to bring a new one to the next level. The FISD members were always helpful and encouraging. Last time, this turned the build and documentation into real fun. For the same reasons, this new build will be shared here soon. The plan is to combine a resin kit with many upgrade parts and to integrate a lot of the modifications, as shown in the FISD E-11 Blaster Reference. This time the pictures tell the story, so below is a little teaser… Interactive table of contents for easier navigation to individual posts: - Update #01 - Unboxing - Update #02 - Preparing for the days to come - Update #03 - Paint in the first build step plus Corrective Actions on bolt colors - Update #04 - Dark side of the bolt - Update #05 - Inside the receiver (back end) - Update #06 - Inside the receiver (front end) plus Corrective Actions on front muzzle - Update #07 - Get a grip - Update #08 - Finger on the trigger - Update #09 - The end (cap) is near - Update #10 - Slowly crawling forward - Update #11 - Lucky number eleven - Update #12 - Work on front end - Update #13 - Carving nightmare with the folding stock - Update #14 - Details on the folding stock - Update #15 - Preparations for paintwork - Update #16 - Bob Ross & “The Joy Of Painting” - Update #17 - Making new things look old - Update #18 - Sterling SMG L2A3 - Update #19 - The one with the open bolt - Update #20 - Like the prop-builders did in 1976 - Update #21 - Back on track (T-track tutorial) - Update #22 - The power cylinders - Update #23 - Railworks - Update #24 - The M38 Telescope(s) - Update #25 - Hollowed scope with small parts - Update #26 - Hengstler counter - Update #27 - Cables without labels - Final Credits1 point