Sgt. Bilko[TK] Posted January 13, 2017 Report Posted January 13, 2017 Hello forum members!! I wanted to share my first build, on my journey to join the ranks. I ordered an ATA helmet while being placed on the armor wait list. This way, I could build my toolkit and build methods while I wait. It also makes the journey a bit more 'real'. So here we go: First, let's discuss safety. Make sure you have PPE on hand and ready for the task. I used ANSI approved safety glasses for flying debris while using my Dremel tool. Also, I ensured that I worked with good ventilation for any fumes generated during the build. Lastly, I used good fitting leather gloves when handling the Exacto knife. Next I ensured I had proper tools for this build. I prefer the Dremel tool with extension. I used the Dremel for ALL of my cuts. This is personal preference. Others in the forum swear by cut and snap. Choose what you are comfortable using. Below is a picture of the tools I used for my ATA helmet build. Dremel and Tips Dremel Tips - Diamond Cutter is the proverbial "Hot Knife" through butter. Very nice cutting tip. Now let's get started! Special thanks to Pandatrooper for the how-to. Step 1 - Get excited and take pictures of your BBB day. Here, my mini BBB day...helmet only. Thanks to ATA for good communication and fast delivery of the helmet! Do a simple inventory to ensure you have all the parts in the kit. Several folks indicated late in their build that they did not have essential parts. ATA, spot on here. Including spare ear for this rookie! Step 2 - Breathe and take your time....measure, measure, and measure again. Pandatrooper's guidance coupled with ATAs mold cutout lines helped tremendously. Used this handy flexible straight-edge ruler to guide my 1 1/4" from the eyes here to mark my cutout for the mask. As called out by Pandatrooper. As useful tip to prevent tearing here in the ear / helmet junction. Step 3 - Measure again and verify against online photos. Step 4 - Fire up the Dremel! The extension tool comes in handy while working in snug / sensitive areas. Rough cuts, need sanding. Change Dremel tip to sanding drum. Open the teeth from inside and use knife to square out on outside. File down to clean up. Teeth close up, before final clean up. Comments here from forum vets are welcome! I'm purposely stopping here to sand the inside of the helmet for priming and paint. I also would like to get some feedback on this progress. Comments very welcome before I continue on. Quote
Sgt. Bilko[TK] Posted January 16, 2017 Author Report Posted January 16, 2017 From here, I sanded, primed and painted the helmet interior black. Quote
Sgt. Bilko[TK] Posted January 16, 2017 Author Report Posted January 16, 2017 I began working on the dreaded ears...and found out why perfectionists cry while completing this step. Lots of learnings here to carry into the next build. Pencil the rough cuts, but stay at least 1/4" away from the mold lines, as you helmet will likely not fit the original. In this step I fit, sand, marked with pencil the sand area and repeated until I was satisfied. I drilled the three fastener holes for this stunt helmet and countersinked each by hand. Holding the countersink and and twisting to take care. The final product was sanded, washed and assembled for painting. Right ear was the toughest for me, for some reason. I had to lower the ear and try to fit on the vent of the helmet after initial drilling. Quote
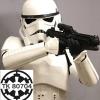
Sgt. Bilko[TK] Posted January 16, 2017 Author Report Posted January 16, 2017 (edited) On to painting....I chose to paint this helmet by hand. I created my own stencils from the numerous posts. Started with the black paint first, vocoder, black outlines, etc. I allowed the paint to dry and then started on the grey. I chose to use Testors for my paint. For the ATA, I followed the mold outlines and pictures on Starwarshelmets.com Edited January 16, 2017 by Sgt. Bilko Quote
Sgt. Bilko[TK] Posted January 16, 2017 Author Report Posted January 16, 2017 I'm planning to disassemble the helmet, tightening up some paint areas and then fully clean / polish. Any feedback from the vets of the group? Areas I need focus? Thanks!! Quote

Recommended Posts
Join the conversation
You can post now and register later. If you have an account, sign in now to post with your account.