TK 22686[TK] Posted March 30, 2016 Report Posted March 30, 2016 (edited) Hello everyone, I figured it was time to actually make a build thread as I'm finally getting into the meat and potatoes of this kit. I've had it since sometime in February and put it off to the side for a few weeks as I looked at other build threads and did my research. I completed the rough trimming in a day or two and stopped again, not wanting to cut into the pieces for fitting as my soft goods hadn't arrived yet. I got my undersuit and gloves Monday and now I'm pressing on with fitting and then gluing. I need outside opinions and other sets of experienced eyes to make sure things look/fit good and that I'm on the right track. I already know that I've got about an inch gap on each side of my Ab/Kidney plate connection, so I'm debating on shimming or not. I could really work out and tone up, and that gap would disappear. I am aiming for Centurion CRL's and will be building it according to those standards, with the possible exception of the issue mentioned above, and possibly re-submitting for Centurion when I can suck it in and close the gap. Update #1: 4/11/2016 - Added work from over the weekend. Helmet Accuracy updates, TD work, and Shin contemplation Update #2: 4/12/2016 - Finished the Thermal Detonator Update #3: 4/17/2016 - Hosted my first armor party, worked the Anovos belt, sorted out the shins, worked the thighs, glued the left, front forearm and bicep....and other various trimming and sanding. Update #4: 4/20/2017 - Posted pictures of completed left arm, velcro'd padding, and belt Update #5: 5/18/2016 - Posted pictures of hot water bath work, button gluing, and finished arms. Update #6: 6/1/2016 - Posted pictures of thigh and shin gluing, more hot water bath shenanigans. Update #7: 6/9/2016 - Completed the front of the thighs and shins, glued my shoulder bell elastic that goes around the bicep, had an Aker Amp order problem, received my iComm, received my HFx E-11 Centurion, made some of my double snaps for the main body armor pieces Update #8: 6/9/2016 - Completed the thighs, working on Kidney Plate shims, Have front of shins glued, deciding on the backs of the shins. Edited August 1, 2016 by E_Palpatine Quote
TK 22686[TK] Posted March 30, 2016 Author Report Posted March 30, 2016 (edited) This was BBB day. I could barely fit this box into my Focus. I had the seat reclined all the way back and moved as far back as it could go. The thing kept turning the radio off on me when I would come up to a light. The contents came in 2 layers. It was all a bit overwhelming at first.... Edited March 30, 2016 by E_Palpatine Quote
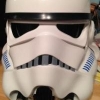
TK 22686[TK] Posted March 30, 2016 Author Report Posted March 30, 2016 I had to try the helmet on. When I first looked at it, I knew that the hard hat liner would have to go, the eyes would have to be trimmed, and the mouth mesh would have to be re-glued. I was going to Plasti-dip it anyways... Quote
TK 22686[TK] Posted March 30, 2016 Author Report Posted March 30, 2016 Looks like I've bound and gagged a trooper. It was for the best. The plasti-dip has made the helmet much less disorienting (all the white and light) and now I can go about adding all the fun stuff back to it. Quote
TK 22686[TK] Posted March 30, 2016 Author Report Posted March 30, 2016 (edited) I'm also keeping the velcro lense install method, not switching over to a screw in set up (at least not yet). I dremmled a notch into the visor so that wasn't bumping into my nose. Highly recommended if you go this route. This is also the helmet after cleaning up the eyes, all that is left is adding the helmet pads I'm making myself, and then looking into a fan system coupled with a voice mic for an iComm and Aker set up. Edited March 30, 2016 by E_Palpatine Quote
TK 22686[TK] Posted March 30, 2016 Author Report Posted March 30, 2016 I wanted to start with the Forearms. I figure I would work up the arms to the shoulder bells....then the torso, and then the thighs, followed by the shins. The 2 most iconic things for me on the outfit are the helmet and the forearms. I started with scoring/snapping. Now to rough fitting and cleaning up the butt joints on the front and back. I have enough room in the wrists to get my hands through and the forearms slide up and down without effort. They will be connected to the biceps, so I'm not terribly worried about the extra room. I have about 1/3" gap all the way around between the armor and my arm, so I believe I'm good as the recommended number I remember hearing was 1/2" gap. The return edge has been removed and I'm at the point of gluing them together if things look good. Quote
TK 22686[TK] Posted March 30, 2016 Author Report Posted March 30, 2016 I fitted the biceps next. I don't have any trimming pictures to post right now, I will take pictures of the halves when I get home from work...but I really didn't trim off a whole lot on the sides for the butt joints. The left bicep had a big curve in it from the cut line, so I trimmed off enough to make that straight and flat. Otherwise, I just sanded them down to make the butt joints flat and they're just big enough that they'll slide down if they're not attached to something, but they're not floppy on me. Guess I've just got some guns . Quote
illusionz_09[TK] Posted March 30, 2016 Report Posted March 30, 2016 (edited) You're on the right track. If you are going for centurion you will definitely have to close the gap of the ab/kidney with shims (or loose weight of course) but one thing at a time. First basic approval, then EIB, and then centurion. Although doing the build in all one shot will save you some duplicate efforts later. Move Along! Edited March 30, 2016 by illusionz_09 Quote
TK 22686[TK] Posted April 6, 2016 Author Report Posted April 6, 2016 (edited) Gah!...I've been too busy lately to do much work on the kit...I did take advantage of the nice weather one of the last few days to really get in there and sand out the body pieces....Ab/Cod, Butt, Kidney, Chest, and Back. Now I can start thinking about strapping those together....I'll have to run to Tandy's in Bloomington to look at getting snaps. Anyone know how often they go on sale? I know they had them half off sometime within the last month on the website. I'm looking to go the 100 snap route so that I can double snap on the main pieces, and then single snap the further out from the body I go. I'll get up close up pictures tonight or tomorrow of my hand guards, forearms, and biceps before I glue them. Edited April 6, 2016 by E_Palpatine Quote
TK 22686[TK] Posted April 11, 2016 Author Report Posted April 11, 2016 Well, it was a weekend full of getting the little details wrapped up! I ordered 100 Line 24 snaps, as well as 15 S Poppers for the various visible ones around the armor. I'll be getting them tonight and Thursday, respectively. I then went out and got my hands on Testors gray, semi-gloss black, gloss white, french blue, and most importantly...enamel thinner. Cleaning the brushes without it, or switching color is nearly impossible. Finally, I went to Home Depot and picked up these.....Ear replacement screws for Centurion Accuracy.....and here they are painted. Helmet Ears Before and After..... Before After Quote
TK 22686[TK] Posted April 11, 2016 Author Report Posted April 11, 2016 Next, it was onto the Thermal Detonator.... I picked these up at Home Depot to replace the inaccurate screws. Also, here they painted. Then I mocked up the TD... The tube initially was exactly 7.5" It would have been just a little too long once the caps were installed, so I ended up trimming just under 1/4" off of the end of the tube, sanded it down flat, and re adjusted. Then it was time to try my hand with E6000. I had never worked with the stuff before, so I decided to use it on the TD before I used it on the forearms, biceps, etc. It wasn't bad to work with honestly. It was a little harder in texture than I was expecting, but definitely allowed for enough time to get things in place. 1 Quote
TK 22686[TK] Posted April 11, 2016 Author Report Posted April 11, 2016 Now I'm trying to figure out the Shins. I know that the front return edge is only 10mm each side, but 2 of the shin pieces have really faintly marked return edges (especially on the bottom) that Im not 100% sure where to trim them. Also, there has been so much speculation about which shin piece goes with what, that I'm not sure what the correct assembly is for them. It has been said that 2 pieces are more angular, and 2 pieces have softer curves....I think I captured that in these pictures...but what would you say are the inside and outside pieces? (I believe the top are much smoother and the bottom are more angular). Here is another look at 2 of the pieces....I want to say that these are the inside pieces: That's all I had time for this weekend, but hopefully I can get the forearms glued up tonight and have the arms ready to assemble by the end of this week. Quote
TK 22686[TK] Posted April 12, 2016 Author Report Posted April 12, 2016 Got the Thermal Detonator assembled and done last night. Total length is about 7.35". I had to cut about 1/4" off of the tube otherwise it would have been just a bit too long. Got the screws painted black, so that is ready for Centurion approval. Quote
TK 22686[TK] Posted April 17, 2016 Author Report Posted April 17, 2016 (edited) From my pictures today...it won't seem like I got much done...but I made considerable progress with my kit today and I can feel myself getting closer to completion. Hosted my first armor party today....we had 4 total show up over the course of a late morning/early afternoon. But it was a beautiful 70 degree day in Minnesota, and I wanted to build outside in my garage. Couldn't ask for more beautiful weather! I was working on my shins....he was sanding his kit. We were watching some Episode 7 and discussion some of the minute details of the movie. I'll be hosting another in a couple weeks, and I'm going to need a wider table. The first thing I started off doing was re-configuring my belt for basic approval. I removed the 2 top screws of the holster (will use them when re-attaching the plastic belt to the Kittle cloth belt when I get around to ordering that. That way I can hold onto the old one and use it when I'm going somewhere particularly dirty...like the Renaissance Festival here. I then cut the stitching off 3 sides of the velcro at the very end. There was a bit of fabric sticking up where the belt was folded over for the velcro at the end. Cut a few swatches of that off and E6000'd it over the holes where the Chicago Screws used to be. Next...it was onto the dreaded Shingate. I referenced Ukswrath's build threat as well as Obsidian's Anovos Build blog that I found online to get a handle on this once and for all. I finally had a switch flip on after I had trimmed the front of the shins down to the 10mm length on either side and looked at the very top of the shin connections to understand. 2 of the shin pieces have a narrower bump on the top and 2 of them have a wider bump (for lack of a better term). I lined them up, and the tops matched perfectly. I also have longer edges on the inside of my boots. For me, Left Shin = 24 and 27 and Right Shin = 25 and 28. I got the fronts flush and realize that I really can't take any off the back as my calves are on the bigger side. I may need to re-shape them a bit to make the fit better. Next, I wanted to get a good start on the thighs. The fronts took a little work as the front butt joint connection really is not as straight as the forearms or shins were. I referenced Ukswrath's build extensively to determine where I need to mark and trim from to get the butt joint down to 20mm total. It took some trial and error, but I got there...+/-a few mm here or there. The backs are not fitted because I needed a break from them. The last thing I managed to get done was starting on gluing my cover strips on. I hate to say that the first coverstrip I cut may be a hair short on the top and bottom of the left forearm, but honestly, I don't think it looks bad. The left bicep turned out a little better. I now have a feel for it and the rest of the cover strips should go better. I also had some trouble getting both sides at the same time.....so what I did was glue the cover strip to one half of the piece...held in place with magnets, then glued the other piece and slit it on the cover strip. Then I slid the magnets so they were on the whole strip and clamped the ends where I could. Much easier that way. I did the fronts today, will do the backs tomorrow...and then the left arm will be complete, minus strapping. My other time was spent with cutting down return edges that I missed, sanding...and watching Episodes 4-7. Overall, it was a great build day. Edited April 17, 2016 by E_Palpatine Quote
TK 22686[TK] Posted April 19, 2016 Author Report Posted April 19, 2016 I've been doing some Assembling from Sunday through today...just waiting for the glue to dry and my extra 50 magnets to come in. I'll post some pictures tonight of my completed left forearm/bicep and how the belt came out. I'm in the middle of gluing the right forearm and will need most of my current magnets for the back side of that tonight as I definitely could have used a few more on the back side of the left. Quote
TK 22686[TK] Posted April 19, 2016 Author Report Posted April 19, 2016 You're on the right track. If you are going for centurion you will definitely have to close the gap of the ab/kidney with shims (or loose weight of course) but one thing at a time. First basic approval, then EIB, and then centurion. Although doing the build in all one shot will save you some duplicate efforts later. Move Along! Thanks! I still haven't decided if I am going to shim or naturally try to close the gap. It's great motivation for getting back into the fitness routine...but how long do I want to wait to go for centurion? I'll probably just leave it and maybe use elastic instead of nylon until I can close it up. That way It can stretch a little and shrink back down over time. Then I'll replace it with nylon when it's closed up. Looking good Jason! Thanks. Now that I'm in the gluing process, I feel like I'm much closer to being done...but I know I still have a lot of work ahead of me. Pass some of that over here! looking good... Thanks. It's definitely been a learning experience so far. Quote
illusionz_09[TK] Posted April 20, 2016 Report Posted April 20, 2016 Thanks! I still haven't decided if I am going to shim or naturally try to close the gap. It's great motivation for getting back into the fitness routine...but how long do I want to wait to go for centurion? I'll probably just leave it and maybe use elastic instead of nylon until I can close it up. That way It can stretch a little and shrink back down over time. Then I'll replace it with nylon when it's closed up. Honestly, you can take as long as you need to go centurion. you can stay at either stage as long as you need to make the touch up for the next phase. As i mentioned you're on the right track. Just keep at it. 1 Quote
TK 22686[TK] Posted April 20, 2016 Author Report Posted April 20, 2016 (edited) These are the pics of the last few days of building. I have the left arm completely glued together and all I have left to do is to strap it up and add my elastic strap that will go around my bicep to the shoulder bell. The right arm will be completely done tonight and then I'll be taking the rest of the week off as I'll be out of town leading a retreat weekend. Hopefully when I resume next week my stronger, more plentiful magnets will arrive and I'll get the gluing done more quickly so that I can move on to strapping, fitting, and adjusting. Here is my completed left forearm: Top Cover Strip Back Cover Strip Forearm Shape Here's the completed left bicep: Top Cover Strip Back Cover Strip Bicep Shape I also got my helmet padding velcro'd in: Here's also the belt modifications I made to the Anovos Belt to get by with Basic and EIB certification until I get my armor complete, order the correct sized Kittle belt, and completely convert it to Centurion standard: Edited April 20, 2016 by E_Palpatine Quote
illusionz_09[TK] Posted April 20, 2016 Report Posted April 20, 2016 looking good. Can't wait to see the new canvas belt! lol As most I am not a fan of seeing that Anovos belt. Quote
TK 22686[TK] Posted April 20, 2016 Author Report Posted April 20, 2016 looking good. Can't wait to see the new canvas belt! lol As most I am not a fan of seeing that Anovos belt. I don't mind the look of the belt...as long as it's modified to be more rigid. You can definitely tell who has an Anovos kit when trooping by who has the saggy belt (unless they've upgraded of course). I think I'll re-enforce my old one and attach the plastic belt to the new canvas one with chicago screws. That way I can swap them out depending on where the troop is. One place I'm planning on venturing out to is the Renaissance Festival I work at. We're doing a Star Wars themed last day for security. I want to weather my new belt, but not with that much dust/dirt. I'll be able to swap it out and maybe leave off the holster (not able to bring weapons). Quote
TK 22686[TK] Posted May 18, 2016 Author Report Posted May 18, 2016 It's been a while since my last update...I've been busy with things and have been doing stuff when I can....here's what I've been working on.... Got my right forearm completed. I ended up removing the back cover strip to even out the butt joint. It sits much more flush and I have a much better curve on the back side of my forearm. I'm thinking of doing a hot water bath on the left side of the forearm, as it seems a little narrow. It's like a teardrop shape at this point. Wrist Side Elbow Side Next up...I glued my Right Bicep. This, like my left, was pretty straight forward and I'm pretty happy with how they turned out. Now my arms are completed, with the exception of the upcoming hot water bath for my right shoulder bell, my right forearm, and the strapping that needs to be done. Top Cover Strip Back Cover Strip Bicep Shape I needed to make another helmet modification...not needed to I suppose...but since I was going to be painting on the extra teeth, I felt it was necessary to repaint the whole frown. I initially tried with 70% rubbing alcohol and didn't have any luck. I picked up some 91% and it took the frown paint right off. I will say though, that getting the frown how I wanted it was a very frustrating experience. I'm still not completely happy with it, but it will do for now until the time when I want to try again, or can think of a full proof way to get the paint exactly how I want it. Frown Stripped Frown Painted Frown (Left Side) Frown (Right Side) Quote

Recommended Posts
Join the conversation
You can post now and register later. If you have an account, sign in now to post with your account.