


deputyd0ng
-
Posts
39 -
Joined
-
Last visited
Content Type
Profiles
Forums
Gallery
Articles
Media Demo
Posts posted by deputyd0ng
-
-
Red EL Tape or EL Panel. I have been trying to do this on mine but splicing EL tape, for a n00b is basically impossible.
-
1 minute ago, Cricket said:
I'm not entirely sure, sorry. My guess is that having 3 layers allows you to put some extra reinforcement in there. I wouldn't use the holster with just the 3D printed layers alone. I can only imagine someone bumping against you and the blaster snapping off of the holster... and it would be difficult to even notice it was snapped off at all if your helmet is on. Having some metal installed in the bracket adds a bit of strength so that this kind of scenario won't be as likely to happen.
This is the image I used for reference.

For length, I don't remember exactly what I used, sorry! I had a pack of assorted metric screws and kind of tried out different lengths. They weren't the security torx ones because I couldn't find them in the size I needed. Remember that my build was scaled down, so the length would be different for you anyhow. The screws I used exited the inside of the thigh armor just a little bit... just enough so I could get some e6000 on them to make sure they wouldn't go anywhere and also to cover the ends to prevent scratches.
I used the 7mm M3 bearings found here. https://www.amazon.com/gp/product/B07FW18RQY/ I think I kind of eyeballed things for size. I don't know if you would need to go with a thicker bearing due to scaling, though. Maybe someone else who has built a full-sized holster bracket could chime in here? @ukswrath?Makes sense, Ill add a piece of sheet metal in between and drill it out, like you did.
And that answers my main question on the bearing, Im guessing this helps it "slide" into place, rather than having a screw head on there that would scrape the blaster.
-
22 hours ago, Cricket said:
The snaps in the pic look like the typical line 24 snaps that we use on TK builds. That's what I would use. Look for Tandy brand. They attach with a hammer. You'll need a fastener kit like this:
https://www.amazon.com/General-Tools-1265-Fastener-Fasteners/dp/B00004T7VT
Or if you prefer to use a little less force for a little more money, you can invest in a snap press. It is my second favorite build tool (the Dremel is my #1 tool!).
https://www.goldstartool.com/heavy-duty-press-for-grommets-snaps-buttons-rivets-1-die-set.htmDefinitely getting a snap press.
I re-printed the right thigh, with the new holster mount. The holster assembly has two versions, one you print in 3 layers, another that is a complete unit. What benefit, other than limiting overhangs is there for the 3 layer version?
also, for the screws, I saw a post on here regarding which screws to use, my question is, what lenght did you use, and is the M3 ball bearing an M3x7x3 bearing? Just want to verify before ordering.
-
 1
1
-
-
On 10/10/2020 at 5:57 PM, RankAndFileTrooper said:
It sure depends on the kind of blaster how easy it is to fit the electronics. That said in most cases the difficulty is not to get the board or electronics itself to fit but to cram-fu in the wiring and the battery. But it is far from impossible. Especially standard blasters like an E11 offers sufficient room for even a homebrew.
Of course if someone wants to have a professional solution which is easy to install, can order a DIYino Stardust/Proto board. Especially for professional installers I offer special deals when ordering in large quantities. Making it available on OSH park I do not consider, for the simple reason that my DIYino boards are known for their excellent, 0-defect quality (i.e. all boards I delivered over the years work perfectly), and I cannot guarantee the same if the production is someplace else... I hope you understand.
You have some options for a carrier board though, for example the brewboard from Saber Republic, an excellent homebrew carrier made to replicate my ealier DIYino Prime board design:
https://saberrepublic.bigcartel.com/brewboard
and skyone's new arduino carrier board (https://www.whitearmor.net/forum/topic/19322-arduino-a-cheap-board-for-e11-blaster-effects/page/18/#comments) has a very similar component list, at first glance I'm pretty sure FX-BlasterOS can run on his board as well, since it uses a DFPlayer too, and the arduino board he uses has the same controller as the nano.
Brew board would have been perfect, but it is sold out, unfortunately. And the skyone isnt yet shipping. May make a carrier board with a blank PCB just to make the soldering easier
-
Also, what type of snaps do you reccomend? IM looking to order some now. Are they screw in for hammer rivet? and what size?
-
2 hours ago, Cricket said:
Nope. The chest plate has a slight overlap over the "vest" part of the back/yoke part. I secured the chest plate with industrial velcro at the overlap in the chest area as well as at the side areas where the chest and back plates overlap. It keeps things really secure, but I don't like having to readjust everything each time Cameron suits up.
In hindsight (and possibly for future builds), I will probably do this approach: creating a strap across the front part of the back plate that allows for the chest to be secured with snaps. The photo isn't mine, but I like the idea. I think strong magnets would work well for this, too. I probably wouldn't use an ABS strip as they did, but instead use a strap of nylon webbing for this.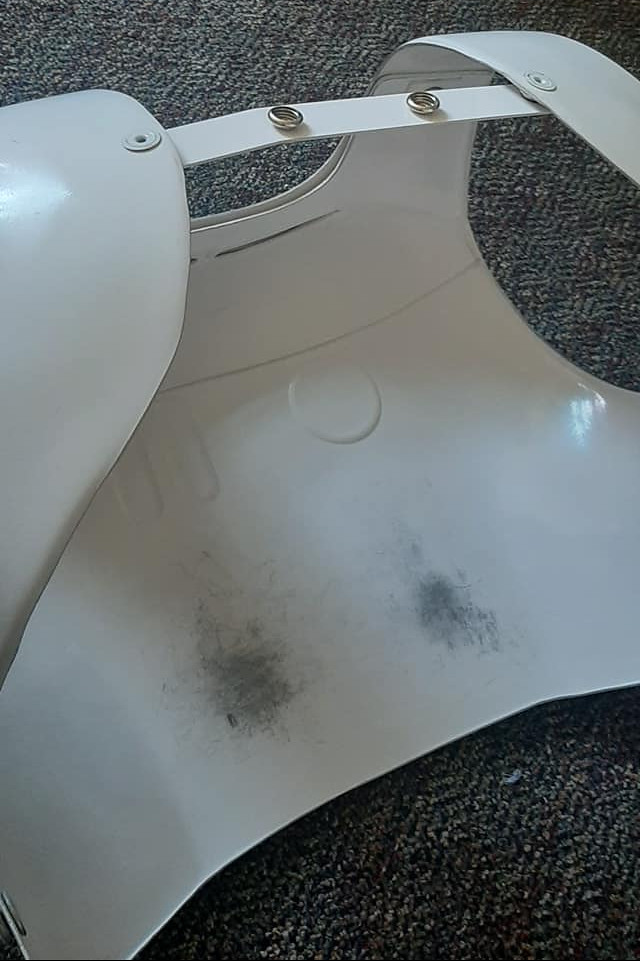
Thanks cricket...Ive been painting/priming/sanding...and now that the parts are "done" the idea of making them werable seems daunting! Ive been looking over this thread a lot for references, thanks again for everything.
-
1
-
-
Did you weld the chest plate to the back plate?
-
1 hour ago, RankAndFileTrooper said:
It sure depends on the kind of blaster how easy it is to fit the electronics. That said in most cases the difficulty is not to get the board or electronics itself to fit but to cram-fu in the wiring and the battery. But it is far from impossible. Especially standard blasters like an E11 offers sufficient room for even a homebrew.
Of course if someone wants to have a professional solution which is easy to install, can order a DIYino Stardust/Proto board. Especially for professional installers I offer special deals when ordering in large quantities. Making it available on OSH park I do not consider, for the simple reason that my DIYino boards are known for their excellent, 0-defect quality (i.e. all boards I delivered over the years work perfectly), and I cannot guarantee the same if the production is someplace else... I hope you understand.
You have some options for a carrier board though, for example the brewboard from Saber Republic, an excellent homebrew carrier made to replicate my ealier DIYino Prime board design:
https://saberrepublic.bigcartel.com/brewboard
and skyone's new arduino carrier board (https://www.whitearmor.net/forum/topic/19322-arduino-a-cheap-board-for-e11-blaster-effects/page/18/#comments) has a very similar component list, at first glance I'm pretty sure FX-BlasterOS can run on his board as well, since it uses a DFPlayer too, and the arduino board he uses has the same controller as the nano.
Im putting it in T5H F-11D. Are you just JSTing all the wires? Or are you soldering distribution joints for the + /-
-
18 hours ago, RankAndFileTrooper said:
To take open-source blaster building to the next level, I decided together with the sound font artist who developed the sounds for MK-X to release them, free of charge and open to everyone who wants to build blasters.
The sound font bundle contains 3 high quality, complete set of sounds optimized for the FX-BlasterOS platform. You simply need to populate your SD-card with the bundle and using the one-click installer upload the code to your Arduino-based blaster electronics.
FX-BlasterOS Sound Font bundle
Please note that a lot of effort and dedication were poured into the creation of these sound fonts. They are as of now the best quality sounds for blaster props, created by a sound font artist. If you like them, consider a donation as a way of acknowledging the great job the guy did on them (see Donate button on the protowerkstatt web site)!
Once you have a working prop with FX-BlasterOS via one-click installer and the sound bundle, feedback to User Experience is more than welcome. Please also share pictures and videos of your working prop as a source of inspiration to others.
Breadboard is total success....getting it into the blaster....thats a whole other story im currently working on.
A suggestion, I know you were selling your own board, but if you could make a board available on OSH park, similar to what Troopduino did, that would make getting into the blaster MUCH easier.
-
22 hours ago, Cricket said:
Also, if you've purchased the FOTK files from CGTrader, I asked the designer to rebuild his holster so it could be made functional. He has redesigned the holster so it should be functional now. I haven't printed them, but they look pretty good. It might be worth a look over there to download the updates!
I see that now,
I have already printed the right thigh, and unless something goes wrong, I dont want to re-print it lol.
With this new one, the thingiverse bracket would not be needed, correct?
They also made me a new ab plate, it does not have the flared curve outward going up, this prevented the ab plate from clearing my beer gut, and allowing the chest play to attach correctly.
-
So im on my last 3 parts of printing this model. I have to re-print the abs section. I had to print it in 4 different pieces, and none fo them mated together well, they were also EXTREMELY thin, is your abs ection very thing as well? I would be afraid to even sand it, even if they did mate.
Almost all other parts are welded together and ready for priming painting, I was just checking on this thread to see how you are doing the snaps/suspenders/shins so I will look at your other builds for the shins. I may use an ab plate from a different model, that is thicker.
ALSO, I cant find the thigh bracket on thingiverse...their search is notoriously bad. is it part of an FO suit or its own model? I want to weld it to the thigh
-
1
-
-
On 9/18/2020 at 4:50 PM, RankAndFileTrooper said:
The long waiting comes now to an end!
Look here and make it work literally with one-click:
https://www.protowerkstatt.com/imperial-armoury
(Hint: look for the download and follow the working instructions)
I got everything working just confused on wiring the nozzle neopixel. I have 5v and grnd, the data on Top going to the stripe, but, how do I wire the bottom hole? I tried wiring it to data, and the nozzle stays on when fired.
-
On 9/18/2020 at 4:50 PM, RankAndFileTrooper said:
The long waiting comes now to an end!
Look here and make it work literally with one-click:
https://www.protowerkstatt.com/imperial-armoury
(Hint: look for the download and follow the working instructions)
Im almost there, just need to iron out an issue with the nozzle light. does the DO nozzle light connect to the top and bottom of the flora, and then onto the rest of the wiring? I have it wires as such and am getting some funky behavoir from the nozzle light
-
On 9/10/2020 at 11:58 AM, likemike973 said:
I just finished mine, and the sound is loud. It is adjustable through the programming. Maybe in a crowded area you might not hear it loudly, but should be fine for most troops.
Im having issues making my "aux" button work. The fire button works fine and I can long hold it to get through the menus but the second button does not work.
Am I missing some changed I must make in configuration to allow the second button to work? Ive looked through the code but havent seen it.
-
On 9/15/2020 at 11:38 PM, deputyd0ng said:
SO I removed fx-blaster while I was messing around with something else, and now for the life of me cannto get it to compile. At all.. have followed guide. But keep getting undefined reference errors exit code 1.
Now managed to get it down to BODS undefined
NVM SOLVED---Had wrong board selected from when I was flashing my 3d printer firmware last night. its compiled now.
-
On 9/14/2020 at 5:52 AM, deputyd0ng said:
I have it bread boarded out, sound is working (havent hooked up the pixels to the board yet. But it seems like I only have trigger/fire button, not aux.
Is there any details on instructions on the config files and which parts could/should be uncommented for configuration? I dont wanna bugger anything up.
SO I removed fx-blaster while I was messing around with something else, and now for the life of me cannto get it to compile. At all.. have followed guide. But keep getting undefined reference errors exit code 1.
-
On 9/9/2020 at 3:54 PM, RankAndFileTrooper said:
The DFPlayer has an in-build LM4871 audio amp, capable of driving a 4Ohm or 8Ohm speaker with up to 3W. I do not see how the PAM8403 would be of benefit over it. The LM4871 makes the DFPlayer crazily loud.
No need for volume control, you can control the volume from the firmware from 0 to 31, which is again a feature of the DFPlayer.
I have it bread boarded out, sound is working (havent hooked up the pixels to the board yet. But it seems like I only have trigger/fire button, not aux.
Is there any details on instructions on the config files and which parts could/should be uncommented for configuration? I dont wanna bugger anything up.
-
37 minutes ago, RankAndFileTrooper said:
The DFPlayer has an in-build LM4871 audio amp, capable of driving a 4Ohm or 8Ohm speaker with up to 3W. I do not see how the PAM8403 would be of benefit over it. The LM4871 makes the DFPlayer crazily loud.
No need for volume control, you can control the volume from the firmware from 0 to 31, which is again a feature of the DFPlayer.
Got it, so map button for volume up/down?
-
On 9/1/2020 at 5:21 PM, RankAndFileTrooper said:
You are good to go!!! Good luck and let me know if you need any assistance!
Is there enough power in this to power a PAM8403? If not, can a potentiometer be placed somewhere for volume control? or is the DFplayer amp suitable as long as the connected speaker is less than <3w?
-
On 9/4/2020 at 10:18 AM, Cricket said:
Hey Sean! Yep, I used ArmorSmith to scale everything down to fit him.
For placement of armor parts, I used the CRL pic of the full-body FOTK and screen images as my references as well as studying FOTK Centurion pics. I studied how everything lines up relative to the trooper's body. For example, the bottom of the chest plate ends roughly at where the elbows bend. That was where I started, followed by hours of looking at finished kits.
In ArmorSmith, I put the chest and back plates on the avatar all at once, and scaled them pretty much at the same time. They fit together. In ArmorSmith, you can color code each piece as well as change the opacity of the parts. I put the opacity at 50% and each piece had a different color. You will be able to see when parts intersect/overlap with each other or with the avatar as you move them around the avatar. You will also see how much gap you can make between your avatar and the armor part (always allow for gasket thickness!).
I spent a few hours just manipulating the parts around on the avatar until I got them just right to my liking. Parts were not all scaled the same on the same axis, which was a surprise to me. For example, my son's chest/back were scaled (XYZ) at 76%, 80%, and 75%, but the ab/butt/cod were scaled at 76%, 80%, and 73%. The forearms are scaled differently, as are the shins and spats. Heads up: the spats need to be scaled up to properly fit the shins. The designer thickened the shins to repair the thin walls, but didn't compensate for this by correcting the spats to fit. I've had to add an additional 3% on the X and Y for the spat to fit correctly.
Good luck with your build!Definitely spent a few hours so far JUST in armor smith. The forearms, and shin came out good and fit good. However, Im still struggling with the chest/back/abs. I like the idea of changing the pieces of the colors to see intersection, Im going to do that. I have been using the opacity.
And after I export the parts im bringing them into blender to measure the openings and make sure theyre true to the real-life measurements I took of my body.
Also, how much does the chest overlap the abdomen? I find this to be q challenge for me
-
I have this all bread boarded out. (oshpark board hasnt arrived yet). I currently just have one push button connected, as I would like to, for now just use it in voice activated mode mounted in my bucket.
Is there any documentation that shows which button is supposed to do what? and how to activate each mode?
-
Hows it coming along? I am in the process of building the same model.
-
I am in the process of building this exact model right now...first time doing any armor other than a bucket. It looks great! Did you use armor smith to scale it initially? I find Im having issues with just knowing how exactly this should go together...for example how high up should the abdomen plate be? Ive been using the FOTK reference files but I need like an idea of how these parts should be worn when complete so I can scale appropiately.
-
22 hours ago, markgambino said:
I ordered the resistors according to part number in the BOM (via Digi-Key) and everything works just fine - no extra components required.
Sent from my Pixel 4 XL using Tapatalk
understood,
Im printing an FOTK helmet right now, that has an outward-facing speaker mount on the left side facing the vent that I intend to cover with black speaker fabric. Ive done some small electronics, but that was by following guides online. Can I wire the output to a 90mm 8ohm 5watt speaker, rather than a headphone jack? Im thinking some type of amp may be required. I am reading about the max446, and it says an amp is required, so im thinking I can use one of the small audio amps meant for arduino, but Im gonna have to see what the real estate is like inside the bucket. I also plan on adding a TP4056 board for recharging the battery without removing. Ideally I can 3d print housing for all of these parts, so they can be semi-permanently installed.
Cricket's 3D Print FOTK (TLJ)- ABS, Kid-sized- FINISHED!
in TLJ Build Threads
Posted
Hey Cricket,
I have started adding my straps snaps and belcro to make it wearable, but Im having an issue with the back plate, and wanted to get your advice.
I printed the back in two pieces, and each "strap" as one piece. As you can see in the photos, there isnt much clearance to get my arms through, which although when on it fits, when removing I broke the strap at the weld. I used Sci-Grip Weldon #4 on the outer and inner seam, and when that cured used an old soldering iron to strengthen the weld underneath.
I realize I could probably lose a few inches off the straps, as they will be covered by the chest plate. But I want to somehow re-inforce the straps to the back plate. Should I extend the sheet metal shoulder tabs for the bells to go across the seam and form them into place and then try to do some welds to the plastic?
Surprisingly E-6000 is working on the PETG, I didnt think it would, but so far the fabric elastics I glued into the shin armor seems to be holding up, should I dump some e6000 onto the seam after re-welding?
ANY advice would be appreciated, trying to get this thing done by next weekend. This thread has been a huge help since I started this.
I printed these squares with an 11mm hole in them out of PETG, and welded them into the abdomen plate for snapping the torso suspension on. So far so good, but I want to address this back plate issue!