

Koryu1212(Dan D)
-
Posts
34 -
Joined
-
Last visited
About Koryu1212(Dan D)

-
 Request access https://www.501st.com/members/displaymember.php?userID=27887&costumeID=2 Thank you
 -
Koryu1212(Dan D) changed their profile photo
-
Trooping as a Vet with PTSD and issues in crowds.........
Koryu1212(Dan D) replied to TK-42775's topic in Off Topic
Awesome post and since I don't post much, I would like to add my "two cents"...I am currently active duty Navy (Master-at-Arms Chief), been down-range twice, and I cannot begin to explain how rewarding it has been to be able to "suit up" in my armor with out having someone shooting at you! Although, there are times when I find myself falling back into "the zone" patrolling around different venues that I troop, but the amount of joy I've been able to give back to the community...I don't think I will ever get over the "physical" reaction I get from kids when I look thier way! LOL I agree with James; Get out there and do it! And those vets out there that have questions, please don't hesitate to ask; I know I would be more than happy to help and with the amount of support I've recieved from my local Garrison, I am more than certian that we can help! -
Detailed picts from my submission. And there you have it...Any questions, please feel free to hit me up!
-
"Oily" Mix pass... Pauldron was done with watered down acrylics and baking soda... And a month later...
-
Belt and pouches...Leather was distressed with sandpaper and baking soada... Canvas belt and shoulder straps were done using "dry brush" techniques with sponges...
-
Weathering the suit. Burnt Umber pass...
-
Interior pad set install...The Aker and iPod had to be removed since I could not get the feedback issues resolved I also lined the helmet with neoprene as well for stability and heft...I also used acorn nuts to cover the tips of the screws. For the "S" seal...I left approximately 1" over the length of the hole and pushed it together and so far it has remained in place via compression...
-
Using Burnt Umber and "Oily" mix of Burnt Umber, Mars Black and Unbleached Titainum acrylics, based on PandaTroopers tuitorial, I started the weathering process... Coated the entire helmet in Burnt Umber... And with a damp brown t-shirt and baking soda I started lifting off the paint... First pass done... Next, added the dark "Oily" mix starting with the back...Now that I look at that picture...I see Mimbian Trooper Results from "Oily" pass...
-
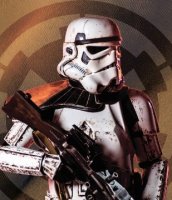
Painting in the "Stop that Ship" Trooper helmet details...Using several referance pictures I penciled in the chips and run areas... Blue tube stripes painted in after the cracks were painted... ABS paint runs added... Think I nailed it pretty well... Time to get dirty!
-
Painted the teeth, and the "Black" area's first... While waiting for the black to dry I cut and formed my lens as well as painted my Hovi tips... First coat of grey... Installed my wire mesh... Two coats of grey later... Installed green lens... Time to add the damage and ABS paint drips...
-
Time to get serious! Ok, so for the ears...I penciled in my cut lines and for the "caps" I used blue tape to get the lines straight... Also, somewhere on this forum I read that you MUST LEAVE a STRAIGHT EDGE coming off the "Cap" before you begin trimming the ear for the curvature of the tubes, since the helmet is still somewhat straight up and down just before the tubes curve out... Deep breath...and using the cutting wheel and a steady hand...with A New Hope playing in the background... I used a cutting tip for the curve of the ear... Sanded the "Cap" flush... And slowly began dremeling off a LITTLE at a time, test fitting to the helmet after each pass... DON'T FORGET TO CHECK THE BACKSIDE OF THE HELMET FOR FIT.... Ok! Got my ears done ( I only used ONE set!)! Drilling out holes for ears... Ears screwed on TIGHT and just like that... Time to put my commercial art degree to use and break out the paint brushes...
-
Finishing up the rivets... Rivets, done... Now time for what we all dred and loathe...those ears!
-
Cutting and trimming... Punched a hole to prevent tearing... X-acto knife for scoring... Dremeling out the teeth... Broke out the cutting wheel for the eyes...no fear! Whew...after a bit of sanding... Trimming out the teeth...I found these little sanding sticks from Hobby Lobby... Faceplate done... Quick dip in the sink... Measuring for the brow trim a-la "Stop that Ship" helmet... Holes drilled and helmet riveted together... Think I'm doing pretty good!
-
Hemet build...not going to lie, this was very stressful, but in retrospect, I am glad I saved the helmet for last! Penciled in cut lines...
-
Added nylon screws along the bottom of the return edge on the chest and painted them and all my rivets... Now...time to dig out one final box...
