PICTreed
-
Posts
43 -
Joined
-
Last visited
Content Type
Profiles
Forums
Gallery
Articles
Everything posted by PICTreed
-
Interesting. Thanks for the paste info. I think that gave me some ideas. I may assemble the armor and then remold it to fix it but I'd have to make it from fiberglass or obtain a large vacuum machine I've been eyeing. I'm not sure I want that big machine around though. I'd rather not mutilate this armor since it's ATA so I'll have to think on this a bit.
-
What kind of a shim please?
-
...and a forum friendly front shot:
-
Thigh - The strip on the back is going to be pretty big and I want to consider a tapered strip which means I'll use the filler to make it smooth and then add a strip the same size as the front. Does that make sense?
-
I still don't think I'm explaining it correctly. I want to know if I can make the trim strips 7/8" on front and 1" on back of the thighs...
-
Sorry, maybe I didn't explain it right. The cover strip in the front will be continuous 3/4" top to bottom. The back of the leg the cover strip will be 1" top to bottom. That gap in the middle may be misdirecting my question. I'll squeeze them together so the trim piece will sit just above the bend in the armor continuously top to bottom. I'll line up the knee parts which as you can see makes them uneven at the top but I'll trim that on the outer part and the trim piece but I'll reference photos first. Tim
-
Question on thighs. I need to get some more room so is it ok to use a 3/4" strip on front and a 1" on back and will they still pass for Centurion?
-
Steaming and stretching Imperial Boots. I have different sizes by accident but these are 45s.
-
Buildup prop
-
Forearms I got a bit of glue on a spot I'll have to take care of. I've switched to E6000 and magnets from the magnet discussion. If you haven't seen the new source for magnets you should check it out.
-
My name is Tim, I'm on the East side of Dallas, I manage a Fire Sprinkler company and I fly a Mooney airplane, skydive, build model planes, and enjoy creating things. My bother and I bought our ATA armor 4 years ago and between the move and purchasing the airplane I have been too busy to get to the armor but now I'm moving along nicely. I have my blaster and holster to start as well and I'm looking forward to doing so community trooping when needed.
-
Arms... The lower and upper arms are assembled. I'll post some photos for comments tonight. I'll be ordering another right bicep to replace the skinny left one.
-
I've had the armor for 4 years. I don't know anything! But I'm going to do what I can. I'm planning on an ANH Stunt to Centurion standards and plan on trooping with the Star Garrison....ok, maybe I know a bit. I have the boots from Imperial Boots in a 43, 44, and 45...don't ask, it hurts. I'm stretching the 45's now so maybe they will be ready by the time I'm done with armor. I broke an ankle skydiving so that boot may need some additional work...we will see if the swelling goes down. If you're local to DFW I'd be down to helping you decide which boot size you need. Maybe we need an exchange program...give deposit, try on boot, get deposit back???
-
I picked up the N52's from there today in 3/4"x1/8". While showing how dangerous they could be at work they slid together and pinched my finger. I expect it to blister up in the next couple days. THEY ARE DANGEROUS! LOL.
-
Appliedmagnets.com is much cheaper. Someone let me know if I'm missing something.
-
 I ordered a size 43 instead of a 45 by accident. Is there a forum to put them up for sale?
 -
Ya, I think this one is close but it seems a bit small compared to my Stormtrooper. It will probably end up in the theater room as a prop.
-
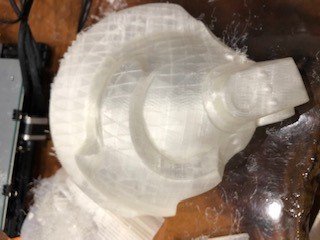
I think ultimately I will order a Tie Fighter helmet and convert it (TK needs to be finished first) but I just got the printer and wanted to experiment. I'm not impressed with a plain printed part. I think it's a great start but it's difficult to make a finished product so this may help the guys that have the printers and realize a printed costume isn't where you stop. The materials are sitting on my shelf from my days in RC Plane building. The vacuum machine was used for making different types of fiberglass parts like wings and fuselages so we can get lighter fiberglass parts. We vacuum formed the canopies and we used the silicone molds for scale engine parts and other details cast out of resin. The construction from raw materials is what I like best. I was deep into producing parts for other guys and it's not anything I ever want to get into again unless we run across something that isn't being produced by a proper shop. I think we need to support these shops as much as we can because if it weren't for them we wouldn't have these awesome costumes.
-
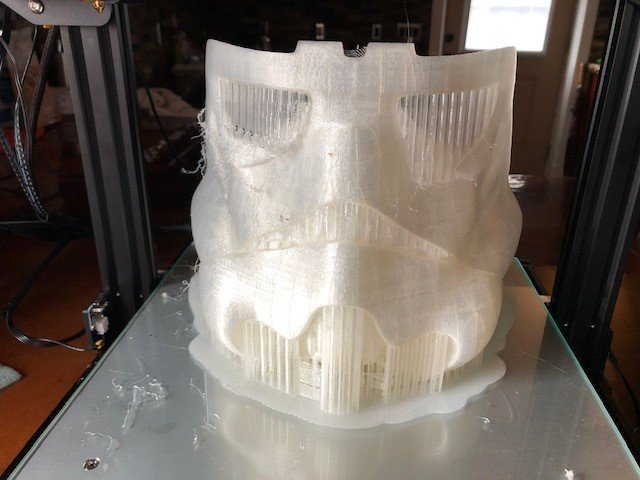
After failed attempts at joining Jolly Roger I thought I'd post here about my build and maybe get some feedback. I thought I'd try a 3D printed helmet and use it as a mold for the final product. I'll be using a combination of vacuum forming, composite or sandwich construction with fiberglass and epoxy, and HydraCAL/Hydra Stone or something similar for casting. I'd like to make this as accurate as possible even though it's not from an approved source. My fear is that the scale of the helmet may be off. Once I get it finished maybe someone can compare some measurements from their Tie pilot helmet.
.jpg.b7b117a24c749e2c693e7cdca9df516b.jpg)
-
It said to create a ticket which I did and I've had no response.
-
I tried JRS...no luck! Thanks, I'll look at the 'other' page.
-
I have all the build materials now. Picked up the proper gloves and will start on those. I guess I need to look at the pictures and just try to line it up as the reference photos show? For the blue and black buttons on the ab I thought about printing some round vinyl paint masks so the circles will come out perfectly round. Pics to come. While waiting I started printing an Inferno/TIE Pilot helmet. Takes a long time! It will get assembled, cleaned up, and probably molded so I can pull some a carbon fiber helmet. I have some yellow kevlar, that might look kind of cool too as a prop. Each half of the helmet will take 2-1/2 days! Too bad we don't have a section here to post TI stuff. I may have to make a clay bust first to adjust some things...we will see what it looks like after assembly.