

bartonajb
-
Posts
96 -
Joined
-
Last visited
Content Type
Profiles
Forums
Gallery
Articles
Everything posted by bartonajb
-
Thanks for the feedback guys! Sometimes despite looking at lots of pictures you just need a little verbal reassurance. I got the belt buttons cut and glued on today. Attached the holster as well. Measured 2 cm over from edge of plate and 1.5 cm up from the bottom edge of belt for first hole. Measured that it was 12 cm from mid strap to mid strap on holster to mark second hole. Made holes with punch through belt then marked holes on holster leather straps leaving a 1 inch gap of leather between belt and holster. Attached Chicago bolts Drop boxes are going on tomorrow. Had to take a few shots of kit to date. It sure makes my legs look spindly! Sent from my iPhone using Tapatalk
-
Finally had a day off today and kids back in school after vacation so got some work done. First glued on button plates. Next started on belt. I began trimming using the drill hole dimples as an index point. Measured 3/4 inch out from center of hole. And added two more marks 1 1/2 inches from box edge. Marked 4 mm from the top and bottom of all boxes. Connected the dots and cut using scissors. Here is rough cut. Sanded down smooth and square then measured in 1/2 inch on each corner. Confirmed 45 angle. Final product. Drilled 1/8 inch holes on the dimples . Next I marked the center of the belt by folding in half. Confirmed center by measuring to snaps as well. Marked mid point on belt and then centered on middle hole. Next punched 1/8inch holes with center punch. Installed tube rivets from back Then used a dowel and hammer to set the heads This brings me to one question. When I attach the belt it appears to encroach on the buttons. It’s not covering them but does cover the bottom edge of the plate and comes close to bottom button. Is this ok? Figure if I have to move something now would be the time. Thanks everyone! Sent from my iPhone using Tapatalk
-
You actually had me there for a second... that’s what I get for checking this when half asleep. Thanks for the support! Sent from my iPhone using Tapatalk
-
Made minimal progress over the last couple of days because of a couple of long work days. I did get the buttons painted on the ab plates. They generally measure out at 11 mm as suggested on the crl. Do you guys think these look clean enough on the edges? I always second guess myself on the quality of my hand painting and just want to make sure that if I need to make any changes I do it before attaching the plates. Thanks guys and I hope everyone is having a good weekend. Sent from my iPhone using Tapatalk
-
Thanks for the tip! That will be my next step. Sent from my iPhone using Tapatalk
-
Got home yesterday from vacation and couldn’t wait to do something on my armor. I don’t think my wife was impressed that I had the e6000 busted out when the suitcases were still in the car. I trimmed the straps with pre installed snaps and glued to the shoulder bells using e6000 and magnets. I think I sized them properly first however I left some extra in case they prove to be too short and need lengthening. I had also trimmed the bridges before leaving so started getting those on as well. I’ll put up some better shots once I have the clamps off. I placed them with the 5th bump at the edge of the chest shoulder edge (if that makes sense) as that seemed to sit the best on the front without encroaching on the back too far. That will satisfy me enough for now. Sent from my iPhone using Tapatalk
-
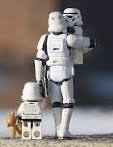
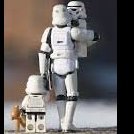
I think Disney is mocking me... and providing inspiration for my next build Sent from my iPhone using Tapatalk
-
My arms are close to completion at this point. Some of this is a bit retrospective as I started on the arms first. Shoulders were trimmed down to 5 inches measured across the bottom from the edge of the ridge and 12 inches along the ridge from bottom to top. Glued in the shoulder strap with enough tension to pull the shoulder edges in about 1/2 inch to hug the bicep. I had posted some questions while working on the biceps elsewhere. There are still some odd edges on top where the two halves come together. They don’t show so I guess I’ll see how they feel while wearing them if they catch or not or cause discomfort. Made the bicep clips out of a 4 inch piece of cover strip material. Heated with heat gun and bend into shape while wearing heavy gloves. I think the fit looks good and is fairly comfortable with test fits so far. The left forearm was fairly strait forward to trim and fit. Return has been cut off wrist side and double cover strips on all parts. I’m still struggling a bit with the right forearm. I initially assembled it but felt it was too wide so I just ripped off one of the strips to trim it down more. I also think I need to take more off the return on the underside at the elbow which should make it fit better. Updates to come on this one. Glued the latex hand guards to the gloves with CA glue. I learned after the first one to be careful not to slop glue onto the gloves as it begins to dry white fast, smears and looks awful. I had to use quite a bit of nail polish remover to remove it from the gloves. This is the only place on armor I would ever allow polish remover to be used as it is acetone and will damage anywhere else. No more progress for the next 12 days. Headed to Disney World with the family tomorrow! Everything boxed and awaiting my return.
-
Two days ago I got all the torso straps on. I sewed various lengths and tried different ones until I felt that the alignment of the pieces was good. For the back/kidney/butt 1inch seems to work well (2inch piece folded in a loop). For the chest/abdomen I used 1.5 inch loops (3inch piece folded in half). I guess I will see how these longer ones work. They seem to allow the chest to drop down more to better fit my torso height. This does however allow some range of motion of the chest piece. Don’t know if this is normal or not. Left shoulder strap chest to back fitted and glued. Here’s the whole unit so far. Throwing the belt on was a piece of cake since it all came pre snapped[emoji3] Planning on attaching shoulder bridges and cod strap tonight. Still working out the right shoulder strap issue. Sent from my iPhone using Tapatalk
-
Thanks. Took your advice and sanded those front edges down. Gonna have to make a trip to the hobby store for snaps since I haven’t had to actually install any since everything came with them pre installed. Appreciate the advice! Sent from my iPhone using Tapatalk
-
Hoping to grab two quick opinions. First, do you think these bridge edges look trimmed well? I’ve looked at several pictures but just hoping for reassurance before attaching them. Second. Do you think that placing the right shoulder strap snap this far down in the chest will give me any fit issues? I’m 5,8 so in test fitting I don’t appear to require a lot of exposed strap at the gap between chest and back. The snaps were all pre installed by RS but you can see that if I leave it as is it will connect a couple inches down instead of at the edge of the chest. Thanks guys. Sent from my iPhone using Tapatalk
-
Thanks for all the input everyone! A few days ago I attached abdomen to kidney. I first had to trim a little off the sides of the abdomen. I used the pre installed snap on the right side as a starting point and measured over 20mm to draw my cut line. Once the right side was trimmed I took a little off the left to fit. Next was left side rivets. I marked the first drill hole on the abdomen 20 mm from the top return and 10mm in from edge. Then the bottom abdomen rivet hole 10mm up from the ridge. Marked the middle rivet hole midway between them. On the kidney side the top was marked 20mm down and 10mm in. Marked the bottom kidney rivet 40mm above the notch. Made sure both sides lined up and drilled 1/8 holes. Next I cut three pieces of 1inch strap and used a leather punch to punch two holes 20mm apart in each piece. Then placed the rivets and attached the straps. Next I took the pre snapped right strap and cut it down to about 2.5 inches. Glued it and clamped it with 15mm from return to mid snap. Bracket loops coming up next. Sent from my iPhone using Tapatalk
-
Is there any reason you can’t use a wider strap than 1 inch? What about strapping like the shoulder straps where you could get away with a hole dead center and still have material around it. Could you then trim down the strap to 1 inch where it’s off the belt top and bottom to look authentic? Sent from my iPhone using Tapatalk
-
Thanks guys. I’m sure I can find some black felt in the kids craft bin for the TD clips. Sent from my iPhone using Tapatalk
-
Thanks guys. I’m sure I can find some black felt in the kids craft bin for the TD clips. Sent from my iPhone using Tapatalk
-
Thanks guys. I’m sure I can find some black felt in the kids craft bin for the TD clips. Sent from my iPhone using Tapatalk
-
Thanks guys. I’m sure I can find some black felt in the kids craft bin for the TD clips. Sent from my iPhone using Tapatalk
-
After installing the brackets I needed to wait to get the elastics sewn so figured the TD was low hanging fruit to complete. As others have pointed out RS installs the clips to the tube for you. One of mine was a little crooked which was bugging me so I removed them and replaced them both strait. I penciled a line at 20mm on the end caps, trimmed them close to this with scissors and sanded them to size on my palm sander which gave a nice flat uniform edge. Attached the caps abutting the clips and then trimmed the control panel( I think that’s what it’s called) to square. I found that a dowel wrapped in sandpaper worked well on the curved edge I painted the screw heads black while they were backed out repositioning the clamps then made sure everything was square prior to gluing. Sent from my iPhone using Tapatalk
-
Alright... here we go. So I started on the biceps first followed by shoulders and forearms. Those are pics I had posted elsewhere so I will repost here later. I moved onto all the torso pieces next. Trimmed the return edges to 1/8 inch except for bottom chest, top abdomen, bottom back, top and bottom kidney and top butt which I trimmed to 3/8 inch to mount hanger brackets to. I drilled the holes for the mounting brackets using a 7/64 bit. This required me to gently use a screwdriver to get the screws through however they don’t fall out as I manipulate the brackets. This has been particularly helpful as I have already removed each one at least once. I wasn’t going to countersink the screw heads for fear of weakening the plastic however I have already found how often they catch on each other and snag so I’m going to go back, remove them and countersink the heads. I am also adding reinforcing strips to each bracket on the return. More updates to come! Sent from my iPhone using Tapatalk
-
Hi guys. I hope you dont mind if I start over on a build thread. I proved my internet ineptitude by starting my build thread exactly in the area titled "please dont post build threads here." I dont mean to clog up the forum but I really enjoy following other members threads and I hope to be able to glean as much expert advice from you all as possible. I had posted a bit in my other thread that maybe I will summarize and repost here for completeness sake as long as you all dont mind.
-
 Thanks for the advice on that forearm. I think the reason it came out to wide is that I need to cut back that deep cup on the proximal inner arm at the elbow more. That narrows down the opening so much that the wrist side ends up being huge. I made a mount for the lid from a 4$ piece of 1 inch steel flat bar from Lowe’s. Just bent the angles on my vice after measuring the height and depth of the helmet. Sent from my iPhone using Tapatalk
 -
I have been making some good progress recently. I tend to get things done in little bits here and there so daily updates would not make interesting reading. I got my helmet done a while ago and was posting pics of that on a different thread. I have it mounted on the wall in my game room currently. I attached the bicep straps to the shoulder bells. Made the bicep clips from a 1x4 inch piece of cover strip sheet and molded with the heat gun. I think the left forearm came out well and no return on wrist I didn’t like the way my right forearm came out so I just pulled off a cover strip and am going to trim more off to reduce its circumference. This RS right one is tougher because it really flares out wide at the elbow. I don’t want to add the strapping to the arms any further until I have the torso all fitted. I have more pics and updates to add in the morning. Would love any feedback if you guys see anything in need of correcting or tweaking. Sent from my iPhone using Tapatalk
-
Thanks so much for the feedback and those before and after pictures. That helps a lot! I was hoping it was the case that when the pieces were strapped and actually on me that the butt would kick out more and line up. I really didnt want to modify the way the gaps were in the armor since if it was in the RS suit then I wanted it in mine. Congratulations on your Centurion! Ill take a look over your thread. I will put some pictures up next week when I get it strapped out. I put all the brackets on in the last 48 hours but I have to wait until my mother visits for Christmas next week to sew my loops Figure Im not about to learn to use a sewing machine at this point in my life.
-
Sent from my iPhone using Tapatalk
-
Sorry, one of the pics didn’t load right Sent from my iPhone using Tapatalk
