

Java 555
-
Posts
42 -
Joined
-
Last visited
Content Type
Profiles
Forums
Gallery
Articles
Everything posted by Java 555
-
Request your EIB Certificate here:
Java 555 replied to justjoseph63's topic in Request Expert Infantry Status
Bryan Coffey 70813 EIB Letter Tony Thank you Joseph! You are most welcome! Now on to your Centurion badge! http://www.whitearmor.net/eib/certificates/70813-eib.png -
Thank you Robert!!
-
Thank you Tony!! That is such great news to hear! Also, thank you very very much for being so clear on the next steps. It's enough to keep me busy for a while, but I'm not scared of a little work and taking baby steps to the finish line. Sent from my SM-G920V using Tapatalk
-
TK-25567 Requesting ANH Stunt EIB Status (ATA) [734]
Java 555 replied to password's topic in Request Expert Infantry Status
Hey Juan, Armor looks great! I'm still pending approval, so take my advice with a grain of salt. I would include a picture of your S-trim and a close up of your boots. Also, I'm not sure if it's required or not but putting some black mesh behind the teeth is handy when trooping so people can't see in your bucket. -
Congrats Francois!! Sent from my SM-G920V using Tapatalk
-
Hi Tony, Thank you so much, please see below for the Left Side, Hovi Mic Tips closeup, and VCoder. Sorry about not including those in the original post - it seems photobucket got the best of me. VCoder Mic Tips Helmet Left Side
-
Thanks Tony! And that is correct, ANH Stunt. Sent from my SM-G920V using Tapatalk
-
Didn't have time at lunch to do research and had just snapped a pic. TD corrected with black painted screws! Thanks again Shane!
-
Thank you Shane!! And thank you for the call out. Thermal Detonator Screws
-
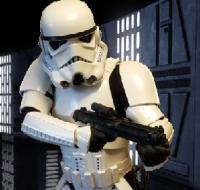
Mandatory Information Name: Bryan Coffey TKID: 70813 Forum Name: Java 555 Garrison: Diamond Garrison Armor: ANOVOS Helmet: ANOVOS Blaster: Hyperfirm 501st Profile: http://www.501st.com/members/displaymemberdetails.php?userID=24921 Optional Information Height: 6'1" Weight: 225 lbs Boots: TK Boots Canvas belt: Homemade to replace ANOVOS Hand Plates: JustJoseph63 Electronics: Stormtrooper Hearing Assist (SHA) by Ukswrath Fan - self wired Neck Seal: ANOVOS with new zipper Holster: ANOVOS Note: I am normally the most patient person in the world, but I would very much like to place an order for the hockey jersey, closing 6/14. So IF you are able and IF my armor is approvable, I would very much appreciate it if I could make that deadline. If not, I still appreciate you taking the time to review my submission. Thank you! Armor Body Full Front Full Back Full Right Full Left Right Detail Left Detail Ab Details Helmet Front Back Right Left Lens Color S Trim Hovi Mic Tips Interior Strapping Ab & Chest I know that the strapping could look much better and I originally tried the bracket system, but I have a long torso and found that the extra support of more elastic kept everything where it needed to be while looking very nice from the outside (and not bending the armor). I plan to rivet the sides when I shed a few pounds and get down to Centurion weight. I know a specific strapping system is not listed in the guide, but I understand if this disqualifies me for EIB. Interior Strapping Back, Kidney, Butt Cod Butt Interior Butt Exterior Legs Knee Right Exterior Knee Left Exterior Knee Right Interior Knee Left Interior Sniper Knee Right Sniper Knee Left Accessories Belt Front w/ Holster Belt Rear w/ Inner Dropboxes Thermal Detonator Outward Facing Thermal Detonator Inward Facing Neck Seal Gloves Rubber & Silicone Hand Guards Boots Side Boots Top Blaster Right Blaster Left Blaster Bottom ACTION SHOT!!!! Thank you very much for your time and consideration. I am already proud to be a part of an amazing brother/sisterhood and hopefully can walk in the footsteps of EIBs who have led the way. Thank you, Bryan
-
Dremel/What size/kind?
Java 555 replied to Imperial_TK_Rob's topic in Build Threads Requireing Maintenance
I used a corded dremel with the flex tool and only the sanding bit. I highly recommend that over the score and snap, because I slipped more with the knife than going slow with the sander. And if you slip with the knife it'll leave that spot weak. But even the sander will eat through ABS, so just keep the speed on medium and hold your hand steady - she'll take care of you easy as can be. Sent from my SM-G920V using Tapatalk -
TK-70813 Requesting 501st access. Thank you in advance! http://www.501st.com/members/displaymemberdetails.php?userID=24921
-
Need Advice - First Build Getting Close
Java 555 replied to Java 555's topic in Build Threads Requireing Maintenance
Thank you Jon & Allan! Jon: Although I'm the only one that's worked on the physical armor, by myself would be a BIG stretch. I owe a lot of credit to many many people on this forum that helped me without knowing it. Tony's build has been my bible throughout the past month+ (see below)!! I've also kept a close eye on the build threads as they've come up, looking for different ways of doing things that I was struggling with. And thanks for pointing out the overlap on the belt, I'll have to pay close attention to that when I finish making my replacement. Allan: I know that gap isn't as pretty as I would like it to be . I did use the boil method to straighten the shoulder part of the back in order to lower it some. I'm afraid that if I lower it more that the gap between the back plate and the helmet would be too much. I am 6'1" and unfortunately have a slightly long torso for the height. -
Need Advice - First Build Getting Close
Java 555 replied to Java 555's topic in Build Threads Requireing Maintenance
Thank you so much!! Sent from my SM-G920V using Tapatalk -
Hi All, As you can see below, my build is coming along and now I need your advice. Can you please take a look below and let me know what is out of place? I've still got things to do, but the main body of work is done (unless you tell me otherwise ). Any comments would be appreciated! Front: I'm currently making a new belt and will snap that on to the ab piece so it doesn't slip, the Anovos supplied one could be a bit more sturdy. Also, I am going to put some foam in the thigh to get them sitting correctly. Back: Need to pick up some 1/4" elastic for the shoulder bridges. I may reset the angle on the right bridge if the elastic doesn't hold it in place. TD is not centered (even though I asked my girlfriend to check). haha Back of Knees: I did have to shim my thighs a small bit and am going to notch out the thigh at least. Do these look like an appropriate amount to you? I will round it more, just not great in MS Paint. How do you feel about notching the calf at the areas marked? Right: Still need to paint the knee ammo pack rivets. Left: Thank you so much for taking a look!! Hopefully I can fulfill that dream of being a TK soon! -Java
-
What I did for the distance on things like that was use about 4 pieces of tape. Size it, then slice the tape along the edge of the overlap. The distance from what's left on the other side is the total of what needs to go away. Take it slow and keep checking the fit. One of the Pros on here probably has better advice though. Either way, Good Luck!! Sent from my SM-G920V using Tapatalk
-
I'm kind of a newbie too, but I cut half the distance from either side (on anovos tk). It helped the end result line up better. Just be cautious if you have bigger quads cause I overtrimmed just a bit and they were snug when I moved around. Luckily I used e6000 and was able to pull apart and add a small shim to make it back up. Sent from my SM-G920V using Tapatalk
-
Java's ANOVOS Build Thread
Java 555 replied to Java 555's topic in Build Threads Requireing Maintenance
Ok, so I'm definitely not very good at taking pictures along the way. I guess I just like to keep grinding. BUT.... Today was my first fitting that wasn't run on blue tape and guesswork!!!! Very exciting for me!!! I still have work to do, so please be kind with your judgements. First pic, you can't see it but I've got a big 'ole grin on under that bucket. My poor doggo didn't know what to think of me, I've been working out in my shed so he hasn't seen much. Next steps: already brought the shoulder bells in closer, tightened up the bicep-forearm, and still have to add on the buttons, shoulder straps, knee ammo belt, thermal detonator, and back of the shins. From the back. Missed taking off some tape from strapping up the back pieces. And OF COURSE, me and my shiny new Hyperfirm!! Hit a few road bumps along the way, but I think it's starting to turn out alright. Wish me luck on the rest of it. -
Java's ANOVOS Build Thread
Java 555 replied to Java 555's topic in Build Threads Requireing Maintenance
Measured, fitted, repeat, repeat, repeat. Excited to finally start gluing and see segments start to come together!!! -
Java's ANOVOS Build Thread
Java 555 replied to Java 555's topic in Build Threads Requireing Maintenance
All I did was use the UPS store and uploaded the pdf file that Ukwrath provided. It has been really helpful since I'm working away from wifi. In black/white it was $26, but worth every penny. Once my build is complete, I plan on passing it along but that may be a while. Sent from my SM-G920V using Tapatalk -
Java's ANOVOS Build Thread
Java 555 replied to Java 555's topic in Build Threads Requireing Maintenance
Sorry, still new to this. Below are me wearing the mockups. However, after trying to wear it for a little while as I worked on other things, I think the 30mm will work. I think part of the uncomfortability is due to the overlap and I also realized that I trimmed more to the middle/far edge of the cut line for the return edge but could gain a couple millimeters by trimming the return edge entirely. As you can see, my sides and back aren't as much of an issue as the front - looks like my calves still have some muscle definition left over from sports years ago and are pulling the whole thing back. -
Java's ANOVOS Build Thread
Java 555 replied to Java 555's topic in Build Threads Requireing Maintenance
Thank you Randy for both the help and support. I have included the photos below for both methods. As for the return edges, I definitely want to keep most of the return edges because I think it looks much better with them than without (e.g. core pieces, shoulder bells, etc.). I have already removed the wrist return edge since I found plenty of centurion submissions supporting that. And just so you don’t think I’m crazy, I added the build text (found in the wrist/forearm section pg.6). J Again, thank you for the help. At 30mm: Using ANOVOS cut lines (35-40mm depending on location): From build guide pdf. -
Hi Troopers! I’ve been excited to start the build process for awhile and was able to get going a short while ago and have already had a few happy surprises and a few not-so-happy surprises along the way. I wanted to start a build thread to share my experience, and ask a few questions along the way. Awesome luck! I was interested in joining, had been researching for a while, but still reached out to my local garrison for advice before taking the plunge and putting my name on a waiting list for a kit. One of the local members had a kit that he’d been sitting on and wanted to sell, so I was able to skip the 6mo wait list!!!! So to anybody thinking about joining, I definitely recommend reaching out to the local garrison FIRST. This is where I was about a week ago: After a trimming at night after work and dinner, I’ve trimmed pretty much all my pieces. Also, printed Ukswrath’s build guide so I wouldn’t need to run back and forth to a computer. Many many thanks Ukswrath for all of the hard work that I can tell went into that guide!! Not so great luck. I’ve known for a time that I need to start shedding some pounds, but didn’t think I was that large. However, when starting to size sections and still stick to the build guide it became apparent that some of the pieces are snug and that ab-kidney gap isn’t going near centurion any time soon (without some decent shimming). I’ve been hitting the gym lately, so maybe a few months from now I can revisit that section. Questions for you troopers: Mostly these involve trimming, and I’m scared to cut off before getting additional confirmation and for now I’m concerned with Basic Approval. · In Ukswrath’s build guide is says that return edges are not required anywhere. Is this still in effect? Areas that I would like to trim out: top of biceps, inside top of thighs, and thin down the top of shins. · For butt joint method: on the shins, I would like to use the cut lines on the front without extra trimming them down and split the cover strip between them. This takes me a bit over the 30mm that the build says is pretty much the max. Is that 30mm a solid rule for all levels or just centurion? · For the Ab-Kidney connection, I know a gap is allowed for basic approval. Is there a maximum gap? Mine is currently around 2 inches when I’m SNUG and I haven’t started connecting pieces yet. Thank you in advance! It’s an honor to be following in the footsteps of so many awesome faceless brethren.
