

LouTKtx
-
Posts
30 -
Joined
-
Last visited
Content Type
Profiles
Forums
Gallery
Articles
Everything posted by LouTKtx
-

T-21 Build with Spool86's resin parts
LouTKtx replied to TheDon's topic in MiniMag PTL Missile Launcher, T-21, RT-97C (MG-15)
Thanks didn't check there so I'll check it when I go again Sent from my Pixel 2 using Tapatalk -
T-21 Build with Spool86's resin parts
LouTKtx replied to TheDon's topic in MiniMag PTL Missile Launcher, T-21, RT-97C (MG-15)
Where did you find the 2.5 ? I went to home Depot and Lowe's and could not find 2.5 Pvc pipe I only managed to get the 3.5 for the large barrel part Sent from my Pixel 2 using Tapatalk -
TK-11006 requesting 501st access. http://www.501st.com/members/displaymemberdetails.php?userID=23569 Thank you! Sent from my iPhone using Tapatalk
-
Also some more good news today!!! My Doopydoos E-11 blaster kit arrived from over the pond!! Sent from my iPhone using Tapatalk
-
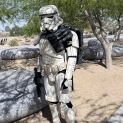
Here's a few pics of he finished armor Sent from my iPhone using Tapatalk
-
Quick update I submitted my photos to my local GML and he had a few corrections for me to fix. I spent some time fixing those issues and resubmitted my photos to my local GML. I received an email today saying he is approving me for 501st approval!! Time for the waiting game! Sent from my iPhone using Tapatalk
-
Checked the mail today and my TD clips from Ukswrath arrived this was the last piece for atleast basic approval into the 501st still waiting on my blaster so I can move to EIB and Centurion Sent from my iPhone using Tapatalk
-
Remounted my lenses using a technique I saw in the forum. I went to Hobby Lobby and bought one thick black foam sheet and traced my lenses onto it and then cut it out. once cut out I pressed them into the inside of the helmet where the lense will mount and got a good indention so I can cut it out for the lense Then I used Zap a gap and glued the foam pieces inside along the eye opening or ridges.I made two for each side and stacked them and glued them together then very carefully glued the lenses to that. I know I need to re plastidip my helmet now lol Sent from my iPhone using Tapatalk
-
Just need my Thermal Detonator clips and I can atleast submit for basic approval and then when my blaster arrives I can apply for EIB and Centurion Sent from my iPhone using Tapatalk
-
My neckseal from trooper bay arrived and my holster only thing I'm waiting is my Thermal Detonator clips and my Doopy Doos E-11 blaster kit . I painted repainted my ab plate buttons because I originally overly painted them way to big and I had the wrong blue paint. The correct blue paint arrived in the mail so I began removing all the old paint by using rubbing alcohol and a old terry cloth. The rubbing alcohol is very safe on the ABS plastic and doesn't ruin the shiney finish like paint thinner and acetone do. I painted the buttons free hand with no masking or stencils. Sent from my iPhone using Tapatalk
-
Today I went to Home Depot to see if I could find aluminum to make some temporary clips for my Thermal detonator just until my clips come in from Ukswrath. I have a 4 day weekend and wanted to take advantage and get my 501st application done. I couldn't find thin enough aluminum so I ended up just buying a 25 Gallon Husky case while I was there. Home Depot did have the 50 Gallon sized Husky Box, but it was like $64 and was freakishly huge, so I settled for the 25 which is more sleek. Everything fits accept the helmet and I have possible room for my blaster when it gets here. This just seems like it would be easier to travel with. Sent from my iPhone using Tapatalk
-
I finally finished the bra hooks for my shins Sent from my iPhone using Tapatalk
-
After the boots were done I just had to try on the armor again Sent from my iPhone using Tapatalk
-
After messing up the Thermal Detonator I started on painting my boots. I bought Angelus white leather paint and Angelus finisher for after. Her are some of the progress photos with only a few coats. And here is the finished boots looks pretty good and it was very fast to paint. Sent from my iPhone using Tapatalk
-
Today I went and purchased a PVC pipe to start on my Thermal detonator Long story short is I couldn't get the end caps even and took to much material off of the caps and control panel. I may end up just buying a completed one. Sent from my iPhone using Tapatalk
-
I need to lower down my chest piece because it is sitting to high. I need to find a way to make the ab plate/kidney plate more narrow because its flared out. Also my gloves are too big need to find smaller chemical rubber gloves.
-
Here's a quick armor test fit I did still have a lot more to work on, but I can see the finish line soon! Sent from my iPhone using Tapatalk
-
Well next I needed boots. I went with Roamers Jodhpur leather boots which I got off of amazon. These boots are super comfortable and easy to slip on and off. Here is the link to it in Amazon https://www.amazon.com/gp/product/B00PI2T4SE/ref=s9_simh_gw_g309_i1_r?ie=UTF8&fpl=fresh&pf_rd_m=ATVPDKIKX0DER&pf_rd_s=&pf_rd_r=3JTN0Z1YPT27YGSQ3ZNR&pf_rd_t=36701&pf_rd_p=a6aaf593-1ba4-4f4e-bdcc-0febe090b8ed&pf_rd_i=desktop&th=1&psc=1 Sent from my iPhone using Tapatalk
-
Painting wasn't to bad but I would recommend small brushes the smaller the better for the frown at least. The brackets didn't take to long maybe about 2 hours or so just because I was rechecking my markings. Sent from my iPhone using Tapatalk
-
The shins and thighs weren't to bad either. I assembled everything with Zap a gap and zip kicker I didn't have the patience for E6000. I still highly recommend E6000 specially if you need for time to orientate the pieces or want more time. My method for cutting covers strips/cutting thighs,shins,biceps,and forearms is to measure the piece and mark from top to middle to bottom with a tick mark, then run a piece of painters tape in line with my marks then score along the line created with the tape with a blade, then after I use a pair of pliers to snap of the piece. Sent from my iPhone using Tapatalk
-
I have to say the biceps and fore arms were easy to tackle. I measured three times and by the way converted the measurements all to millimeters to make it easier. I knew the total measurement when both bicep halves were put together should equal about 15mm. Sent from my iPhone using Tapatalk
-
I don't have any pics of the cutting process, but next I worked on trimming more of the chest,ab,back,kidney,and butt plate so I could move onto installing the bracket system. At this point I wasn't sure if I was going for basic approval, EIB or Centurion status, but the more I work on it and see what the standards are for it the more I'm leaning towards centurion. I have been assembling my armor with all the movie accurate parts and methods so why not?? Will see what happens, but it can't hurt. Sent from my iPhone using Tapatalk
-
I then ended using putting the helmet away for awhile and recently made progress. I ordered decals from Trooperbay for the helmet ad applied them. I painted the frown with Testors 1138 Gray and painted the ear rank area with the same color. For the thin black outline around the ear I actually used a gloss black paint marker that I got from Michaels arts and craft store. I still need to clean up the lines but it is a great option of your not that great at painting fine lines. Sent from my iPhone using Tapatalk
-
I first started with the helmet by cutting and trimming and riveting it together was simple at the time, but also nerve racking. Sent from my iPhone using Tapatalk
-
Here is few progress pics of my ATA ANH build so far. It has taken me awhile to build this armor and get to where I'm at. I was very hesitant at first with this armor cause i did not want to mess anything up with it. I would work on it little by little and put it away for a few months then get inspired again to work on it more, but this has been the most progress I've made in awhile.
