

BuckeyeTrooper
-
Posts
73 -
Joined
-
Last visited
Content Type
Profiles
Forums
Gallery
Articles
Everything posted by BuckeyeTrooper
-
First Build! ESB with AM 2.0
BuckeyeTrooper replied to BuckeyeTrooper's topic in Build Threads Requireing Maintenance
Thanks for the compliment! I have seen that graphic floating around on FISD somewhere and just saved the picture months ago. I also saw it on one of the armor Facebook pages, WTF: Walt's Trooper Factory, I think. I just want to make sure its actually accurate before I make that cut! Sent from my iPad using Tapatalk -
First Build! ESB with AM 2.0
BuckeyeTrooper replied to BuckeyeTrooper's topic in Build Threads Requireing Maintenance
Decided to throw some of the armor together for the first time! I think I'm going to need to open up the bells a bit so they'll allow my shoulders to go deeper into them (hot water bath?). The connecting strap is a good length, but because the bells are a little too narrow for my shoulders. They just pull the white shoulder elastic out from under the bridges. Will definitely need to cut the half circles on the backs of the thighs. Still need to make abs paste to cover the shim seams. Need to adjust kidney/ab connection to make it all lay flat. Also need to add the snaps on the ab to hold up the belt (that's why the holster wasn't on in the pics). Starting to see a finish line, but lots of work still to do. My shins are done, too, but didn't put them on for some reason. Sent from my iPhone using Tapatalk -
First Build! ESB with AM 2.0
BuckeyeTrooper replied to BuckeyeTrooper's topic in Build Threads Requireing Maintenance
One more thing before bed. I know it's not required anymore, but I'd like to do the kidney notch. Does this look correct? Also, here's the guide I found for cutting it. Not going to cut until I know it's correct Sent from my iPhone using Tapatalk -
First Build! ESB with AM 2.0
BuckeyeTrooper replied to BuckeyeTrooper's topic in Build Threads Requireing Maintenance
Ok. Lots to update after a busy few evenings...I have to say that I'm getting more excited the more this thing comes together. Did a lot of inside strapping work. Was also able to identify where I need to make a few adjustments. I need to replace the kidney rivets with longer ones (on the way from Joseph) so I can fit a washer under them. Also need to add a strap to hold the bottom of the kidney/ab together on both sides. I also have the shoulder bridges clamped and drying on the chest. Rivets line up, so that's a plus. I will be getting some acetone to make ABS paste to hide the shims soon. Also installed the right side kidney snap. It's functional and I will use it to help close the clamshell. Will also add a strap toward the bottom and possibly middle on the right to hold it closed. Looks like I'll have no side gaps once the extra straps are added...yay! Also added the cod rivet. Used a short split rivets to attach the inside snap as described in one of the ukswrath builds. Also dropped in a little E6000 to secure it a little more. Also finished the strapping system to hold the bells, biceps, and forearms together. Still need to do the bells-to-shoulder straps, but the snap inside the bell is in. Then I cut, measured, drilled, and attached the thigh ammo pack using double-cap rivets. Also forgot to upload pictures of the sniper knee I glued on a while ago, so viola. So...things I still need to do off the top of my head. 1 - trim about 1/2" to 1" off the tops of my thighs 2 - install snaps to attach thighs to pencap garter system 3 - trim lense material in helmet for comfort 4 - install hearing assist system (velleman kit) 5 - purchase and install ukswrath mic tip system 6 - touch up helmet screws and any rivets with white paint 7 - install snaps on bottom of butt piece (holes marked, waiting on more snaps) 8 - install strap between cod and butt 9 - make padding adjustments in arms and legs for look/comfort I'm sure there's a bunch more, but it's a good start on a to-do list moving forward! Definitely starting to look like a stormtrooper and not just a pile of plastic! Sent from my iPhone using Tapatalk -
First Build! ESB with AM 2.0
BuckeyeTrooper replied to BuckeyeTrooper's topic in Build Threads Requireing Maintenance
Mostly worked on the belt today and got it done (I think, at least). Awesome TKittell belt. Used a soldering iron to punch the holes and riveted it all together. Put a piece of soft Velcro on the inside of the belt where the rivets are so it doesn't scratch my ab armor. Also glued snap plates on the inside of all my body armor pieces. Planning to make the connecting straps tomorrow and try it on. Also got my button plates painted and glued on to the ab. Sent from my iPhone using Tapatalk -
First Build! ESB with AM 2.0
BuckeyeTrooper replied to BuckeyeTrooper's topic in Build Threads Requireing Maintenance
Here's that helmet interior pic. Still need to mount my USB bank and Hearing Assist system. Hoping to add a mic top speaker system down the road, too. Sent from my iPhone using Tapatalk -
First Build! ESB with AM 2.0
BuckeyeTrooper replied to BuckeyeTrooper's topic in Build Threads Requireing Maintenance
Still have a little work one that. Right now, the lenses are just one piece of material attached to the ear screws, but I think I will eventually cut some space for my nose. I also have a big head, so I am experimenting with padding. I'll upload as pic of what I have so far later this evening, along with other progress pics. Sent from my iPad using Tapatalk -
First Build! ESB with AM 2.0
BuckeyeTrooper replied to BuckeyeTrooper's topic in Build Threads Requireing Maintenance
Thanks for the tip. That'll be going on this weekend. Sent from my iPhone using Tapatalk -
First Build! ESB with AM 2.0
BuckeyeTrooper replied to BuckeyeTrooper's topic in Build Threads Requireing Maintenance
Think I could fit a few more on there? Sent from my iPhone using Tapatalk -
First Build! ESB with AM 2.0
BuckeyeTrooper replied to BuckeyeTrooper's topic in Build Threads Requireing Maintenance
Got the inner and outer strips glued into one shin. Will hopefully get the back strip glued tomorrow. Going to use the Velcro method, at least to start. Also got the supports for my side shims glued into the kidney piece and cut shims. I'll have to cut them down once I test fit the whole abdomen. I've also done some trimming down of return edges and sanding some of the corners to be a bit smoother and more round so they don't stab me when I wear it. Put together some more snap plates, too. Hoping to make some real progress this weekend! Sent from my iPhone using Tapatalk -
First Build! ESB with AM 2.0
BuckeyeTrooper replied to BuckeyeTrooper's topic in Build Threads Requireing Maintenance
There are others who have explained it better but don't fasten the brow together at all. I used two rivets to attach at the ears and one on each cheek just above the tube. The ear covers them cover those rivets when attached. I only used the six longer, flat head screws - one above and below the ear bumps and one at the bottom of the ear piece where t attaches to the bottom of the tube on each side. Here's an example of the rivet placement I found in a building group on Facebook. This is he same helmet. Some people use the other screws for temporary hold until they have it all fitting together the way they want. Then they replace with the rivets Sent from my iPhone using Tapatalk -
First Build! ESB with AM 2.0
BuckeyeTrooper replied to BuckeyeTrooper's topic in Build Threads Requireing Maintenance
Just to be sure. I'm using the belt on the right, correct? The one without the indents for the button covers. Sent from my iPhone using Tapatalk -
forget what I just said, just read the original post. Best of luck to you! Sent from my iPhone using Tapatalk
-
I just got size 14 boots from TK boots and they're fantastic. Tkboots.com Sent from my iPhone using Tapatalk
-
First Build! ESB with AM 2.0
BuckeyeTrooper replied to BuckeyeTrooper's topic in Build Threads Requireing Maintenance
Finally got my imperial cog cut and put on my helmet stand base today! Really happy with how it turned out. -
First Build! ESB with AM 2.0
BuckeyeTrooper replied to BuckeyeTrooper's topic in Build Threads Requireing Maintenance
TK Boots came in today. They are really nice boots, not only for a TK suit, but just in general (if one ever needed white disco boots). They also came with some tips for care, a long and a short shoe horn, a big sticker, a big patch, and a cloth bag for storing each boot. For the price, I'm not sure these things are beatable! Don't let the photo's tint fool you, they are bright white. Didn't get much time to work on the armor today, but I unclamped the TD and added the end caps. Just need to touch-up the black paint on the screws and I think I can call that done. Also unclamped the inside strips on the one thigh I started. Then glued and clamped the outside cover strips (I cut all the cover strips for the legs last night). The edges of the cover strips are clean, that's just excess glue in the picture. I've learned to be a bit more liberal with the E6000 than I originally was. Helps make the bond better but is super easy to clean the excess after it cures. I always sand the area of the armor and cover strip before applying glue. Then lay down a thick bead in the middle of the to-be-glued area. Before I put the two pieces together, I use a tongue depressor to spread the glue a bit and then wait a few minutes to let the E6000 "Tack-up" a bit. Seems to be working pretty well. Plan for tomorrow night - Glue & Clamp inner strips into the other thigh. -
First Build! ESB with AM 2.0
BuckeyeTrooper replied to BuckeyeTrooper's topic in Build Threads Requireing Maintenance
OK...finally got the inner strips glued into the front and back of my right thigh. Didn't mess with the return edge, because I'm going to as have to trim some off the top because I'll never be able to walk at all as is. Also got my TD Clips and screws from ukswrath (fantastic, btw!) today and installed them into the TD tube and then glued on the control panel with E6000. I'll let that dry overnight. taped off the screws and painted them black Also got to paint my homemade helmet stand black. When I get a chance, I'll run over the shop and cut the white vinyl imperial cog decal to go on the top of the base. I have some extra adhesive rubber feet laying around from another project, so I'll use four of those on the base as well. Pretty happy with how it turned out. I know it's a super easy build, but I've never really done anything with wood before. -
I drilled a hole where the indentation is on the blaster and then cut the d ring off-center along the top, used pliers to bend it, slid it in the hole in the blaster, and bent it back. Then hid the cut in the d ring in the blaster. Then painted black. If that makes sense.
-
First Build! ESB with AM 2.0
BuckeyeTrooper replied to BuckeyeTrooper's topic in Build Threads Requireing Maintenance
Worked on my helmet on and off over the weekend, got it pretty much done (I think). Placed the fans inside. Still waiting for my USB bank to arrive and need to install the hearing assist. Going to order the Mic tips with speakers system next month. Have to admit, the smile on my face got bigger and bigger the closer it got to being completed. Also made a helmet stand with wood pieces from Michael's. Cost about $7 for the base, dowel rod, wooden ball and screws. Had to buy a 5/8" bit to bore a hole in the base for the dowel rod. Then screwed the dowel in from the bottom and glued the ball on top. Going to paint black and put a whit imperial cog on top of the base. So... Forearms - done Biceps - done Helmet - I think done, for the most part Thighs - trimmed to fit, need coverstrips cut and glued on front and back (and eventually trimmed at top for height) Shins - Trimmed for cover strip on front, but waiting for my TK boots to arrive for the sizing (UPS says Thursday) TD Clips & Screws - arriving early this week from ukswrath Then it'll be time to work on the chest, back, abs, and kidney (which will need some shim work on sides). Will work on my belt once the ab armor is ready to go so the snaps line up. Then strapping - I've made a few snap plates....I HATE pounding snaps together, so that'll be fun. Tempted to get the screen accurate brackets & loops from Mr No Stripes to avoid some snaps but worried about possible cracking -
First Build! ESB with AM 2.0
BuckeyeTrooper replied to BuckeyeTrooper's topic in Build Threads Requireing Maintenance
OK, biceps pieces blueing (inside strips on one and outers cover strips on the other). Late tonight, I can unclamp and finish with the outer cover strip before bed. I also got ESB decals from TrooperBay and my white canvas belt arrived from TKittell. Also, I forgot to mention that I got a thigh-garter system from pencap here on FISD. Can't say enough about how nice they both are. Just got done trimming the fronts of my thighs and taping them so I can fit them and mark them. Looks like I'll likely have to remove about an inch from the top of both, but I will wait until everything else is done. Its also warm enough that I can plastidip with inside of my helmet. I'll do that either tonight or Thursday night, then I can start to assemble the helmet. I also may have to redo one of the forearm cover strips as one side of it started to lift a bit from the main pieces. I'm thoroughly enjoying this process so far, more than I expected. Barely started on this one and I'm already kind of thinking about which armor is next! -
First Build! ESB with AM 2.0
BuckeyeTrooper replied to BuckeyeTrooper's topic in Build Threads Requireing Maintenance
Here's a closer look at the helmet. Only thing I've done so far is cut out the teeth and mark lines for painting. The ears come pre-trimmed. According to some who have put these together, they will only need fine-tuned if anything. -
First Build! ESB with AM 2.0
BuckeyeTrooper replied to BuckeyeTrooper's topic in Build Threads Requireing Maintenance
Busy day today between working my normal job then announcing a basketball game at night an hour away...but I was excited to get home and unclamp and pull the magnets off my forearm. Fits pretty well, too! One piece down. Also got the rest of my arm cover strips cut. I think I'm going to need to give my bicep pieces the hot water bath to make them more rounded before fitting and trimming down. May work on that and the helmet tomorrow. Definitely going to glue in the inner strips to my other forearm. -
First Build! ESB with AM 2.0
BuckeyeTrooper replied to BuckeyeTrooper's topic in Build Threads Requireing Maintenance
Got a little work done last night on the forearms. Trimmed the return edge off the hand side and took a little off the elbow side as well. Then overlapped them on my arms, marked them, score and snap & tape. Then glued inner strips on one of them using E6000. Waiting for the glue to dry is brutal! While waiting for the glue to dry today on the one forearm, I cut out the teeth! Dremel to start from the backside and then used needle files from a cheap Walmart set. Seems to have worked pretty well. -
First Build! ESB with AM 2.0
BuckeyeTrooper replied to BuckeyeTrooper's topic in Build Threads Requireing Maintenance
Here's just about everything that was in the box USB powered dual fan setup from one of the armor building groups on facebook 8oz ESB holster from Darman on here Chemical gloves from TrooperBay Neck Seal from Darman Hyperfirm blaster ("naked" version without counter or power cylinders) Added the D-Ring from TrooperBay A few days ago while waiting on my BBB, I put together a Velleman kit to use in my bucket as hearing assist. It was my first time soldering a PCB, pretty happy with how it turned out. -
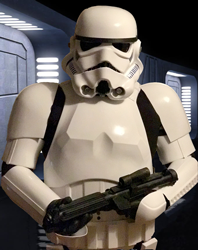
Such a great day today - BBB Day! My new AM 2.0 kit with their new 4.0 helmet (one piece cap and back) arrived today. I've collected all (I think) of the other materials except for boots (going to get TK Boots), white canvas belt (ordering TKittell belt in a few minutes), and TD Clips. Can't wait to get started, but will also try to move slowly and ask plenty of questions. I've been researching on here for a very long time, but once the plastic arrived, I feel like I need to make extra sure before doing some things! I'd like to go centurion with this kit, so please keep that in mind when giving advice, which I hope to get plenty of from you all! I've already noticed that I'll have to add about 1.5" shims on the sides between the abs piece and kidney, I'm up for it. Looks like I may have to shorten the thigh pieces, too, but we'll save that for last to be safe. I think I will start with trimming off the return edges on the forearm pieces and work on finding where I need to trim the biceps and forearm pieces to fit me. Woohoo!
