


Retrodai
-
Posts
5 -
Joined
-
Last visited
About Retrodai

-
Very nice looking Blaster =) You even did that little "thing" on the ejection port, that's one of the things I will most likely opt out on in this build. The link I will definately save for later though. The way I see it, this build will be a "learning by doing" project, and then later down the road I might pick up a second more serious build, adding to knowledge from the first Blaster. I'm currently doing this in a one room apartment so work space is a bit problematic, which is why I don't want to drag this project too far. Then again, so far I've decided to try and hollow out the scope for some sort of lens replica, add some better looking screws, doing a removable magazine and securing the folding stock with drill holes, so I've landed in something in between at the moment. Doing a spring is probably not that difficult, but if I do, I will definately just glue/screw it in position. That's when I came up with this alternative idea instead. The idea would be to just fill the whole chamber with a plastic pipe, then secure the pin to a separate strip of plastic, at the moment it barely moves inside the pipe, but some sanding I think would solve that. It's crude, but a bit easier than doing the spring, and a nice touch to be able to move it. But I dunno... might just be a crazy idea and someone should talk me out of it =P Added some pictures to clarify. The tube would naturally be longer. I just used the part I did if I go with a spring build.
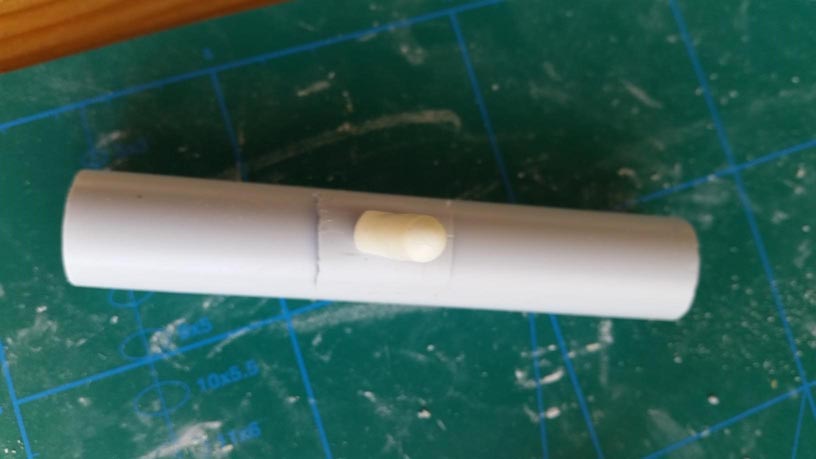
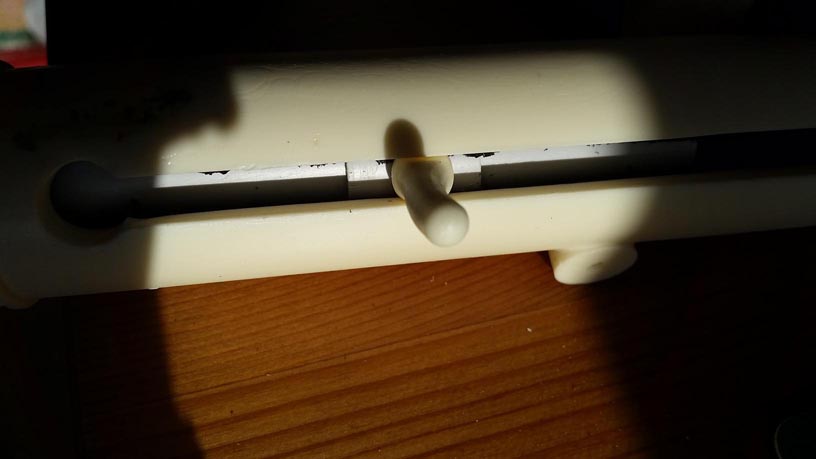
-
So a lot of builds I've seen usually go the realistic route, creating Blasters as close to the original Sterling as possible. This is my first build in preparation for the armor (mostly to gather the courage to get started) and I've tried to the best of my abilities to modify my doopydoo beyond just assembling and painting. But I'm not sure how to proceed with the spring chamber. I've bought some wire to be able to make the realistic modification, but I have this idea to just fill the whole chamber completely with a plastic pipe instead. The reason being that I'm not too keen on the realistic approach... at least not that specific part... it's supposed to be a futuristic rifle after all... secondly, if I go with my plastic pipe idea I might be able to pull off a movable charging handle, which might be neat. I know, it's possible to do a workable handle with spring and all, but I feel it's a bit above my skill level. Now I've read the custome reference guide and the only thing stated for basic approval is: Based on a real or replica Sterling sub-machine gun, scratch-built, or a modified commercial toy Stormtrooper blaster. So I assume a gun with no spring is acceptable. I would like to get some input. What is the general opinion on this? Is a bit of personal flavour to the gun accepted within the community (I'm talking basic approval here, this isn't a gun meant for centurion application) or is it shunned upon and preferably I should just do the regular spring chamber and follow conformity?
-
So the only way for pictures to come back is if the original poster updates it manually? Great... I was really depending on for encouragement doing my blaster, but that account hasn't been online since September last year
-
I really appreciate the thorough answers from both of you, and no worries about taking your time. I'm just grateful people take their time to answer a question I understand has been answered plenty times already =) You are correct that it's cotton. I was focusing hard to find an all black solution and never really considered the material to be a problem, until now that is. I've seen you mention acetone to remove logos and such before, but is it necessary if the logos are covered by the armor? I understand the problems with the neck area and contrast stitching in the provided examples, just want to get it all right from the start =) I did some quick looking and found two possible alternatives that I think would do the trick. Would these suffice or am missing something? I imagine the logo by the hip might be a problem... https://postimg.org/image/vhy6bpntf/ https://postimg.org/image/gxxtn0toj/
-
Kman! A friendly face =) You're a frequently helpful in the anovos group on facebook. I hope you don't mind me asking since this has been quite the headache for me... what about stitching that is black? Is that acceptable? I'm having a hard time how to interpret the CRL on that specific point, and the picture is too low res to be certain. Finding an undersuit with no logos and no textures was harder than I expected but I finally came across a two piece that met the criteria no logos and no obvious textures, but it has these stitch lines that I imagine will be visible. For example I have one line running approxiamately across the black area between the chestpiece and shoulder. https://postimg.org/image/p7za7bvr3/ And another on the lower part of the arm, that will be visible between the bicep and the forearm. https://postimg.org/image/bkpej2jnx/ These lines also run across the inner and outer legs. Is this a problem or am I overly picky? (seeing as people seem to say "it's fine as long as you use a sharpie")