

MissingNo
-
Posts
37 -
Joined
-
Last visited
Content Type
Profiles
Forums
Gallery
Articles
Everything posted by MissingNo
-
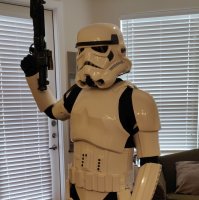
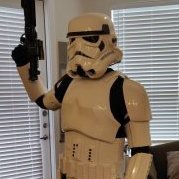 TK-51453, reporting for duty and requesting 501st status. https://www.501st.com/members/displaymemberdetails.php?userID=30964
 -
MissingNo Requesting Pre Approval Review (ATA)
MissingNo replied to MissingNo's topic in Request TK Pre-Approval
Hey, just wanted to say that I got my basic approval! TK 51453 here. Thanks so much for helping make this finally a reality. Next comes the higher levels of approval, and it seems like I have a pretty good roadmap of other changes I'll need to make to get there. -
MissingNo Requesting Pre Approval Review (ATA)
MissingNo replied to MissingNo's topic in Request TK Pre-Approval
Thanks! Yeah, I'm not sure what was going on with the brow trim in that picture. It's not glued down yet, so I can still play with it. Thighs are a definite must as I go along. Those return edges hurt, man. I'm glad things are coming along, though. Thanks for all the help thus far. -
MissingNo Requesting Pre Approval Review (ATA)
MissingNo replied to MissingNo's topic in Request TK Pre-Approval
Here is the next set of pictures. I've made a lot of improvements. I would love to go forward with these for at least the basic level of approval, hopefully its at least at that level now! Some of the things I fixed are: Tube Stripes moved up. Chestpiece adjusted to sit better on ab Ab buttons reduced in size Strapping system for shoulder bells -> biceps -> forearms. Improved strapping on the handguards. Adjusted cushioning in helmet Changed the calf opening side. https://imgur.com/a/yVAMt9q -
MissingNo Requesting Pre Approval Review (ATA)
MissingNo replied to MissingNo's topic in Request TK Pre-Approval
Thanks, going to try making some paste today and repairing it. Gotta see if I can find any of those screws too. I know the original reason I didn't use the support system was that the length on the screws I got with the bracket kit were too dang small they never would have fit through the armor plastic and the support plastic. I'll have to see if I can find some longer ones. -
MissingNo Requesting Pre Approval Review (ATA)
MissingNo replied to MissingNo's topic in Request TK Pre-Approval
Well, work was coming along well until I discovered a new problem. Looks like there was a bit of stress on that spot and it cracked. Of course I can't find the screw or the nut--does anyone know what the sizes are used for the bracket system? I can't remember, and I'll have to pick up more. Other than that, the calf is just about ready and I've shaped up a bit of the paint... Was getting ready to try it on for more pictures again tomorrow. -
MissingNo Requesting Pre Approval Review (ATA)
MissingNo replied to MissingNo's topic in Request TK Pre-Approval
Working on the calf now, here is the helmet with the tube stripes raised up. -
MissingNo Requesting Pre Approval Review (ATA)
MissingNo replied to MissingNo's topic in Request TK Pre-Approval
Only a little disheartened! The shins are attached with the bra straps, so there are holes in the other side of the armor that I suppose will hopefully be covered when swapping the cover strip over. I'll need to remove the current straps and swap them over as well though. I suppose the question I should really be asking is what's the best way to remove e600 glue? -
MissingNo Requesting Pre Approval Review (ATA)
MissingNo replied to MissingNo's topic in Request TK Pre-Approval
Thanks for the advice! In the process of making some improvements, will be posting update pictures later this week. Shortened the strapping on the the chest and it seems to fit a better now, will have to see how excessive moving impacts it. Also added strapping to the arms, so those all sit a bit more still. Widened up the biceps so I could get them further up my arm. Still need to fix the tube stripes, waiting on some stickers for that one, and the surgical removal of some paint from the ab button. A lot of it seems to be adjustment issues in terms of how the costume is sitting on you. How do you best keep that sort of thing stable during actually wearing the costume? -
MissingNo Requesting Pre Approval Review (ATA)
MissingNo replied to MissingNo's topic in Request TK Pre-Approval
Thanks a lot for the advice, seems like there is still quite a bit of work to be done! -
MissingNo Requesting Pre Approval Review (ATA)
MissingNo replied to MissingNo's topic in Request TK Pre-Approval
Thanks a lot for the quick look over, Coastertk. I haven't put in any arm strapping yet, right now its all sort of just held up by momentum...Any recommendations for what I should use? Thankfully those tube stripes are just stickers so it should be easy to replace them, and I had heard the suggestion about the chest overlap--I'll have to take a look and see what I can do. Thanks for the input thus far, I knew there were going to be some things I had to improve on--but, I'm at least happy to finally have something actually put together. -
Name: Peter DeNicola Future Garrison: Star Garrison Armor Maker: ATA Helmet Maker: ATA Cloth Belt Maker: Trooperbay Neck Seal Maker: Trooperbay? Boot maker: TK Boots Blaster Maker: MGC Height: 5'10 Weight: 180 TK Type: ANH Stunt Help: Tim Waychoff, Use of Pandatrooper's Helmet Guide, ukswrath's armor build guide. Pictures: https://imgur.com/a/fOUdvSg
-
At the suggestion of others I trimmed some material off the codpiece and the posterior. That seemed to help a little bit. I'm wondering if maybe the fit is wrong on the shoulders which is causing the kidney piece to slide too far up, or if more material on the codpiece is forcing the ab forward. I took a bunch of pictures https://imgur.com/a/QPZ78hZ
-
That looks good! I might have to give that a try. How exactly do the tabs handle staying in place, though? The problem definitely looks like the shape of the kidney doesn't line up with the shape of the ab, and that is what the tabs are trying to fix, yeah?
-
-
-
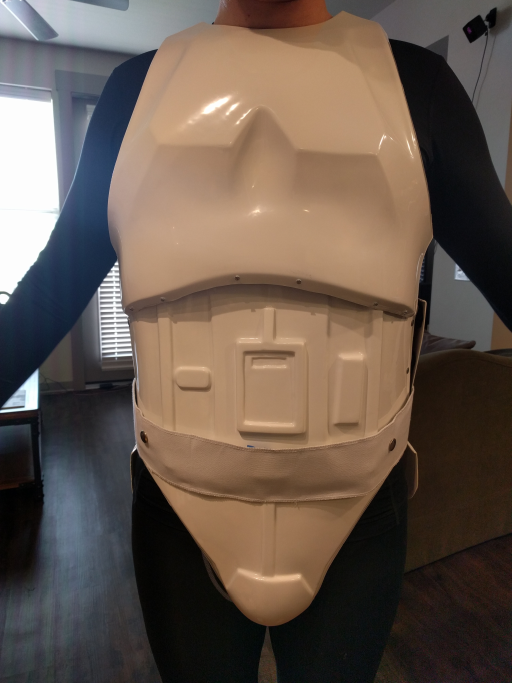
Hey yall! Been a looong time since my last update, but I've been on and off working on my armor. I never thought the day would come, but I've gotten everything stapped together. I'm running into an issue though. The shape of my kidney piece doesnt seem to line up with my ab piece which creates a bit of a gap. Anyone have any ideas on how I solve this? Looking at the pictures you can see the gap that slightly forms there.
-
The ab plate was a a bit loose. I think you're right and trimming down the kidney is probably the right way to go, just nervous to make that cut!
-
Hey, everyone! I haven't updated in awhile, but I've still been working slowly and surely... Got all my pieces relatively trimmed, and did my first test fit. I've marked where I intend to make all the holes for the Bracket system, but I figured it would be best to see how it all fits together before I actually start drilling. So, tried on my armor. It seemed to be a bit loose. (One picture shows a bit what the gap under the breastplate looks like) I'm not sure what the solution would be for this would be, whether I should trim some material off to fit or what. Was wondering how it all looked. I think the butt is a bit low, might have to raise that overall piece up a bit. And one of the shins is a bit off and needs to sit lower down on the boot. Here is my first test fit, let me know what you think! Of course I had to try on my incomplete helmet: And heres the gap:
-
Well, they are a pain to get in and out of--but I have legs now.
-
Looking at ukswrath's photo now I can sort of estimate that notch at 1/2 an inch
-
Working on trimming the kidney plate, was wondering how close I need to bring in the return edge--also, looking at ukswrath's guide I notice there are notches in the armor which the ATA one doesn't have, how big should these notches be? Heres a picture of his notches: And here are the pieces I'm working with, wondering if the pencil I drew on the top side is where I should trim and if the bottom should be trimmed down as well.
-
Found the video where he talks about it, thanks! I'll be giving that a go this week. The next question I have in my long list is about the back of the shins. So, I'm wondering what size I should make my initial trim there. Should I trim one down to 10mm, then check the overlap with the other one? Should I bring both down to 15mm before checking the fitment? When I do the fitting itself, how tight / loose should I try to make it? Thanks for any answers yall provide!
-
So I trimmed out my ammo pack for the thigh. The ATA armor doesn't have lines to curve out the edges. Was wondering, before I cut them out myself, what the best way to draw out that line would be. Are there any regulations on the size of the curve?
-
Looked at the original photos, its a lot less pronounced there than I've made mine for sure. I will try to limit it in the rest of the strips I do and replace the offending ones when the time comes. On that note, what is the best way to get rid of that excess glue / remove a coverstrip if need be?
