


hupspring
-
Posts
359 -
Joined
-
Last visited
Content Type
Profiles
Forums
Gallery
Articles
Media Demo
Posts posted by hupspring
-
-
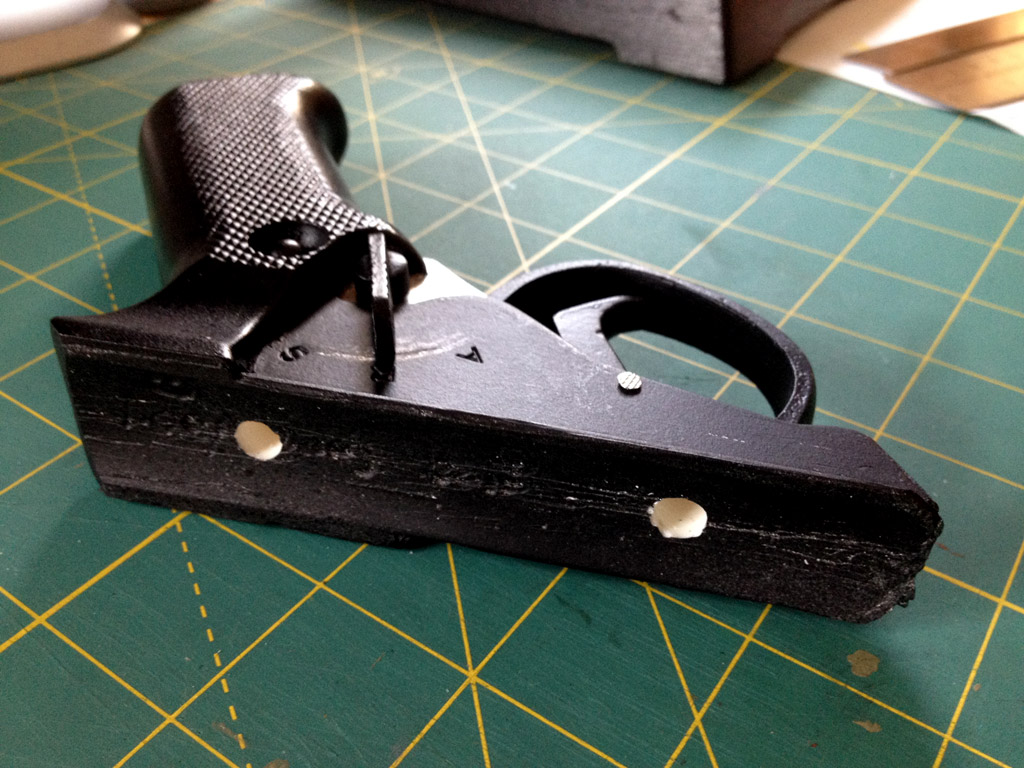
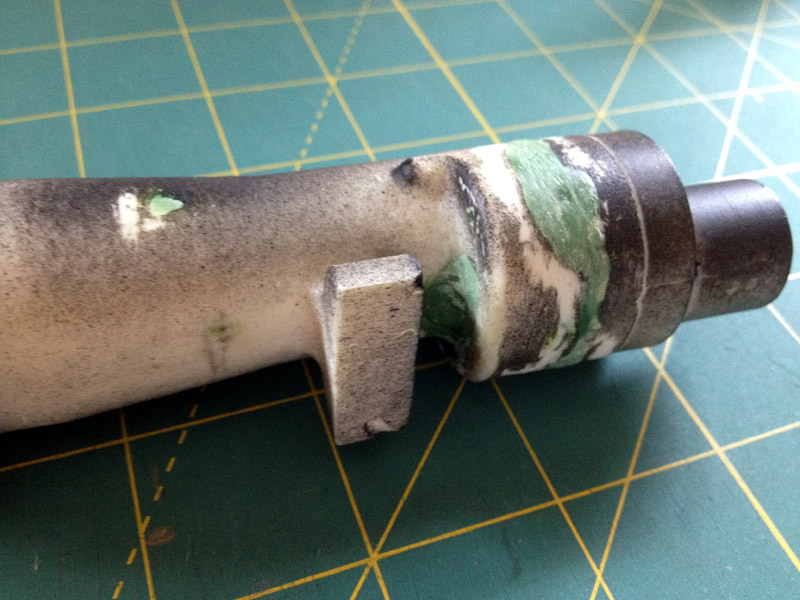
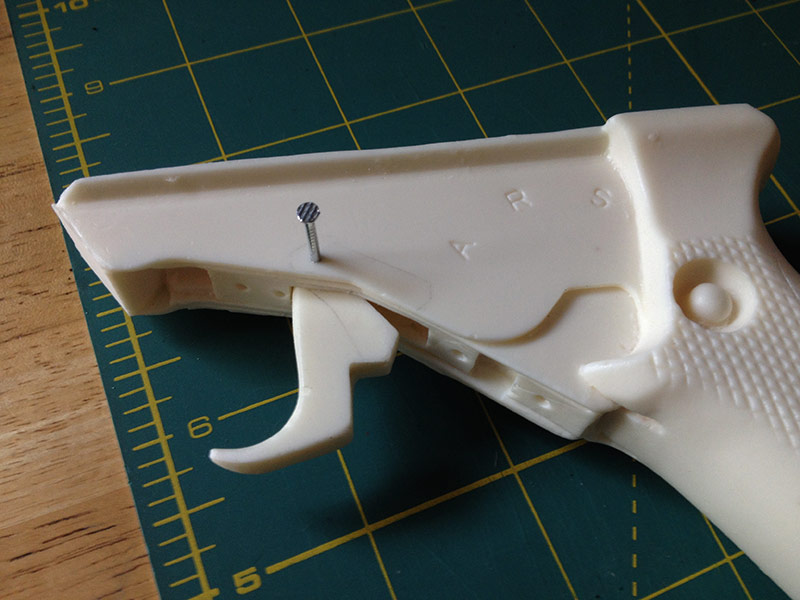
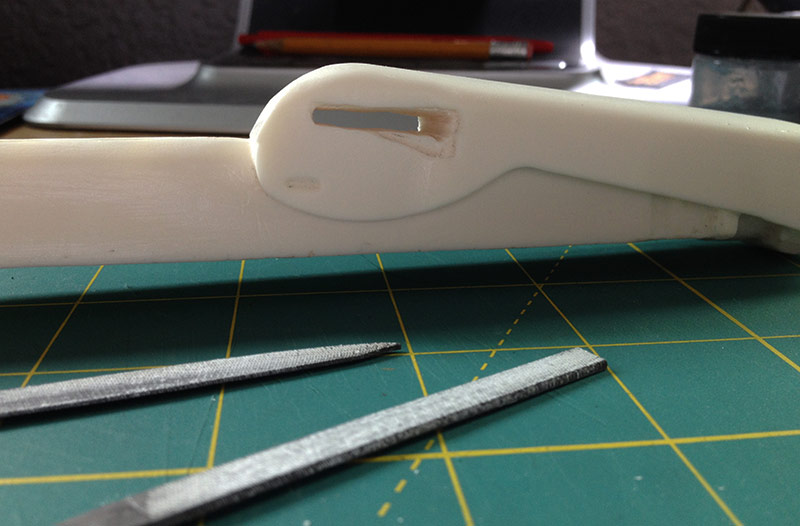
I was also able to do more work on the grip. I fixed the trigger so that it didn't stick out too far by adding some green stuff to the top of it, helping to hold it in place. I painted the parts that should be metal with metallic aluminum then masked those parts off after the paint dried. Then I painted everything flat black, and when that dried I used more blue painters tape to mask off everything else that wasn't the actual grip. Once that was done I painted the grip with satin black (I would have used glossy black but didn't have any). When that dried I took off the tape and added the trigger, trigger guard, selector switch and the free/lock screw.
The trigger guard had pins added to both ends. I cut off pieces of a small nail and used a pin vice to drill a hole for the nail to fit in, then glued the nail into place. Then I lined up the trigger guard and drilled holes into the grip and glued them into place there as well. I also did the same with the selector switch. The free/lock screw was just glued into place since I had already cut off the head (I don't remember if I did that on purpose or not, it's been so long since I started working on this!).
When I added the selector switch, I was playing around with it moving it back and forth and didn't notice that it was scratching a path, leaving a line of silver. I though it looked pretty cool so I left it as weathering. Other marks were also unintentional but make it a bit more realistic.
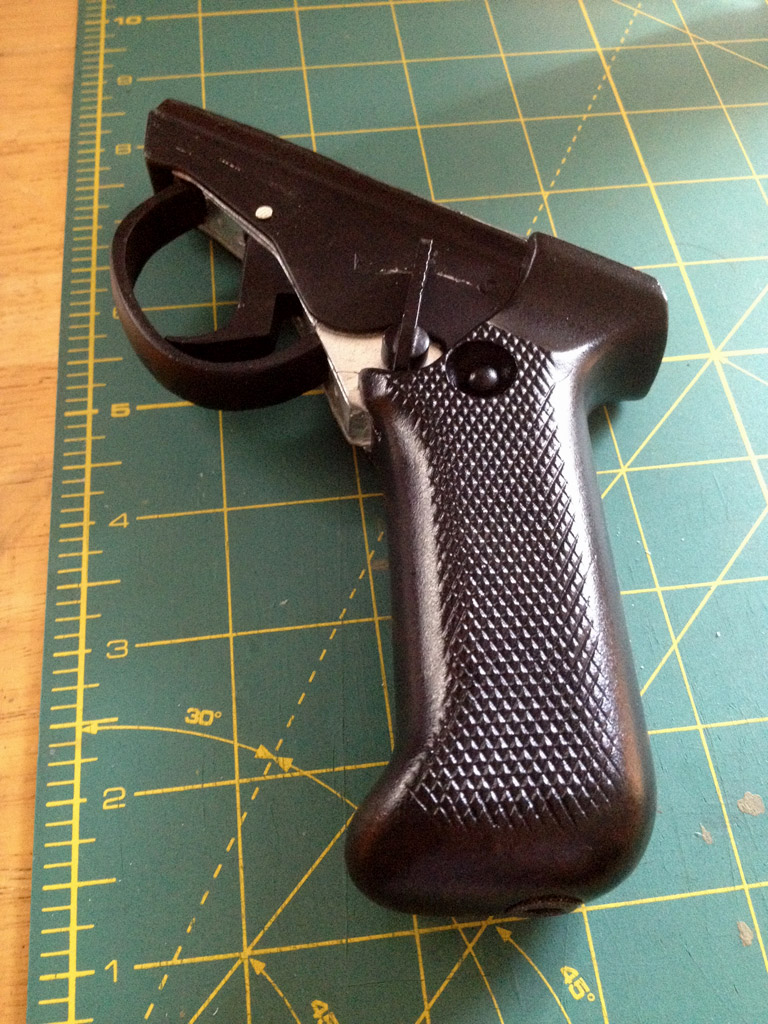
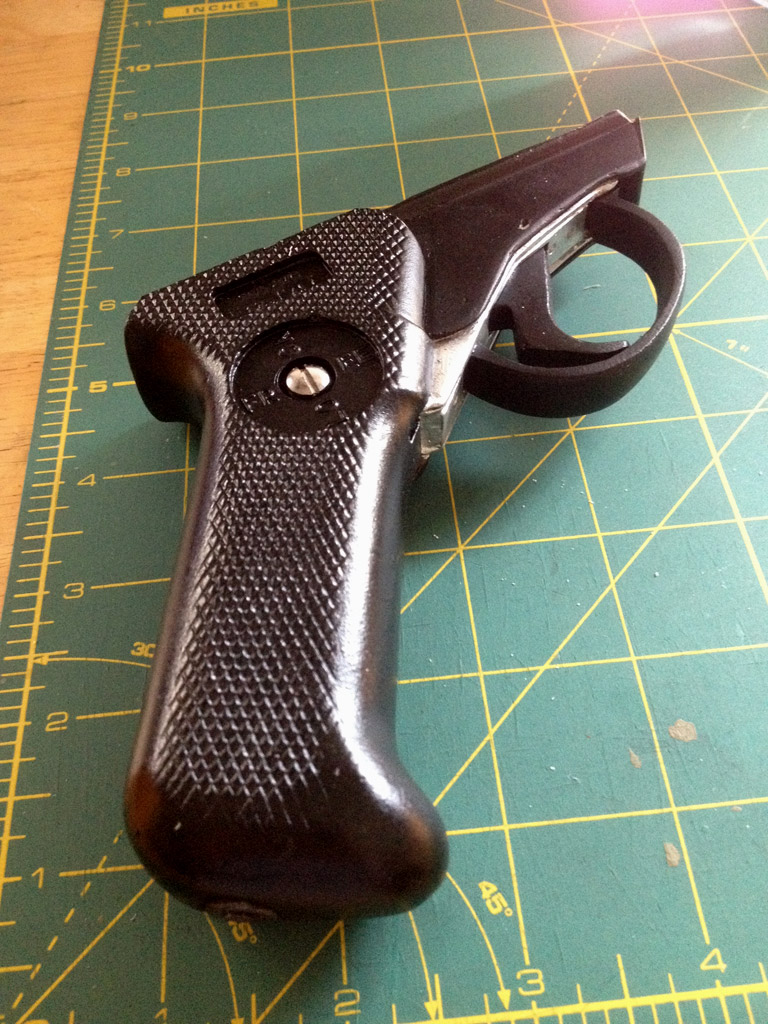
I still need to do a little cleanup above the trigger area where the nail is. I might try to countersink the nail head, or just cut the head off, then use green stuff to cover the holes.
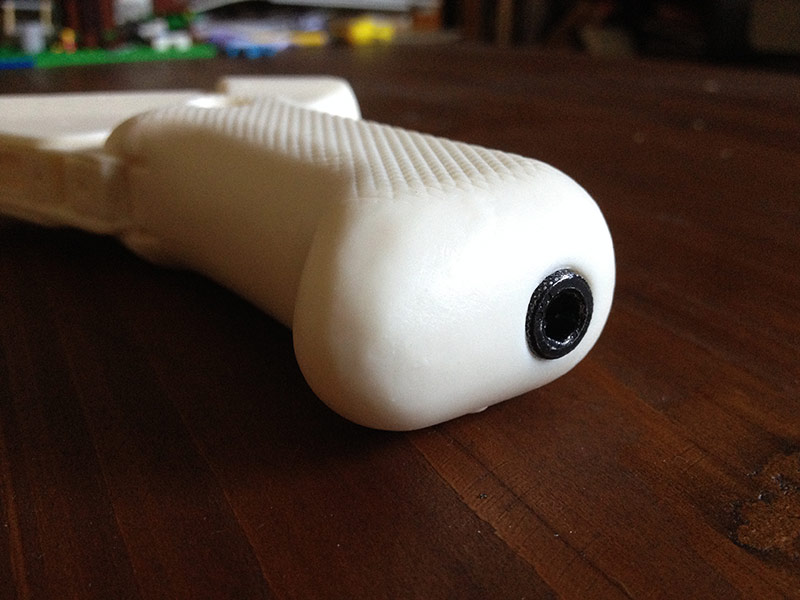
The last thing I did was to drill two holes on the top of the grip where it meets the barrel for two screws to act as pins when I attach them together. I'm using the shafts that were cut off the hex bolts that are on the front muzzle.
-
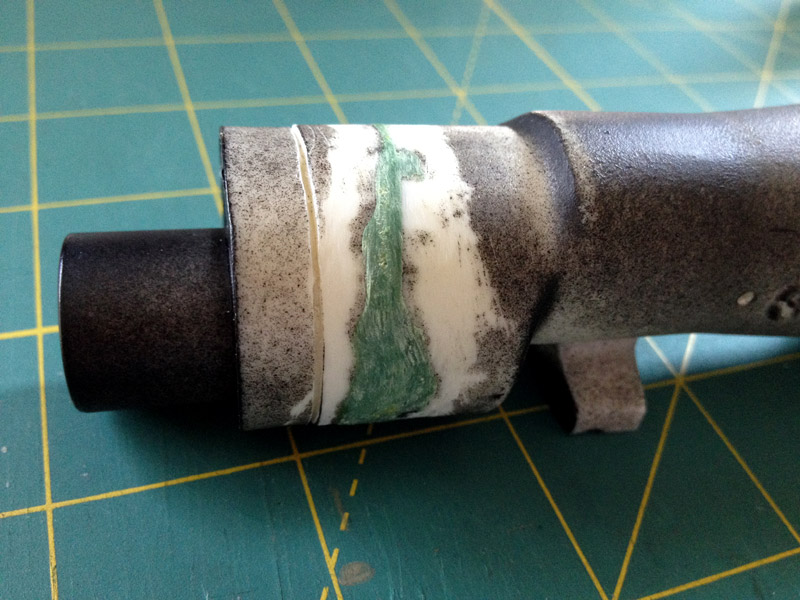
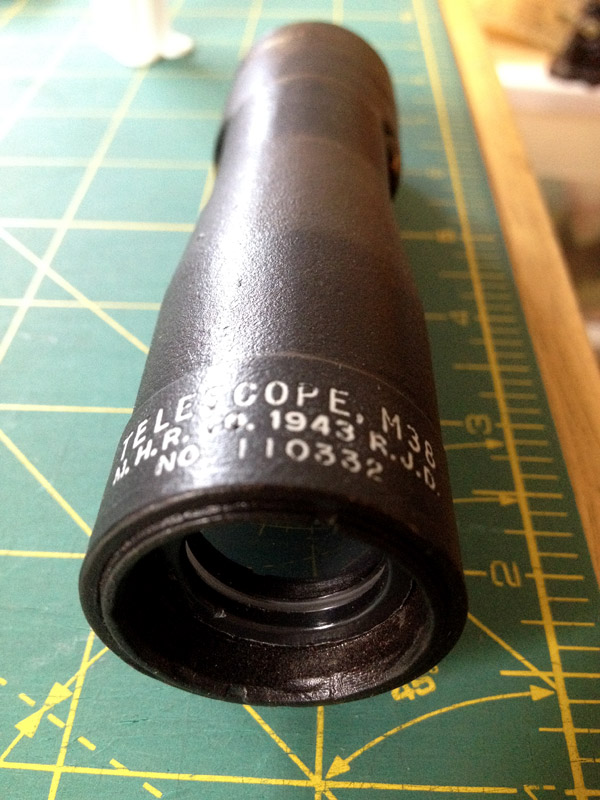
It's been a while since I posted any updates, mostly because I haven't had time to do anything. The last thing I did on my scope was to use green stuff to stick the two sides together, and so far it has held very well. I sprayed the inside of the scope flat black and then sanded down the green stuff.
I put a couple coats of primer then a couple of bronze, then finished it off with a couple of coats of flat black (allowing drying time between all coats). After it was all dried, I put the lenses in. I had to sand the housing that the larger lens was in so it would fit...it was easier to do that than sand the inside of the scope more since it was already painted.
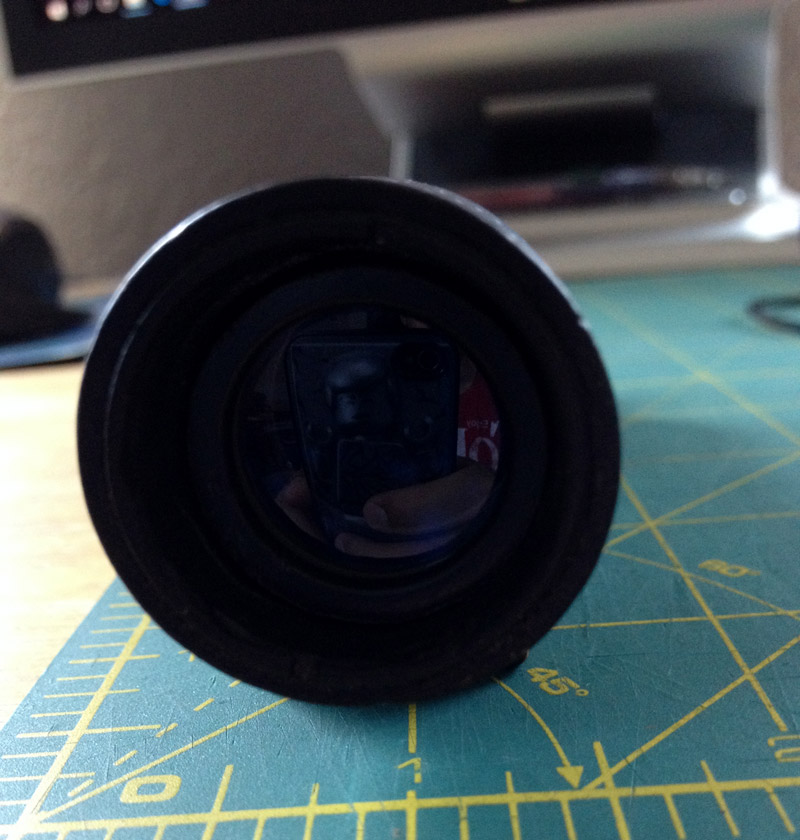
Since there is a lens at either end, light is able to go through the scope, but unfortunately I wasn't able to add additional parts to make it a working scope. Everything I tried just didn't work that well or look good enough for me to keep it. But it still looks pretty good.
For weathering the scope, I put a bronze layer under the top coat and was going to try the sanding method to show that layer. But every time I tried sanding a spot down, I would do it too hard or something because I would end up with one spot going straight down to the resin. I ended up drybrushing some gold paint (ran out of bronze) onto parts of the scope to get some weathering. I don't think I did the best job, but it looks okay.
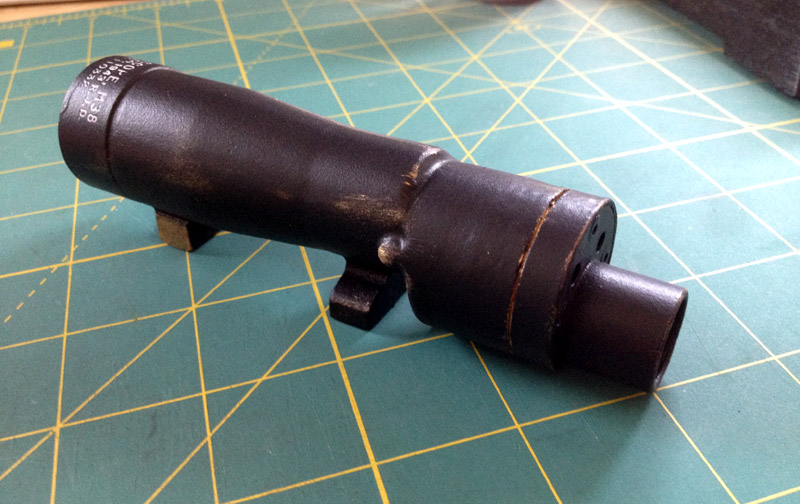
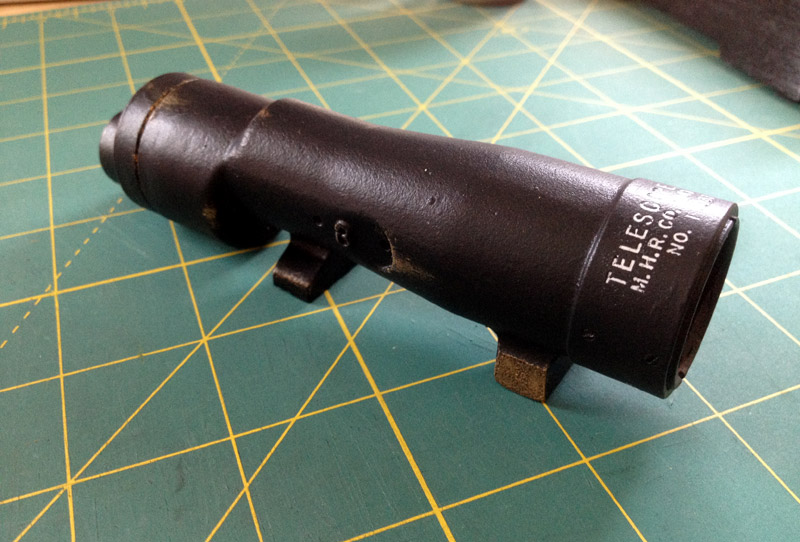
I also used the white crayon technique to make the lettering pop, it was a lot easier than I was expecting it to be. It also looks really cool.
Once all the painting and weathering was done, I put the screws in. I didn't glue or cut any of the screws, I actually screwed them in. They were a pretty snug fit and not loose at all.
I did use CA glue for the front lens around the edges and totally didn't expect the lens to cloud, but it did. I had to use a q-tip taped to a chopstick to stick inside the scope to wipe the inner side of the lens. I was able to clean the lens off so light can get through again and what's left around the edges just looks like wear.
-
Is this their contact email?
Troopersupplies@hotmail.com
Yep, that's the one I used.
-
I got on their waiting list back in May. I figured I have plenty of time since I'm also waiting on my Anovos TK kit. I haven't actually heard anything directly from them though - are they only giving updates on their website?
-
That one in the etsy link is a Rubie's blaster which you can buy for 14 bucks. What are you looking for in an E11? Even if you aren't crafty, you can buy a Rubie's and paint it black if nothing else.
-
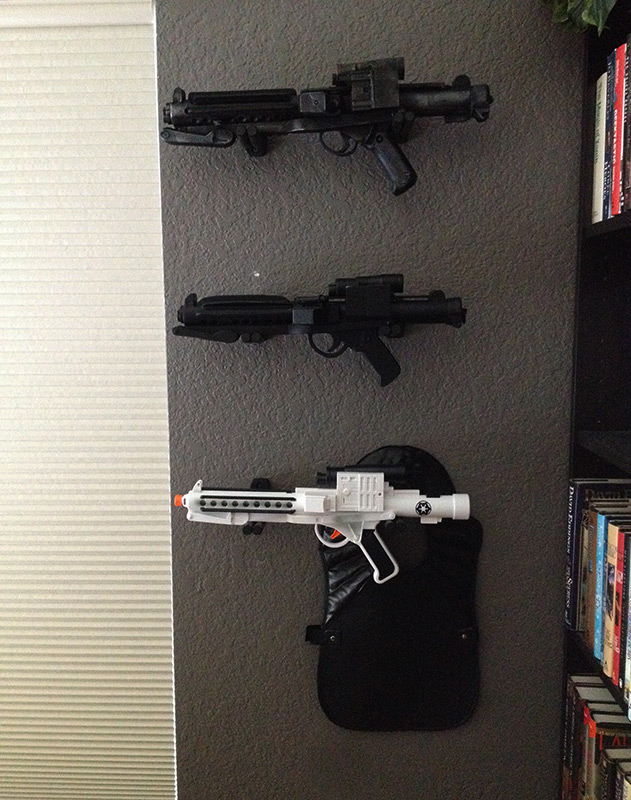
I ordered several of these and in my haste to get my blasters off the table and onto the wall, I didn't line up the mounts very well and the blasters are farther apart than I wanted. But at least they are displayed and out of the way now. Just need to finish up my Doopydoo's build and add it to the wall.
-
Very cool, I was going to try to come up with a wall mount for my blasters eventually, but I really like how this looks.
Sent from my iPad using Tapatalk
-
Might be too late already, but I fear your trigger swings too far forward and will touch the inside of the trigger guard. The little spring might also become visible then.
If still possible, you could add some green stuff on top of the trigger (where you had sanded) to create a mechanical barrier for the trigger to keep it from moving to much forward...
It's not too late, I haven't put everything together yet (still in the painting process). I did see the issue with the trigger touching the trigger guard - I'll try your advice with a little green stuff at the top.
-
 1
1
-
-
Since I already did some work on the grip, I wanted to finish it and get it out of the way. I sanded down the trigger and fit it in place, then drilled a hole for the pivot through the grip and trigger. I stuck a nail in to test the fit and (after a little bit more sanding on the top) the trigger swung freely.
 I went with the ballpoint pen spring method and measured where the spring would go. I drilled a hole to fit the spring in both the trigger and grip, just a couple millimeters deep to hold the spring, and tested it out.
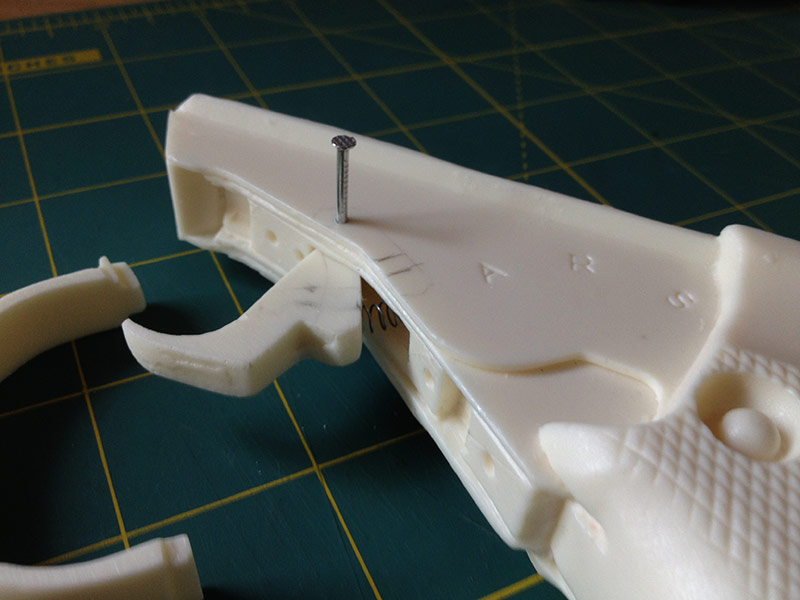 It works! Happy with the result, I moved on to the selector switch. I sanded down the bottom, measured where I wanted it and drilled a hole in both the switch and the grip. I used Tino's instructions from his completion kit and cut the nail he provides, using the pointy part for the switch and the part with the head for the trigger.Thinking I was done with the grip, I took these parts out for some painting. I did two coats of flat black primer, then two coats of metallic aluminum. Then I realized I had wanted to carve out some definition on the parts where the trigger and trigger guard go. So I carved a little more definition into the lines separating pieces and sanded off some of the paint - I'll have to repaint that section again later, then mask it off to paint the grip black.
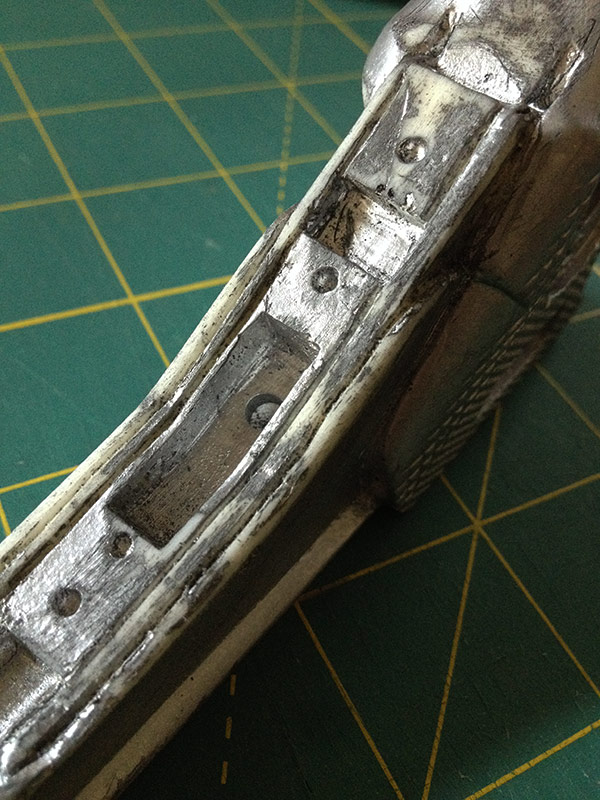 The last item I worked on was the front sight. I was able to remove excess resin and clean it up with the drill bit that came with my rotary tool. I still need to clean it up further and decide if I want to recreate the housing for the pin or leave the resin one there.
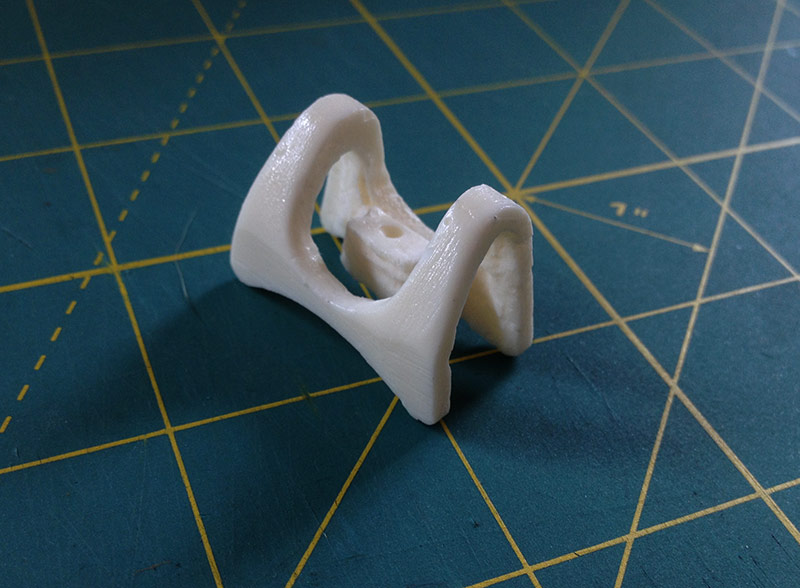
-
Since I got the completion kit, I wanted to start drilling out other molded screwheads and put in the real ones. I started with the grip first, drilling out the bottom and gluing in the hex screw.
 Next was the free/lock screw - I used the 3/8" spade bit to drill it out being careful not to go too far. I haven't decided yet if I'm going to cut the head off the screw and glue it in, or just leave it intact and screw it in.
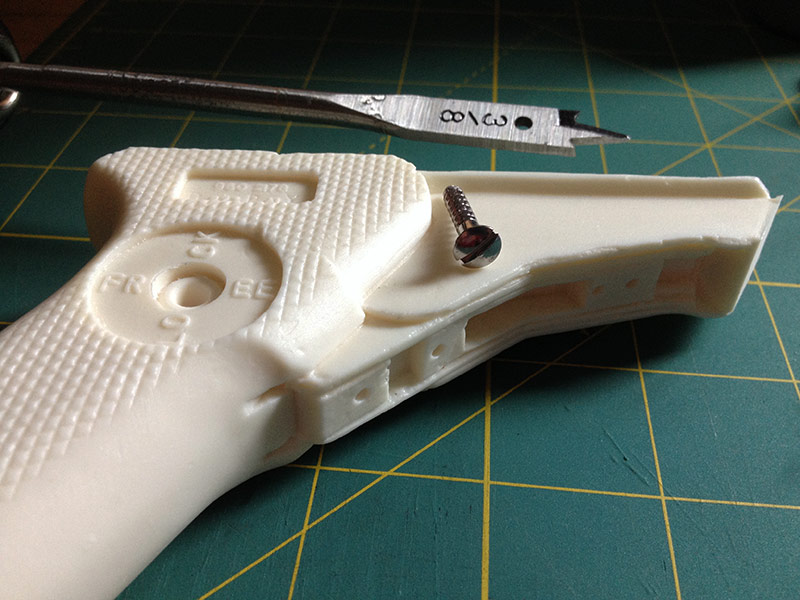 As I was in a drilling mood, I decided to drill out the molded holes on the bottom of the barrel. I used a normal 3/8" drill bit which worked great, but was slightly smaller than the actual hole. I tried to clean it up a bit with a rounded grinding tip from the rotary tool.
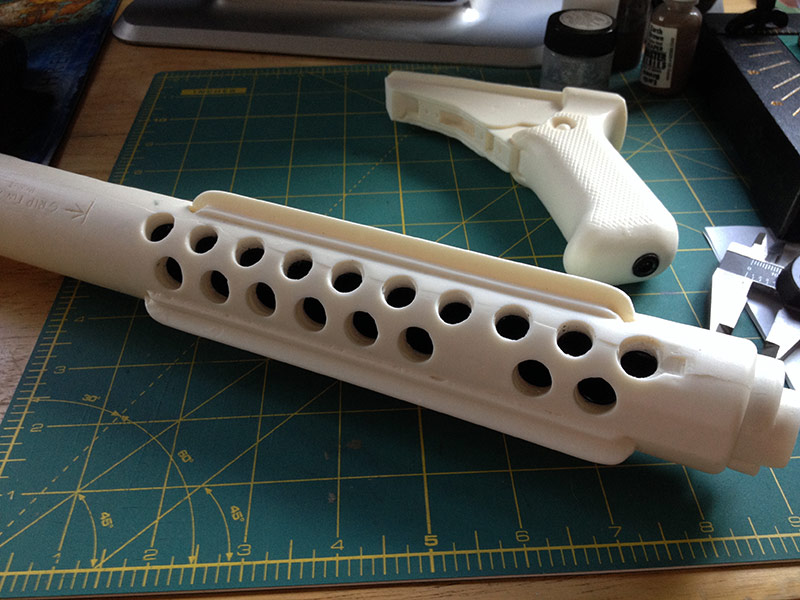 I still need to cut out the notch on the first hole as I want to have some type of catch on the stock that will stick in there. Or I might leave it and use that spot to glue in a pin that will help hold the two parts together. Decisions decisions.
-
Next up: the folding stock. I cut out the little section on the bottom by drilling small holes all the way through with a pin vise. One mistake I made was not paying attention and making sure I was going through straight - one of my holes was at a slight angle, so when I came out on the other side, it was a little too low and drilled out a part where it should stay solid.I drilled about eight holes along the length of the piece I was removing. Then I used the pin vise to drill from one hole to the next at an angle to try removing the material between the holes (I probably could have done this with the rotary tool but most likely I would have gone too fast and messed something up). I was able to open up most the area doing this until I was able to fit a small metal file in. Then I used files to clear away the rest of the area.
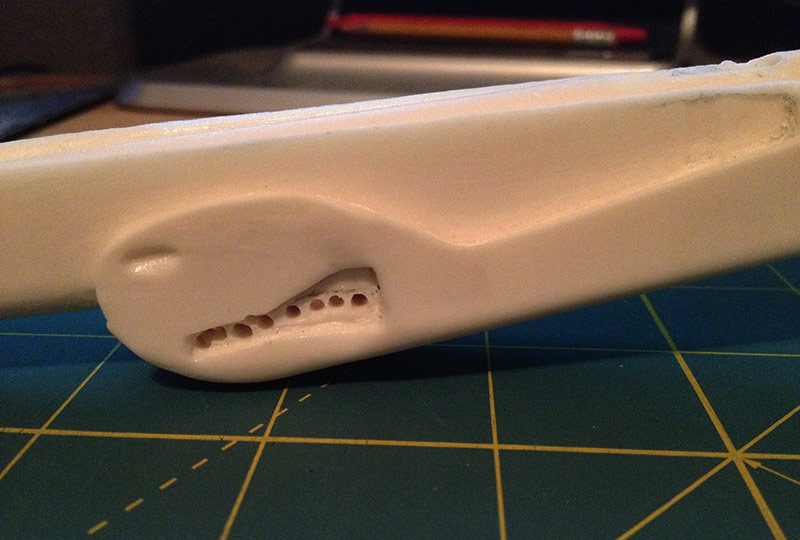
 Next I drilled out the holes along the stock, first drilling a pilot hole in the middle of each hole. I used a drill bit to make each hole (the 3/8" bit fit pretty well but is slightly smaller than the hole should be). For the hole nearest the front, I used a spade drill bit and I went very slowly from the top so that when it broke through, it didn't cut any of the handle part.
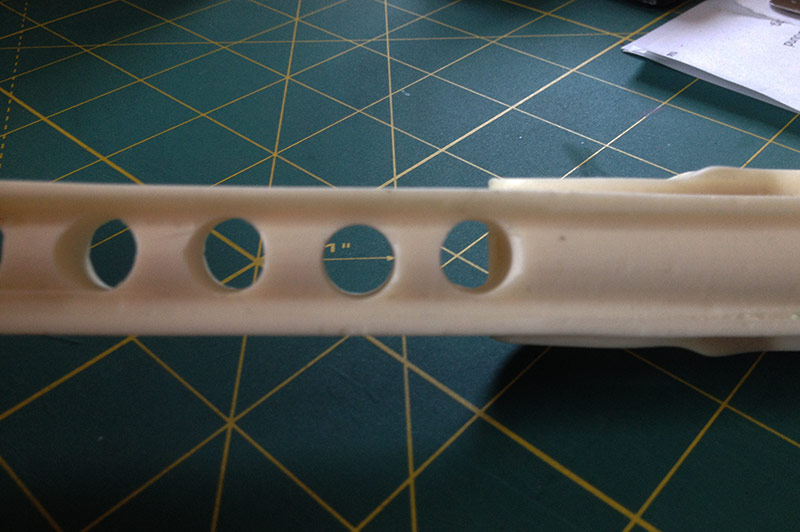
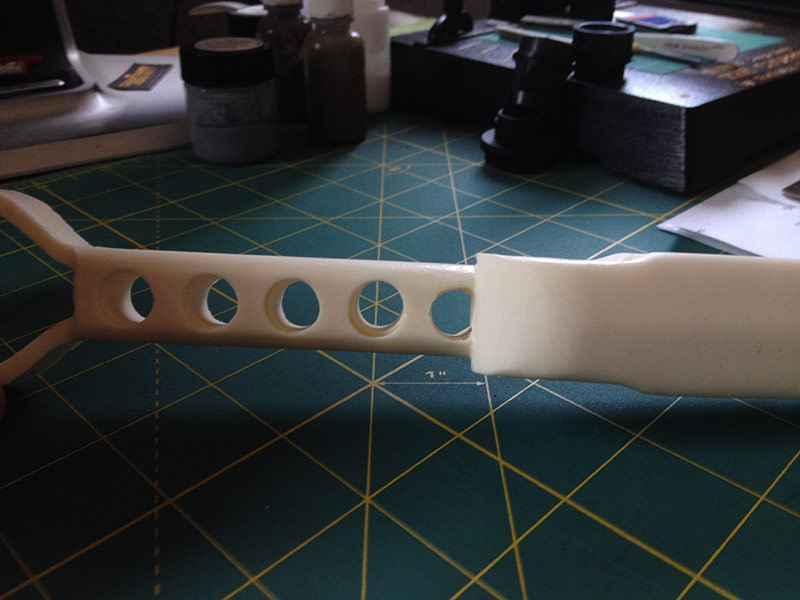 I then cleared out the top area to fit the small tube from Tino's completion kit. I used a 3/8" forstner bit to drill the areas between the holes, going down about halfway. I then used a grinding bit on the rotary tool to clear out the rest of the resin until the tube fit. I should probably go a bit deeper but I'm not really sure how deep it should be.
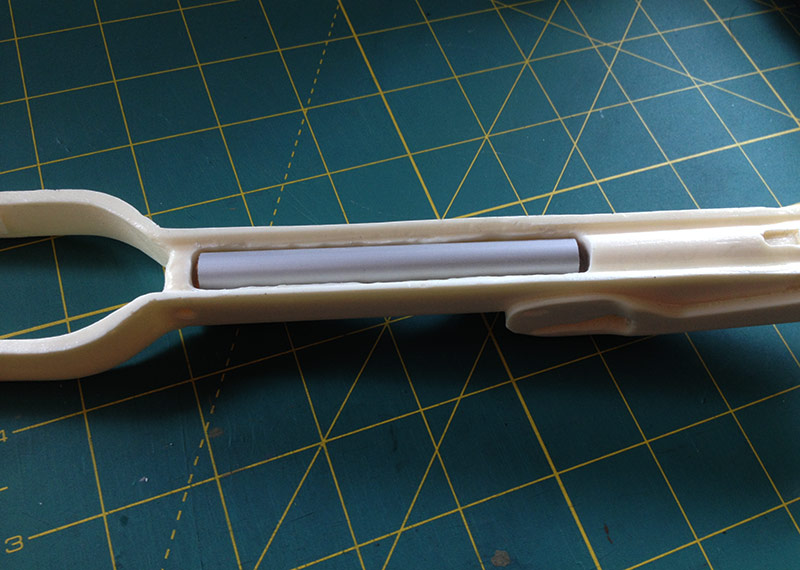 I also starting carving between parts (as shown in the FISD E11 Blaster Reference) to show more definition between parts, but my tools must not be very sharp because not a whole lot of resin is being scraped away. But the little I've done so far does make a difference.
 -
Richard I have never used green stuff to stick pieces together like this so don't know how strong the bond will be.
I will be interested to know the results but I would potentially be concerned that it may stick the two pieces together but the bond may fail if the scope is bumped.
Will you also have access to the inside of the scope as some green stuff will have squished out to the inside of the joint similar to what can be seen on the outside of the joint ?
If you can still get in I would use a knife or something similar to remove the excess before it cures.
In any event it is certainly worth testing as the worst case scenario is that the joint isn't strong enough and you end up glueing the two pieces together.
I think I was too excited on putting the scope back together that I totally forgot about putting on glue. I'll probably play with it in a few days and see if it loosens or falls apart.
When I put the green stuff on, I mostly put it on the outer half of the rim hoping that when I pressed the two parts together, it wouldn't push too far inside. I forgot to check the inside after putting the parts together so I don't know how it looks in there yet! I'll check on that tonight. If anything, I can just cut the front off again at the same spot and put it together correctly with glue (assuming it doesn't fall apart first).
-
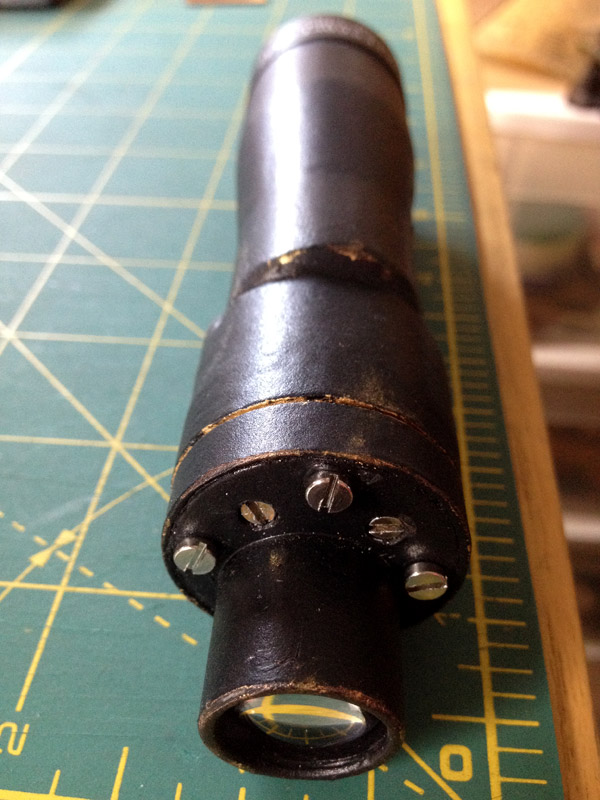
Continuing with my slow build, I was able to get a little more work done the past couple of weeks. I drilled out the molded screw heads on the front of the scope. For the two inset screws I used a 5/32" drill bit and for the other three, I used a 5/64" drill bit.
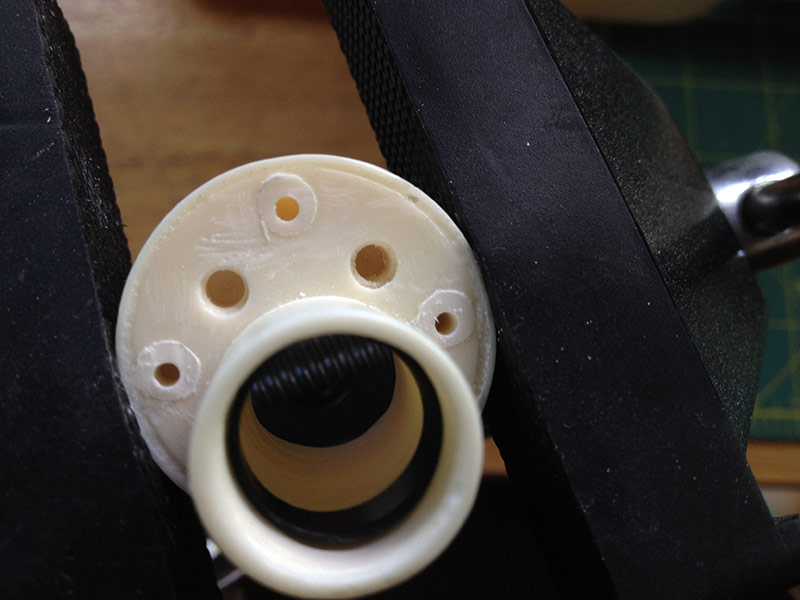 I still need to do a bit more sanding where you can still see the outline of the screwheads.Next up: I finally opened up the green stuff for the first time to fix the hole I put into the bottom of the scope. This stuff gets sticky! A word of advice - keep some water handy as it really helps to wet your fingers as you are working with it. If your fingers are wet, you are able to move the green stuff around without it sticking to you, making it easier to stay where you want it to.
 I also filled the inside of the rear opening of the scope with some green stuff since I opened it up way too much. After a couple of days, I sanded it down so that the rear lens will sit nice and snug, then did a spray of flat black on the inside of the scope.Then instead of using glue to get the two parts of the scope back together, I stuck some green stuff on one of the halves and squished the two parts together, holding it together with a clamp. This is where I'm currently at with the scope - I'm waiting for the green stuff to finish curing and hopefully it will act as a strong bond...anyone see any issues with doing this?
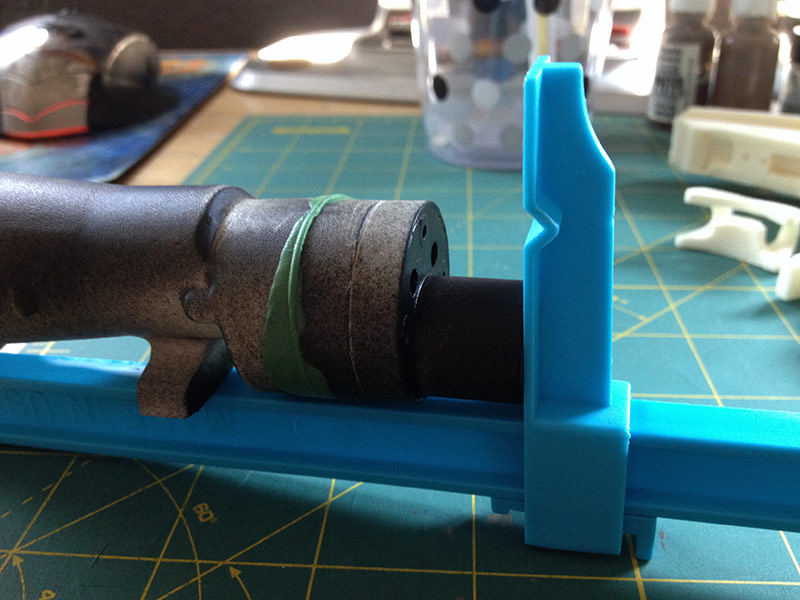 Once it's cured I'll sand it down and paint it.
-
I used a 3/8" drill bit to drill out those holes. They were slightly smaller than the predrilled holes, so I then used a grinding stone with a round tip in my rotary tool to widen the holes just a tiny bit. You might want to try decreasing the speed on your dremmel as that helped me learn to control it better. I still tend to make a mess of things when I go too fast.
Sent from my iPad using Tapatalk
-
1
-
-
You should be able to embed Flickr photos as well - on your Flickr photo, there's a share button (looks like an arrow pointing to the right) that has multiple options - one of those is BBCode which you should be able to paste into the reply box. Or you could use the HTML embed option and get the .jpg link in that code, and paste it into the Image link on the forum.
-
I like #8 the best, followed by #7 and #3. They all look good though.
Sent from my iPad using Tapatalk
-
Hi Richard and thanks for then mention on your thread above.
I like ypur idea of the wires to form your crosshairs and hope it works out well for you.
My idea at the moment is to print out on overhead projector transparent film. If this works out well and you are unhappy with the wire solution when it is finished I'm happy to print a selection off and post them to you.
Thanks for the offer Chris! I might take you up on it, but for now I'm liking the wires. I'm planning on painting the scope interior flat black (including the wires) so I'll see how that looks. I'll also be keeping an eye on your thread.
-
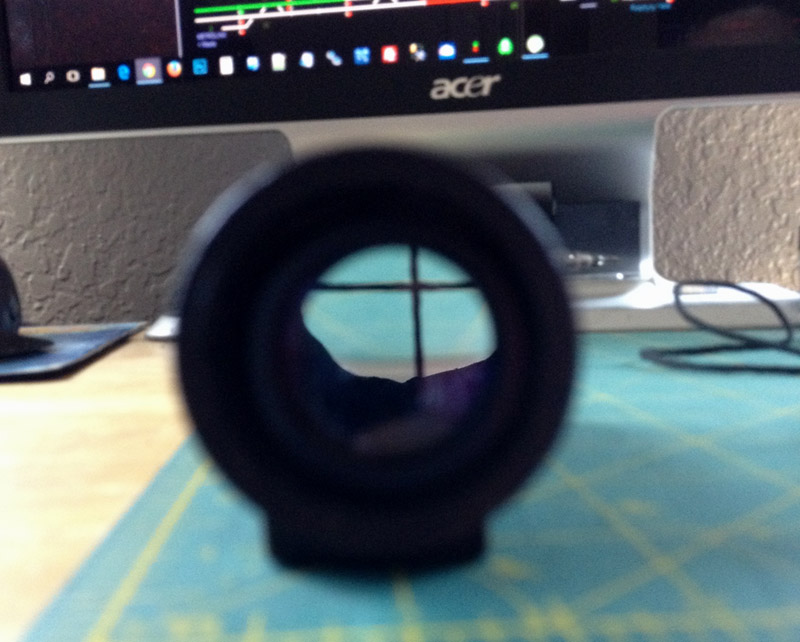
I measured about an inch and a half away from where the rear lens will sit and used a pin vise to drill the small holes for the wires that I'll use for the crosshairs.
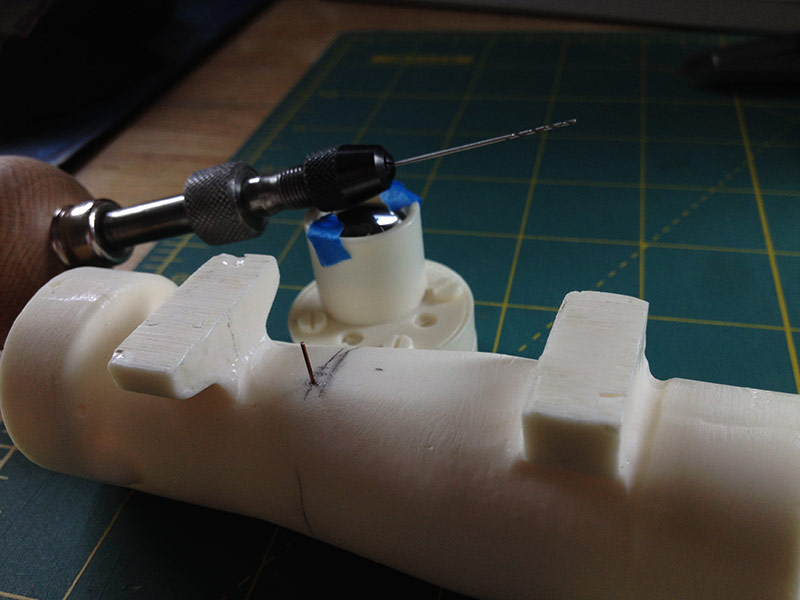 I didn't manage to put the wires in exactly center but it probably won’t matter. It looks okay in person, but the farther away from the scope you are the harder it is to see the crosshairs.
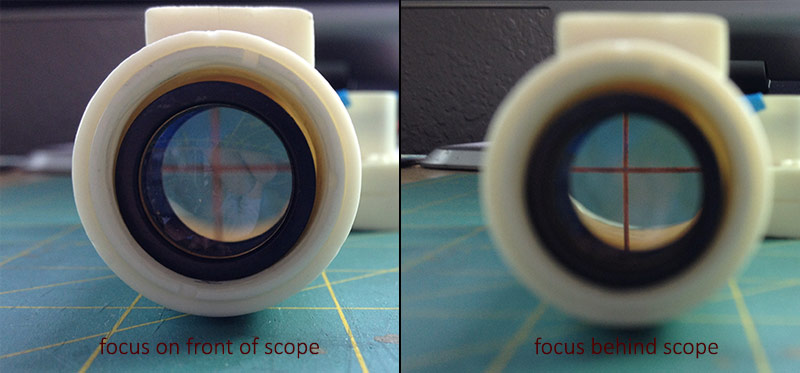 It's growing on me though, so I may just leave it like that.
-
1
-
-
I haven't really done anything with the scope in a while - I tried cutting some small mirrors and setting them up inside the scope to reflect the light from the front so that it reached the back, but the mirrors were probably too small to really do any good, and making them larger wouldn't work as there isn't much room in the scope. So I tried to use the prisms that were inside the iphone magnifying lens that I dismantled. Since the magnifying lens was straight (unlike some monoculars I've seen which look more like the scope) the prisms were shaped a bit weird and didn't really work for sending the light from the bottom of the scope to the top.I'm considering buying a cheap monocular that is shaped similar to the scope and seeing if the prism in that will work better. Thrawn's Guard was able to do this and it came out pretty nice.I also think I'm going to try something different for my target crosshairs - I was going to use a clear piece of plastic and draw on crosshairs, but I couldn't get anything drawn on that looked good (my hands are too shaky for that). So now I'm thinking of using a small piece of wire (the calipers I have say they are 0.48mm diameter) and sticking that inside the scope.
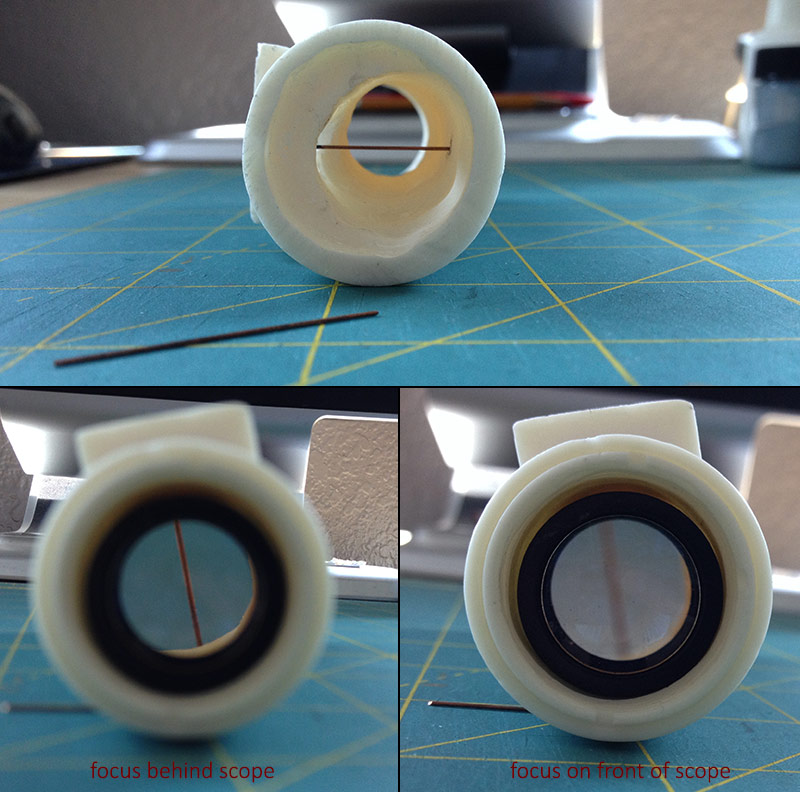 The above is a test shot of a piece of wire inside near the front of the scope - it's actually entering in the hole I created from being too eager with my drilling (see earlier post #3 above). Ideally I would put the wires around 1.5" from the back lens as the lens would focus on it. I would just use two pieces of wire, sitting perpendicular to one another. I wanted to have a small circle where the wires would cross, but I don't know what I would use for that.I did get my completion kit from Tino, and one of the first things I did was eat the gummy bears (thanks again Tino!).
-
1
-
-
I think your scope turned out great! I don't like a lot of weathering, and you did a good job keeping it at a good amount. I will probably do a similar amount or even less on mine.
-
1
-
-
You can get a B grade Hyperfirm for $150, which is what I plan on doing eventually. The B grade is cheaper than the A grade (which are $300) since there are some minor issues from my understanding like air bubbles. My Doopydoo's will just be a display piece.
-
If you're just going to wear it once and want something that looks like a Stormtrooper, you can make one out of foam. Check out Astyanax's thread where he made one for his kids. The helmet in the video you linked actually looks kind of cool (the paper mache one).
-
Really nice build! I wish I had gone ahead and cut out the space under my scope rail...I wasn't too sure it would hold up. Looks like it did for you.

Bill
Thanks Bill! After looking at your build I see there is so much more I can do with mine, but now that I have a Doopydoo's to work on, the Rubie's will be pushed back to a later date when I have more time.
-
I like how your blaster turned out. I really like how you did the clearing strip on the inner bolt without having to add extra parts. I may end up using that idea someday when I go back to my Rubie's to make it look better.
-
1
-
Talked my wife into trooping...
in Off Topic
Posted
I recently got sandtrooper armor from a member on the boards for my wife. We just need to fit a couple of pieces to her but she's very excited about it. She's also going to make an officer outfit. And probably before I get my TK kit.
Sent from my iPad using Tapatalk