


Pilot trooper
-
Posts
14 -
Joined
-
Last visited
Content Type
Profiles
Forums
Gallery
Articles
Everything posted by Pilot trooper
-
Hyperfirm is fine right out of the box. Durable for trooping as well. Your Etsy E-11 looks good but unfinished. Could be great. I'm sure there are many on this board that could make that one amazing in the end. If you were to keep that one I would certainly paint the bolt and give it some dry brush to weather it. Looks like the power cylinders could stand to be moved out a bit.
-
 No need to sigh... Go for it! Go for it with gusto! There will always be naysayers but as the veterans on this board have always said, it's not the suit but how you build it (or modify it in your case) and how you wear it. Even rubies can look great if modified and warn correctly (Toddo's EIB thread proved that) and even TM can look poor if built and warn incorrectly.
 -
TD 11320 respectfully requesting 501st access. http://www.501st.com/members/displaymemberdetails.php?userID=19135
-
Hello all, I have been diligently studying both FISD and MEPD in an attempt to modify what is probably the earliest armor out there. It has been frustrating at times but also a lot of fun. Starting from scratch with a more accurate kit would have probably taken less time than all the mods I have done but I believe there is something special in taking this old armor and turning it into something the 501st can be proud of. As you can see from the pics below, I am turning this armor into a TD. This will be probably be my final post over here on FISD but I thought some might want to see a bit of the work I have done. I will post a better update with pics on MEPD soon. This is probably the last time this armor is seen nice and shiny clean work performed to date: Helmet: - removed old pant from frown, tears and traps. - cut out frown teeth - repainted frown, traps tears with testors 1138 - replaced clear lenses with trooperbay dark green - added s-shaped helmet seal - replaced cheezy black tube stipes with standard medium blue - added trooperbay hovi mic tips - removed ears and detached face plate from rear plate to try my best to "stretch" the helmet a bit. - replaced ears in better position Armor: - did major cuts on posterior armor for better screen accuracy - cut top of kidney armor. was way too high. about a 3" overlap. - cut top of ab plate. it was literally a straight line across and way too high (even for a 6'3" guy) cut to mimic the angle of the bottom of chest armor. - detached thigh strapping from cod/ab. now use nylon belt. - re-strapped entire torso section. Marco's was decent but need to do this to detach thigh armor from cod/ab piece. - replaced plastic belt pieces with off white canvas. - trimmed sides of ammo belt to 45 degree angles. - removed droid caller and holster. - fashioned three square buttons for belt using extra ABS and the "heated up dime" method for the dimples. - shimmed ab/kidney gap using plastic belt pieces. used homemade ABS paste to seal cracks. - cut cod piece for better accuracy. - replaced inaccurate hand plates with flexible pieces attached to gloves. - trimmed forearm armor for fit. - trimmed ends of shoulder bells for better accuracy - trimmed parts of thigh and shin armor for both fit and accuracy. - permanently attached small ammo belt to bottom of right thigh with rivets (was velcro before) and trimmed curve into back of small ammo belt. - permanently glued thigh, bicep and forearm armor (instead of Velcro). tried to glue fronts of shin armor but the armors thickness and lack of flexibility made it impossible to spread the armor apart to get leg in before glue cracked open. it is staying Velcro - removed sniper knee plate and Velcro which attached it in preparation for TD plate. TD mods: - removed plastic ribbed shoulder straps. using only white elastic for attachment. - cut ab plate to remove button panel that was molded in. - used drop box to create "blank square" panel to replace button panel. used homemade ABS paste to seal cracks - fashioned three button panel on left side of ab plate with extra ABS and used the "heated up dime" method. - replaced and permanently fixed diamond sniper knee plate. - replaced inaccurate pauldron with trooper1 variation. BEFORE ---------- AFTER --------------
-
Netslave, thank you for asking this question and bringing this discussion out. I'm sure a lot a of newbies have similar questions when they first get here. I know I did. It is good to hear answeres from the horses mouth. That being said, I agree with the veterans above. There are very many subtle differences in the FX. I have been comparing pics between FX, my own armor, and the centurion submits for a few months now. The longer you look the more details you see that are different. I would add to your list: -Shoulder bell shape (too straight) -no return edge on shoulder bell - kidney/posterior one piece. Can be cut but never looks quite right. - whole ab detail is inaccurate. Not just box and button strip. - both thigh and shin contouring inaccurate. Specifically, top of shins an bottom of thighs. Accurate shin tops and thigh bottoms generally end in a ruff hexagonal shape (looking from above). FX ends in a general circular shape. While I agree that FX shouldn't be centurion eligible because of all these flaws, I've noticed that some on these boards mislead all the way to the point of telling new guys that FX armor ( I know the helmet is a no go) is completely unworkable even for basic 501st approval. I'm all for promoting screen accuracy but let's be truthful. I have been working on mods to a set of armor that predates and was actually the predecessor to the FX armor (I have had to make cuts just to get it to look like FX...) It is a lot of work. Probably is more than just starting with a new kit. I am enjoying the journey and at the end of the day, it won't be centurion (actually police officer/ swat because it will be a TD) but it is a lot of fun and kind of cool to restore an old dinosaur up to standards. There is more than one way to have fun with the 501st.
-
Hi all, I have been working on mods to my Marco armor. Things are going well. Plenty of work to do but its getting done. I have pretty much decided to turn this set into a TD. It came with some TD gear and just seems suited for getting sandy. I will post a few more updates here for anybody who might be interested in seeing this old armor get cleaned up. I pretty much finished the helmet. Compare this pic to the one above. - removed old pant from frown, tears and traps. - cut out frown teeth - repainted frown, traps tears with testors 1138 - replaced clear lenses with trooperbay dark green - added s-shaped helmet seal - replaced cheezy black tube stipes with standard medium blue - added trooperbay hovi mic tips -------------
-
Advice on shim between ab and kidney (FX)
Pilot trooper replied to netslave's topic in Hard Armor (General Discussion)
Study as many of the submission pics for centurion as you can. They will show you how it should look. There is also a pretty old thread around here about upgrading FX armor to EIB standards. It talks about the ab/kidney shim a bit. I think your pretty close though. There is usually a notch at the bottom of the kidney armor that is not attached to the ab plate. Maybe you could incorporate that. The belt will cover a lot of the bottom of the shim either way. Was your posterior already separated from the kidney when you got it?I am facing similar choices with my older armor. -
OK guys and gals. Here are a few things I've learned about probably the earliest armor out there, Marco Enterprises. I have had a few chances to try on the whole armor set and a few weeks to digest this armors interesting quirks. First off, I don't think it looks that bad. A lot of similarities with FX and even AM. That can be a good or bad thing depending on your "certain point of view..." Centurion or even EIB are probably not in this armors future but I think it can be 501st approved. Differences to most quality fan made kits... Thickness - Right off the bat, the first thing you notice about the armor is its thickness. It is probably twice as thick as anything else I've seen on these boards. Not sure if its ABS or something else (PVC?). The plus is that it seems virtually indestructible. The minus is that it is kinda heavy. Hand plates - They are a non-standard true pentagon vs the ANH "rough pentagonal shape". Helmet - this is not the old goofy one on stormtrooperhelmets.com. It seems to be some sort of recast. Its details are very very soft and its put together pretty sloppily. I think a new helmet is in my future but in the mean time I will be cleaning up the sloppy paint job getting som new decals and replacing the "clear" lenses with dark green ones. Interesting size pieces - a lot of the armor in this set seems a bit oversized. This is great for me as I am 6'3" 190lbs. the large shoulder bells seem to work on my frame although they could be modified to get rid of the straight 90 degree angle at the bottom. the forearm armor is way too thick for me. I will most likely cut this down. Thighs and lower leg armor had a bit too much room for my skinny legs but padding was added to keep things snug. Rather do that then trimming to keep the armors proportions better. Everything seems geared toward a bigger trooper except in the waist. I have a 34" waist and this area is tight for me. I swear Marco must have designed this part for a stick figure. you could probably have a 30" waist and there would still be a gap between the ab plate and the kidney/posterior piece! That brings me to what is probably the most "interesting" piece of the armor. The butt and kidney piece. I still don't really know what to make of it. It is one piece which is fine for now. It and the ab plate are also super tall. They both can stand to be cut down substantially. but what makes it "interesting" is the odd shape. It seems that Marco has modified it since the picture in Stormtrooperhelmets.com (I like to call that the storm trooper g string) but its still not quite right. still trying to figure out how to rectify this or if it even can be... anyways... Here are a few pics. I'm still not sure which direction to take this armor (TK or TD). It will be a fun journey either way. Please post comments tips or suggestions. Like I said earlier. I'm a newbie. ----------------
-
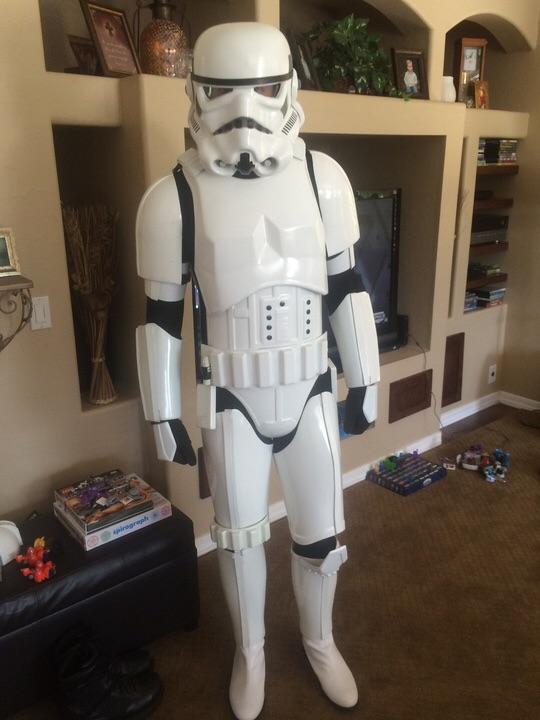
OK. Here is my first pic with the Marco armor. I will post more pics and some thoughts tonight. there is plenty of work to do to bring this up to basic 501st standards no matter which version to shoot for. This thing is kind of a hybrid. But, I think it's got a future. I do believe it's a far cry from the pic on the starwarshelmets.com site. This is unmodified out of the box. Well, I have made a few mods for comfort and wearability.
-
Firebladejedi, you are right. I cringed when I saw the old helmet. There were a bunch of pieces in this armor that were and are suspect but can be modified if not just replaced. The helmet was a nonstarter though. I emailed Marco and confirmed that he was including an updated helmet in his set. (More on that later). The one in your link he was still selling as his "prototype" helmet until very recently.
-
Oops..... Deleted price stuff... Sorry, just found out it's a no no... PM me for info. There are many things I will be modifying. both for comfort or for accuracy. This is a work in progress. I believe I can get it up to specs. I'll post more here about the armor and the mods I'm making as time permits. With pics.
-
Hi guys! First ever FISD post. I thought it fitting that it be on this thread. I have entered the realm of stormtrooper armor myself recently with a purchase of Marco enterprises armor. Yes, the old man is still selling gear. Was at celebration last month and talked to a guy that I thought looked pretty good in sand trooper armor. Turns out he got his stuff from Marco. I ended up meeting Marco there and he explained how he sells his stuff. He literally still uses his catalog (circa 1985). I actually bought his catalog on eBay. The stuff is not super screen accurate. But it is a far cry from the pics earlier in this thread. ( he doesn't sell that awful helmet anymore). I had been researching incessantly about the ins and outs of trooping, the 501st, different versions of the armor and helmets, and the various fan made kits out there. At the end of the day, this was just too good of a deal to pass up. I will be posting some pics and my opinions on the quality as well as some of the differences between this and more accurate armor out there.

