
Ashari
-
Posts
34 -
Joined
-
Last visited
-
Days Won
1
Content Type
Profiles
Forums
Gallery
Articles
Everything posted by Ashari
-

Ashari's TLJ Captain Phasma Build Thread
Ashari replied to Ashari's topic in Captain Phasma Build Threads
7 - Getting Dressed Pre-armor Undersuit Shiny shorts Mic Headset, unplugged Balaclava Neck seal Strapping Harness with Shoulder Gaskets (velcro to harness) Legs Velcro Knee Gaskets to Thigh Slide on Thigh/Knee Gasket Snap Thigh to Strapping Harness Slide on Spats Boots with Toe Plate Add Mid-boot and Back-boot Plates Slide Spats down to make room for Calf & Shin Velcro Calf to Knee Gasket Velcro Shin to Calf Velcro Spats to Calf Velcro Clips to Shin/Calf Torso Kidney Plate Use velcro ties to close Kidney Plate Snap on Cod & Butt Snap elastic Cod to Butt Snap Belt to Kidney Hook Thermal Det to top of Kidney & press into velcro Back Vest goes over head Close Back Vest sides via snaps Velcro AMP to front of Back Vest Plug in Mic Headset to AMP Turn on AMP Velcro Chest to Back Vest Arms Velcro Biceps to Elbow Gasket Slide Bicep/Elbow Gasket on Velcro Biceps to Shoulder Gasket Snap Shoulders to Back Vest Velcro Elbow Gaskets to Gauntlet Finally Cape Turn on Helmet Fans Helmet Gloves Phasma Build - Getting Dressed.pdf -
Ashari's TLJ Captain Phasma Build Thread
Ashari replied to Ashari's topic in Captain Phasma Build Threads
6 - Transportation Transportation Items List: Large rolling bin Perimeter padding https://imgur.com/JhW4x8a Blanket https://imgur.com/HpVpuIW Rolling Bin photos & notes https://www.whitearmor.net/forum/topic/56976-asharis-tlj-captain-phasma-build-thread/#findComment-795396 Helmet bag Chest wrap 2x Shoulder wrap 2x Bicep wrap https://imgur.com/q6v2ChT 2x Gauntlet wrap 2x Glove/hand box Kidney wrap https://imgur.com/GS4h47N Thermal det bag https://imgur.com/XhShTDq Belt storage 1x Cod wrap https://imgur.com/kzNyL99 1x Butt wrap 2x Thigh wrap https://imgur.com/gjfhpXi 2x Knee wrap 2x Shin wrap 2x Shoe wrap Mic/Amp pack Undersuit & neck seal bag Gasket bag Balaclava & shiny shorts bag Shoe bag Emergency kit Item bag labels Twill Tape alphabet stamps stamp pad. Individual item bags https://www.whitearmor.net/forum/topic/56976-asharis-tlj-captain-phasma-build-thread/#findComment-795398 Phasma Build - Packing List.pdf -
Ashari's TLJ Captain Phasma Build Thread
Ashari replied to Ashari's topic in Captain Phasma Build Threads
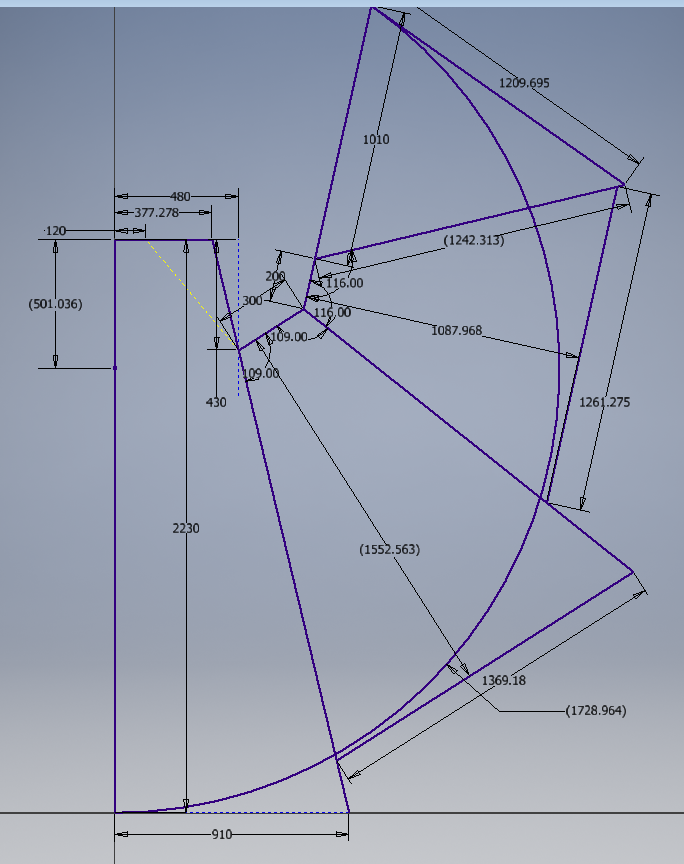
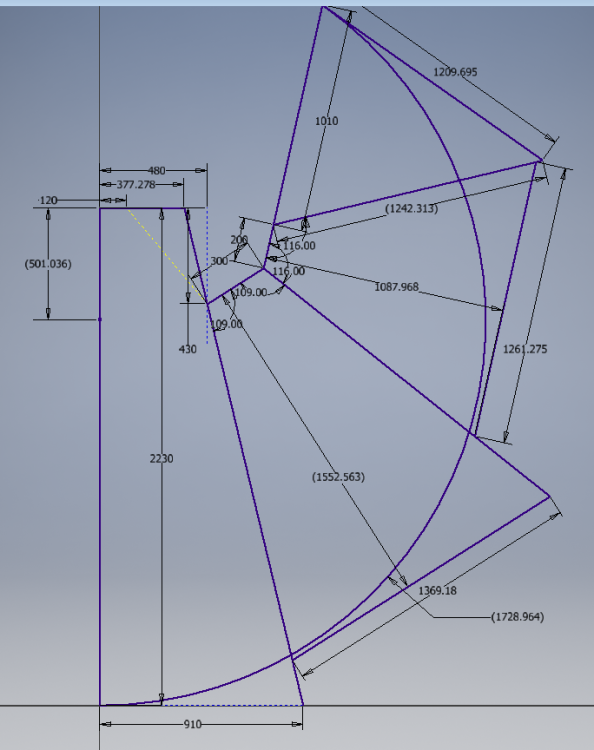
5 - Cape Build Cape build discussion and photos Copy example pattern from Captain Phasma Costumers group Cape Pieces: 4x cape pieces 2x 4.5” x 9” pocket 2x 5.5” x 11.5” pocket 3x 1.5” x 14” leather strap 1x 1.5” x 16” leather strap Cape Materials: 4.5m of black cotton duck cloth 1.5" wide leather strips Amazon Black Leather Strap Strip 1.5 Inch Wide 79 Inch Liquitex Gloss Heavy Gel Medium Michaels Canada Liquitex® Gloss Heavy Gel Medium Tulip Matte Fabric Paint in Red Michaels Canada Tulip Matte Brush-On Fabric Paint Sewing Instructions Add 0.5” to all edges of cape pieces (except leather straps) for seam allowance Sew vertical seams with french seam Sew with wrong sides together at ⅜” Clip seam Press and flip seam so right sides are together Sew at ¼” Sketch bottom hem curved shape & cut (https://imgur.com/bmYZqQu) Hem bottom with double rolled ¼” hem Cut hemming piece for left and right edges Left edge: 1.5” seam, cut piece 2.5” x 230cm (½” seam allowance) Right edge: 1” seam, cut piece 2” x 125cm (½” seam allowance) Sew hemming piece to right edge ½” seam allowance Press hemming piece long edge seam allowance to inside Press to hemming piece to inside and sew with 1” seam allowance Pin leather straps to left edge & stitch into seam allowance The top strap is 1.5” x 16” and the bottom strap is 1.5” x 14” The top strap is located about 1” above the bottom strap “around the left hand area” Sew hemming piece to left edge ½” seam allowance Press to hemming piece to inside and sew with 1.5” seam allowance Pin pockets and 1x 1.5” x 14” leather strap Back left side of the cape starting approximately in the shoulder blade area Pockets in 1, 2, and 1 pattern The top and bottom pockets are approximately 4.5” x 9” 2 middle pockets are approximately 5.5” x 11.5” The bottom pocket has a black leather strap approximately 1.5” x 14” attached horizontally to the bottom left corner Sew on pockets Finish neckline Sew on 1x 1.5” x 14” leather strap at right shoulder Paint external cape surface with Liquitex Gloss Medium except left seam (https://imgur.com/KQAyJ8W) Paint external left seam with red fabric paint (https://imgur.com/MQSiOTG) Close left attachment end Add closure Determine if clip to armor needed to keep cape from choking me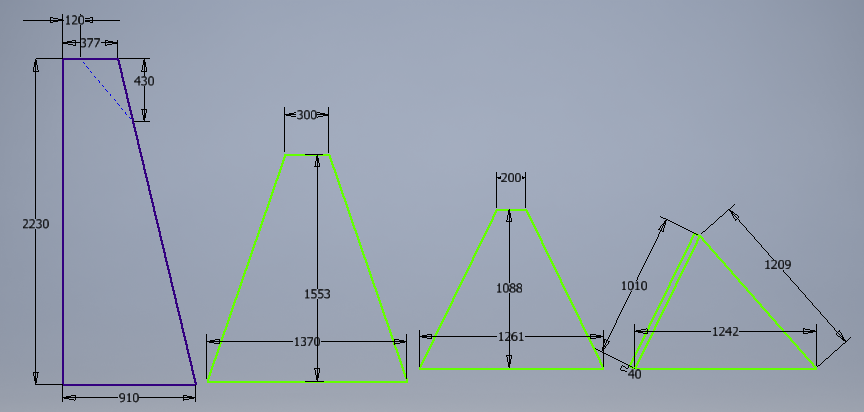
-
Ashari's TLJ Captain Phasma Build Thread
Ashari replied to Ashari's topic in Captain Phasma Build Threads
4 - Assembly & Strapping Install helmet visor Install helmet frown mesh Install helmet padding Install helmet fans Install chest mesh and gaffer tape Install bicep gaffer tape Install shin gaffer tape Figure out amp mount for chest Attach felt strips along any overlaps on interior to prevent rubbing Shoulder underside Chest overlap Vest overlap Belt box backs Mid-shoe plate Spat bottom Suspenders (Geeky Pink) Suspenders to shoulder gasket by velcro Suspenders to Thighs by buckles Back & Chest Back sides by snaps and black elastic Chest to back by velcro? Magnets? Shoulders by snap straps & shoulder support 11.2mm tall at join between back and shoulder bell Arms Shoulder gasket to Bicep by velcro Bicep to Elbow Gasket by velcro Elbow Gasket to Forearm by velcro Gloves Make elastic loops for each joint piece Attach elastic via hot glue to each piece Slide onto each finger with glove on to find placement Tack elastic on each finger to secure Add hand plates by velcro Kidney Kidney closure Kidney to Butt by snaps Kidney to Cod by snaps Cod to Butt by elastic (styrene plates) Thermal Det by velcro? Belt? Sew buckle to one end Stick weather stripping to rubber Belt boxes attach Chicago screws (2x per box to keep level) Snaps to kidney Leg Holster needs metal plate, screws & bearing Thigh to Knee Gasket by velcro Knee plate to gasket by velcro Knee Gasket to Shin by velcro Shin to calf by velcro Shin clips by velcro Spat to Shin by velcro Shoe plates Toe plate by elastic string (d-ring attach similar to ?) Mid-foot plate velcro to toe plate Mid-foot plate by elastic to Shoe back plate & sole by elastic string -
Ashari's TLJ Captain Phasma Build Thread
Ashari replied to Ashari's topic in Captain Phasma Build Threads
3 - Prep & Paint !! CAUTION !! This kit is a fiberglass kit. Fiberglass sucks. DO NOT BREATH IT IN. If you're building the fiberglass kit, consider building a DIY Sanding Box to protect your health, as well as wearing appropriate PPE including respirator, goggles, gloves and coveralls. PREP Wash the fiberglass with soapy water - this removes any remaining release agents on the surface Sand the insides of all pieces to remove any sticky pokey bits (Sanding & plastidip photos) Give it a good vaccum Rinse the armor again to remove any left over fibers OPTIONAL: Coat inside with Plastidip This is optional because you could always coat it with something else, however you should coat with something to prevent transfer of any fiberglass to your clothes or skin Vents Cut out the vents with rotary tool Chest vent https://databank.501st.com/mw501/images/6/6e/CHEST_CROP_TLJ_PHAS.png Chest pill holes Bicep pill holes https://databank.501st.com/mw501/images/7/7a/BICEP_CROP_TLJ_PHAS.png Shin pill hole https://databank.501st.com/mw501/images/f/f6/SHIN_CROP_TLJ_PHAS.jpg Helmet frown https://databank.501st.com/mw501/images/b/b2/HELMET_CROP_TLJ_PHAS.jpg File edges of vents until smooth Add greeblie buckles with E6000 (E6000 is probably overkill, but hey, I'm learning) 2x Bicep 4x Forearm 4x Thigh 4x Shin (velcro post chrome) 2x Spat Add greeblie shin boxes (left calf only) with E6000 https://databank.501st.com/mw501/images/f/f6/SHIN_CROP_TLJ_PHAS.jpg Add holster (right thigh only) with E6000 https://databank.501st.com/mw501/images/0/03/THIGH_CROP_TLJ_PHAS.png Fill gaps around shin boxes and holster with Milliput Fill any "large" imperfections in the armor surface I used Bondo Glazing Putty for the majority of these, primarily because I learned about Milliput after I was far past this step. Wet sand with 400 sand paper PRIMER OPTIONAL: Clean surface with air from compressed air (either Compressor & Air Blow Guns or Compressed Air Duster Can) Clean surface with tack cloth to remove any left over particles Coat with a light coat of Dupli-Color Grey filler auto primer Wait about 15 minutes Coat with a medium coat of Dupli-Color Grey filler auto primer Wait for at least one hour (I left them over night, but I'm 100% learning as I do this) Wet sand with 400 sand paper Check for imperfections & do minor fills (with either Bondo or Milliput) Wait for filler to dry OPTIONAL: Clean surface with air from compressed air (either Compressor & Air Blow Guns or Compressed Air Duster Can) Clean surface with tack cloth to remove any left over particles Coat with a coat of Dupli-Color Grey filler auto primer Wet sand with 600 sand paper Check for imperfections & do minor fills (with either Bondo or Milliput) OPTIONAL: Clean surface with air from compressed air (either Compressor & Air Blow Guns or Compressed Air Duster Can) Clean surface with tack cloth to remove any left over particles Coat with a coat of Dupli-Color Grey filler auto primer Repeat this until either you're happy with the surface or you want to cry a lot PRIMER Round 2 OPTIONAL: Clean surface with air from compressed air (either Compressor & Air Blow Guns or Compressed Air Duster Can) Clean surface with tack cloth to remove any left over particles Coat with a light coat of Dupli-Color Black sandable filler auto primer Wait about 15 minutes Coat with Dupli-Color Black sandable filler auto primer Let cure at least 1 hour prior to clear coat Clear Coat !! CAUTION !! This is a hazardous material. Spraying 2-pack isocyanate paints is the main cause of occupational asthma in the UK https://www.ultrimaxstore.com/blogs/news/how-to-use-isocyanate-paints-safely-ultrimax-coatings-uk Spray Max 2K Clear Glamour Clear Coat Causes serious eye irritation. May cause drowsiness or dizziness. Suspected of causing cancer. Suspected of damaging fertility or the unborn child. May displace oxygen and cause rapid suffocation Precautionary statements (GHS) : Obtain special instructions before use. Do not handle until all safety precautions have been read and understood. Keep away from heat, hot surfaces, sparks, open flames and other ignition sources. No smoking. Do not spray on an open flame or other ignition source. Do not pierce or burn, even after use. Avoid breathing dust/fume/gas/mist/vapours/spray. Wash hands, forearms and face thoroughly after handling. Use only outdoors or in a well-ventilated area. Contaminated work clothing must not be allowed out of the workplace. Wear protective gloves/protective clothing/eye protection/face protection. If exposed or concerned: Get medical advice/attention. If on skin: Wash with plenty of water. Take off contaminated clothing and wash it before reuse. If skin irritation or rash occurs: Get medical advice/attention. If inhaled: Remove person to fresh air and keep comfortable for breathing. IF IN EYES: Rinse cautiously with water for several minutes. Remove contact lenses, if present and easy to do. Continue rinsing. If eye irritation persists: Get medical advice/attention. Store in a well-ventilated place. Keep container tightly closed. Store locked up. Protect from sunlight. Do not expose to temperatures exceeding 50 °C/122 °F. Dispose of contents/container to hazardous or special waste collection point, in accordance with local, regional, national and/or international regulation. Spray pass: 2 spray passes each. 0.6 to 0.8 mil Evaporation time: 5 to 10 minutes / 20° C (68°F) Drying - Infrared appliance: 18 hrs / 20° C (68°F) or 60 mins / 60° C (140°F) IR: approx. 15 mins For best results, use the can at a temperature of 20–25°C and a relative humidity of 45–60% High humidity can cause the finish to lose gloss After allowing approximately 24 hours dry time, It may been polished by hand or machine. If possible, have this step performed by a professional with proper equipment. Shake the can vigorously for two minutes Remove the red button from the cap Turn the can upside down and attach the button to the pin on the bottom Press the red button firmly until it clicks into place Shake the can again for two minutes After activation, this product will last approximately 48 hours. Coat with a light coat of 2K catalyzed clear coat https://www.napacanada.com/en/p/MAX3680061 Wait about 5-10 minutes Coat with 2K catalyzed clear coat Check the surface Masking Thermal detonator: control panel is black. Reference: https://i.imgur.com/dHqmL0u.png, https://databank.501st.com/mw501/images/e/e4/TD_CROP_TLJ_PHAS.jpg Thermal detonator: right-hand recessed end cap is black. Forearm: Detail box includes black rectangle on small edge perpendicular and closest to wrist. https://databank.501st.com/mw501/images/4/4a/FOREARM_CROP_TLJ_PHAS.jpg Kidney: The large box has a small black recessed square on the lower left of the wearer. https://databank.501st.com/mw501/images/4/4c/ABS_CROP_TLJ_PHAS.jpg Chroming Duralumen spray instructions: https://youtu.be/0smZWrOxGMs From Lumin's Workshop: Apply using an Airbrush or HVLP touch-up gun, wearing an appropriate VOC / painting respirator. Use high pressure (~30PSI) and low paint volume (1/4 open on HVLP fluid needle or 1/18 open on airbrush). Spray approximately 8-12 inches away in fast, lightly overlapping strokes until the desired opacity and shade is achieved. It is recommended to stop every couple of passes and allow the Duralumen to dry for at least 5 minutes. Then buff with a clean microfiber cloth or blue shop towel to remove unbound dust particles and produce a high shine. Duralumen is very resistant to removal in this way. Working slowly in this method can allow you to work up to your desired shade and opacity. Leave Duralumen to cure for at least 8 hours prior to handling. If applying a clear coat, leave at least 24 hours at room temperature for full cure to retain maximum shine and reflectivity. Clear Coat Round 2 (OPTIONAL) Most people find that clear coat dulls the shine of chrome paint. You can decide whether you prefer high reflective shine or protection for your paint. That said, I'll be clear coating my finger and shoe plates because they're quite small and I find the dullness not as noticeable. Plus they will be the pieces more likely to see wear. !! CAUTION !! This is a hazardous material. If possible, have this step performed by a professional with proper equipment. Coat with 2K catalyzed clear coat https://www.napacanada.com/en/p/MAX3680061 -
Ashari's TLJ Captain Phasma Build Thread
Ashari replied to Ashari's topic in Captain Phasma Build Threads
2 - Materials & Supplies Armor List Black balaclava (Koa Ski Mask Pattern) Black undersuit From Geeky Pink: Strapping harness Neck seal Gloves Shoulder gaskets Elbow gaskets Knee gaskets Shiny Shorts Boots (Feel Grounds Chelsea) Cape (See Section 5 for build) 4.5m of black cotton duck cloth 1.5" wide leather strips Amazon Black Leather Strap Strip 1.5 Inch Wide 79 Inch Liquitex Gloss Heavy Gel Medium Michaels Canada Liquitex® Gloss Heavy Gel Medium Tulip Matte Fabric Paint in Red Michaels Canada Tulip Matte Brush-On Fabric Paint Belt Trooper Bay TFA Belt Sound system: SHIDU Mini Voice Amplifier Portable Rechargeable Bluetooth Speaker https://www.amazon.ca/dp/B08HQZL6DK Armor Jimmiroquai Helmet & Visor Chest & Back Kidney Thermal det Shoulders Bicep Forearm Wrist plates Hand plates & fingers Belt boxes Cod Butt Thigh Knee Shin Foot plates Materials PPE Respirator 3M Half-face quick mask respirator Goggles Nitrile Disposable Gloves Costco Canada Nitrile Gloves Coveralls XL Disposable Coverall Assembly Materials Hot glue gun Heavy Duty Snap Pliers https://www.amazon.ca/Fasteners-【Upgraded-Version】Snap-Fastening-SewingTarps/dp/B0C532Y22F Air compressor HVLP Paint Spray Gun Airbrush Rotary Tool Needle files Precision needle files Princess Auto Curved Precision File Set E6000 CA Glue Clamps of various sizes Black Felt 1” black webbing ⅝” black snaps 2” black elastic 1” & 2” black hook & loop Black styrene or ABS strips Black Gaffers tape https://www.amazon.ca/dp/B00VVHZZQU Weather Stripping Foam Tape 2 Inch Wide X 1/4 Inch thick https://www.amazon.ca/dp/B0747DK7HW Chicago Screws https://www.amazon.ca/dp/B07CYYGWC9 Sandpaper (250, 400, 600, 800, 1000 - wet sand) Bondo Glazing spot putty tube Milliput BC Hobbies Black Milliput Tack cloths Bondo Tack Cloth Dupli-Color Grey filler auto primer https://www.canadiantire.ca/en/pdp/dupli-color-scratch-filler-auto-primer-11-oz-0471019p.html Dupli-Color Black sandable filler auto primer https://www.canadiantire.ca/en/pdp/dupli-color-sandable-auto-primer-0471012p.html Grey Plasti-dip !! CAUTION !! THIS IS A HAZARDOUS CHEMICAL 2K Clear Coat https://www.napacanada.com/en/p/MAX3680061 DURALUMEN Chrome Paint – TheDigitalArmory DURALUMEN Chrome Paint – 1 Litre Small Bits Helmet Frown Mesh Helmet Frown Fabric - Black cotton double gauze Helmet Padding - Tactical Helmet Pads https://www.amazon.ca/dp/B0C3GJ7N41 Helmet fan - DC Brushless 5v Blower style https://www.amazon.ca/dp/B07V2KVQB7 Chest Mesh - UkswrathsSpeciality FOTK Chest Mesh & Gaffers Tape Extra 3D printed greeblie clips - MrPoopie/TheRascalKing's TFA & TLJ First Order Stormtrooper Greeblie Pack Holster Ball Bearing 3mm x 7mm x 3mm https://www.amazon.ca/dp/B07FW18RQY Transportation Bin DEWALT Tough Chest 38-inch 238.5L Mobile Tool Box (HomeDepot) SunGlo Soft Foam Cushioning 18 X 18 X 3 Inches (Walmart.ca) Foam Camping Mat (this might not be for sale any more) hometrends Plush Velvet Blanket, Queen size (Walmart.ca) Random foam I had around the house from other projects Multi-Tool (RYOBI 18V ONE+ Lithium-Ion Cordless Multi-Tool) Any long bladed cutting tool (Olfa Heavy-Duty L-1 Cutter 18-mm ABS Plastic and Stainless Steel - Yellow) So much hot glue Armor Protection 3m velvet chenille with sherpa backing Fabricland Blanketing -
Ashari's TLJ Captain Phasma Build Thread
Ashari replied to Ashari's topic in Captain Phasma Build Threads
1 - References CRL: Captain Phasma TLJ CRL Captain Phasma Costumers group on Facebook How to put on a Screen accurate Captain Phasma armor! #captainphasma - Adventures of a Stormtrooper Build Threads: Indie's TLJ Phasma Build Sea Marshall TFA Phasma Build Ukswrath FOTK Build Darth Biscuits Rogue One Build The Rascal Kings Build Captain Drydock FOTK Build (youtube) Individual Pieces Threads: Hard plastic lens attatchment help needed... General Trooping Stuff: How to DIY USB Helmet Fans USB Fan Kits Best Cosplay Voice Amplifiers for Masks/Helmets: Shidu S617 vs Norwii S368 'Mini' (youtube) DIY Sanding Box: https://www.instructables.com/DIY-Indoor-Sanding-Box/ Duralumen spray instructions: https://youtu.be/0smZWrOxGMs Chrome Paint videos Spray Paint Chrome Showdown Revell Rustoleum Duplicolor Krylon IronLak Review Scale Model How To - hpiguys Workshop Testing Revell Chrome Spray - Is It Worth $35 ?? - Barbatos Rex Testing Different Chrome Spray Paint - Barbatos Rex AK Super Chrome: My First Impressions #akinteractive #superchrome #modelcars #modelcarbuilding - Time Machines Scale Models Comparing Alclad and Duralumen Chrome Paints. - gordontarpley Will Duralumen Paint hold up to handling without a topcoat? - gordontarpley How to Paint with a Spray Paint Gun (& Air Compressor) HVLP Spray Gun Basics- How To setup - Tom Stringham How to Setup your Paint Gun to Spray a Car Guide! - Paint Society How to use a paint spray gun. Vaper HVLP gun in this video - backyardmech Cleaning an Airbrush How To: Cleaning the Airbrush - The All-In Nerd Hobby Cheating 213 - How to Clean Your Airbrush Fast - Vince Venturella Cleaning Airbrush Between Colors // Quick Tip Airbrushing - Baker Builds -
I'm well on my way through constructing my Captain Phasma costume, but I was encouraged to share the planning and building notes I've done so far! So... here we go! I'm going to try to break out each piece into a new post to keep it a little more organized. Notes about me: From Canada, so a lot of vendors are going to be Canadian 182cm tall (just over 6'), but most of my height is in my legs - I have a short torso 93kg (about 205lbs) 1 - References 2 - Materials & Supplies 3 - Prep & Painting 4 - Assembly & Strapping 5 - Cape Build 6 - Transportation 7 - Getting Dressed
-
Requesting access please! ID 91385 https://www.501st.com/members/displaymemberdetails.php?userID=15687