

TK Monkus
-
Posts
313 -
Joined
-
Last visited
-
Days Won
2
Content Type
Profiles
Forums
Gallery
Articles
Everything posted by TK Monkus
-
 Hey Guys, So I have completed the main build and would like to join the legion! After suiting up I can see I still have many areas to work on (which I knew I would), but hopefully what I have will be ok for basic? Once I get basic I can then work on it from there (hoping to get to centurion). See below the info and pics. If you would like any others feel free to ask. Also see below areas I think/know there are issues. Problem Areas: Whole midsection needs to be tapered in on front and back. Looks too wide. I need to adjust forearm placement( strapping issue) Both sides of ab/kidney junction do not sit even. The kidney pushes up. (maybe add middle strap to the left side?) But plate overlap on sides and back of thighs. But plate back side snap area should be more tucked in I think? (maybe heat gun?) Think I need to add mobility cuts to backs of thighs and shins Trim down backs of shoulder straps? Sure there are more... Information Matthew Landes Southern California Garrison/Los Angeles Squad RS Props RS Props RS Props RS Props Imperial Boots Still waiting for blaster N/A 5'10 125lb ANH-S Thank you @gmrhodes13 @TKSpartan @justjoseph63 Thanks, M
 -
TK Monkus' RS Prop Masters ANH-S Build Thread (first build)
TK Monkus replied to TK Monkus's topic in ANH Build Threads
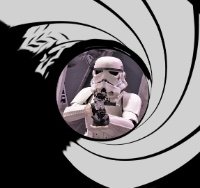
I put the second coat of blue on this morning and just pulled off the stencils. It looked almost perfect! There were a few spots where some of the blue came up with the stencil, but after minor touch ups I think it looks awesome! This means my bucket is now complete, which means my suit is now complete! I will let the touch ups dry a bit then do a full suit up for my 501st submission pics. Very exciting! This has been quite a journey. I know it is not done yet as I have some tweaks to make here and there and will tackle those, but it feels good to have a presentable suit in time for Celebration! (and hopefully by then those tweaks will have been made as well). Thank you to everyone who has helped along the way, especially @gmrhodes13 @TKSpartan and @justjoseph63 . I will post up pics once I do my suit up, but for the tweaks and fixes should I post those here or make a new thread? Thanks, M -
TK Monkus' RS Prop Masters ANH-S Build Thread (first build)
TK Monkus replied to TK Monkus's topic in ANH Build Threads
Thanks Glen, I think it may just be the pic but I may try and scrape a bit off. -
TK Monkus' RS Prop Masters ANH-S Build Thread (first build)
TK Monkus replied to TK Monkus's topic in ANH Build Threads
Put the first coat of blue on the tube stripes. I followed the recommendation of @justjoseph63 and @gmrhodes13 and did a couple coats of white first. I'll let this sit overnight then put on the 2nd coat tomorrow. I also painted my ab buttons. I painted them so they dont go all the way to the bottom of the button, but how do they look? Do they need any added or taken away? I think they look pretty good. Thanks, M -
TK Monkus' RS Prop Masters ANH-S Build Thread (first build)
TK Monkus replied to TK Monkus's topic in ANH Build Threads
After a few minor touch ups I am pretty happy with how the stripes came out. Now for the tube stripes...wish me luck. Thanks, M -
TK Monkus' RS Prop Masters ANH-S Build Thread (first build)
TK Monkus replied to TK Monkus's topic in ANH Build Threads
Rubbed off the black outlines and had them repainted by my cousin who is an artist. Very happy with how she did! I also touched up my left ear. I ordered stencils for my tube stripes and they came with ones for the traps and tears as well so I will hopefully get those on tonight. Thanks, M -
TK Monkus' RS Prop Masters ANH-S Build Thread (first build)
TK Monkus replied to TK Monkus's topic in ANH Build Threads
Installed Thanks, M -
TK Monkus' RS Prop Masters ANH-S Build Thread (first build)
TK Monkus replied to TK Monkus's topic in ANH Build Threads
Thanks as always Glen! M -
TK Monkus' RS Prop Masters ANH-S Build Thread (first build)
TK Monkus replied to TK Monkus's topic in ANH Build Threads
While I am waiting for some paint to dry figured I could attach my holster to my belt. I saw it needs to be about 20mm from the edge of the belt and about 25mm gap from the bottom. RS has marked some points on the back already, but they are a bit off those numbers. The distance from the edge is about 35mm. How strict are the numbers here? Do I need to have it exactly 20mm from the edge or is that 35mm point ok? I will also need to cut the tops of the holster straps down as when it is 25mm from the bottom they stick out. Just want to make sure my numbers are correct before making any holes or cutting. It will then be secured with snaps on the back and a rivet on the front. See pics below. Thanks, M -
TK Monkus' RS Prop Masters ANH-S Build Thread (first build)
TK Monkus replied to TK Monkus's topic in ANH Build Threads
Thanks Glen! Will modify and post back. Thanks, M -
TK Monkus' RS Prop Masters ANH-S Build Thread (first build)
TK Monkus replied to TK Monkus's topic in ANH Build Threads
I added the black outlines and painted the vocoder. Apparently I do not have steady hands haha. It was not easy and there were many wipe aways and retries. I think it came out ok, but think I need to go back and do them again. They look a bit thick to me and think I need to redo the outline of the tears as it looks like there is more of an inward curve? I do think the vocoder came out alright though. See pics below. Thanks, M -
TK Monkus' RS Prop Masters ANH-S Build Thread (first build)
TK Monkus replied to TK Monkus's topic in ANH Build Threads
Thanks Mario! Thanks, M -
TK Monkus' RS Prop Masters ANH-S Build Thread (first build)
TK Monkus replied to TK Monkus's topic in ANH Build Threads
Thanks Joseph. I moved the current padding more towards the back and it seemed to help lower the helmet which as you said makes it look better and I can see better. Will probably play with it some more. Thanks, M -
TK Monkus' RS Prop Masters ANH-S Build Thread (first build)
TK Monkus replied to TK Monkus's topic in ANH Build Threads
Grey paint on. I did about 3 coats on each part (2 on the ear). I figure the black line will clean up the edges of the areas as they are a bit unkept as of now. I think the teeth look ok, but if anyone sees any areas that need cleaning please point them out. Thanks, M -
TK Monkus' RS Prop Masters ANH-S Build Thread (first build)
TK Monkus replied to TK Monkus's topic in ANH Build Threads
The helmet is fully assembled! @TKSpartan I know you had recommended lowering the brow to fit more into a stunt build (which I know is correct), but if it is ok and will still pass I would like to keep the lower brow. I just like the look better. I am going to probably try and get something other than the yellow foam at some point but it works for now. I am also going to try and get some mesh for the frown. The lens is not permanently secured yet. I will probably do a mix of what @justjoseph63 recommends with the SUGRU and what the RS videos recommend after I paint. Now off to start painting! Question: Is it normal to not really be able to look at the ground while you have the helmet on, or should it be tight enough that when you tilt your head down you should see the ground without having to hold the helmet in place? @justjoseph63 lens attachment Thanks, M -
TK Monkus' RS Prop Masters ANH-S Build Thread (first build)
TK Monkus replied to TK Monkus's topic in ANH Build Threads
Completed mic tips. Thanks, M -
TK Monkus' RS Prop Masters ANH-S Build Thread (first build)
TK Monkus replied to TK Monkus's topic in ANH Build Threads
Thanks Glen. For some reason that first pic you sent didn't come through, but those others are great. Thanks, M -
TK Monkus' RS Prop Masters ANH-S Build Thread (first build)
TK Monkus replied to TK Monkus's topic in ANH Build Threads
Painted the mic tips black and can tell they definitely need something on the tip. So my new question is: Question: will the grey I have for the traps and tears work or do I need to find a silver? Thanks, M -
TK Monkus' RS Prop Masters ANH-S Build Thread (first build)
TK Monkus replied to TK Monkus's topic in ANH Build Threads
Installed the "S" trim on the bottom of the helmet. Changed the position 3 times before deciding to have the join just under the R mic area. Seems to be the spot best concealed. I tried under the vocoder and thought you could still kind of see it. Going to paint and install the mic tips, lenses, and chin strap. Question: Should I/do I need to paint the tips of the mic grey? They are currently a creamy white (as you can see in the pic below). When looking at screenshots they seem to be a silvery color though...I am going to paint the outside black and will leave the tip as is currently to see how they look. Thanks, M -
TK Monkus' RS Prop Masters ANH-S Build Thread (first build)
TK Monkus replied to TK Monkus's topic in ANH Build Threads
Thanks Mario. -
TK Monkus' RS Prop Masters ANH-S Build Thread (first build)
TK Monkus replied to TK Monkus's topic in ANH Build Threads
Just attached the right ear. On to trimming the bottom and getting the S trim, mic tips and lenses on. Thanks, M -
TK Monkus' RS Prop Masters ANH-S Build Thread (first build)
TK Monkus replied to TK Monkus's topic in ANH Build Threads
I have attached the left ear and all screws are countersunk. On to the right side! Thanks, M -
TK Monkus' RS Prop Masters ANH-S Build Thread (first build)
TK Monkus replied to TK Monkus's topic in ANH Build Threads
Thanks Caleb, I think I will try a small notch then screw in the top screws and fine tune a little after that. See a picture of where the current dimples are in pencil. I think I need to maybe move them where the red dots are to line up more? The top one seems a bit high and the bottom seems a bit to far over to the left. Thanks, M -
TK Monkus' RS Prop Masters ANH-S Build Thread (first build)
TK Monkus replied to TK Monkus's topic in ANH Build Threads
I have trimmed the left ear to about where I like it. I think I can try and lessen that gap a bit more in the front, but want to make sure I am positioning the ear correctly in the first place. Question: Does the placement look correct? I have it centered on the back trap line and follow that down at an angle. Can I trim some off the bottom or should I leave that extra on? Once the screws are in will some of the gap at the top round area be eliminated? Thanks, M -
TK Monkus' RS Prop Masters ANH-S Build Thread (first build)
TK Monkus replied to TK Monkus's topic in ANH Build Threads
Thank you Mario! I will probably end up placing them then taking pics and asking for confirmation here before screwing them in! M
