garydavis8
-
Posts
17 -
Joined
-
Last visited
About garydavis8

-
Thanks Joseph Ill try googlechrome, I think for comfort it wong be too bad as there is material on the back. I'd be more worried about the latex melting in the heat or becoming sticky. In the past for fixed models Ive dealt with this by doing a last coat mix of pvc/latex and water which protects it a bit more, but I worry that if I get the mix wrong it may be too rigid and unconfortable.
-
So as Im on the wait list for an ATA bucket and kit I thought I'd have a look at some of the things I can work on instead of climbing the walls waiting for the day I get that email to pay for my brown box One of the first things I wanted to look at was the neck seal, I've seen some great ones here and will probably buy one in the future but most seem to be all textile where in the movies they appear more rubbery at the top, so I thought why not have a look at what I can do. I started with some material( old black jogging bottoms) and some rubber string that I have from another project Cant upload photos for some reason so heres a link to photobucket ---------- I thought to see if I could sew them together but too small and fragile so I put material behind them and sewed them to it ( to be taken off later) then I put on a layer of latex to keep the plastic effect. Heres where I made my first mistake my latex was too thick and lumpy, make sure there are no lumps and if necessary add water to the mix, a little at a time, too much and its useless. So rather than abandon the project I cut off the material at the back glued some to the side that looked bad and then latexed the new front side, a few coats later and I was pleased with it. Trying it on I noticed it was a bit just, a bit of advice do it longer and then cut to size. I made the attachment to connect the back ( the version in the photo was just a test to fix, I will make a neater, larger version a bit later) now I had to do the rest. Here I cheated a bit( ok a lot) I took an old t shirt and cut it to size then added velcro, I haven't decided if to cut it at the back to make it easier to put on with velcro and such. Also by attaching it to the rubber part by velcro it's easy to remove and wash later on. So there we are, before I do any final changes I thought I ask here for advice, if it will be acceptable( after being tidied and finished) I thought for the back attachment on the rubber piece that I could do it in black elastic but I don't know if that's accepted in the 501( yes I need to look at the photo guide again ) Ps if the photo link doesn't work Ill try again but if anyone can tell me how to put photos directly on it would be appreciated ( tried on my phone and my ipad)
-
Anyone got the link to where you buy the hytek unit, cant seem to find it to have a look?
-
Good thread, will help a lot. I thought I was just terrible, )
-
Oh thanks for the advise bones, I actually didnt dremmel the teeth it's all done by my craft knife, I did go back and clean it up a bit but as I said before the detail on this bucket around the teeth area was pretty poor and I tried to use the minute ridges it had, still good practice for a decent bucket to come. Ps has anyone else tried the pvc cheesecloth solution? If so which is better more practical? As this one is more than likely going to be a model and/or a plaything for my son I decided to go with the pva, but Im not sure if it would stand up to trooping? Gazza D "A dark man with a light heart, one very confused jedi." Sent from my iPad using Tapatalk
-
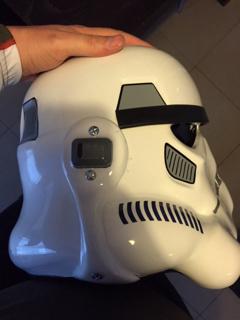
Ok there are other photos but for some reason some are too big no matter what I do! Time for a break I think. Anyway after two coats plus painting the support black I was quite pleased but in putting the hard hat support in some of the paint came off so I will have to give it a last coat to get it 100 percent(ocd). Looks much better especially around the bottom of the ears where you no longer see the gap. I also tried something from another thread putting a bit of plastic pipe in the bottom which looks pretty good, just a few last bits to do, paint screws white, repaint black parts which I scratched and put in velcro for the piping ( so as I remove if I change my mind) and for the padding at the side. I have to say that I think its not come out too bad in the end, my son loves it calling it his helmet so thats cool as Im looking forward to getting my hands on the my ATA bucket and kit some time in the future. Just wondering how the hell I could fit in a fan(s) and microphone/sound effect system in this bucket or any as there really doesnt seem to be much/any space, ah well that's part of the fun Gazza D "A dark man with a light heart, one very confused jedi." Sent from my iPad using Tapatalk
-
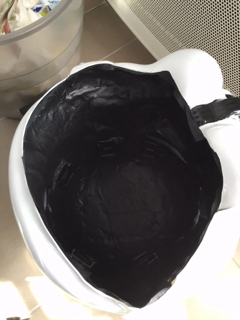
Next came the inside, wanted to do the whole cotton mesh thing but decided to go with a pva glue water mix as in some areas the plastic is a little thin and felt this might strenghen it a bit, just before doing this I added the 'hard hat attachements to add the support in later. Gazza D "A dark man with a light heart, one very confused jedi." Sent from my iPad using Tapatalk

-
I also painted the teeth decals as they were a bit lacking and put the mesh behind them, apparently the photo wont upload will try again later Gazza D "A dark man with a light heart, one very confused jedi." Sent from my iPad using Tapatalk
-
Whoops still have to paint the screws white! Gazza D "A dark man with a light heart, one very confused jedi." Sent from my iPad using Tapatalk
-
Gazza D "A dark man with a light heart, one very confused jedi." Sent from my iPad using Tapatalk
-
So As I said I wanted to work more on this bucket to test out a lot of things I saw on the website, first thing I did was sand the ears, they're better but because the helmet arrived trimmed too short and theres space at the bottom each time I correct it it never goes back exactly the same and some of the plastic is a little brittle. I did paint the ear pieces but as I didnt want to risk taking them off yet again it was a pain in the @@@@ to do, they came out ok Gazza D "A dark man with a light heart, one very confused jedi." Sent from my iPad using Tapatalk
-
Zarlon's First ANH Build Thread (ATA)
garydavis8 replied to Zarlon's topic in Build Threads Requireing Maintenance
Nice, looking forward to following your progress Gazza D "A dark man with a light heart, one very confused jedi." Sent from my iPad using Tapatalk -
Thanks Locitus I actually didnt know that, ( amazingly in all the threads vids etc Ive watched Ive never heard that ) even doing that I find it a little snug on the nose maybe I just have a big hooter Gazza D "A dark man with a light heart, one very confused jedi." Sent from my iPad using Tapatalk
-
Oh Gazmosis one last question, are all helmets so claustrophobic? Ive seen the stuff other people have put in theirs and apart from a bit of foam mine is quiet tight, so tight in fact I have to squeeze the sides in to get my nose in! Ive measured the dimensions at the bottom where my head goes in and it's 26cm wide (10.2") and 18cm long (7").
-
Thanks Gazmosis I have actually bought my first dremel and will try out the sanding feature before letting loose on the ATA kit( used the drill feature and almost pierced my living room table ) Ive seen your advice on other threads and have some of it noted down started a little bucket note book. Im looking at trying an e11 home build but also have a email notice for doopydoo just in case. Im going to do the fabric belt myself( old hand at sewing after doing my rebel legion jedi costume) as I want to get ahead whenever possible. I also think I may do the holster myself Do you know the dimensions or where I might find them? I can probably do it myself once I make/buy the E11 but hard facts make it a lot easier. I'll finish by thanking you again because Im sure I'll have lots of questions in the future, I love this hobby but I think It brings out my ocd, got to remember to take a break next time to take a few more photos. Gazza D "A dark man with a light heart, one very confused jedi." Sent from my iPad using Tapatalk