

Moussvroum
-
Posts
79 -
Joined
-
Last visited
-
Days Won
2
Content Type
Profiles
Forums
Gallery
Articles
Everything posted by Moussvroum
-
Today I’ve worked on the handle. First challenge was to reconstruct the puzzle. Then assembling was easy. I’ve glued the selector to prevent it from rotate when moving the lever. After that, I’ve had some difficulties to assemble the two parts of the handle (left and right). So I’ve to trim a little the right part and the trigger guard (in red). Everything went fine and I was to finish by fixing the plastic cross to the aluminum part with the transverse screw. My mistake was not to clean the screw thread. May be some little aluminum parts were lying here : my screw was jam and I’ve destroyed in when removing it. Fotunately it didn't broke in the thread ! The thread wasn’t in a good shape but I’ve rebuilt it. Will ask Chris to send me a new transverse screw. So, one advice : clean the thread before screwing !
-
Today I’ve begun the assembly off the magazine. I’ve cut and sand the little parts of metal (scalpel and Dremel). I advise you to test the threads before assembly to remove the small pieces of metal (I’ve used WD40 to help). I’ve cleaned the aluminum parts with a toothbrush and washing-up liquid. I’ve cleaned the real steel magazine with WD40 and a toothbrush. Under the dirt I’ve found a little text. I was so happy ! I’m looking for something to remove the rust. I’ve assembled all the parts (I followed Chris tutorial here) There was just a little problem. The holes off this part were slightly misaligned, so the screw can’t be tight completely and the retention lever can’t move. I’ve decided not to tight to much in order to make the retention lever working. The mag catch makes a beautiful “clic” when you insert the magazine. Finally, the result is very good. I’m very satisfied with it.
-
Thanks all ! (p4ntb0y, you won't regret it )
-
I also thought it would never pass the french custom but it did. The European laws are strict about guns, even with replicas ... The seller is using fedex. The shipping is so fast that I doubt the custom have time to inspect the parcels ...
-
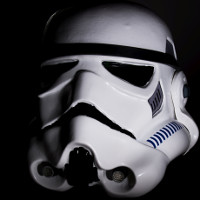
The assembly instructions were in the photo ! ( round in the aluminum pipe tube ). They are also here Thanks p4ntb0y and T-Jay (I think some parts on my first blaster are from you ). As you've seen on Flirck, I love stormtroopers helmets
-
Hi, I recently bought a complete E11 blaster kit from Chris Fieldmarshall (sterling replica, M38 scope and rail, T racks, Hengstler counter, sensor type A, real sterling mag). It was quite complicated to import it in Europe (I'm French) but it's finally at home ! This kit is absolutely incredible and I can't wait to start assembling it. It's a long journey that begins and I want to share it with you. I send a friendly greeting to Chris with whom I had very good conversations on the phone and on the web! Thanks again to you!
-
Thanks ! This helmet is one of my favorites !
-
Many thanks all ! Will need more room soon ;-)
-
Hi, I just finished a Stormtrooper Hero helmet and I want to share it with you. It’s a Dark Agent kit. - ABS 2mm, - 3 sets of teeth either side of the frown, - only 2 screws and 3 bumbs per ear, - green acrylic bubble lenses, - riveted and screwed like the originals, - hand painted with accurate colors (Humbrol Enamel, gloss black for the vocoder, « bleu de France brillant » for the tub strips, « Gris amiral » for the rest), - accurate U brown trim ans S neck trim, - mic tips in resin (black satin), - straps from TB, - foam found in a sewing shop, - Novus n°1 polish.
-
- Have fixed the mic tips, put the U brown trim, screwed the ear. The screws are painted in white. - S neck trim - Have put the acetate green film for lenses. It's not easy to fit - Foam (canvas from Whitearmor forum ), straps (from TB). The result is not perfect but the overall is good. The paint job was difficult. I don't know if I'll do some weathering ...
-
First a picture of the inside : red oxydine + white + green HDPE = dirt pink. Like the original Today I've done the paint details : - vocoder in gloss black (Humbrol Enamel), - grey on the temples and the the dome (3 layers) + details in black, - removing the mic tips template : it was easy but the teeth are not perfect ... As we say in France "Le mieux est l'ennemi du bien", "Better is sometime worse than good" . I've decided to keep it like that.
-
Painting details ... I'm not very happy with the white color. Not as glossy than I thought. May by because I usually work on ABS helmets. Wondering if I should apply a glossy coat when finished (but it won't be accurate ... ). Never mind, I've started painting details. Even with a white paint on it, HDPE is difficult to paint ! It'll need two layers. I used a masking template for the strips (13 teeth on the right, 14 on the left). We'll see when I'll remove it ... Colors : - Humbrol Enamel 20014 "Bleu de France brillant" - Humbrol Enamel 20005 "Gris amiral brillant" I confirm that the paint is fragile. A little piece have gone near the right ear when I removed it ... (but it's accurate !!! )
-
Mic tips are in resin. A friend a mine give me them a long time ago ...
-
In natural light ...
-
Hi everybody, I've found some time to apply the white paint ( 4 layers of Rust-Oleum white gloss (distance: 25 cm, each layer is spaced from 10 minutes)). Now, It must drie ... (more picture in natural light soon ) I've a problem for the tube strips. I want to paint them and I usually use a masking template from TB but it's on ABS helmets ... If I do that on this one, I think the white paint could be remove when I'll remove the template. Any idea ?
-
Here is his FB : https://www.facebook.com/theshedofglitteringdelights/ In 1977 they used a brown primer before white painting.
-
Hello everybody, I want to share with you my last project which is the realization of a HDPE stormtrooper helmet. My goal is to make a helmet as accurate as possible. The forum helps me a lot because it is full of valuable advice and I want to thank you all ! I first trimmed and assembled the helmet which is a 2mm khaki HDPE kit from Dark Agent. HDPE is very easy to cut. I was afraid because I used to work on ABS helmets : you can cut HDPE like butter ! I’ve prepared the green acetate film, the S trim and U trim and the foam. I assembled the two parts with two rivets on each side. For the paint to hold, I first flame treated the helmet with a blowtorch and then I cleaned it thoroughly with ethanol. I’ve found this tip here. (Be careful not to use the torch next to ethanol!). Believe me, it's very impressive to pass a flame on his helmet! I applied 3 layers of Rust-Oleum red primer (distance: 25 cm, each layer is spaced from 10 minutes). First layer : Now I will wait a week that it dries. I also assembled and painted the mic-tips that are not those of the kit but those a friend gave me (I find them more accurate -Thanks Javier ). I used a black satin paint. Next time : the white paint ...
-
 The blaster I've ever looking for ! You're an happy man !
