GeorgePBurdell
-
Posts
43 -
Joined
-
Last visited


-
I aligned my strapping on the cod to where it's always tucked up and under the ab plate
-
SEANTX AM 2.0 Stunt
GeorgePBurdell replied to SeanTX's topic in Build Threads Requireing Maintenance
I actually stuck the whole ear in the oven and heated it with the screws in place, then stretched it until the holes were aligned, and pushed it into place on the cheek to close the gap a bit. I don't think it would be approved for other approvals because it caused a little discoloration (which I covered with some paint), it softens the corners so they look rounded instead of crisp, and the circular portion of the ear became misshapen (ellipse instead of circle). I'm not sure about reforming the cheek, but I know we're not the only people to have this issue with the AM kit so maybe someone else has done it and posted their results. Good luck! -
SEANTX AM 2.0 Stunt
GeorgePBurdell replied to SeanTX's topic in Build Threads Requireing Maintenance
I had the same problem, so I heated the ear and reformed it to fit the helmet. It looks a little off but was good enough for basic approval Sent from protocol Android -
Cooling system for armor
GeorgePBurdell replied to GeorgePBurdell's topic in Boots, Soft Parts, and other Accessories
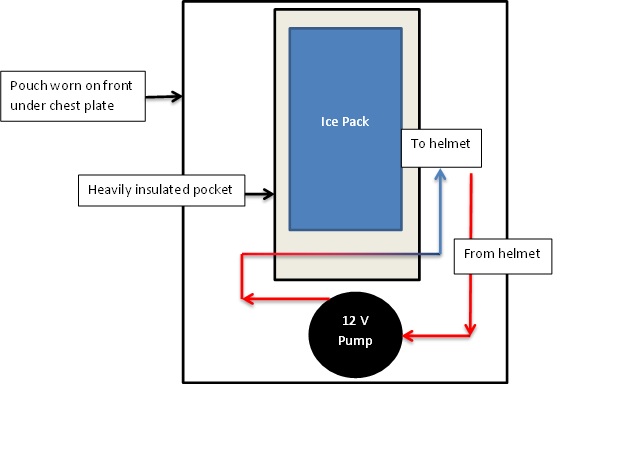
Here is a diagram of a simple system I'm buying parts for. Total cost: ~$45 Basically I plan on sewing an insulated pocket into a small backpack-like pouch I would wear under the chest plate of the armor. The insulated pouch would store one of those blue ice packs you put in coolers, and have a small tube running through the bottom. I would use a small water fountain pump I found to circulate water from the pump, through the cold pouch, into the helmet (with the tube running up the neckseal). The power would be provided by 2 battery packs stored in the back plate. It's not a perfect solution, but I think it should be good enough to last at least 2 hours, which is perfect for those short, outdoor troops. Pump on Amazon: http://www.amazon.com/gp/product/B00JWJIC0K/ref=ox_sc_act_title_3?ie=UTF8&psc=1&smid=A867P1BBKCZM8 Insulating fabric to make pouch from: https://www.fabric.com/buy/0328317/insul-shine-22-mylar-poly-batting I think in future iterations of this I will try adding thermoelectric coolers (https://www.sparkfun.com/products/10080?gclid=CjwKEAjwwZmsBRDOh7C6rKO8zkcSJABCusnbdNDaIFHtudeI67r9AH2CpwLJdrL1IWQuN2YeSfHGeBoC01nw_wcB), and maybe switching the water with something closer to engine coolant (if the system doesn't leak on me of course). I will hopefully have the parts soonish... I'll definitely be sharing the results here when I finish it though!
-
Cooling system for armor
GeorgePBurdell replied to GeorgePBurdell's topic in Boots, Soft Parts, and other Accessories
I guess I should clarify haha... This is in addition to keeping hydrated. -
Cooling system for armor
GeorgePBurdell replied to GeorgePBurdell's topic in Boots, Soft Parts, and other Accessories
One idea I had for getting rid of heat from the torso was to have tubes run up into the helmet under the neck seal and use fans to cool whatever fluid and blow excess heat out the various holes in the helmet. You could also potentially have it vent out through the fabric of the under suit in exposed areas such as the shoulders or neck area -
Has anyone tried making (or found a commercially available) cooling system for your armor? Not just fans in the helmet, but something that actually can lower the temperature inside the torso and helmet areas? I've found some vests that can do that, but they run off of backpacks that are too big to fit inside the armor and are about $600....
-
TK13779 requesting 501st access. Thanks! http://www.501st.com/members/displaymemberdetails.php?userID=18671
-
Got accepted into the 501st! TK 13779!
-
Last update for a while. But first thank you all for following my progress and offering your help! It's been a fun few months and I look forward to applying to the 501st and getting out there! I finished my holster up, pretty sure I did it right. I followed the measurement charts on everything. I trimmed the tops of the shin backs. I know it's not screen accurate, but it seriously improves knee flexibility so I can go up and down stairs and even sit! Added snaps to the shoulder straps to help reinforce them. They also help pull the chest piece up so it sits a bit nicer I think. I trimmed the bottom edge on the back plate. It was originally curved at the bottom but after studying the screen shots I found that this bottom edge is supposed to be straight. Here's some full body pictures. Notice the chest plate has also been trimmed a few inches on the sides. Also notice the boots, which finally came in from Imperial Boots. Realized after taking this picture that I made this same pose before... I apologize for that... Now I'm just waiting for a blaster! I'm looking to get a doopydoo's resin kit, but they haven't been in stock for a while now... If anyone knows where else I could look for a blaster that would be greatly appreciated.
-
FINALLY have something to show! After doing research and a convenient Tandy Leather sale, I found the appropriate leather to get started on a holster. Turns out leather work isn't my best area of expertise. Took me 2 tries to get it good enough... Still far from perfect, but I'm happy with it. ALSO I got my boots! Forgot to take pictures of them, but I'll include them in a future set of pictures. After I finish the holster all I have left is finding a blaster.
-
3D Printing ANH armor (Feedback please!)
GeorgePBurdell replied to Neb Sgird's topic in Build Threads Requireing Maintenance
In my personal experience 3D printing, you would only be able to print small sections of each part then glue them together. Most 3D printers will also leave a really bad surface texture so you'd have to either used them as vacuum forming molds OR chemically treat them (if it's ABS printed that is). I'd probably only recommend it for printing blaster parts (especially if it's free for you) -
Finally made some more progress. I made a simple PVC stand for the armor, so it's not taking up half of my apartment anymore. I remade the belt, this one is much longer and made with a heavy duty thread, so it should have better velcro grip and be more durable, and I added some line 24 snaps to the ab plate for better support. I also added actual snaps to the posterior plate. I replaced the elastic straps around the shoulders with something more accurate. I also replaced all of the stick on velcro with sew one, as they kept falling off of the elastic. Trimmed the thighs down a bit. In this picture, the one on the right (the left thigh piece) is trimmed while the one on the left is not to show before and after. Here's a comparison of before (left) and after (right) when being worn. The most notable difference in size is around the knee area, but you can also kinda see that the curvature of the thighs and shins now lines up a bit better. I'll be adjusting the padding on the inside to get the knee plate on the left shin to stop going under the thigh.
-
I actually used my oven, set at 225. But be careful if you do that. If you leave it in too long it will sag a bit, or you can potentially get bubbling if your ABS has been exposed to moisture. It's a common problem with 3D printing...