


TKheehaw
-
Posts
134 -
Joined
-
Last visited
Content Type
Profiles
Forums
Gallery
Articles
Everything posted by TKheehaw
-
Does anyone have more detailed pics on how / where to attach the "bicep-forearm" strap?
-
TK HeeHaw ATA ANH Stunt Build.
TKheehaw replied to TKheehaw's topic in Build Threads Requireing Maintenance
Thanks for the input! The strap width would be easy to change out, so no prob on that. In reference to glen's pic, my inner boxes look a bit weak compared to the STD. Will change both. -
TK HeeHaw ATA ANH Stunt Build.
TKheehaw replied to TKheehaw's topic in Build Threads Requireing Maintenance
Almost forgot. Thanks to Darman in the metropolis of JAX for the holster! -
TK HeeHaw ATA ANH Stunt Build.
TKheehaw replied to TKheehaw's topic in Build Threads Requireing Maintenance
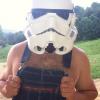
And thanks to Walt for the TK kids kit! Here is a pic of the kids helmet beside the newer ATA. -
TK HeeHaw ATA ANH Stunt Build.
TKheehaw replied to TKheehaw's topic in Build Threads Requireing Maintenance
The canvas portion of the belt was "home made" from white canvas from a local fabric store. The ammo pack was attached to the belt with heavy duty snaps and the covers glued on with Zap a gap. Closer view... And here is the back side showing the ammo pack attachment. -
TK HeeHaw ATA ANH Stunt Build.
TKheehaw replied to TKheehaw's topic in Build Threads Requireing Maintenance
The bends were pretty easily done with a kerosene shop heater, a good vise, leather gloves, and a 2' section of RR iron. Pretty happy with how they turned out. After they came out of the shop, 2 small sections of white velcro were attached to the back of the clips to prevent armor scratching. -
TK HeeHaw ATA ANH Stunt Build.
TKheehaw replied to TKheehaw's topic in Build Threads Requireing Maintenance
And the thermal detonator: Could not find 1" Aluminium 1/16 thick bands from any where around so I had to use 1 1/4 angled and cut it down. The grizzly saw came in handy, but I had to be careful with the Al chips flying back and went nice and slow. And of course, used the proper PPE to prevent eye injuries. Actually it probably would be a good idea to use a face shield. Just an FYI. -
TK HeeHaw ATA ANH Stunt Build.
TKheehaw replied to TKheehaw's topic in Build Threads Requireing Maintenance
And have been working on the strap system. I don't have a pic of the harness just yet, but a "Thanks" goes out to Osothebear for his pics and advise. I doubled up the strap to give a bit more support, but the pics don't show it very well. -
TK HeeHaw ATA ANH Stunt Build.
TKheehaw replied to TKheehaw's topic in Build Threads Requireing Maintenance
And back to the build.... Here is a pic of the painted ab bottons.... I used Hombrol #14 French Blue. -
Shoulder Strap question....
TKheehaw replied to TKheehaw's topic in Build Threads Requireing Maintenance
Thanks Guys! Looks like I may have been over thinking this. -
In the process of building a ATA kit and would love to have a more durable set-up. One of the weak points in daily wear and tear is the shoulder straps. Seems like the elastic would wearout easily then in turn crack the plastic straps over time. Doing some reasearch, I came across this web site.http://www.legionxxiv.org/starmormods/. TD 124 seemed to have a pretty good solution for this. But I would like to submit for Expert Inf. when 501st approves. So the rivets are out of the question, per http://www.501st.com/databank/Costuming:TK_anh_stunt. Thought about subing in white leather for the elastic, attached w/ velcro to satisfy the level 2 requirements. Any body got any other solutions, ideas, comments????
-
HOW TO: Paint Handguards - Another Option
TKheehaw replied to gmrhodes13's topic in Tutorials, Tips and HOWTOs
Thanks you two for posting on painting hand guards! Was wondering about how to do that. Will probably try the print screen paint method first. -
TK HeeHaw ATA ANH Stunt Build.
TKheehaw replied to TKheehaw's topic in Build Threads Requireing Maintenance
It is a matter of preference. Gazmosis, in the next post, is correct that CA's are much less forgiving than E6000. CA (cyanoacrylates) are basically super glues and set up like a rock, but on the other hand E6000 is formulated to have some flex to it and the tech sheets state a shore A hardness of about 80 (stiff rubber). I've used E6000 on my e-11 resin project and you can cut into the "glue" to free up parts and re-glue if nessasary. E6000's main chemical, tetrachloroethylene, is actually used in the dry cleaning industry heavily and it probably slipped into the adhesive industry by mistake. But it is still pretty good for more non-permantent bonds. I tend to over do things, so the more permanent CA's are in line with the way I do things. And Gazmosis is correct again, that you have to know just where you want things to go before you start applying the CA's. And be prepared to lose a few layers of skin off your finger tips. I've tried zip kicker and it will make the CA's even less forgiving. CA's are normally moisture activated and atmospheric conditions can effect how quick the glue sets. Presently, in my area of the US, the relative humidity is pretty low, so I have decent control of the set time. There are also a few spots I'll have to touch up due to some wayward CA drips. Thankfully some decending grit sandpaper, Novaris polish, and elbow grease will take care of those. -
TK HeeHaw ATA ANH Stunt Build.
TKheehaw replied to TKheehaw's topic in Build Threads Requireing Maintenance
Thanks SCTrooper! IMG code from here on out. Was curious on which linked worked better for everyone. -
TK HeeHaw ATA ANH Stunt Build.
TKheehaw replied to TKheehaw's topic in Build Threads Requireing Maintenance
Ran across the motivation for building this and wanting to join the legion. http://i1287.photobucket.com/albums/a628/TKheehaw/MyMotivation_zps9a05ad22.jpg Maybe after the TK is done, a time to research the dark lord is in order. -
TK HeeHaw ATA ANH Stunt Build.
TKheehaw replied to TKheehaw's topic in Build Threads Requireing Maintenance
Assembled the greaves and thigh armor pretty much the same way as the forearm and biceps. http://i1287.photobucket.com/albums/a628/TKheehaw/FinishedGreaves_zpsca82f428.jpg http://i1287.photobucket.com/albums/a628/TKheehaw/FinishedThighs_zps8254faef.jpg One thigh seemed to be a bit longer than the other.... Any body else seen this or is it a common armor variation? -
TK HeeHaw ATA ANH Stunt Build.
TKheehaw replied to TKheehaw's topic in Build Threads Requireing Maintenance
cont. from above... was skeptical about which ones to buy, but took a chance and sent TKboots an email and they just happen to have my size! http://i1287.photobucket.com/albums/a628/TKheehaw/TKboots_zps90899f9c.jpgese These boots are REALLY comfortable! Everyone here on FISD talks highly about these things and now I see why. I normally stand all day and I wouldn't take issue with wearing these to work.... If I could keep them from getting botched up. So back in the box these babies go. -
TK HeeHaw ATA ANH Stunt Build.
TKheehaw replied to TKheehaw's topic in Build Threads Requireing Maintenance
And a pic of the Thermal detonator. A 2" grey conduit pipe worked perfect! So this one is on the slim end of the range for detonators. I think you can get them a bit larger on here, but this one that ATA supplied looks great and will do nicely. http://i1287.photobucket.com/albums/a628/TKheehaw/Thermaldet_zps20cefa52.jpg During the interim, I researched the boots required and -
TK HeeHaw ATA ANH Stunt Build.
TKheehaw replied to TKheehaw's topic in Build Threads Requireing Maintenance
Here is another pic of the glue up. http://i1287.photobucket.com/albums/a628/TKheehaw/Forearmglue-up3_zps103caf2c.jpg And a few of the final forearm and biceps all bound together chemically. http://i1287.photobucket.com/albums/a628/TKheehaw/FinishedForearms_zpsa36182ae.jpg http://i1287.photobucket.com/albums/a628/TKheehaw/FinishedForearms2_zps6470f801.jpg http://i1287.photobucket.com/albums/a628/TKheehaw/FinishedBiceps_zpsfe4dac57.jpg As usual, an constructive criticism is always welcome. -
TK HeeHaw ATA ANH Stunt Build.
TKheehaw replied to TKheehaw's topic in Build Threads Requireing Maintenance
Ok here is the missing empty box shot. http://i1287.photobucket.com/albums/a628/TKheehaw/smallbox_zps92e6dce1.jpg After all the initial trimming, finally started the task of gluing stuff. May have approached this a bit different (and slower), but it seemed to do OK. http://i1287.photobucket.com/albums/a628/TKheehaw/Forearmglue-up1_zpsb63827e3.jpg http://i1287.photobucket.com/albums/a628/TKheehaw/Forearmglue-up_zpsf09ac200.jpg Glued the inside strip of the biceps and forearms first and made sure the fit was going to be decent. Did have to trim some extra material off and align the opposing parts to be glued later. No pics of this, didn't feel it could add value to the post. -
TK HeeHaw ATA ANH Stunt Build.
TKheehaw replied to TKheehaw's topic in Build Threads Requireing Maintenance
Finished most of the trimming and still very impressed with ATA works material. Much easier to work with than MOT stuff. Will post some pics soon. BTW, what is the best way to post pics on this forum???? -
TK HeeHaw ATA ANH Stunt Build.
TKheehaw replied to TKheehaw's topic in Build Threads Requireing Maintenance
And the pic of the full suit pre-trimming.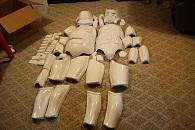
-
Starting our with the usual "box shot"... Couldn't wait so an opened box will have to do.
-
New ATA Helmet build and lessons learned....
TKheehaw replied to TKheehaw's topic in ANH Build Threads
Box arrived! Will post pics soon. Thanks ATA works!!!!! -
New ATA Helmet build and lessons learned....
TKheehaw replied to TKheehaw's topic in ANH Build Threads
Box arrived! Will post pics soon. Thanks ATA works!!!!!
