

Vader Rocks
-
Posts
500 -
Joined
-
Last visited
Content Type
Profiles
Forums
Gallery
Articles
Media Demo
Everything posted by Vader Rocks
-
Thanks for the words of encouragement Isaac. Was considering getting the belt and neck seal from trooperbay, I've read some pretty good things about his stuff, but not sure on where to get holster yet. I'll have to look into and send some PM's on those you suggeted. Figured i'll use some abs sheets to fill in side gap, but unfortunately only had enough to add to one side this evening. I'll have to make trip to hobby store tomorrow and snag some more. I was thinking side rivets were only required for Centurioun, is this incorrect?? My boots showed up the other day so hopefully I can get the accurate sizing for my shins now. I don't want to add cover strips, sniper plate and ammo belt without fitting them right first. Other forearm has cover strips drying and handplate experiment drying as well. Kidney and ab not attached yet to that's why it's sitting a little low (didn't know it was sitting low when pic was taken) Other than that, I think it's coming along quite well.
-
Thanks Isaac. Ill wait to cut the shins, but have a little issue with using the abs strips for the side gap, I used them for the cover strips on my limbs. I picked up some abs pieces from a local hobby store and was going to try using those. Not so sure how close the colors will be but I don't think i'll have to use too much of it so i'll probably try it out and see. After I finished the legs and had strapping done to hold thighs up. Yesterday after I got the bells and biceps situated. And these just arrived this afternoon Still need to round up my neck seal, belt and holster, but i'm getting closer
-
Hey Isaac. I did get back to my build tonight, no real new pictures to post though. I've been working on the webbing and getting everything attached. Pretty happy with the progress tonight and this past Sunday. I have to thank Brian for his suggestion, I had problems with the plastic snap plates not sitting flat on the armor, like the pic above so i used the webbing as my snap plates and it's worked awesome so far. All my limbs are done except for cover strips (which two biceps and a forearm are setup to dry this evening), kidney and butt plate are attached. I feel like i'm getting pretty close but I know there's gonna be those little things here and there that still need done. I need to make up shims for my ab to kidney plate caue i'm a little on the bigger side and i've got to figure out if i'm gonna trim the shins or not. After wearing them i'm wondering if they're too tall for me. I had to cut the top off of my thighs because they were too long for me so i'm thinking i've got the same thing going on with the shins. Anyone else have to do this???
-
TK-9492 Requesting ANH EIB Status[246][AM]
Vader Rocks replied to theisaac's topic in Request Expert Infantry Status
Looks good. Congrats on the EIB certification. Glad to see you made it. Been following your build and taking pointers for my AM. Hope to join the club with you soon. -
Thanks Brian. Didn't know if the webbing would be the correct way to go or not. I thought I had read that the webbing wasn't as durable as the plastic, like the webbing stretching out to much and causing fit issues. Do you think the snap melting armor thing is a concern with the materials i'm using for my build?
-
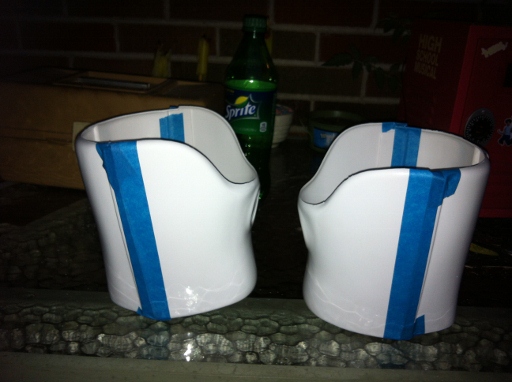
Made some pretty good progress this weekend I think. Arms and legs should be done aside from adding cover strips (though they did get measured out and cut today). Having a bit of what I'd consider an issue with the snap plates. I made the plates approx. 1" by 1 1/2", my issue seems to be that the thickness of the snaps are not allowing plate to make contact with the armor (i've added pics to hopefully help explain my situation). I've added the small piece of tape to the backside of the snaps as i've seen mentioned in another thread to keep from damaging the armor. Not sure if that is necessary or not. I'm using Line 24 Snaps from Tandy Leather, ABS armor and E6000 for my adhesive. Would this combination cause the armor melting issue??
-
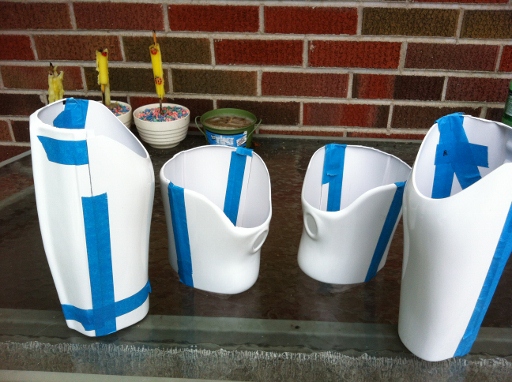
Hey all, got back to my build today. Working on thighs and shins, I went with the overlap method of assembly. I cut a 23mm cover strip to add to the front of the thigh, but not sure that it looks right. When the cover stip is added, the overlap is wider than the cover strip is (not sure if that make sense to anyone). Should the cover strip be made the width of the overlap??
-
Ab plate to Kidney plate gap
Vader Rocks replied to Vader Rocks's topic in Hard Armor (General Discussion)
Thanks for the tips everyone. I picked up some abs strips from the local hobby store. Was going to use them for cover strips, had them installed on one side bicep and forearm, and after meeting with local garrison member he thought better off to not use them due to color difference. Not sure if extra abs with the kit will take up enough of the gap. Do armor makers usually sell spare parts like Mark suggested or more likely to find something like that on the forum? -
Hey everyone, still working on my AM build. I'm a little on the bigger side and have more than the required 1/2" gap between the ab and kidney plates. Anyone else had this issue? What can I use to shim it up to make it accurate?
-
The measurements above are the width, not the length
-
Not much progress made recently on my build, but thought i'd share some of my new goodies with you all. Blaster, not sure of the maker, but I got the thumbs up from a local garrison member before making the purchase. New bucket arrived today. CAP purchased from FISD member, thanks again Joey.
-
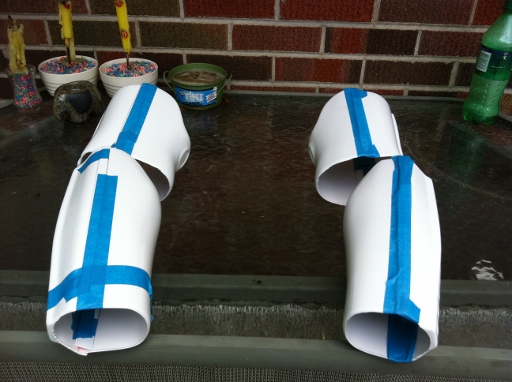
I've got my shins taped up, i'm pretty sure on the correct sides after going through the AM shin thread. I havent trimmed any of the the pieces and they seem like they'll fit perfect after I add velcro to secure the back. Is this normal or do they have to be trimmed to add front cover strip. I've already done butt-connections on biceps and forearms so i'm assuming the whole armor has to be done the same way. Also, do all of the return edges on the shims get trimmed off or just trim for comfort??
-
Figured it out, uploaded to photobucket.
-
Aaaaand, we're setting. Think i might have screwed up a little bit though. Center of pieces not holding tight to inner strip, magnets I picked up apparently aren't strong enough. Hopefully they'll hold tighter together when assembling outer cover strips and using stronger magnets. Tried posting more pics but it says file is too big. I've resized them before to work but it's not working this time.
-
Been a while, but got back to the build this afternoon. Got the forearms and biceps fit and trimmed, now it's time to take off the tape and glue em together.
-
Had my wife place inner piece over my arm while i held the outer to my arm and did the whole slide my hand in and out. Think we got some good markings at the wrist, but similar situation to Jenny, the top at the inner bend if my arm it got so big it just didn't look right. Wasn't sure if the cut should be straight up the arm and leave quite a gap or if an angle needs to be taken to make it form fitting. I know strapping can be used to keep it from sliding around my arm. I think I'm gonna have to consult with a local member about heating bicep and forearm to make for a better fit.
-
Well not a very productive evening. Got the rest of the return edges cleaned off the biceps and took down the return edges on the forearms. Kind of went down hill from there, got frustrated trying to figure the best way to measure and cut the forearms (measure twice and cut once right). I have the edge trimmed on the outside pieces and butt connection shims taped in place, but can't seem to accurately measure the inner pieces for trimming. How does everyone go about holding them in place on your arm for marking your cut lines? Mine keep sliding around so there is no accuracy to lines I try to make. I try to set them so I can slide my hand in and I know they're supposed to follow the angle of the forearm, but I just can't get em right.
-
Thanks Brian, was hoping to hear that. Bottom return edges are digging into my arm pretty good and I think are the cause of the awkward fit.
-
Here are the photos as previously mentioned.

-
Sorry, picture file size is too big. I'll have to figure out how to resize for posts and post em later.
-
Hello everyone. Well, my armor arrived about a week and a half ago, but I wanted to do all my research before even touching it. I had an approintment set up with a member of my local garrison to get me started on the right path, but unfortunately, I had to cancel due to a family emergency. So tonight, with the help of these forums (thanks pandatrooper and silverBoyd), I've decided to jump right in and see what I could do. I've only worked on the biceps tonight, but I believe it's true what everyone is saying, once you get started, your confidence level gets a boost. But before I go too far, I wanted to get some opinions to make sure i'm starting off right, so here I go. Here are pics of the biceps i've done tonight using the butt connection method. They seem a little big at this point and I know I can adjust them down, but they're tight when trying to the reach to my head. I think it may be due to the return on the bottom, i've removed the top to what I thought was decent but wasn't sure if lowers could be removed and still be accurate or not. I thought I read on a post (that I can't find now) that it's ok remove to top because they'd be covered by the bells but lowers should be left. Any thoughts or input?? Thanks everyone, Jim
-
Thanks Mark, just sent a PM to a member that has an unbuilt AM kit for sale here on the forum. Just waiting to hear back from him. Hopefully i'm on my way to my armor build.
-
Was just checking that out
-
Thanks Gregg, figured for my size AM will be best for my first build, but saw this and was wondering.
-
Would anyone be able to help me out with any info on this armor. http://www.ebay.com/itm/Stormtrooper-Sandtrooper-Armor-Prop-Model-Kit-Star-Wars-style-costume-/120931497897?pt=LH_DefaultDomain_0&hash=item1c281437a9 I'm searching for my first tk setup. Thanks, Jim