

Potty Meister
-
Posts
140 -
Joined
-
Last visited
Content Type
Profiles
Forums
Gallery
Articles
Everything posted by Potty Meister
-
Yeah I'm pretty sure they are. Except that they got the German speaking suits.
-
looks like a half conehead alien....thing
-
 See the tutorial section? Or the search box? They are your best friends.
 -
Geaux Saints' ANH stunt build (TM)
Potty Meister replied to Geaux Saints's topic in Build Threads Requireing Maintenance
The ammo pack is one of the last things I need to do. Thanks for the find on how to get a proper rounded edge. I'd never seen that before. My armor is ATA and I've been debating on whether or not to use the heat gun to bend the ammo pack because it's already pretty flexible. It's supposed to be off center, right? The perfectionist in me wants to center it. -
Horrendous T/MC builds...
Potty Meister replied to Horrendous's topic in Build Threads Requireing Maintenance
Awwwww yeah! Can you say armor party? I'd like to employ your heat gun skills. I need to bend my thigh ammo pack, and kidney and butt pieces. -
MxPxRobbie's ANH Stunt Helmet Build [ATA]
Potty Meister replied to MxPxRobbie's topic in Build Threads Requireing Maintenance
Kind of looks to me like the teeth need to be opened up a bit more. Other than that, it looks great -
Nicksevere's ATA helmet build.
Potty Meister replied to nicksevere's topic in Build Threads Requireing Maintenance
This is coming along nicely -
Horrendous T/MC builds...
Potty Meister replied to Horrendous's topic in Build Threads Requireing Maintenance
That's a good looking lid, Peter! Not sure if you're done painting the teeth and ears yet, but they should be the same color grey as the trapezoids and tears. I used testors grey #1138 on mine, just in case you're curious. The vocoder looks like it turned out nice. Can't wait to see it in person! -
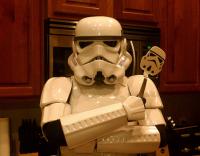
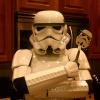
Here are some pics of the full getup so far. I completed the belt and drop boxes (the one on the left started coming apart..more glue!) and I'm not sure why I appear to be leaning left. Maybe I'm just uneven The elastic straps on the drop boxes are just glued to the back of the plastic part of the belt. For my handplates, I pretty much followed the instructions from panda's tutorial. My mom is a master painter (a paintress?) and helped me with the ab buttons. I think they look pretty good! Up next is attaching the holster and the thigh ammo pack and building the thermal detonator. I still haven't fixed the flaring kidney or butt. It doesn't look too bad in the photos, but in person it's a lot worse (at least it is to me). Please let me know if I need to change or fix anything. This is getting exciting! Might as well cook something while I have this on.
-
To quote Monty Pyton: RUN AWAY!
-
Small update. Added some comfort by way of some padding in the front of both shins. Now they don't stab me in the knees. Sniper plate/knee fights are no more. woot! More comfort goodies in the backs of the thighs. Now they don't stab me in the back of the knee or my butt. This makes it so much easier to walk. All the padding is connected with velcro. Worked on the drop boxes. I had to cut a bit out of the corners of the backs to make them fit in the front pieces. Riveted on some straps and glued them together. I pretty much have the belt done too. The last thing is connecting the drop boxes. Sorry no pics of that right now. As far as the strapping for the thighs go, I should be able to install some snaps in the straps above the velcro and use those for some added security. Thanks for the pointer!
-
First test fit. Immediate takeaways - need to put some padding inside the top of the left shin to keep the sniper plate from digging into my knee; going up and down stairs is awkward; my right bicep and forearm appear to be a little bit lower than the left; looks weird without gloves; butt flare; minor kidney flare; need to devise a way to keep the neckseal under my shirt (keeps slipping out. anyone else with darman's neckseal have this problem?) This being the first time suiting up, let me have it! Some side shots...
-
Arms/Shins progress Arms are strapped Back cover strips on shins Ok, the sniper plate. This is not glued yet. I wanted to make sure the positioning looks good and that this is how it's supposed to connect and look. Is it supposed to be flush all the way around or is it ok to have those small gaps between it and the shin?
-
This is the aluminum strip I used. Picked it up at Lowe's.
-
Ok...progress First order of business (for today) - shins! Inside cover strips glued. With the exception of the ammo pack, my thighs are completed. I completed a thigh garter using this tutorial. I basically duplicated it. http://www.whitearmo...ter-for-thighs/ riveted plastic to elastic strap velcro on plastic velcro on inside of thigh Next, on to my kidney piece. I trimmed a bit more and installed nylon straps and my overlap/flare is pretty much gone. woot! Still have a bit of flare on the top...little things. Also, I glued on the ab buttons Here are a couple pics of the flare I still have on the bottom. This is still strapped with elastic. I'm contemplating using nylon straps on this too. If anyone has suggestions for fixing a flaring butt, do tell! thx My arms are very close. Just need to strap the shoulders to the shoulder bridge. The shins are very close. Getting close for a first full body test fit. yay!
-
I was thinking about making some nylon straps for the sides for better tension, but then I wonder about flexibility. I've always heard that you're supposed to use elastic everywhere. Just wondering if anyone else has tried nylon strapping in certain places. Might try it just for kicks...but I'm pretty sure my current elastic straps can be made a bit shorter. So far, the mid section is turning out to be the hardest part.
-
Among some other random jobs, I trimmed the kidney piece and the overlap is pretty much gone, but it still has the flaring problem. Sorry, only more more pics of the kidney...others will follow later This is fully strapped, and it still sticks out. Trooperbay belt is a little big for me...I'll have to fix this. Flaring with belt. I put on one of my finished thighs (yes the top needs to be trimmed a bit) to show how far the butt sticks out. Is this something a heat gun can fix? Again, thanks for the input.
-
"Mr no stripes" - SDS helmet repaint
Potty Meister replied to Neo Kerberos's topic in Build Threads Requireing Maintenance
I like it. nice job -
The straps are actually already installed and connected in those pics. It's just hard to see them in the picture.
-
Ok, I turned the kidney piece around. It definitely feels better. Here are my issues now... Quite a bit of flaring on the sides From the side it actually lines up pretty well, it's just not flush to my body. Looks like I've got a bit of sanding to do as well Now, when I put the belt on I get a pretty big overlap. I have a 33ish waist. Sorry the belt was a little low in these pictures. I'm thinking I'll have to trim the kidney a little bit. Might help the flaring problem?? Thanks for any suggestions
-
I think you're right. One side definitely looks longer than the other. I'll get it turned around and try to get some better pics
-
Before continuing, I just want to say thank you to everyone for all the information that has been shared about how to build this kit. Everything I've been able to do so far is the result of months of research on this forum. The tutorials that people have been willing to share help so much. It is amazing how much everyone has been willing to help, either directly or indirectly. Thank you! In case anyone is curious, I'm doing butt joins on everything. Arms are good to go. Time to add some straps... Started on the thighs. One thigh uses all the magnets I have. The earth magnets I bought aren't the strongest ones out there, but they get the job done. I have to double or triple them up (sometimes more) in some places to get a hold. Inside cover strips on the thigh Prepped my calves for cover strips.
-
Progress update...any input/suggestions are appreciated! Inside strips on the biceps Snap plates inside biceps Inside strips on forearms I made 45-50 snap plates while waiting for my armor and wasted no time getting them installed Snap plates for everyone! Finished biceps Finished forearm...and one almost there Okey doke, on to the body armor. I've got a bit of a flaring problem on the butt and kidney pieces. It appears this armor is made for someone much larger than me. Everything here is strapped with elastic, even though it doesn't look like it on the sides. What is the best approach to fix this? Other than my backside looking huge, how does this look? Is the gap between the back and kidney piece acceptable?
-
Only one picture to share for now. I concentrated mainly on the arms and legs tonight to get them prepped for cover strips. So far, test fits feel pretty good. I cut the arms to accomodate 5/8" cover strips, the thighs for 7/8", and the shins for 1". One question I have about the back of the shins is if they get cut the same as the front; meaning half an inch on each side. Or is it best to leave a little extra? I'm going to connect the backs with velcro. I employed the use of the score and snap method for trimming tonight since I was mostly dealing with straight cuts. I have a mini armor party with another guy in my garrison tomorrow who just got his armor so hopefully we can get a lot done! This is so cool!
-
The box arrived today. I laid out all the pieces to get a good look at what I've gotten myself into... ...and decided not to waste any time and got the initial trimming done. The curved lexan scissors are a godsend, but my hand and arm are killing me.