

Dutchtrooper
-
Posts
50 -
Joined
-
Last visited
Content Type
Profiles
Forums
Gallery
Articles
Everything posted by Dutchtrooper
-

Thermal Detonator appearance
Dutchtrooper replied to Dutchtrooper's topic in Assembly, Mods, and Painting
I'm thinking I might have to go this route or cough up another fifty some dollars for new plastic and tube. What did you use to trim them? hand saw? nickel snips, tin snips, Dremmel? -
Is the placement of the gluing standard, required, or preferred? I'm attaching the chest and back with webbing straps, and covering it with the plastic shoulder straps that float in the back for Centurion (hopefully) status. The research i'm doing shows the glued area in the front four or five "squares" (as shown above) on the shoulder straps. Is there a common method for this measurement and where the floaters in the back relate in distance to the OII back? I would hate to glue it too far down or too far up. If not, let me know and I'll glue for "best appearance." Sorry to ask about this, this site has a lot of resources and I like to think I've exhausted them before asking. This thread is the closest reference I can find, and just need reassurance.
-
Thermal Detonator appearance
Dutchtrooper replied to Dutchtrooper's topic in Assembly, Mods, and Painting
We will see. I agree, and hope it is not an issue. I'll move the clips out a bit. I have a ton of gray 2" pipe, so I think I could make a ton of these as long as I had the white plastic parts. I had to buy an 8 foot pipe, so I just started chopping 7.5" sections. I found someone who has an ATA kit, and 2" diameter TD and achieved Centurion. Found this link from somewhere else on this site. Very good photos. Reference thermal detonator photos (106-111) ATA Armor 2012 by Gazmosis PS: You guys ROCK for the prompt replies! Planning on having my armor done for the Detroit Maker Faire this weekend. Wish me luck! -
Thermal Detonator appearance
Dutchtrooper replied to Dutchtrooper's topic in Assembly, Mods, and Painting
Are the specs for the thermal detonator arbitrary? I'm seeing lots of variation in my research. I'm under the impression I'd be able to get Centurion with my ATA kit based on my research during assembly. How concerned should I be about the thermal detonator and approval in your opinion? -
Thermal Detonator appearance
Dutchtrooper replied to Dutchtrooper's topic in Assembly, Mods, and Painting
I was initially thinking the same thing. But 2" Diameter end caps came with the ATA kit. I can't imagine using a bigger pipe because of that. Yes, it is an ATA tube. Here are the specs: Pipe diameter is 2" Pipe width is 7.5" wide plastic control piece is 4.5" wide end caps .75" wide -
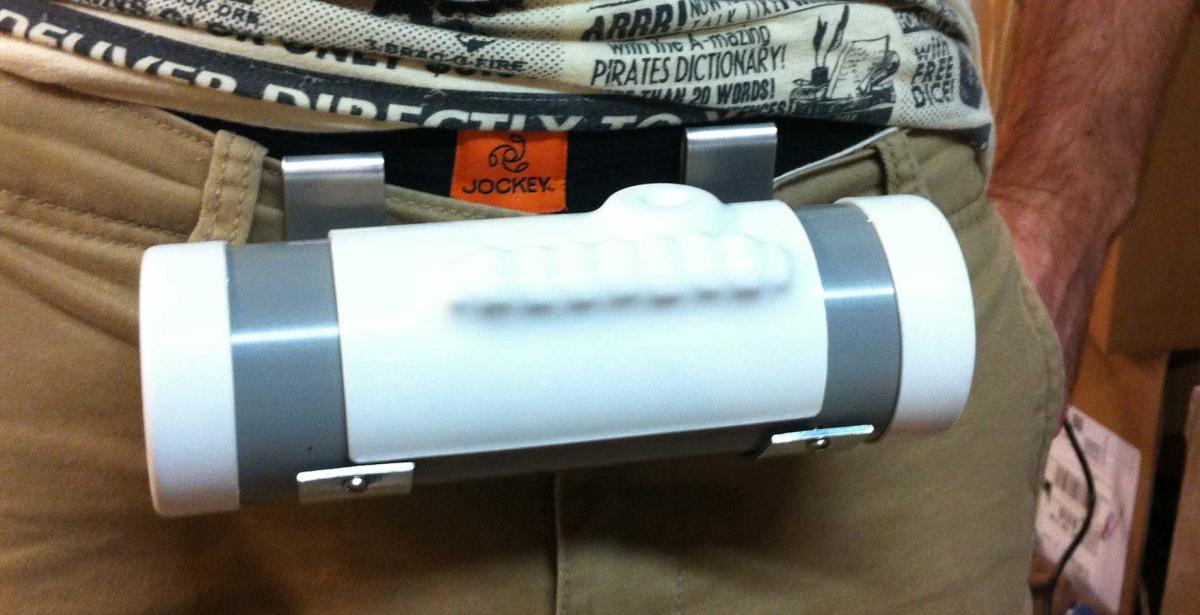
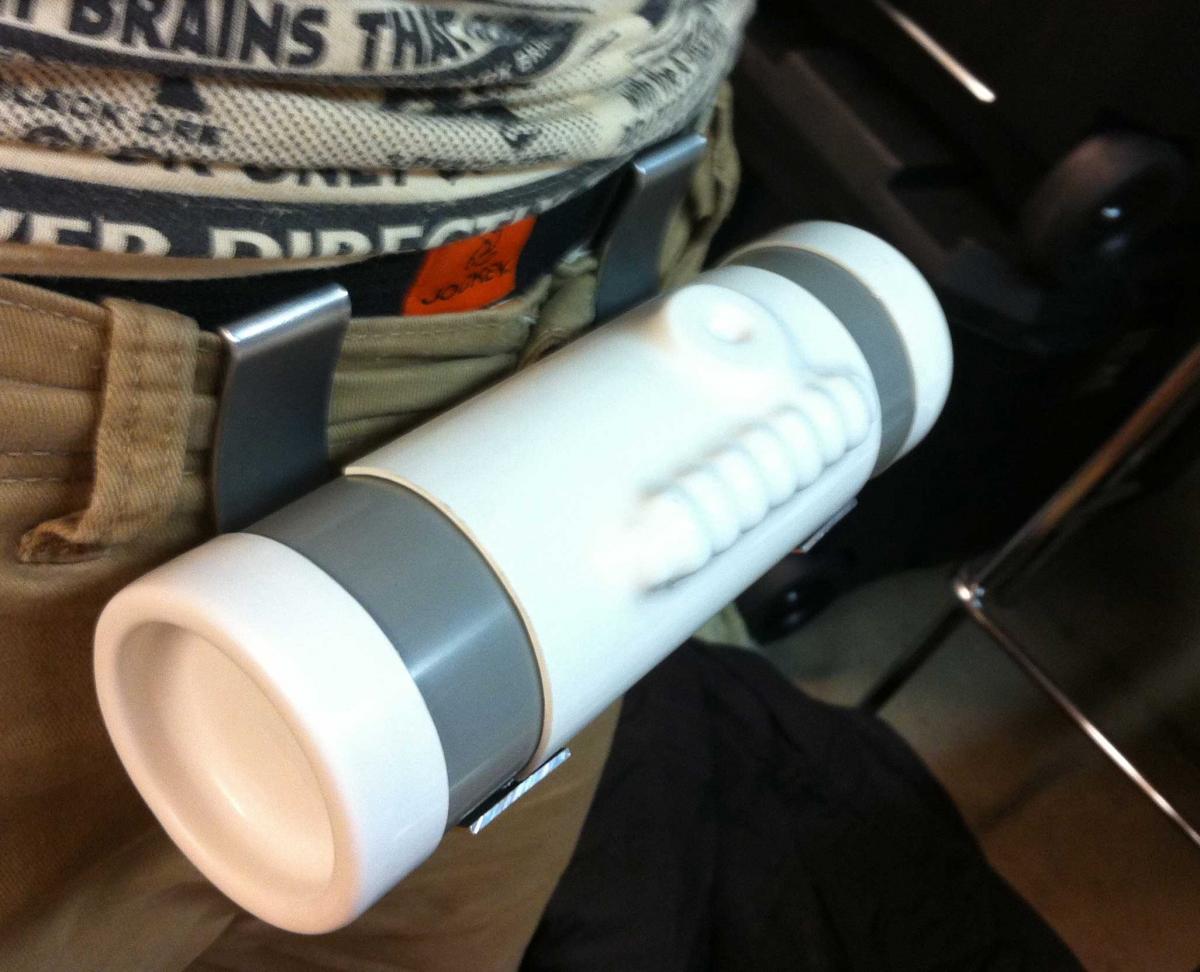
I bought some clips for the thermal detonator from a vendor that posts on this site. I'm not sure if the current look is problematic or not, as it doesn't seem to look as accurate as I'd like. Do you think they wrap around awkwardly around my two inch conduit? It makes the plate that goes on the pipe face upwards, and I think it should face outwards. I cut the end caps and top plate according to a "blueprint" image I had of the thermal detonator. Is it looking right? i haven't glued it yet. PS sorry about flashing my whitey tighties... and no jokes about it being clipped on "on the wrong side"
-
are we talking inches or millimeters? how tight or wiggly is yours? It seems ridiculously much between my stomach and where the abdominal plate is when I have the kidney plate flush to my back...
-
A friend and I are 6 ft and around 150, and I was wondering how much of the abdominal/kidney plates could be trimmed for our ATA kits? matching up the edges on each side, gives me a lot of wiggle room on the inside! How tight should this be???
-
HOW to: assembling ATA ABS helmet #1
Dutchtrooper replied to pandatrooper's topic in Tutorials, Tips and HOWTOs
My recommendation on this: You can taper the holes drilled so the heads line up flush with the ear cover. Then, of course, you'd paint the screw heads white with model paint. The ear covers (especially the top two) are important for holding the entire helmet together, and for getting the ear covers tight against the side of the helmet. The "mask" part of the helmet is not as wide as the shell in the back (or at least it wasn't for me) and the ear cover screws "widened" the mask part to match the width of the back side. Hope that makes sense... • Also, before you start hacking away at it, be mindful of the bottom of the ear cover and where the screw goes. That screw on the bottom needs to go through both the front and back halves of the helmet... and it's easy to cut too much off there based on the photos and eyeballing it. • There also needs to be space between the bottom of the ear piece and the opening of the helmet. There's a black rubber strip that goes all the way around the helmet opening, and they look better when they don't overlap the bottom of the ear cover. -
Thanks, It looks like you have to bend the plastic, or at least put some pressure on them to get them to line up flush! It stings because you don't want to cut off too much. The plastic strips helps cover up any gaps.
-
I started an ATA kit myself around October. Here's the google site I'm assembling to keep track of all my references to take note of: https://sites.google.com/a/oakland.edu/storm-trooper-research/
-
Is there a trick to cutting/fitting the thighs? I cut nice straight lines, and where the thighs curve, I have a considerable gap between the cuts where the the thighs bubble out and the sides don't meet up tight there.. ATA armor kit.
-
HOWTO: A guide to making a canvas belt
Dutchtrooper replied to firebladejedi's topic in Tutorials, Tips and HOWTOs
Is the belt to be 60" I measure 42 (exact) with my armor on... and figure 8" of overlap for the velcro to total 48 inches. Am I going about this wrong? -
Bag / Case for my Costume
Dutchtrooper replied to Damon TK 6144's topic in Boots, Soft Parts, and other Accessories
+1 These rock -
Tube stripe masking templates
Dutchtrooper replied to pandatrooper's topic in Templates and Blueprints
Just made some of these. they worked great. Although they seem longer and less curvy than the stencils from trooperbay. Ended up not using the trooperbay ones. -
HOW to: assembling ATA ABS helmet #1
Dutchtrooper replied to pandatrooper's topic in Tutorials, Tips and HOWTOs
"For the tube stripes, I hand cut decals from sign vinyl." GREAT tutorial... Are there any graphic designers out there that have a vector file for the vinyl masking? .ai or .eps? I'll be doing two helmets soon, and I have access to a vinyl plotter... that would help immensely!