TK5707
-
Posts
136 -
Joined
-
Last visited
Content Type
Profiles
Forums
Gallery
Articles
Everything posted by TK5707
-
Is the scope rail Ok for EIB Or do I need to cut it out? Thanks!
-
Blaster is scuffed up and ready for duty!
-
Made some tweaks, shoulder bells look much better to me. Also dropped the shoulder straps onto the chest more and trimmed the bealt ends I am seeing the importance of having a helper who knows what they are doing! I gotta get my 13 year old son trained up on being a handler! On these shots, I can see that the cod is loose (strap came on done), left side belt is a bit low, and the chest plate is to high. Fellow troopers please help me out and give me your feedback!
-
*** DUPLICATE ***
-
Got it weathered up some, and looks nice! My memory card reader broke though and I can not upload at the moment! Any prblem using this oone for EIB? I plan on trying for that after I replace my FX lid.
-
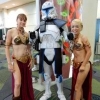
Spent some time looking at photos and figuring out what I needed to adjust to get it dialed in a bit better. All of the AM pieces are oblonged and over-sized. Being the first time the outpost had seen the AM stuff, I think we were reluctant to overtrim anything. I think the problem is that my biceps were about 2"-3" bigger than my arms, so when standing they pushed the bells out. I recut and closed them tighter tonight, waiting for the E-6000 to dry. I also moved the shoulder straps down. Velcro in the back held up the TD< but looking at photos, I also need velcro to the ABD plate in the front like Panda said. Trimming the belt was easy After Halloween, I will rework the shins, they are also to wide. I wore the armor out Monday night to an event and the Force Unleased II release. That was fun! Here is a shot with a certain femtrooper before the tweaks, will take some in the morning and see how it looks.
-
True, but mine is green, seems to work well, I can certainly see it with the helmet on. More of a novelty "gee-whiz" than anything, I still rather have a master replicas
-
Just reread your build thread Tkrestonva, I had read it several times before in my research, but good to refresh. The RT mod is a good idea, my outpost here really disliked the AM chest pieces. I saw that your whole torso clam shells in, mine is T-shirt style on the top, but I do think it can be tweaked some to get in line with what you are saying. Ed
-
Thanks so much for the help! I got the belt velco'd up in the back now, it looks better. I need to get with the outpost guys, they have not tweaked it since it was finished, but I am sure they can help. Sounds like I need the straps dialed in better. To get the back up it'll need the support straps shortened I guess? Part of the issues may well have been a newbie not knowing how to align it as I put it on too.
-
maybe you got a bad tube of e-6000, everyone swears by it, worked great for me! Run a bead, clamp it (raer earth magnet are GREAT!) and let it set. E-bay sellers have a ton of it.
-
Thanks for the comment and armor feedback. I posted in armor builds with no response. The kit is AM, and it is cetainly oblong unless you trim it down. I re did the thighs and got them more in line, and I will prob redo the shins, I just wanted to get it wearable and get in the 501st, then tweak it. I hope the added button on the E-11 is legal, but it is pretty subtle. The new doopy doos kit is very cool, I love the included D-ring, t-track, and scope mod. I have the battery packs for the blaster too, looking for good wiring to use for it and then I will install it also. I am going to self troop the Force Unleased II release tonight, will try to get some photos there. I was pushing to get the blaster ready to use tonight, and I made it!
-
Not much different on my Hasbro build, but I decided to add in a laser pointer and light up the scope. I just bought a cheap E-bay pointer, cut it apart, and zip tied the trigger on. I cut off the end of the scope, E-6000'd it in, and then drilled a hole in the doopy-doos add-on for the laser. I also replaced the tip LED with a superbright, and added one more into the rear scope viewfinder. I cut up an old magnifying glass, and used a scotch tape roll for the eye piece. I also added on real allen bolts on the end. Paint is still soft, so I have not weathered it yet, but scope is bronze uundercoat, and rest is silver. Should look great with some scuffing And oh, no one has commented if my armor looks OK, please LMK what you pros think of this stuff!
-
whew! What a long weekend! OK, here is my first try! I have done so much the last few days, but I would never be here without the incredible talent of the Pacific Outpost. Mahalos! One shoulder strap popped off when I tried it on, it was put on with CA instead of E-6000, so I will fix it. Also, the belt was sliding down some, I could not get it tight enough. Do some people velcro it in the back? Please give me some feedback guys, looking for pure honesty!
-
Last night we made alot of progress on the assembly. It is really close now, just needs the finishing touches! I sewed up a set of suspenders based on the tips from Wet Okole and did a little work like installing the battery pack and sinper plate. We started by installing the 6 rivets on the abd and back plates. I am a big guy, and the sides just met with no trimming needed. Velcro was used on the right. We then started on the shoulder bell suspension straps using snaps and the regular method. The over sized chest really took some work to get it lined up right, but so far, we did not trim the bottom, just the shoulder attachments were cut off. After that, straps were made to secure the thighs. The thighs seems to be just a bot on the long side, so later they will be trimmed back 1". We then tried the first test fit with the full set. The greaves are somewhat "oblong", wider on the lateral aspect, and the quickly rotated 90 degrees. They may need recut and oulled in closer, but I was going to try foam padding first. So here is my "to-do" list: - Assemble belt/thermal det/holster - Attach hand plates to gloves - trim the thighs 1" - some minor strap adjustments - minor edge cleaning up - The helmet needs padding or a suspension system and then it should be wearable! here are the pics so far, any feedback/tips/comments are more than welcome! And oh, my leg laceration is healing well! pics: