


Hawkeye
-
Posts
374 -
Joined
-
Last visited
Content Type
Profiles
Forums
Gallery
Articles
Media Demo
Posts posted by Hawkeye
-
-
Welcome Desmond
-
Good luck Mate!
I shall follow suit
-
Hi TKRestonva
My Shoulder bells are, not holding right. Also the biceps keep turning! i need the thumb print to be under the arms!!
What do you suggest mate?
Also, like you i will be cutting the thighs later, first troop went well, but need more to asses it. Thanks
-
Hi Rob
I have an AM as well, i got the belt from you which i must say was excellent by its own.
Can you send me some pics of your internal snaps and how you used the suspenders? I am about to to this as well.
-
Hi All
I want to offer my thanks and i am very greatful to all who have provided me with advice.
My Armour is almost done, and hopefully i can get the straps working.
I would also like to single out Terry and Brian!!! you have been really great! and you tips are excellent.
Lots of troopers will benefit from what you both have done!!!
I have pics of my build, which i will edit and post once i am done with the first trooping this weekend!
-
Hi Brian
Me again, can you send me your contact for the drop box please.thanks
-
I used French blue, but like Terry said either is acceptable.
As far as the 4-button plate goes, the standard FX/AM method is to attach them directly to the ab piece by drilling holes and securing them via the nuts that come with the buttons. Not as accurate, but perfectly acceptable.
If you want to go the extra mile as both Terry and I did, cut out a piece of ABS from the extra strips that came with the kit - let's call it a "spacer plate" - just slightly larger than the raised area where you would install the buttons directly if you were using the standard assembly method. Drill four evenly spaced holes in the spacer plate, then glue it on top of the raised area on the ab plate. Once the glue dries, drill holes in the ab plate using the holes you drilled in the spacer plate as a guide, then install your painted ab buttons.
Like Terry said, definitely reference the build threads as you go, and not just the AM build threads. As I'm building my kit I find myself referencing the TM build threads more than anything else. Different kit, but always turns out superb, and many of the techniques can be applied to AM. Chances are they will be able to answer many of the questions you haven't even thought of yet.
I've also compiled a comprehensive photo library illustrating the best practices from the many builds, along with just about every available high-res image of stormtroopers from ANH and ESB. It took time, but the source material is available for free right here at the FISD. I actually add new photos to it on a weekly basis as I find them here at the FISD. Troopers Helping Troopers.

Thank you guys! we all appreciate you both!
I am gonna read up,and go the extra mile and do what is required for the ab button
All is going well, hope i can make it into EIB, need to find a better blaster
-
On 7/15/2010 at 1:57 AM, pandatrooper said:
I used midnight blue for the buttons, check this thread here for more info
-----
Either color is fine for EIB
The AM ab button plates are attached with the metal buttons included in the kit, they are threaded and bolt / nut inside. There are instructions included with the kit on how to install the plate.
Some advice going forward: most of your questions are addressed in various build threads on the forum and in the instructions that come with the AM kit. There’s several AM specific build threads that have yielded great results, make sure to review them for reference during your build.
My AM build thread is here and has many photos.
-----
Thanks Terry, i will check. I will follow the method you used. with extra abs for the 4 buttons
-
Hi TKrestonava/Terry
I am now working to color the ab buttons using the humbrol paints.
Which scheme should i use for EIB? the French Blue 14 or Midnight Blue 15?
Also, how did you attach your plate which has 4 button? Separate ABS Plastic or did you drill into the ab?
Thanks
PS: Shins are done, and i have painted my Thermal Detanator and looks awesome!!.
-
You could go either way - I used both methods. For my inner joining strip (which is not required but adds strength to the joint) I glued half the strip on one side of the shin armor, let it dry, then glued the other half. For the external joining strip, I did it all at once.
Personally I'd go with E6000 for any external parts, but especially the shins. Reason being is that it dries clear, the bond is more flexible than ABS cement, and if you make a mistake and/or get overspill (which you can avoid by taping off the areas that are not to be glued) it's much easier to pull it apart, remove the residue, clean up the part, and start over. You actually want a flexible bond on the front of the shims, since unless you have tiny legs and even smaller feet, you'll have to open the shins up like a clamshell - the "hinge" being the front - to get them on and off.
ABS cement works by literally melting together the two pieces of plastic that will be joined. The resulting bond is stronger and dries a lot faster, but if you get any on your armor where you didn't intend to, it will damage the finish. Once it's dry, pulling it apart without damage is near-impossible. As a result, it's a lot less forgiving than E6000.
Thank you, i have been building everything with E6000, so will go that way,and do half and then half.
nice tip on the tape off thoose area that dont need glue!
Thanks again
-
Hi Guys.
me again! sorry to bother you with so many question. i am about to glue the shins!
I do not have clams deep enough but i have earth megnats that are silver and round!
How did you guys put glue the shims? Did you add ABS glue to each Butt of the shin, or did you just glue half of the strip on one side,then do the other?
Thanks
-
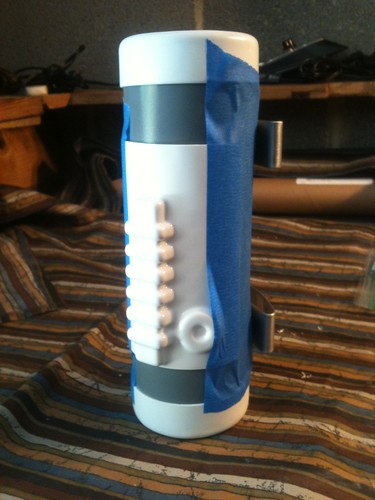
I also got the thermal detonator and ab buttons finished.
For the thermal detonator, instead of using the FX-style TD that comes with the kit, I went with a 7.5" section of PVC pipe I bought from TK4702, along with a matching set of TD belt clips and end caps. The paint is Testors 1138. I also primed and painted the end caps a gloss white - not a perfect color match, but better than powder-white color that they were unpainted. The only part of the kit TD I used for this was the control plate.
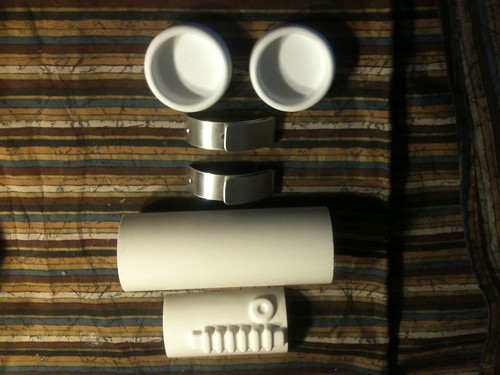
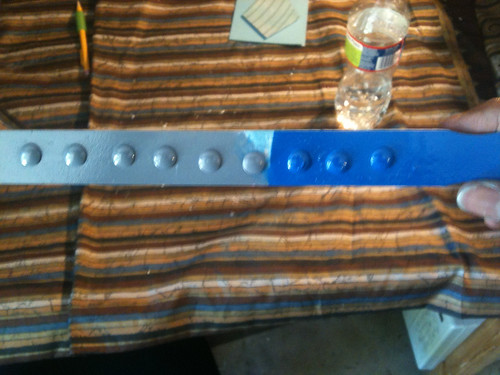
Ab buttons, painted with Testors 1138 gray and Testors ???? french blue (forgot the color # and I don't have the spray can in front of me):
Hi TKRestonva
Why use a separate PVC pipe?Just want to ask, as i need to build mine.
Can we just use the one that came with the armour?
-
I'm curious as to why it was recommended that you make the angled cut. Can you find out?

You don't necessarily have to replace the ab piece. Like Terry said, it is fixable, especially if you still have the pieces you cut off. But if you choose not to, it looks like you may be able to cover it up with the chest piece in place.
Put the cut piece back in place and use patch it from behind with a strip of plastic - you can cut a strip from one of the four ABS strips that came with the kit. Once it dries, fill the front seam with ABS dust/shavings, and dribble some Plastic Weld on the seam. The Plastic Weld will melt the ABS shavings into the seam. Afterward, maybe some light sanding and polish.
The side rivets are not required for EIB, they're more of a nice-to-have.
Thanks for the tip. I think when we fit without the belt, it was thought to be restrictive for the bells.
I still have the pieces. I will build the entire armour and then see if i need to do something with the abs. At the mo, the back armour wraps around fine and closes it. So i might not have seems on the side. (Do you think its wise not to have any seems) i might cut off the top of snaps and paste it there and make it look like its snapped but actually its just stick on.
What do you think? Works?
How would the inner part hold, Velco!
Share your thoughts mate,
-
The snaps are not must haves for EIB, they are "should have'". You can use rivets that are approx. the size suggested buy the EIB guidelines, or use snap heads approx the same size. Some people use jean rivets too.
I'm confused as to why you cut the Ab plate at an angle like that? All you need to do with the AM kit put the ab / kidney section on, find out where they overlap, and make a vertical cut on both the Ab and kidney where you want the seam to be (it should be on your "side"), and they should match up just fine.
Judging by what I see, the front Ab section is the right "depth" if you didn't cut it already. I can just see a little bit peeking out the bottom. If you haven't cut the side of the Ab yet, use that as your vertical seam on the ab, and just cut the kidney to meet up with it. Then do your snaps on both sections.
However, I can't see what's going on with that angled cut you made. If you cut it at that angle all the way along that line - sorry to say, but you made a big mistake. You would either glue it back on and patch it from behind or something and maybe try and hide the glue seam, or buy another Ab piece.
Thank you. I was following an advice, from a FX user,but i should have known better.No love lost.
I havent cut the side of the ab yet, so I will use the vertical seem on the ab, and cut the kidney to me up and then do the snaps on both section. Thanks again Terry!!
So with out the rivets on the Left, would i still make EIB as its "Should haves"?
-
Hi Guys n Gals
Need help again. I am aiming for EIB, but I hit a bump!
I have attached 3 pics. Can i still mod this to have 3 rivets / snaps?
How do i do it?
Also can you send the best rivets or snap to buy? We have ACE Hardware here! but if there is other sites that ship international, i can buy it.
Need you help!. I have cut the top of the ab plate! and the site is curving downwards! Need your expert advice .thanks
-
Hi Terry
About to glue the cover strips and the inside shim. I got myself the E6000 glue,
any tips before i start? I have got the clamps already, and have some ice cream sticks too!
Thanks
-
On 2/5/2010 at 4:29 AM, Billhag said:
Terry
Nice one fella, fantastic illustration ,

Saves a few people digging through the old threds finding the info (...even though they should <_< 'coz you learn more that way
 )
)
Guys
Here's a link with some additional info to accompany Terry's Top-Tip

------------
Hi Mate, What glue did you use to glue the front of the shin together?
-
My biceps and forearms are glued front and back. Never really need to use Velcro for the forearms unless your hands are huge and you want slimmer looking forearms, and you need to open them to get your hands in.
For the biceps, I bent my arm at the elbow and flexed my bicep, so that there was enough room inside for my “huge guns”.
You just want them big enough that you have room to bend your arm / flex, but not overly big. I prefer to not have any padding in there if possible. The screen look is very “fitted”.For the forearms, I assembled them so that the front hand opening has little or no return edge (screen used didn’t have any if I recall) and leave enough room so that you can squeeze your hand through, and assemble the forearm at that size. The area near your elbow should again have enough room for flexing, but be snug. Since AM doesn’t have the ridges molded in, you can make them any size you want. Definitely check out the screen caps from the films for reference, but make them fitted to your body.
Thanks Terry! very valueable advice. Any thing i need to watch out for while building the armour? Maybe something that you would have like done different?
-
Yes. I did mine with inner and outer shims and it's nice and strong.
Hi Terry
Need your expert advice. When you wear your biceps? Are they glued both front and back or velcro at the back?
Also when you wear it, is there room between skin/undersuit and armour? how much? thumb fit? Hope i am making sense here.
Also for the forearm are you using velcro at the back? thanks in advance
-
Hey Hawkeye,
One thing I would reccomend is changeing out that old brown masking tape for some new blue or green painters tape. The old stuff will leave a nasty residue. You'll have to remove it with WD-40 or some mild detergent. I found this out the hard way. I had taped all the pieces together just like you with regular masking tape. I had to spray the WD-40 onto a napkin & rub gently to remove the residue. I did this over the sink so I could rinse it off quickly if needed. I have an older FX kit. The WD-40 did not hurt my plastic. It even left a shiny sheen.
I know this was not what you were looking for. But Im doing my legs right now too. I was looking for useful information to help me. But Im on the right leg & need help with the "gas cylinder" belt. So Im off to find useful information

Just incase mate,I am heading out to buy the tapes u recommended! you are all simply beautiful people!
-
Excellent skills. I notice that you have glued the front of the thigh seems left and right together. Then added a cover strip.
I am going for the same. But can you post some pics on what you did on the back of the thigh and the shin please.
I am stuck at that point. I want to use velcro, but do you over lap? or do you add another strip? Thanks
-
Hey Hawkeye,
One thing I would reccomend is changeing out that old brown masking tape for some new blue or green painters tape. The old stuff will leave a nasty residue. You'll have to remove it with WD-40 or some mild detergent. I found this out the hard way. I had taped all the pieces together just like you with regular masking tape. I had to spray the WD-40 onto a napkin & rub gently to remove the residue. I did this over the sink so I could rinse it off quickly if needed. I have an older FX kit. The WD-40 did not hurt my plastic. It even left a shiny sheen.
I know this was not what you were looking for. But Im doing my legs right now too. I was looking for useful information to help me. But Im on the right leg & need help with the "gas cylinder" belt. So Im off to find useful information
Hi Mate
Thanks, any advice on here is always good advice. I found and easy way to remove the residue. Just use a drop of cooking oil and remove it by using a soft cloth to wipe it off. Works fine. The oil can be easily removed as well.
thanks
-
Looks good to me. Make sure you leave enough room at the back for the cover strip / velcro, and always test fit the shins with boots on.
Thanks again Pandatrooper. After i have glued the front of the shin with cover strip and inside strip.
When i open the back to put on the shins, would the front hold? thanks.
-
I'm also building my AM kit this way. The only thing I'd add is to make sure the parts line up first.
For the calves, line them up at the top and trim the bottom as necessary.
For the thighs and biceps, line them up at the bottom and trim the top as necesary.
For the forearms, line them up at the wrist and trim the edge near the elbow as necessary.
Thank you tkrestonva.
This is an excellent tip!. I will be doing that, in the pic the dont line up for the legs, so i will do that from the top
The rest is bottom up. Thanks again.
But am i heading the right way mate?
Thigh help
in Hard Armor (General Discussion)
Posted
I would recommend use velcro first, troop then see what need to be taken off.thanks